


首先请安装nginx, 此文以 nginx-1.16.1 作为范例来操作,nginx 下载链接nginx下载
yum -y install pcre-devel zlib-devel openssl openssl-devel libxml2 libxml2-devel libxslt-devel gd gd-devel perl-ExtUtils-Embed ibunwind-devel google-perftools-devel libuuid-devel libblkid-devel libudev-devel fuse-devel libedit-devel libatomic_ops-develcl

mkdir -p /data/soft/
cd /data/soft/
wget https://nginx.org/download/nginx-1.16.1.tar.gz
tar zxf nginx-1.16.1.tar.gz

cd nginx-1.16.1


./configure --prefix=/usr/local/nginx --user=nginx --group=nginx --with-compat --with-debug --with-file-aio --with-google_perftools_module --with-http_addition_module --with-http_auth_request_module --with-http_dav_module --with-http_degradation_module --with-http_flv_module --with-http_gunzip_module --with-http_gzip_static_module --with-http_image_filter_module=dynamic --with-http_mp4_module --with-http_perl_module=dynamic --with-http_random_index_module --with-http_realip_module --with-http_secure_link_module --with-http_slice_module --with-http_ssl_module --with-http_stub_status_module --with-http_sub_module --with-http_v2_module --with-http_xslt_module=dynamic --with-mail=dynamic --with-mail_ssl_module --with-pcre --with-pcre-jit --with-stream=dynamic --with-stream_ssl_module --with-stream_ssl_preread_module --with-threads --with-cc-opt='-O2 -g -pipe -Wall -Wp,-D_FORTIFY_SOURCE=2 -fexceptions -fstack-protector-strong --param=ssp-buffer-size=4 -grecord-gcc-switches -m64 -mtune=generic -fPIC' --with-ld-opt='-Wl,-z,relro -Wl,-z,now -pie'


make && make install

 cp /data/soft/nginx-1.16.1/objs/nginx /usr/bin/nginx

#测试nginx
nginx -t

#启动nginx
nginx

#重启nginx
nginx -s reload

#关闭nginx
nginx -s stop
nginx 默认只支持http 代理,不支持https,如果想要支持https 代理,需要下载对应 插件
我们可以通过github 下载https代理模块 proxy_connect_module
cd /data/soft

git clone https://github.com/chobits/ngx_http_proxy_connect_module
下面是每个nginx 版本对应的 proxy_connect_moduel 版本。
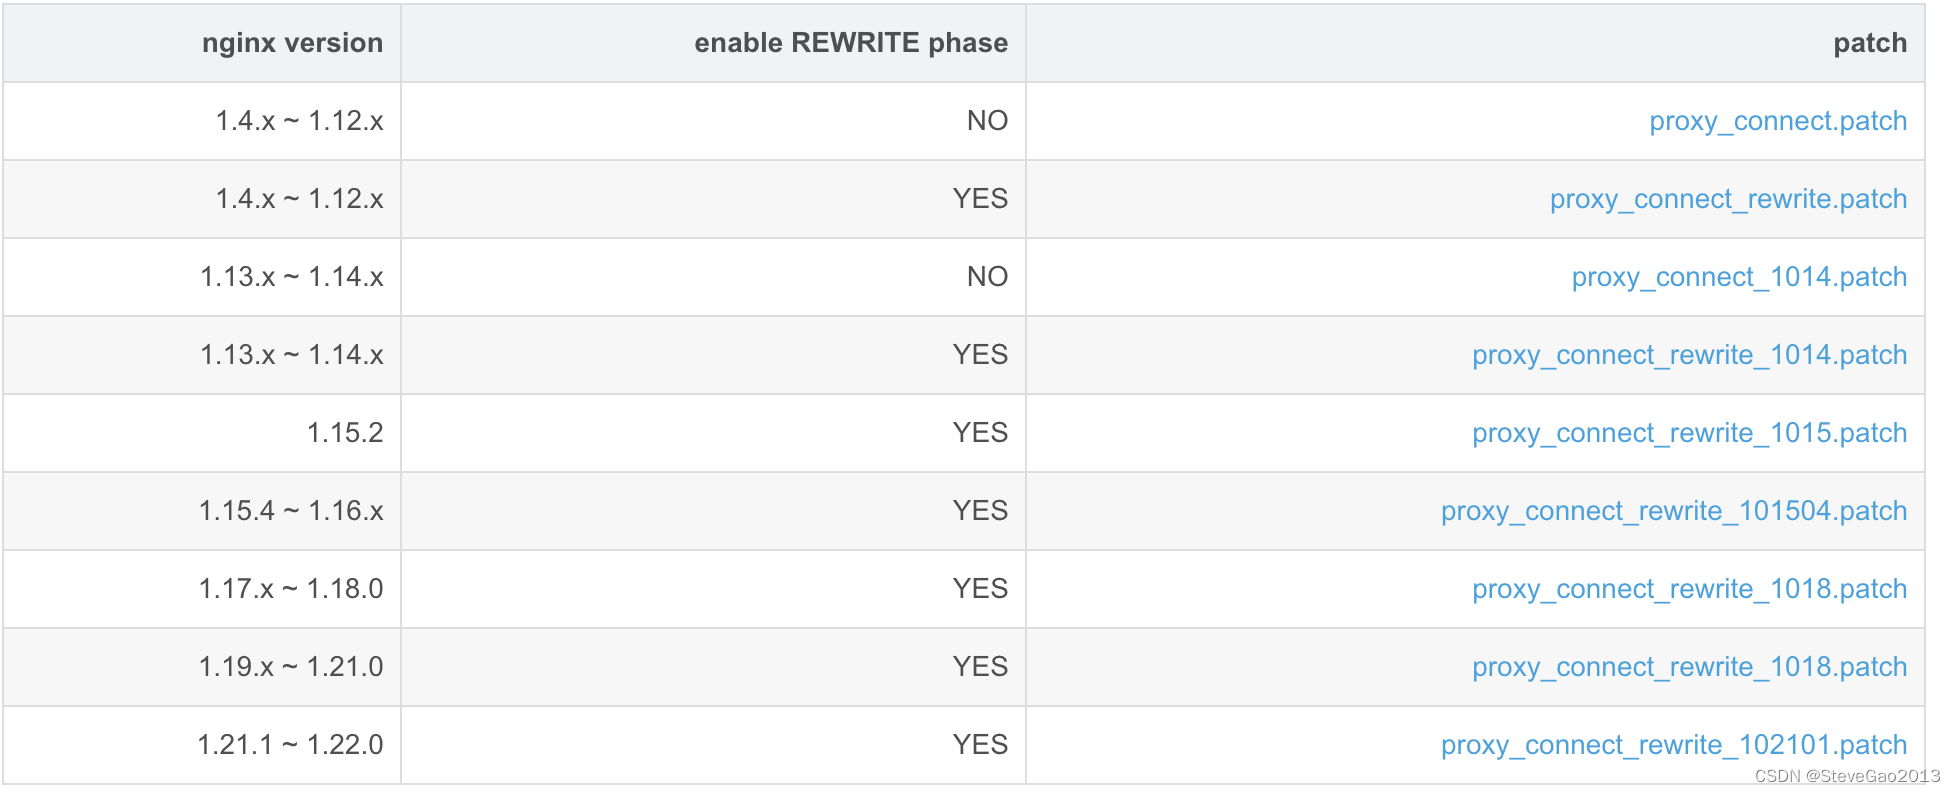
接下来就需要加入对应版本的插件
cd /data/soft
patch -p1 < /data/soft/ngx_http_proxy_connect_module/patch/proxy_connect_rewrite_101504.patch
进入之前安装nginx的安装包内重新编译nginx
cd /data/soft/nginx/nginx-1.16.1

./configure --prefix=/usr/local/nginx  --add-module=/data/soft/ngx_http_proxy_connect_module
make&& make install
编译好后重启nginx
nginx -t
nginx -s reload
编写代理的forward.conf
这个配置会自动进行 302跳转,但是需要将真正跳转链接的 端口加在proxy_connect_allow 上面,
如果没有增加允许相应的端口,会出现 HTTP 403 Forbidden 的错误信息。
server {
     listen 3128;
     resolver 100.100.2.136 valid=60s ipv6=off; #dns服务器解析,cat /etc/resolv.conf 查看dns
     proxy_intercept_errors on;
     recursive_error_pages on;
     resolver_timeout 30s;
     proxy_connect;
     proxy_connect_allow            443 563 7181; #https链接中的端口,需要的端口都需要加上,否则会报403 forbidden
     proxy_connect_connect_timeout  30s;
     proxy_connect_read_timeout     30s;
     proxy_connect_send_timeout     30s;
      location / {
         proxy_pass $scheme://$http_host$request_uri;
         proxy_set_header Host $host;
         error_page 302 301 = @error_page_302;
     }
     location @error_page_302 {
        proxy_pass $scheme://$http_host:$server_port$request_uri;
     }
}
然后重启nginx
nginx -t
nginx -s reload
在另外一台没有外网的服务器配置代理并执行source
echo export http_proxy='http://172.26.132.111:3128' >> /etc/profile
echo export https_proxy='http://172.26.132.111:3128' >> /etc/profile
source /etc/profile
配置后可以通过 curl 访问查看 整个访问链路,-k 是忽略 ssl证书
curl -I -k https://www.baidu.com -L


 2178
2178


 被折叠的 条评论
为什么被折叠?
被折叠的 条评论
为什么被折叠?
 到【灌水乐园】发言


