


实验拓扑
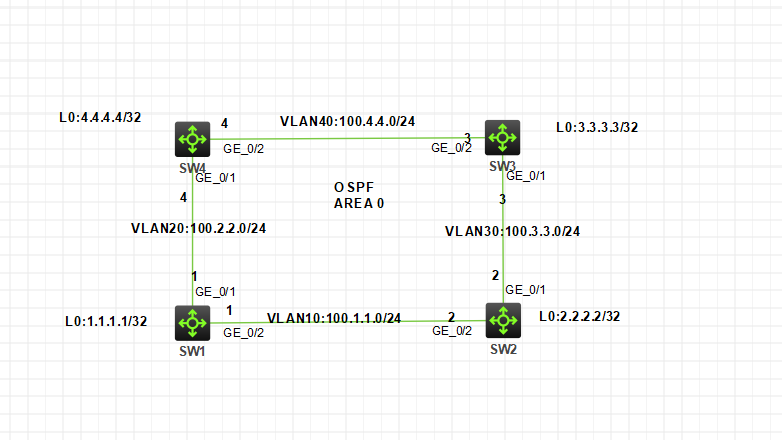
图 1-1
注:如无特别说明,描述中的 R1 或 SW1 对应拓扑中设备名称末尾数字为 1 的设备,R2 或 SW2 对应拓扑中设备名称末尾数字为 2 的设备,以此类推;另外,同一网段中,IP 地址的主机位为其设备编号,如 R3 的 g0/0 接口若在 192.168.1.0/24网段,则其 IP 地址为 192.168.1.3/24,以此类推
实验需求
-
按照图示创建 Vlan,所有接口配置为 Access 类型加入相应互联 VLAN
-
按照图示配置 IP 地址
-
配置 OSPF,实现全网互通
实验解法
-
按照图示创建 Vlan,所有接口配置为 Access 类型加入响应互联 VLAN
分析:根据需求,每台交换机上只需要创建本端的互联 VLAN 即可,并把相应接口加入到对应的互联 VLAN。如果接口配置为 Trunk 的话,可能会造成 Vlan1 和其他 Vlan 存在环路而被 STP 阻塞端口,导致路由不通
步骤 1:在 SW1 上创建 Vlan10 和 Vlan20,G1/0/1 口加入到 Vlan20,G1/0/2 口加入到 Vlan10。
<H3C>sys
System View: return to User View with Ctrl+Z.
[H3C]sysn sw1
[sw1]vlan 20
[sw1-vlan20]port g1/0/1
[sw1-vlan20]vlan 10
[sw1-vlan10]port g1/0/2
步骤 2:在 SW2 上创建 Vlan10 和 Vlan30,G1/0/1 口加入到 Vlan30,G1/0/2 口加入到 Vlan10。
<H3C>sys
System View: return to User View with Ctrl+Z.
[H3C]sysn sw2
[sw2]vlan 10
[sw2-vlan10]port g1/0/2
[sw2-vlan10]vlan 30
[sw2-vlan30]port g1/0/1
步骤 3:在 SW3 上创建 Vlan30 和 Vlan40,G1/0/1 口加入到 Vlan30,G1/0/2 口加入到 Vlan40。
<H3C>sys
System View: return to User View with Ctrl+Z.
[H3C]sysn sw3
[sw3]vlan 30
[sw3-vlan30]port g1/0/1
[sw3-vlan30]vlan 40
[sw3-vlan40]port g1/0/2
步骤 4:在 SW4 上创建 Vlan20 和 Vlan40,G1/0/1 口加入到 Vlan20,G1/0/2 口加入到 Vlan40。
<H3C>sys
System View: return to User View with Ctrl+Z.
[H3C]sysn sw4
[sw4]vlan 40
[sw4-vlan40]port g1/0/2
[sw4-vlan40]vlan 20
[sw4-vlan20]port g1/0/1-
按照图示配置 IP 地址
步骤 1:创建 Vlan10 和 Vlan20 的三层接口,并配置 IP 地址
[sw1-vlan10]int vlan 10
[sw1-Vlan-interface10]ip add 100.1.1.1 24
[sw1-Vlan-interface10]int vlan 20
[sw1-Vlan-interface20]ip add 100.2.2.1 24
步骤 2:创建 Vlan10 和 Vlan30 的三层接口,并配置 IP 地址
[sw2-vlan30]int vlan 10
[sw2-Vlan-interface10]ip add 100.1.1.2 24
[sw2-Vlan-interface10]int vlan 30
[sw2-Vlan-interface30]ip add 100.3.3.2 24
步骤 3:创建 Vla30 和 Vlan40 的三层接口,并配置 IP 地址
[sw3-vlan40]int vlan 30
[sw3-Vlan-interface30]ip add 100.3.3.3 24
[sw3-Vlan-interface30]int vlan 40
[sw3-Vlan-interface40]ip add 100.4.4.3 24
步骤 4:创建 Vlan40 和 Vlan20 的三层接口,并配置 IP 地址
[sw4-vlan20]int vlan 40
[sw4-Vlan-interface40]ip add 100.4.4.4 24
[sw4-Vlan-interface40]int vlan 20
[sw4-Vlan-interface20]ip add 100.2.2.4 24-
配置 OSPF,实现全网互通
步骤 1:在 SW1 上配置 OSPF
[sw1-Vlan-interface20]int loo 0
[sw1-LoopBack0]ip add 1.1.1.1 32
[sw1-LoopBack0]ospf rou 1.1.1.1
[sw1-ospf-1]a 0
[sw1-ospf-1-area-0.0.0.0]netw 1.1.1.1 0.0.0.0
[sw1-ospf-1-area-0.0.0.0]netw 100.1.1.0 0.0.0.255
[sw1-ospf-1-area-0.0.0.0]netw 100.2.2.0 0.0.0.255
步骤 2:在 SW2上配置 OSPF
[sw2-Vlan-interface30]int loo 0
[sw2-LoopBack0]ip add 2.2.2.2 32
[sw2-LoopBack0]ospf rou 2.2.2.2
[sw2-ospf-1]a 0
[sw2-ospf-1-area-0.0.0.0]netw 2.2.2.2 0.0.0.0
[sw2-ospf-1-area-0.0.0.0]netw 100.1.1.0 0.0.0.255
[sw2-ospf-1-area-0.0.0.0]netw 100.3.3.0 0.0.0.255
步骤 3:在 SW3上配置 OSPF
[sw3-Vlan-interface40]int loo 0
[sw3-LoopBack0]ip add 3.3.3.3 32
[sw3-LoopBack0]ospf rou 3.3.3.3
[sw3-ospf-1]a 0
[sw3-ospf-1-area-0.0.0.0]netw 3.3.3.3 0.0.0.0
[sw3-ospf-1-area-0.0.0.0]netw 100.3.3.0 0.0.0.255
[sw3-ospf-1-area-0.0.0.0]netw 100.4.4.0 0.0.0.255
步骤 4:在 SW4上配置 OSPF
[sw4-Vlan-interface20]int loo 0
[sw4-LoopBack0]ip add 4.4.4.4 32
[sw4-LoopBack0]ospf rou 4.4.4.4
[sw4-ospf-1]a 0
[sw4-ospf-1-area-0.0.0.0]netw 4.4.4.4 0.0.0.0
[sw4-ospf-1-area-0.0.0.0]netw 100.4.4.0 0.0.0.255
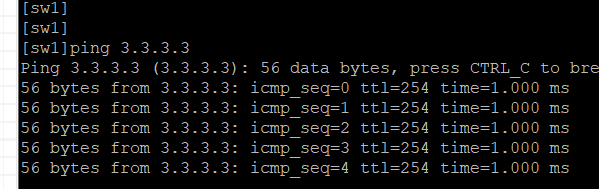
[sw4-ospf-1-area-0.0.0.0]netw 100.2.2.0 0.0.0.2557,使用sw1测试ping其他交换机,都是可以通的


 807
807


 被折叠的 条评论
为什么被折叠?
被折叠的 条评论
为什么被折叠?
 到【灌水乐园】发言


