


接下来的几节我们将讲解UI控件,什么是UI?UI是user interface的缩写,翻译成中文就是用户界面的意思。UI由一些控件组成,常用的控件有Label、Button、Menu、Slider等。这一节我们来讲Cocos2d-x中的Label,首先让我们来看一段示例代码
cocos2d::Rect visibleRect = Director::getInstance()->getOpenGLView()->getVisibleRect();
Size visibleSize = Director::getInstance()->getVisibleSize();
Vec2 origin = Director::getInstance()->getVisibleOrigin();

int index=2;

// create a scene
auto scene = Scene::create();

auto layer = LayerColor::create(Color4B::GRAY);
scene->addChild(layer);

// add title
auto label = LabelTTF::create("Label", "Marker Felt.ttf", 32);
label->setPosition(Vec2(visibleRect.origin.x+visibleRect.size.width/2, visibleRect.origin.y+visibleRect.size.height/2).x,
                   Vec2(visibleRect.origin.x+visibleRect.size.width/2, visibleRect.origin.y+visibleRect.size.height).y - 30);

scene->addChild(label, -1);

//add the menu item for back to main menu
label = LabelTTF::create("MainMenu", "Marker Felt.ttf", 32);
auto menuItem = MenuItemLabel::create(label);
menuItem->setCallback([&](cocos2d::Ref *sender) {
Director::getInstance()->replaceScene(HelloWorld::createScene());
});

auto menu = Menu::create(menuItem, nullptr);
menu->setPosition(Vec2::ZERO);
menuItem->setPosition(Vec2(visibleRect.origin.x+visibleRect.size.width - 80, visibleRect.origin.y + 25));
scene->addChild(menu, 1);

// this is for Labels section of the Programmers Guide

// 1. BMFont
auto myLabel = Label::createWithBMFont("bitmapRed.fnt", "LabelBMFont");
myLabel->setPosition(Vec2(origin.x+visibleSize.width/2, origin.y+visibleSize.height/2).x,
                     (Vec2(origin.x+visibleSize.width/2, origin.y+visibleSize.height).y - (++index) * 40));

scene->addChild(myLabel, 1);

// 2. LabelTTF
auto myLabel2 = Label::createWithTTF("LabelTTF", "Marker Felt.ttf", 32);
myLabel2->setColor(Color3B::RED);
myLabel2->setPosition(Vec2(origin.x+visibleSize.width/2, origin.y+visibleSize.height/2).x,
             (Vec2(origin.x+visibleSize.width/2, origin.y+visibleSize.height).y - (++index) * 40));

scene->addChild(myLabel2, 1);

// 3. LabelTTF with TTFConfig

// create a TTFConfig files for labels to share
TTFConfig labelConfig;
labelConfig.fontFilePath = "Marker Felt.ttf";
labelConfig.fontSize = 32;

auto myLabel3 = Label::createWithTTF(labelConfig, "LabelTTF from TTFConfig");
myLabel3->setColor(Color3B::RED);
myLabel3->setPosition(Vec2(origin.x+visibleSize.width/2, origin.y+visibleSize.height/2).x,
                      (Vec2(origin.x+visibleSize.width/2, origin.y+visibleSize.height).y - (++index) * 40));

scene->addChild(myLabel3, 1);

// 4. Label using SystemFont
auto myLabel4 = Label::createWithSystemFont("Label using SystemFont", "Arial", 32);
myLabel4->setColor(Color3B::RED);
myLabel4->setPosition(Vec2(origin.x+visibleSize.width/2, origin.y+visibleSize.height/2).x,
                      (Vec2(origin.x+visibleSize.width/2, origin.y+visibleSize.height).y - (++index) * 40));

scene->addChild(myLabel4, 1);

// 5. LabelTTF with shadow, outline and glow
auto myLabel5 = Label::createWithTTF("LabelTTF with Shadow", "Marker Felt.ttf", 32);
myLabel5->enableShadow();
myLabel5->setColor(Color3B::RED);
myLabel5->setPosition(Vec2(origin.x+visibleSize.width/2, origin.y+visibleSize.height/2).x,
                      (Vec2(origin.x+visibleSize.width/2, origin.y+visibleSize.height).y - (++index) * 40));

scene->addChild(myLabel5, 1);

auto myLabel6 = Label::createWithTTF("LabelTTF with Outline", "Marker Felt.ttf", 32);
myLabel6->setTextColor(Color4B::RED);
//setColor will change the color of the whole label with effects as if 3.4
//    myLabel6->setColor(Color3B::RED);
myLabel6->enableOutline(Color4B::WHITE, 1);
myLabel6->setPosition(Vec2(origin.x+visibleSize.width/2, origin.y+visibleSize.height/2).x,
                      (Vec2(origin.x+visibleSize.width/2, origin.y+visibleSize.height).y - (++index) * 40));

scene->addChild(myLabel6, 1);

auto myLabel7 = Label::createWithTTF("LabelTTF with Glow", "Marker Felt.ttf", 32);
myLabel7->enableGlow(Color4B::YELLOW);
myLabel7->setTextColor(Color4B::RED);
myLabel7->setPosition(Vec2(origin.x+visibleSize.width/2, origin.y+visibleSize.height/2).x,
                      (Vec2(origin.x+visibleSize.width/2, origin.y+visibleSize.height).y - (++index) * 40));

scene->addChild(myLabel7, 1);

// return the scene
return scene;
运行结果如下
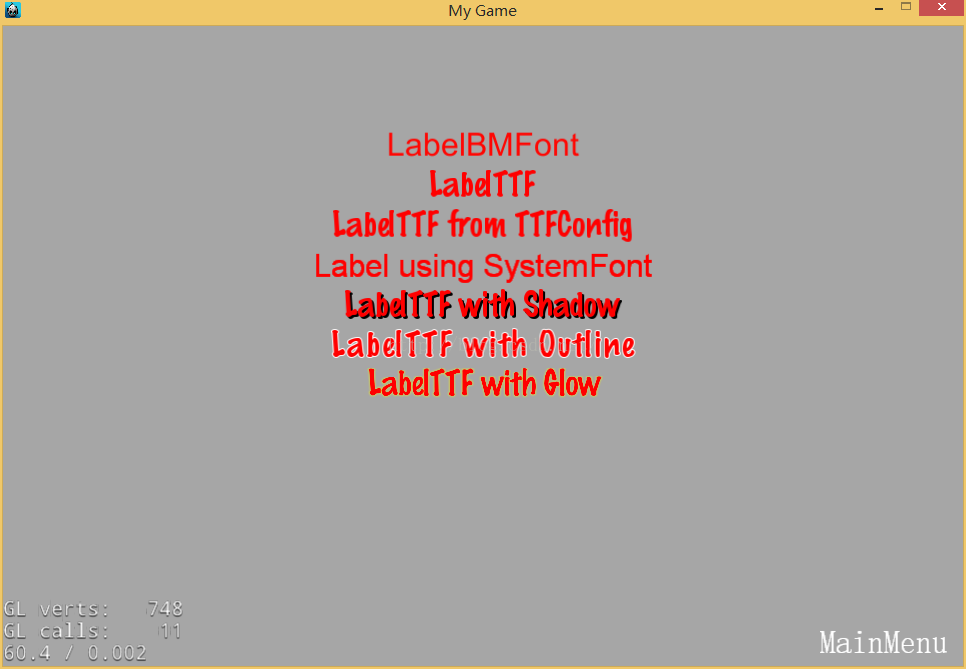
1、BMFont Label
第35到37行创建了一个BMFont Label,这个Label使用了位图字体,位图字体由一系列的矩阵点组成。这种创建Label的方式简单快速,但是不可扩展。之所以不可扩展是因为,用BMFont创建Label中的每一个字符都需要单独的字体,并且不同尺寸也需要不同的字体。创建BMFont Label需要用到Label::createWithBMFont函数,第一参数为.fnt字体文件名,第二个参数为Label显示字符。需要指出的是,要显示的字符必须都要在.fnt字体文件中,否则会创建失败。
2、LabelTTF
第42到45行创建了一个LabelTTF,TTF是True Type Fonts的缩写,就是用真实的字体创建Label。和上面讲的BMFont Label不同,LabelTTF创建的字体可以改变尺寸,而不需要另外的字体文件。虽然LabelTTF创建Label的方式比较灵活,但是它也有缺点,就是需要耗费更多的时间。创建LabelTTF时除了可以利用上面的方法外,还可以利用TTFConfig,代码的52到59行就采用了这种方式。用TTFConfig创建Label的好处是,当你创建了一个TTFConfig对象之后,就可以重复利用这个对象来创建相同字体的Label。
3、System Font
第64到67行用系统字体创建了Label,用这种方法创建的字体不可以改变字体的效果。
当用LabelTTF创建完Label之后可以改变它的效果,第72到76行为Label指定了阴影效果,第80到86行为Label指定了轮廓线效果,第90到94行为Label指定了荧光效果。


 4124
4124


 被折叠的 条评论
为什么被折叠?
被折叠的 条评论
为什么被折叠?
 到【灌水乐园】发言


