Otto 应用入门
本篇博客通过分析Otto官方提供的例子来分析otto的使用
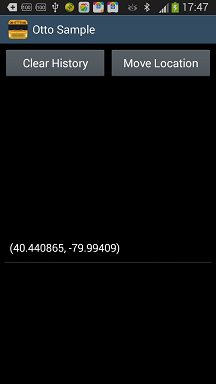
分析界面功能
功能很简单,通过点击Move Location按钮,在下面的fragment中添加一个位置信息,即经纬度。当然,这里是采用随机数的方法随机生成的。再然后就是Clear History按钮,点击这个按钮,清除刚刚生成的位置信息。
界面代码如下:
<?xml version="1.0" encoding="utf-8"?>
<LinearLayout xmlns:android="http://schemas.android.com/apk/res/android"
              android:layout_width="match_parent"
              android:layout_height="match_parent"
              android:orientation="vertical"
              android:padding="@dimen/holo_gap">
    <LinearLayout
            android:layout_width="match_parent"
            android:layout_height="wrap_content"
            android:layout_marginBottom="@dimen/holo_gap"
            android:orientation="horizontal">
        <Button android:id="@+id/clear_location"
                android:layout_width="0dp"
                android:layout_height="wrap_content"
                android:layout_weight="1"
                android:layout_marginRight="@dimen/holo_gap"
                android:text="@string/clear_location"
                />
        <Button android:id="@+id/move_location"
                android:layout_width="0dp"
                android:layout_height="wrap_content"
                android:layout_weight="1"
                android:text="@string/move_location"
                />
    </LinearLayout>
    <fragment class="com.squareup.otto.sample.LocationMapFragment"
              android:id="@+id/map"
              android:layout_width="match_parent"
              android:layout_height="0dp"
              android:layout_weight="1"
              android:layout_marginBottom="@dimen/holo_gap"/>
    <fragment class="com.squareup.otto.sample.LocationHistoryFragment"
              android:id="@+id/history"
              android:layout_width="match_parent"
              android:layout_height="0dp"
              android:layout_weight="1"
            />
</LinearLayout>
当然要实现这个功能很简单,比如用广播,或者fragment提供一个公有方法供外界调用,修改界面。此处,使用Otto框架来实现。
由于两个按钮差不多,此处我只分析Move Location按钮。
Otto使用
1.提供一个java类来传递数据
这里要实现的功能其实就是如何以Otto的方式将数据从Activity中传递到Fragment,既然要传递数据,自然要提供一个类来封装
//代码路径com.squareup.otto.sample.LocationChangedEvent
public class LocationChangedEvent {

    public final float lat;
    public final float lon;
    //省略了带这两个参数的构造函数,以及toString方法
    ...
}
2.注册
Otto的使用需要注册
@Override
protected void onResume() {
    super.onResume();
    // Register ourselves so that we can provide the initial value.
    BusProvider.getInstance().register(this);
}

@Override
protected void onPause() {
    super.onPause();
    // Always unregister when an object no longer should be on the bus.
    BusProvider.getInstance().unregister(this);
}
注册非常简单,核心方法如下
BusProvider.getInstance().register(this);

BusProvider.getInstance().unregister(this);
注意,无论是发送的Activity还是接受的Fragment都需要注册。此处的BusProvider是一个Bus的工厂,提供Bus的单例。
3.传递数据
有了数据下一步要做的就是传递数据,当然可以使用广播的方式,Otto这里做的更加简便
findViewById(R.id.move_location).setOnClickListener(new OnClickListener() {
    @Override
    public void onClick(View v) {
        //经纬度通过随机数生成
        lastLatitude += (RANDOM.nextFloat() * OFFSET * 2) - OFFSET;
        lastLongitude += (RANDOM.nextFloat() * OFFSET * 2) - OFFSET;
        //核心代码
        BusProvider.getInstance().post(produceLocationEvent());
    }
});

@Produce
public LocationChangedEvent produceLocationEvent() {
    // Provide an initial value for location based on the last known
    // position.
    return new LocationChangedEvent(lastLatitude, lastLongitude);
}
总结一下
1. 提供一个public方法(注意,必须是public方法,否则会报错),方法的返回值返回我们需要传递的数据即可
2. 在方法上面加上@Produce注解
3. 在需要发布数据的地方post一下即可
4.接收数据(LocationHistoryFragment)
1)同样的接收方也需要注册与反注册
2)订阅事件
private final List<String> locationEvents = new ArrayList<String>();
private ArrayAdapter<String> adapter;

@Subscribe
public void onLocationChanged(LocationChangedEvent event) {
    locationEvents.add(0, event.toString());
    if (adapter != null) {
        adapter.notifyDataSetChanged();
    }
}

@Subscribe
public void onLocationCleared(LocationClearEvent event) {
    locationEvents.clear();
    if (adapter != null) {
        adapter.notifyDataSetChanged();
    }
}
//省略界面初始化相关代码
...
从代码可知,有两个方法订阅了事件,但是传入的参数不同。从上文可知我们传递的参数是LocationChangedEvent,所以此处会将事件传递给onLocationChanged方法。
这样当我们点击按钮时候,就会通过post方法将我们需要传递的数据传递给订阅了该对象的方法。
至此,此Example的流程就简单的分析完了。
看首个界面,发现我们并没有点击Move Location按钮,但是界面上依然出现了一行数据。这是因为当我们regist时候,会向所有订阅此事件的方法传递一个数据。订阅通过@Subscribe以及传入的参数来判断。
总结一下,Otto的使用:
1)在订阅与生产事件的类中注册
2)在生产者类中添加@Produce方法
3)在订阅类中添加@Subscribe方法
4)通过post方法进行事件传递


 1万+
1万+

 被折叠的 条评论
为什么被折叠?


