


前言:react-router 分为 react-router-dom ( web 应用 ) 和 react-router-native ( React Native应用程序 )
这里主要介绍 react-router-dom:
一、安装:npm install react-router-dom --save (最后使用4.x及以上版本哦)
二、基本方法介绍 ==> 这里只是常用的方法并且是简单使用,具体详细参数请参考官方文档
1. BrowserRouter、 HashRouter :使用react-router管理整个应用的路由
BrowserRouter:正常模式,与HTML5的History相似
HashRouter:hash模式,地址栏会有 #
基本使用:
import React from 'react';
import ReactDOM from 'react-dom';
import App from './pages/routerDemo/index';

import { BrowserRouter, HashRouter } from 'react-router-dom'

ReactDOM.render(
    // (
    //     <BrowserRouter>        //正常模式
    //         <App />
    //     </BrowserRouter>
    // ),
    (
        <HashRouter>        //hash模式
            <App />
        </HashRouter>
    ),
    document.getElementById('root')
);
hash模式效果:

2. Link 、NavLink :控制路由跳转
Link :主要API是to,to可以接受string或者一个object,来控制url。
NavLink :它可以为当前选中的路由设置类名、样式以及回调函数等。
3. Route:React Router中最重要的组件,保证渲染的UI个路由地址是一致的
主要参数:path:路由地址; component:对应的组件
4. Redirect:导航到新位置,即重定向 ==>> 最常用的方法是用于显示默认的组件
主要参数:to:要重定向组件的路由地址,即Route中定义的 path 参数
5. Switch:下面是多个Route(可能还会有一个 Redirect ),Switch保证只显示其中的一个
使用Link、Route、Redirect、Switch:
import React, {Component} from 'react';
import {Link, NavLink, Switch, Route, Redirect} from 'react-router-dom'

import Home from './home'
import About from './about'
import Message from './message'

export default class App extends Component{

    render(){
        const styleObj = {
            outBox: {
                display: 'flex',
            },
            ulStyle: {
                marginRight: 20,

            },
            listyle: {
                borderWidth: 1,
                borderColor: '#ccc',
                borderStyle: 'solid',
                width: 80,
                textAlign:'center',
                borderRadius: 6,
                marginBottom: 6,
                cursor: 'pointer'
            }
        };
        return(
            <div style={styleObj.outBox}>
                <ul style={styleObj.ulStyle}>
                    <li style={styleObj.listyle}>
                        <Link to="/home"> Home </Link>
                    </li>
                    <li style={styleObj.listyle}>
                        <Link to="/about"> About </Link>
                    </li>
                    <li style={styleObj.listyle}>
                        <Link to="/message"> Message </Link>
                    </li>
                </ul>
                <Switch>
                    <Route path='/home' component={Home} />
                    <Route path='/about' component={About} />
                    <Route path='/message' component={Message} />
                    {/* 默认显示 Home 组件 */}
                    <Redirect to='/home'/>
                </Switch>
            </div>
        )
    }
}
使用NavLink、Route、Redirect、Switch:
import React, {Component} from 'react';
import {Link, NavLink, Switch, Route, Redirect} from 'react-router-dom'

import Home from './home'
import About from './about'
import Message from './message'

export default class App extends Component{

    render(){
        const styleObj = {
            outBox: {
                display: 'flex',
            },
            ulStyle: {
                marginRight: 20,

            },
            listyle: {
                borderWidth: 1,
                borderColor: '#ccc',
                borderStyle: 'solid',
                width: 80,
                textAlign:'center',
                borderRadius: 6,
                marginBottom: 6,
                cursor: 'pointer'
            }
        };
        return(
            <div style={styleObj.outBox}>
                <ul style={styleObj.ulStyle}>
                    <li style={styleObj.listyle}>
                        <NavLink
                            to="/home"
                            activeStyle={{
                                fontWeight: "bold",
                                color: "red"
                            }}
                        >
                            Home
                        </NavLink>
                    </li>
                    <li style={styleObj.listyle}>
                        <NavLink
                            to="/about"
                            activeStyle={{
                                fontWeight: "bold",
                                color: "red"
                            }}
                        >
                            About
                        </NavLink>
                    </li>
                    <li style={styleObj.listyle}>
                        <NavLink
                             to="/message"
                             activeStyle={{
                                fontWeight: "bold",
                                color: "red"
                             }}
                        >
                            Message
                        </NavLink>
                    </li>
                </ul>
                <Switch>
                    <Route path='/home' component={Home} />
                    <Route path='/about' component={About} />
                    <Route path='/message' component={Message} />
                    {/* 默认显示 Home 组件 */}
                    <Redirect to='/home'/>
                </Switch>
            </div>
        )
    }
}
效果:
6. history 对象 ==> 一般用于js写路由跳转,该对象在根组件(一般为App)中不存在,因为根组件的 this.props 为 { }
所有方法:


常用方法:
push(path, [state]) - (function)将新条目推送到历史堆栈 ==> 覆盖当前路由,使用goBack()可以返回
replace(path, [state]) - (function)替换历史堆栈中的当前条目 ==> 替换当前路由,使用goBack()可以将直接返回当前路由的上一个路由
go(n)- (function)按n条目移动历史堆栈中的指针
goBack() - (功能)相当于 go(-1)
goForward() - (功能)相当于 go(1)
实例:在 Message 组件中显示 MessageDetail 子组件
import React, {Component} from 'react';
import {Route} from 'react-router-dom'

import MessageDetail from './messageDetail'

export default class Message extends Component{

    goToPush = () => {
        this.props.history.push('/message/1')           //注意:当前路由是'/message',这个不能省略
    };
    goToReplace = () => {
        this.props.history.replace('/message/2')           //注意:当前路由是'/message',这个不能省略
    };
    goToGoBack = () => {
        this.props.history.goBack()
    };
    goToGoForward = () => {
        this.props.history.goForward()
    };
    render(){
        return(
            <div>
                <div style={{marginTop:20,}}>
                    这里是Message组件
                </div>
                <div>
                    <button onClick={() => this.goToPush() }>push</button>
                    <button onClick={() => { this.goToReplace() }}>replace</button>
                    <button onClick={() => { this.goToGoBack() }}>goBack</button>
                    <button onClick={() => { this.goToGoForward() }}>goForward</button>
                </div>
                <div style={{marginTop: 20}}>
                    {/* /:id 是路由占位符,在子组件的 this.props.match.params 对象中通过id的取到实参内容 */}
                    <Route path='/message/:id' component={MessageDetail} />
                </div>
            </div>
        )
    }
}
效果:注意路由的变化(特别是 push 和 replace 在 goBack 时候的区别)
三、路由传参 => 有点类似vue的params传参(路由占位)
1. 路由占位(父组件中,定义 Route 的 path )
{/* /:id 是路由占位符,在子组件的 this.props.match.params 对象中通过id的取到实参内容 */}
<Route path='/message/:id' component={MessageDetail} />
2. 调用history对象跳转路由(传实参,父组件中,js方式跳转)
goToPush = () => {
        this.props.history.push('/message/1')           //注意:当前路由是'/message',这个不能省略
};
3. 子组件接收参数 ==>> this.props.match.params.id

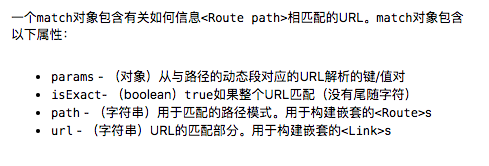
4. 看一下官方文档对 match 对象的解释
文章仅为本人学习过程的一个记录,仅供参考,如有问题,欢迎指出!


 230
230


 被折叠的 条评论
为什么被折叠?
被折叠的 条评论
为什么被折叠?
 到【灌水乐园】发言


