


1、Introduction 简介
This on-line document accompanies the slides and other material available for the courses Formal Languages and Compilers and Linguaggi e Traduttori.
It describes the project of a complete compiler for a real programming language and is organized to demonstrate how to incrementally design and implement the successive phases of the compilation process.
All the used tools are freely available on the Internet:
1. the front end of the compiler has been developed by means of JFlex, a lexical analyzer generator, and Cup, an LALR parser generator, both based on the Java Standard Edition Platform
2. the back end is made by the LLVM retargettable code generator, which currently supports X86, X86-64, PowerPC, PowerPC-64, ARM, Thumb, SPARC, Alpha, and IA-64 architectures.
2、Source Language 源语言
The source language for the compiler is mjava, a subset of Java which mainly differs from the standard language in the following points:
1. all classes in a program are declared in a single file (linking is not needed)
2. multiple inheritance is not supported (interface declarations are not allowed)
3. abstract classes are not admitted
4. static fields and static methods are not allowed
5. overloading is not supported
6. basic only flow-of-control statements ( if, if-else and while ) are implemented
7. basic input/output operations on the I/O standard devices are performed by invoking the C-like functions printf and scanf.
This is an example of mjava source program:
/********************************************************************
 * Sample mjava source program
 *********************************************************************/
public class String {

} // end of class String

public class Int {
	int n;

	public Int(int i) {
		n = i;
	}

	public int f() {
		return fact(n);
	}

	int fact(int n) {
		return n > 2 ? n * fact(n - 1) : n;
	}
} // end of class Int

public class Test {
	public void main(){
    int n, f;
    Int t;
    n = 0;
    while(n < 1 || n > 16) {
       printf ("Enter an integer greater than 0 and less than 17: ");
       scanf ("%d", &n);
    }
    t = new Int(n);
    f = t.f();
    printf("factorial(%d)= %d\n", n, f);
  }
} // end of class Test
3、Lexical Analysis 词法分析
First of all we have to specify the lexical elements of our source language by means of a lexical-analyzer generator.
JFlex transforms the specification of a scanner (regular definitions, actions to be executed when a matching occurs, ...) into a Java program that implements a minimum state Deterministic Finite Automaton accepting the specified lexemes.
The lexical specification of the mjava language is reported in the mjava.flex file, that uses the interface sym.java to declare integer constants for the terminal tokens in the language.
From these files JFlex generates a Scanner.java file with one class that contains code for the scanner. The class will have a constructor taking a java.io.Reader from which the input is read.
The %debug directive in mjava.flex also creates a main function in the generated class that expects the name of an input file on the command line and then runs the scanner on this input file, by printing information about each returned token.
The information includes: line number (if line counting is enabled), column (if column counting is enabled), the matched text, the executed action (with line number in the specification), and the integer value of the token declared in sym.java.
You can generate a scanner for mjava and run it on an input program such as SampleProgram.mjava by means of the Windows batch file mjava.bat or the Linux shell script mjava.spt :
1. put the mjava.flex, sym.java, SampleProgram.mjava and mjava.bat / mjava.spt files in a same directory and “cd” into it
2. run mjava.bat / mjava.spt
3. you will get something like SampleProgramTokens.txt printed to your Java console.
4、Parsing 解析
Now we have to specify the syntactic structure of mjava well-formed programs.
By means of Cup, we’ll then transform the parser specification (grammar, conflict resolution directives, ...) into a Java program implementing an LALR parser.
The parser specification of the mjava language is reported in the mjava.cup file, that uses the scanner generated by mjava.flex to perform lexical analysis and then generates the interface sym.java and the parser mjavac.java.
We have slightly modified the previous version of mjava.flex, by introducing the class JavaSymbol.java to retrieve more detailed information about lexical tokens.
You can generate a parser for mjava and run it on an input program such as SampleProgram.mjava by means of the Windows batch file mjava.bat or the Linux shell script mjava.spt:
1. put the mjava.flex, mjava.cup, JavaSymbol.java, SampleProgram.mjava and mjava.bat / mjava.spt files in a same directory and “cd” into it
2. run mjava.bat / mjava.spt
3. the files Scanner.java, mjavac.java and sym.java will be generated
4. you will get something like SampleProgramParsingResult.txt printed to your Java console.
5、Error handling 错误处理
The parser produced so far has a major drawback: on receiving an input program with syntactic errors, such as ErroneousProgram.mjava, it will stop with a Fatal Syntax Error Exception on the first error occurrence, as shown in ErroneousProgramResult.txt.
This behavior is quite unkind to the user, who would like to have all the errors reported, not just the first one.
Cup supports a local error recovery mechanism, based on a special error symbol, to allow the parser to continue when a syntactic error occurs: whenever the error symbol appears in a grammar rule, it can match a sequence of erroneous input symbols.
On encountering an error action, the parser:
1. pops the stack until a state including an item obtained from an error rule A ::= error a is reached
2. shifts a fictitious error token onto the stack, as though error was found on input
3. skips ahead on the input, discarding symbols until a substring is found that can be reduced to a
4. reduces error a to A
5. emits a diagnostic message
6. resumes normal parsing.
Unfortunately this error recovery mechanism is not powerful enough to correctly report any kind of syntactic error: error rules cannot be inserted anywhere into an LALR grammar because they may introduce both shift/reduce and reduce/reduce conflicts.
A parser with error rules for mjava is specified in mjava.cup.
When run on the input program ErroneousProgram.mjava, it will produce the output reported in ErrorHandlerResult.txt on the Java console.
6、Symbol table 语法表
Once completed the syntax analysis, we can start to develop the semantic analysis phase.
First of all we have to design the symbol table organization, in order to hold information about source-program constructs.
Information will be collected incrementally by the analysis phase and used by the synthesis phase to generate the code.
Entries in the symbol table will contain information about every identifier, such as its lexeme, its type, its position in storage, and any other information relevant to the translation process.
Since mjava admits nested environments, where identifiers can be redeclared, we support multiple declarations of a same identifier by setting up a separate symbol table for each scope.
The most-closely nested rule will be implemented by chaining the symbol tables so that the table for a nested scope points to the table for its enclosing scope.
An example of multiple declarations, their scopes, and the corresponding chained symbol tables is shown in the figure:
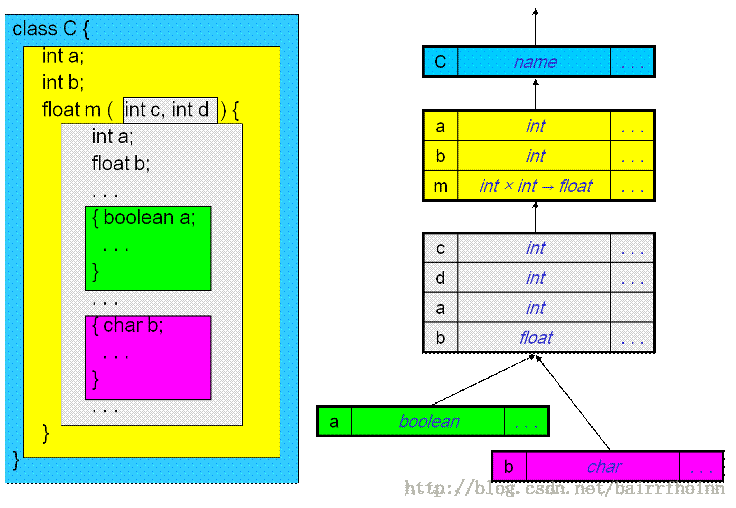
The implementation of chained symbol tables is defined by the class Env in Env.java.
This class models an environment by means of an HashMap (table) and a reference (prev) to the table of the enclosing scope; the static variables top and root maintain the references to the current environment and to the root environment respectively.
Entries in a table are key-value pairs, where the key is the lexeme of an identifier and the value is an instance of the class Symb, declared in Symb.java, that will contain information about the identifier (in this first implementation Symb is empty).
The following static methods are declared in class Env :
1. put adds a new entry in the current environment if its lexeme is not already there
2. get retrieves an entry in the chain of tables starting from the current environment
3. putClass adds a new entry in the root environment if its lexeme (a class name) is not already there and its super class (if any) has already been declared
4. push creates a new environment and makes it the current environment
5. pop restores the previous environment.
The current environment is printed on the Java console anytime it is modified.
The construction of symbol tables for mjava is specified in mjava.cup.
You can generate the parser and run it on the input program SampleProgram.mjava by means of mjava.bat or mjava.spt (Env.java and Symb.java should be stored in a subdirectory named symtab).
The output reported in SymbolTableResult.txt will be printed on the Java console.
7、Types 数据类型
The structure of a type in mjava is represented by a type expression defined as:
· a basic type ( integer, floating, character, boolean, void, error )
· the expression formed by applying a type constructor (name, array, product, method, constructor, reference ) to a type expression.
Types are implemented by the class hierarchy in package type : the superclass Type in Typejava, declares a field (tag) corresponding to either a basic type or a type constructor, and a field (width) containing the number of bytes required to store variables of that type.
Each type constructor is implemented by a corresponding subclass of Type defined, respectively, in Name.java, Array.java, Product.java, Method.java, Constructor.java, and Reference. java.
Type expressions are strings formed by:
· just a tag (for basic types)
· the tag of a type constructor followed by the type expression to which it applies (for constructed types).
In order to efficiently check type equivalence, we maintain a dictionary of the types declared in a source program by means of the HashMap table in class Type : entries in the dictionary are key-value pairs where the key is a type expression and the value is the corresponding Type object.
When a type is encountered in the source program, its type expression is searched for in the dictionary: if present, the corresponding Type object is retrieved and used, otherwise a new Type object is created and a new entry is added to the dictionary.
In this way two types are equivalent if and only if they are represented by the same Type object.
To complete the construction of symbol tables, we have to specify the information we want to collect about identifiers in the class Symb.
In Symb.java we have declared the following fields:
· a reference (type) to a Type object
· a reference (ownerClass) to the Name object of the class where the identifier is declared
· a boolean value (pub), indicating whether the identifier is public or private.
In order to admit forward references, it is necessary to postpone type checking until all the identifiers have been inserted into the symbol table, and therefore to organize the front end in two passes: the first one to create the symbol table, the second one to perform type checking and intermediate code generation.
The front end for mjava specified in mjava.cup implements two passes by reading and processing the source file two times .
The static variables parser.first and parser.second indicate the current pass.
In the second pass the parser moves through the chains of symbol tables, following the same path followed in the first pass.
This behavior is obtained by saving, in the first pass, the current (top) environment into the ArrayList newEnvs (in class Env ) anytime it is going to be changed by push and pop operations.
In the second pass the sequence of environments saved in newEnvs is restored by invoking method next of class Env in Env.java, in place of push and pop.
You can generate the parser and run it on the input program SampleProgram.mjava by means of mjava.bat or mjava.spt (the type package should be stored in a subdirectory named type).
The output reported in TypesResult.txt will be printed on the Java console.
8、Type Checking 类型检查
In the second pass, the compiler front end must firstly perform type checking, to assure that the type of a construct matches the type expected by its context.
Type checking rules have to verify that operators and functions are applied to the right number and types of operands.
Actual types must match with expected types even when coercion occurs (the type of an operand is automatically converted to the type expected by an operator).
The type checker for mjava is specified in mjava.cup.
You can generate the parser and run it on the input program WrongProgram.mjava by means of the files in TypeChecher.rar.
The output reported in TypeCheckerResult.txt will be printed on the Java console.
9、Code generation 代码生成
Finally the front end of a compiler has to generate intermediate code.
Since we don't aim at developing a new back end for our compiler, the choice of an intermediate representation language is determined by the choice of an already available back end.
The LLVM compiler infrastructure is a collection of source code that implements static back ends for the X86, X86-64, PowerPC, PowerPC-64, ARM, Thumb, SPARC, Alpha, and IA-64 architectures.
LLVM uses a virtual instruction set that provides type safety, low-level operations and flexibility.
We have installed LLVM-2.7 revision on the Linux Fedora 13 platform and used the shell script llvm.spt to perform the following steps:
1. assemble a LLVM program ( .ll file ) into LLVM bitcode ( .bc file )
2. compile LLVM bitcode into Intel assembly language for the x86 architecture ( .s file )
3. run LLVM bitcode .
The LLVM code generator for mjava is specified in mjava.cup.
In this first implementation, we have only considered non object-oriented mjava programs, such as Fact.mjava, where no class instance is created and all the methods are called internally to their declaring classes.
You can generate the front end, run it on the input program Fact.mjava to produce the LLVM program Fact.mjava.ll, and finally launch llvm by means of mjava.spt and the files in CodeGenerator.rar.
The x86 assembly program Fact.mjava.s will be emitted and the output reported in CodeGeneratorResult.txt will be printed on your terminal.
You can also try to compile and run the other mjava programs stored in the CodeGenerator/source directory, or to write and test your own mjava programs.
10、Object oriented code generation 面向对象的代码生成
In object oriented languages such as Java (and mjava), array and object variables behave like pointers whose values are assigned when new instances are created.
When a method is called externally to its declaring class, the following operations must be performed:
1. determine the class in which the method is declared and look for the method in that class
2. pass the object on which the method is called as an extra argument of the method call.
The translation of method declarations must avoid name clashes among methods declared with the same name in different classes: for this reason the name of the translated method is the concatenation of the class name and the method name.
The final version of the LLVM code generator for mjava is specified in mjava.cup.
You can generate the front end, run it on the input program SampleProgram.mjava to produce the LLVM program SampleProgram.mjava.ll and finally launch llvm by means of mjava.spt and the files in OOCodeGenerator.rar.
The x86 assembly program SampleProgram.mjava.s will be emitted and the output reported in OOCodeGeneratorResult.txt will be printed on your terminal.
You can also try to compile and run the other mjava programs stored in the OOCodeGenerator/source directory, or to write and test your own mjava programs.
本文原文来自:http://staff.polito.it/silvano.rivoira/HowToWriteYourOwnCompiler.htm,转载请注明原始出处。


 526
526


 被折叠的 条评论
为什么被折叠?
被折叠的 条评论
为什么被折叠?
 到【灌水乐园】发言


