


对于yolo系列,应用广泛,在win10端也有很大的应用需求,所以这篇文章给出win10环境下的安装教程。
先给出系列文章win10+anacnda实现yolov3
YOLOV5-3.0/3.1版本
版本问题
python 3.7 torch 1.6.0 torchvision 0.7.0 cuda 10.1
注意:Yolov5-3.1只能使用torch 1.6.0
1.在网站下载对应版本的torch和torchvision的whl文件
https://download.pytorch.org/whl/torch_stable.html
2.新建虚拟环境
conda create -n YOLOV5-3.1 python=3.73.查看虚拟环境
conda info -e4.激活虚拟环境
activate YOLOV5-3.15.安装相关库
pip3 install opencv-python==4.4.0.46 -i https://pypi.tuna.tsinghua.edu.cn/simple/
pip3 install numpy==1.19.2 -i https://pypi.tuna.tsinghua.edu.cn/simple/
pip3 install Cython==0.29.21 -i https://pypi.tuna.tsinghua.edu.cn/simple/
pip3 install pillow==8.0.1 -i https://pypi.tuna.tsinghua.edu.cn/simple/
pip3 install matplotlib==3.3.2 -i https://pypi.tuna.tsinghua.edu.cn/simple/
pip3 install pyyaml==5.3.1 -i https://pypi.tuna.tsinghua.edu.cn/simple/
pip3 install tensorboard==2.3.0 -i https://pypi.tuna.tsinghua.edu.cn/simple/
pip3 install scipy==1.5.2 -i https://pypi.tuna.tsinghua.edu.cn/simple/
pip3 install tqdm==4.54.0 -i https://pypi.tuna.tsinghua.edu.cn/simple/
pip3 install pandas==1.1.3 -i https://pypi.tuna.tsinghua.edu.cn/simple/
pip3 install seaborn==0.11.0 -i https://pypi.tuna.tsinghua.edu.cn/simple/
pip3 install pycocotools==2.0.2 -i https://pypi.tuna.tsinghua.edu.cn/simple/
6.安装torch
将路径跳转到步骤1中下载的文件位置,使用pip install .....whl 格式来安装whl文件
7.验证
import torch
#查看版本
print(torch.__version__)
#查看gpu是否可用.返回True则表示可以使用gpu
torch.cuda.is_available()
#返回设备gpu个数
torch.cuda.device_count()
8.图像检测
python detect.py9.调用摄像头
python detect.py --source 0YOLOV5-4.0版本
电脑配置
CPU:i7-10750H
内存:16G
显卡:GTX1650 4G
Anaconda:4.9.2
1.一开始就最好把源换一下
查看当前下载源

conda config --show-sources

添加源:

conda config --add channels https://mirrors.tuna.tsinghua.edu.cn/anaconda/cloud/pytorch/

conda config --add channels https://mirrors.tuna.tsinghua.edu.cn/anaconda/cloud/menpo/

conda config --add channels https://mirrors.tuna.tsinghua.edu.cn/anaconda/cloud/bioconda/

conda config --add channels https://mirrors.tuna.tsinghua.edu.cn/anaconda/cloud/msys2/

conda config --add channels https://mirrors.tuna.tsinghua.edu.cn/anaconda/cloud/conda-forge/

conda config --add channels https://mirrors.tuna.tsinghua.edu.cn/anaconda/pkgs/main/

conda config --add channels https://mirrors.tuna.tsinghua.edu.cn/anaconda/pkgs/free/

conda config --set show_channel_urls yes

查看当前下载源

conda config --show-sources

如果出现国内源挂掉的情况,就换回默认源

conda config --remove-key channels
2.新建虚拟环境
conda create -n YOLOV5-4.0 python=3.73.查看虚拟环境
conda info -e
4.激活虚拟环境
activate YOLOV5-4.05.安装相关库
注意1:这里不能直接使用pip install -r requirements.txt 这样直接安装会默认安装cpu版本的torch,不知道为什么,可能是torch是其他库的依赖库,这里不懂,有会的小伙伴可以一起交流。
注意2:Cv2的版本不能是4.5,需要指定成4.4或者以下。同时Python3.8装不上cv2 4.4。所以需要安装python3.7版本,这样才能将cv2的4.4版本安装上去。同时在安装库的时候需要先安装opnecv-python,不能先安装numpy,这样才能安装上cv2的4.4版本。
pip3 install opencv-python==4.4.0.46 -i https://pypi.tuna.tsinghua.edu.cn/simple/
pip3 install numpy==1.19.2 -i https://pypi.tuna.tsinghua.edu.cn/simple/
pip3 install Cython==0.29.21 -i https://pypi.tuna.tsinghua.edu.cn/simple/
pip3 install pillow==8.0.1 -i https://pypi.tuna.tsinghua.edu.cn/simple/
pip3 install matplotlib==3.3.2 -i https://pypi.tuna.tsinghua.edu.cn/simple/

pip3 install pyyaml==5.3.1 -i https://pypi.tuna.tsinghua.edu.cn/simple/
pip3 install tensorboard==2.3.0 -i https://pypi.tuna.tsinghua.edu.cn/simple/
pip3 install scipy==1.5.2 -i https://pypi.tuna.tsinghua.edu.cn/simple/

pip3 install tqdm==4.54.0 -i https://pypi.tuna.tsinghua.edu.cn/simple/
pip3 install pandas==1.1.3 -i https://pypi.tuna.tsinghua.edu.cn/simple/
pip3 install seaborn==0.11.0 -i https://pypi.tuna.tsinghua.edu.cn/simple/
pip3 install pycocotools==2.0.2 -i https://pypi.tuna.tsinghua.edu.cn/simple/
注意:这里需要先安装opencv-python再安装numoy,而且opencv-python的版本最好不好是4.5。否则这里会报出CV2函数的错误。
6.安装torch
我们使用的版本依次是
pytorch==1.7.1 torchvision==0.8.2 torchaudio==0.7.2 cudatoolkit=10.2。
torch1.7版本。Python对应3.7版本,否则不能使用cuda。cv2要用4.5以下版本。
YOLOv5最好使用cuda10.2版本
Yolov5 4.0建议搭配torch1.7/yolov5 3.0建议搭配pytorch1.6
安装方式一:在网站中找到对应的版本然后离线安装
https://download.pytorch.org/whl/torch_stable.html
方式二:
conda install pytorch=1.7.1 torchvision=0.8.2 cudatoolkit=10.2 -c https://mirrors.tuna.tsinghua.edu.cn/anaconda/cloud/pytorch/6.验证
import torch

#查看版本

print(torch.__version__)

#查看gpu是否可用

torch.cuda.is_available()

#返回设备gpu个数

torch.cuda.device_count()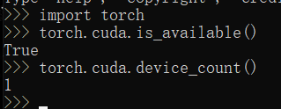
7.图像检测
python detect.py

8.摄像头
python detect.py --source 0
9.mp4视频测试
python detect.py --source 161.mp4 (这里接视频的位置)![]()

如上图,视频已经被识别过啦
过程中的一些报错
报错1:打开摄像头报错

File "D:\BIG-YOLOV5\YOLO\yolov5-4.0\yolov5-4.0\utils\datasets.py", line 276, in __init__
assert cap.isOpened(), 'Failed to open %s' % s AssertionError: Failed to open 0
解决办法:找到设备管理器-照相机-右键开启设备
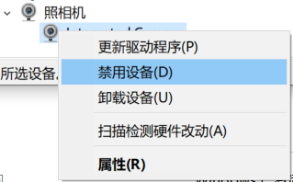
报错2:摄像头报错

解决办法:本人用的是联想拯救者电脑
1电脑-右键属性-设备管理器-照相机-点击开启
2开始-设置-隐私-相机-将设置都打开
3点击任务栏上的电池图标,将摄像头隐私开启。
报错3:在创建虚拟环境后,安装库的时候出现错误
WARNING conda.gateways.disk.delete:unlink_or_rename_to_trash(139): Could not remove or rename D:\anaconda\pkgs\notebook-6.2.0-py38haa244fe_0.tar.bz2. Please remove this file manually (you may need to reboot to free file handles)
原因:在安装库的中途退出了
解决办法:conda clean --all
报错4:
An unexpected error has occurred. Conda has prepared the above report.
If submitted, this report will be used by core maintainers to improve
future releases of conda.
解决办法:conda clean -i
报错5:cv2版本报错4.5.1
cv2.error: OpenCV(4.5.1)C:\Users\appveyor\AppData\Local\Temp\1\pip-req-build-1drr4hl0\opencv\modules\highgui\src\window.cpp:717: error: (-2:Unspecified error) The function is not implemented. Rebuild the library with Windows, GTK+ 2.x or Cocoa support. If you are on Ubuntu or Debian, install libgtk2.0-dev and pkg-config, then re-run cmake or configure script in function 'cvWaitKey'
解决办法:这个错误可真是解决太长时间,一直找不到原因,一直试一直试.....
Cv2的版本不能是4.5,需要指定成4.4或者以下。Python3.8装不上cv2 4.4。所以需要安装python3.7版本,这样才能将cv2的4.4版本安装上去。同时在安装库的时候需要先安装opnecv-python,不能先安装numpy,这样才能安装上cv2的4.4版本。
文章见gzh:机器学习实战python


 1810
1810


 被折叠的 条评论
为什么被折叠?
被折叠的 条评论
为什么被折叠?
 到【灌水乐园】发言


