


数据模板和控件模板的区别在哪?
控件模板是用来修改某个控件内部的布局结构,不涉及到把一些数据(类对象)绑定到控件模板内部
数据模板是用来定义数据怎么显示,数据通常是来自数据集合,把一个数据集合和一个集合控件关联起来,如ListBox,ComboBox,ItemContcrol这种集合形式的控件,数据怎么显示其实也涉及到布局
可以简单理解,只修改控件布局,则使用控件模板,如果想把一个集合控件关联到一个数据集合并自定义显示的方法,则使用数据模板
1.Datatemplate
举个简单的例子,定义一个集合控件ListBox,其中每个数据项是一个TextBlock,TextBlock的Text属性的值 来自一个数据集合List<string>
先定义一个简单的数据模板
Xaml代码:
 <ListBox ItemsSource="{Binding list}">
            <ListBox.ItemTemplate>
                <DataTemplate>
                    <TextBlock Text="{Binding}"/>
                </DataTemplate>
            </ListBox.ItemTemplate>
 </ListBox>
MainWindow代码:
 public partial class MainWindow : Window
    {
       public List<string> list { get; set; } = new List<string>();
        public MainWindow()
        {
            InitializeComponent();

            list.Add("111");
            list.Add("222");
            list.Add("333");
            list.Add("444");
            this.DataContext = this;
        }
    }
运行结果:
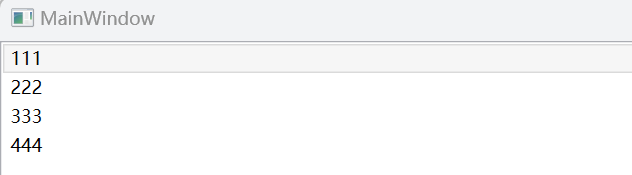
其中的逻辑关系如下:
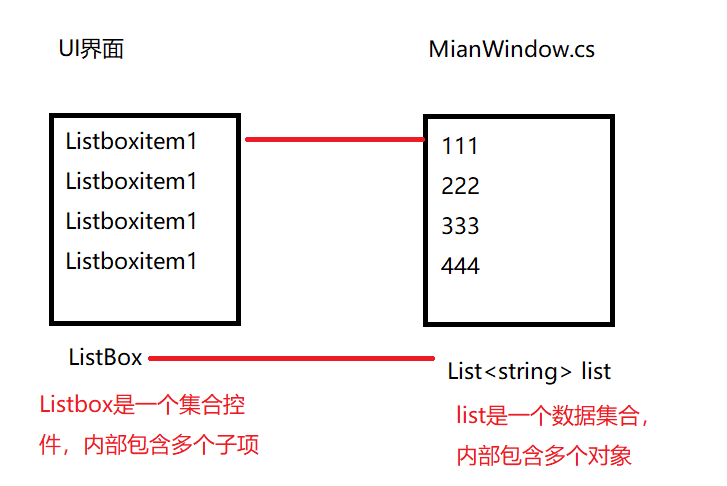
每一个ListBoxitem对应一条数据。listboxitem是动态生成的,数据集合list中有多少条数据,listbox就会生成多少个listboxitem。
(当然如果想要实现添加数据,UI界面自动更新,需要使用带有通知功能的ObservableCollection代替list)
重点是 为什么说数据模板可以定义数据怎么显示?
还是上面的例子,我们定义了一个简单的数据模板
<DataTemplate>
  <TextBlock Text="{Binding}"/>
</DataTemplate>
这时候,每个ListboxItem实际是一个TextBlock,在数据集合list不做任何更改的情况下,我们可以修改数据模板,让数据集合中的数据显示成别的方式,
比如:把listboxitem改成button
数据模板代码:
<ListBox ItemsSource="{Binding list}">
     <ListBox.ItemTemplate>
        <DataTemplate>
           <!--<TextBlock Text="{Binding}"/>-->
               <Button Content="{Binding}"/>
           </DataTemplate>
       </ListBox.ItemTemplate>
</ListBox>
运行结果:
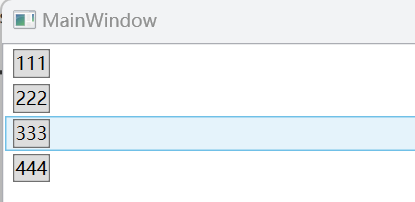
在数据模板中可以做任何布局,从而实现让数据有各种各样的显示形式
再比如:
 <ListBox ItemsSource="{Binding list}">
            <ListBox.ItemTemplate>
                <DataTemplate>
                    <StackPanel Orientation="Horizontal">
                        <TextBlock Text="每一行都是数据模板的数据"/>
                        <Button Content="{Binding}"/>
                        <Button Content="{Binding}"/>
                        <TextBox Text="{ Binding Path=.}"/>
                    </StackPanel>
                </DataTemplate>
            </ListBox.ItemTemplate>
        </ListBox>
结果:
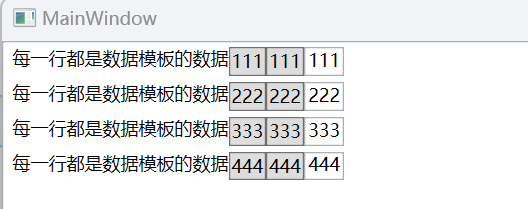
这就是数据模板的作用,可以让数据以任意形式显示。
一个地方需要理解一下:
对于一个集合控件,定义的数据模板是针对每个集合控件的子项来说的。是每个子项的数据模板。或者说,集合控件在生成子项时,根据定义好的数据模板去定义出每个子项。
复杂数据集合的例子
listbox和list<ClassName>数据集合
Book类代码:
public class Book
    {
        public string BookName { get; set; }
        public string Title { get; set; }
    }
数据集合list2代码:
     public List<Book> list2 { get; set; } = new List<Book>();
        public MainWindow()
        {
            InitializeComponent();

            list2.Add(new Book() { BookName ="语文",Title="出师表"});
            list2.Add(new Book() { BookName ="数学",Title="3.14"});
            list2.Add(new Book() { BookName ="英语",Title="Hello"});
     }
xaml代码:
<ListBox ItemsSource="{Binding list2}">
                <ListBox.ItemTemplate>
                    <DataTemplate>
                        <StackPanel Orientation="Horizontal">
                            <Border Background="DarkOliveGreen">
                                <TextBlock Text="{Binding BookName}"/>
                            </Border>
                            <Border Background="Aqua">
                                <TextBlock Text="{Binding Title}"/>
                            </Border>
                        </StackPanel>
                    </DataTemplate>
                </ListBox.ItemTemplate>
            </ListBox>
运行结果:

对应关系:
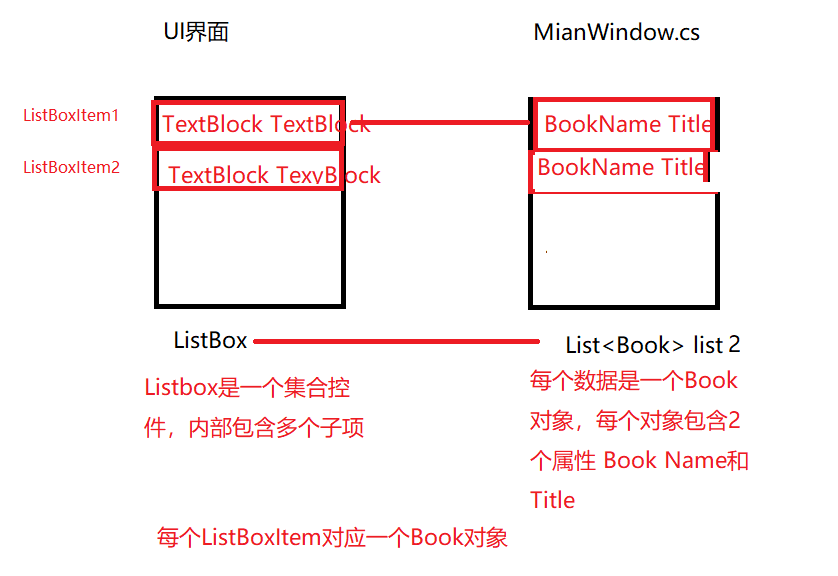
每个ListBoxItem对应一个Book对象,每个Book对象包含2个属性,ListBoxItem中怎么显示Book对象的属性,就是取决于我们如何处理数据模板了。
(对于Book类,如果需要通知功能,则需要继承INotifyPropertyChanged并实现接口)
上面是把DataTemplate定义在控件内部,为了可复用,可抽离出来定义在资源或资源字典中


<Window.Resources>
        <DataTemplate x:Key="MyDataTemplate">
            <StackPanel Orientation="Horizontal">
                <Border Background="DarkOliveGreen">
                    <TextBlock Text="{Binding BookName}"/>
                </Border>
                <Border Background="Aqua">
                    <TextBlock Text="{Binding Title}"/>
                </Border>
            </StackPanel>
        </DataTemplate>
    </Window.Resources>
引用定义好的DataTemplate
<ListBox ItemsSource="{Binding list2}" ItemTemplate="{StaticResource MyDataTemplate}"/>
2.ItemPanelTemplate
继续拿ListBox举例,ListBox集合中的每个ListBoxItem是按照从上往下的排列顺序,如果想要更改内部子项的布局顺序,则需要修改ListBox的ItemPaneltemplate
<ItemsPanelTemplate x:Key="panel">
            <StackPanel Orientation="Horizontal" VerticalAlignment="Bottom" HorizontalAlignment="Center"/>
</ItemsPanelTemplate>
<ListBox ItemsSource="{Binding list2}" ItemTemplate="{StaticResource MyDataTemplate}" ItemsPanel="{StaticResource panel}"/>

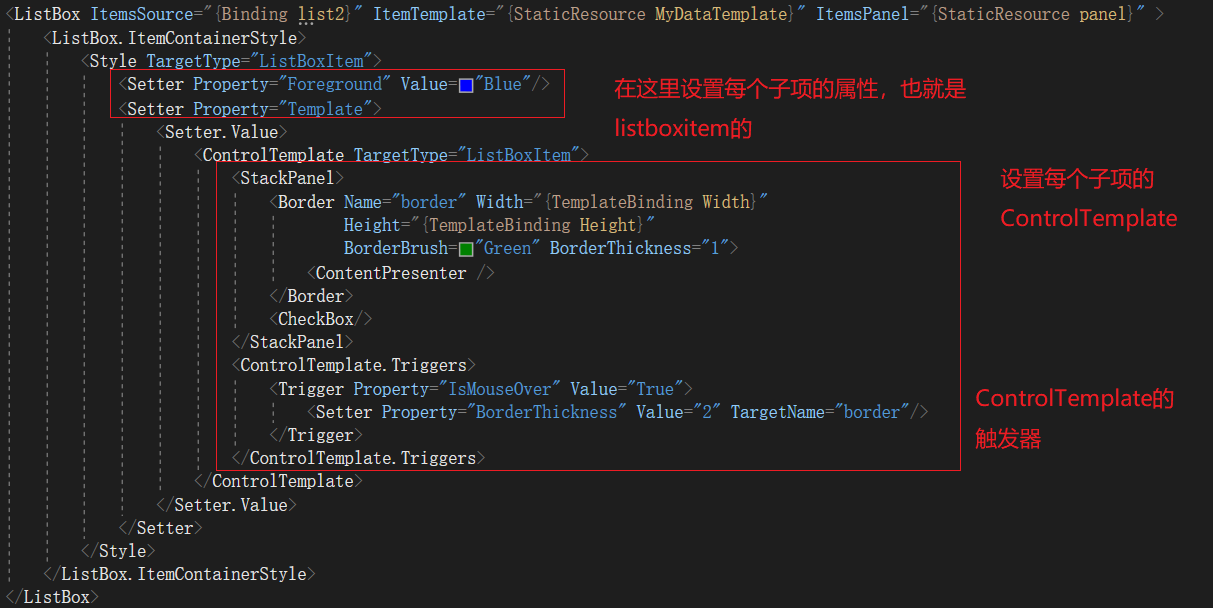
3.ItemContainerStyle
修改每个ListboxItem的style。看一个简单的例子,还是对上面的例子做拓展,每个子项使用一个Border包起来,并在下方添加一个CheckBox
<ListBox ItemsSource="{Binding list2}" ItemTemplate="{StaticResource MyDataTemplate}" ItemsPanel="{StaticResource panel}" >
<ListBox.ItemContainerStyle>
<Style TargetType="ListBoxItem">
<Setter Property="Foreground" Value="Blue"/>
<Setter Property="Template">
<Setter.Value>
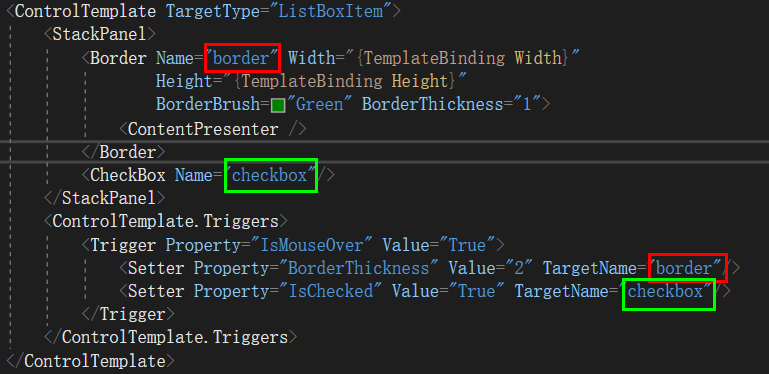
<ControlTemplate TargetType="ListBoxItem">
<StackPanel>
<Border Name="border" Width="{TemplateBinding Width}" Height="{TemplateBinding Height}" BorderBrush="Green" BorderThickness="1">
<ContentPresenter />
</Border>
<CheckBox/>
</StackPanel>
<ControlTemplate.Triggers>
<Trigger Property="IsMouseOver" Value="True">
<Setter Property="BorderThickness" Value="2" TargetName="border"/>
</Trigger>
</ControlTemplate.Triggers>
</ControlTemplate>
</Setter.Value>
</Setter>
</Style>
</ListBox.ItemContainerStyle>
</ListBox>
运行结果:

Triggers:
结果:


 880
880


 被折叠的 条评论
为什么被折叠?
被折叠的 条评论
为什么被折叠?
 到【灌水乐园】发言


