


系列文章目录
前言
面试官总喜欢问:你写过SpringBoot Starter吗?
自己动手写一个SpringBoot,难吗?真的不难,网上随便一搜,各种教程文章一大堆。
那为什么面试官还是喜欢问呢?
其实我们可以换位思考一下,候选人工作好些年了,早已经度过了复制粘贴,到复制改写年龄,应当具备封装能力,甚至定制能力。假设你没有任何亮点,这么多CRUD工程师,我为什么要选你呢?
这里不详细讲SpringBoot Starter的原理,从面试官角度来看,你能回答出SpringBoot启动加载流程、类加载原理、bean对象生成、SpringBoot IoC容器托管Bean等,基本可以过关。但更多面试官会一步一步深挖,直到你回答不出为止。所以光靠临急抱佛脚,死记硬背肯定是不行的。
本文通过项目实战方式,加深一下我们的记忆。假定一个业务场景,项目需要在application.properties/application.yml 中自定义配置变量来获取ip,用来生成不同的日志文件名称。其中random是springboot内置的,myVar是我们拓展的。
my.log.prefix=monitor_${myVar.ip}
my.log.prefix=mopnitor_${myVar.yyyyMMddHHmmss}
my.log.prefix=monitor _${random.int(10)}
一、本文要点
前面的文章《搭建大型分布式服务(十九)面试官:你做过Spring框架功能拓展吗?》 已经介绍如何使用SpringBoot拓展,在yml/properties配置文件自定义变量。本文将这一功能封装成SpringBoot的starter,演示SpringBoot的starter的编写过程。系列文章完整目录
- springboot 拓展
- springboot 自定义配置变量
- springboot application配置文件获取服务IP
- springboot application配置文件获取当前时间 + 格式化
- EnvironmentPostProcessor 外置配置
- logback 读取springboot配置
二、开发环境
- jdk 1.8
- maven 3.6.2
- springboot 2.4.3
- mybatis 1.3.0
- idea 2020
三、创建项目
1、创建一个基础maven工程,打包方式jar。
<?xml version="1.0" encoding="UTF-8"?>
<project xmlns="http://maven.apache.org/POM/4.0.0" xmlns:xsi="http://www.w3.org/2001/XMLSchema-instance"
         xsi:schemaLocation="http://maven.apache.org/POM/4.0.0 https://maven.apache.org/xsd/maven-4.0.0.xsd">
    <modelVersion>4.0.0</modelVersion>
    <parent>
        <groupId>org.springframework.boot</groupId>
        <artifactId>spring-boot-starter-parent</artifactId>
        <version>2.4.3</version>
        <relativePath/> <!-- lookup parent from repository -->
    </parent>
    <groupId>com.mmc.lesson</groupId>
    <artifactId>var-spring-boot-starter</artifactId>
    <version>0.0.1-SNAPSHOT</version>
    <name>var-spring-boot-starter</name>
    <packaging>jar</packaging>
    <description>Demo project for Spring Boot</description>
    <properties>
        <java.version>1.8</java.version>
    </properties>

    <dependencies>
        <dependency>
            <groupId>org.springframework.boot</groupId>
            <artifactId>spring-boot-starter</artifactId>
        </dependency>

        <dependency>
            <groupId>org.springframework.boot</groupId>
            <artifactId>spring-boot-configuration-processor</artifactId>
            <optional>true</optional>
        </dependency>

        <dependency>
            <groupId>org.springframework.boot</groupId>
            <artifactId>spring-boot-autoconfigure</artifactId>
        </dependency>

        <dependency>
            <groupId>org.springframework.boot</groupId>
            <artifactId>spring-boot-starter-test</artifactId>
            <scope>test</scope>
        </dependency>
    </dependencies>

    <build>
        <plugins>
            <plugin>
                <groupId>org.apache.maven.plugins</groupId>
                <artifactId>maven-compiler-plugin</artifactId>
                <configuration>
                    <source>1.8</source>
                    <target>1.8</target>
                </configuration>
            </plugin>
            <plugin>
                <groupId>org.apache.maven.plugins</groupId>
                <artifactId>maven-source-plugin</artifactId>
                <executions>
                    <execution>
                        <id>attach-sources</id>
                        <phase>verify</phase>
                        <goals>
                            <goal>jar-no-fork</goal>
                        </goals>
                    </execution>
                </executions>
            </plugin>
        </plugins>
    </build>

</project>
2、在resources目录下创建META-INF,新建factory文件,编写以下内容,使spring框架能感知到新增的SPI,配置如下。
org.springframework.boot.env.EnvironmentPostProcessor=\
com.mmc.lesson.var.starter.MyValuePropertySourceEnvironmentPostProcessor
3、编写MyValuePropertySourceEnvironmentPostProcessor.java ,实现EnvironmentPostProcessor 、Order 接口,这样可以更高优先级在spring容器refresh前先实现我们自定义的配置的注入。
public class MyValuePropertySourceEnvironmentPostProcessor implements EnvironmentPostProcessor, Ordered {

    private Log logger;

    /**
     * empty.
     */
    public MyValuePropertySourceEnvironmentPostProcessor() {
        logger = LogFactory.getLog(MyValuePropertySourceEnvironmentPostProcessor.class);
    }

    /**
     * init。
     */
    public MyValuePropertySourceEnvironmentPostProcessor(Log logger) {
        this.logger = logger;
    }

    @Override
    public void postProcessEnvironment(ConfigurableEnvironment environment, SpringApplication application) {

        MyValuePropertySource.addToEnvironment(environment, this.logger);
    }

    @Override
    public int getOrder() {
        return Ordered.HIGHEST_PRECEDENCE + 2;
    }
}
4、编写 MyValuePropertySource.java ,定义我们在application.yml / application.properties 的变量前缀 ${myVar} 。
public class MyValuePropertySource extends PropertySource<MyLogValue> {

    /**
     * Name of the random {@link PropertySource}.
     */
    public static final String MY_PROPERTY_SOURCE_NAME = "myVar";

    private static final String PREFIX = "myVar.";

    private static final Log logger = LogFactory.getLog(MyValuePropertySource.class);

    /**
     * MyValuePropertySource.
     */
    public MyValuePropertySource() {
        this(MY_PROPERTY_SOURCE_NAME);
    }

    /**
     * MyValuePropertySource.
     */
    public MyValuePropertySource(String name) {
        super(name, new MyLogValue());
    }

    /**
     * 增加自定义表达式到环境上下文.
     */
    public static void addToEnvironment(ConfigurableEnvironment environment, Log logger) {

        MutablePropertySources sources = environment.getPropertySources();
        PropertySource<?> existing = sources.get(MY_PROPERTY_SOURCE_NAME);
        if (existing != null) {
            logger.trace("RandomValuePropertySource already present");
            return;
        }
        MyValuePropertySource randomSource = new MyValuePropertySource(MY_PROPERTY_SOURCE_NAME);
        if (sources.get(StandardEnvironment.SYSTEM_ENVIRONMENT_PROPERTY_SOURCE_NAME) != null) {
            sources.addAfter(StandardEnvironment.SYSTEM_ENVIRONMENT_PROPERTY_SOURCE_NAME, randomSource);
        } else {
            sources.addLast(randomSource);
        }
        logger.trace("MyValuePropertySource add to Environment");
    }

    @Override
    public Object getProperty(String name) {
        if (!name.startsWith(PREFIX)) {
            return null;
        }
        logger.trace(LogMessage.format("Generating property for '%s'", name));
        return getValue(name.substring(PREFIX.length()));
    }

    /**
     * 目前仅支持ip.
     */
    private Object getValue(String type) {

        if (type.equalsIgnoreCase("ip")) {

            return getSource().getIp();
        }
        return null;
    }
}
5、编写MyLogValue.java ,实现 ${myVar.ip} 的取值逻辑。
@Data
public class MyLogValue {

    /**
     * 获取本机Ip.
     */
    public String getIp() {

        return IpUtil.getLocalIP();
    }
}
class IpUtil {

    /**
     * 获取本机IP,只返回一个.
     */
    static String getLocalIP() {
        String sIP = "";
        InetAddress ip = null;
        try {
            // 如果是Windows操作系统
            if (isWindowsOS()) {
                ip = InetAddress.getLocalHost();
                // 如果是Linux操作系统
            } else {
                boolean bFindIP = false;
                Enumeration<NetworkInterface> netInterfaces = NetworkInterface.getNetworkInterfaces();
                while (netInterfaces.hasMoreElements()) {
                    if (bFindIP) {
                        break;
                    }
                    NetworkInterface ni = netInterfaces.nextElement();
                    if (ni.isLoopback() || ni.isVirtual() || !ni.isUp()) {
                        continue;
                    }
                    // ----------特定情况,可以考虑用ni.getName判断
                    // 遍历所有ip
                    Enumeration<InetAddress> ips = ni.getInetAddresses();
                    while (ips.hasMoreElements()) {
                        ip = ips.nextElement();
                        if (ip.isSiteLocalAddress() && !ip.isLoopbackAddress() // 127.开头的都是lookback地址
                                && !ip.getHostAddress().contains(":")) {
                            bFindIP = true;
                            break;
                        }
                    }

                }
            }
        } catch (Exception e) {
            e.printStackTrace();
        }

        if (null != ip) {
            sIP = ip.getHostAddress();
        }

        return sIP;
    }

    /**
     * 判断是否为Windows系统.
     */
    private static boolean isWindowsOS() {
        boolean isWindowsOS = false;
        String osName = System.getProperty("os.name");
        if (osName.toLowerCase().contains("windows")) {
            isWindowsOS = true;
        }
        return isWindowsOS;
    }
}
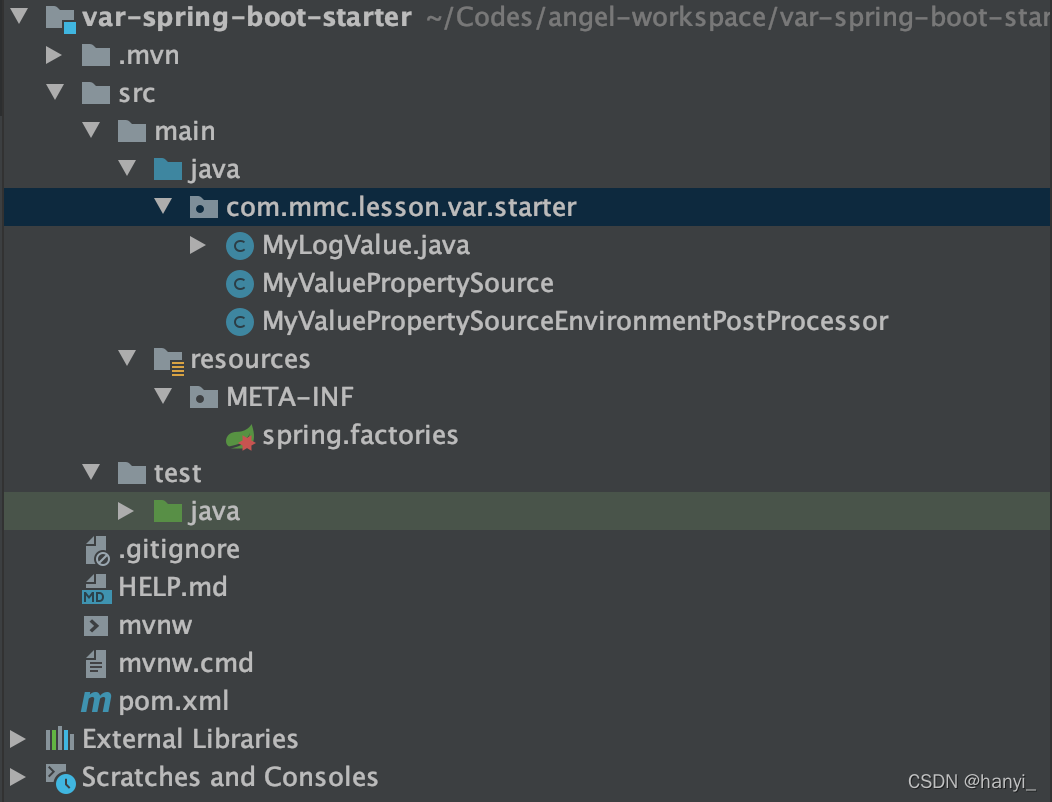
6、整体工程目录。
四、测试一下
1、修改 logback-spring.xml 配置。
    <springProperty scope="context" name="log.path" source="logging.file.path"/>
    <springProperty scope="context" name="monitor.file.prefix" source="my.log.prefix"/>

 <appender name="MONITOR_FILE" class="ch.qos.logback.core.rolling.RollingFileAppender">
        <!-- 正在记录的日志文件的路径及文件名 -->
        <file>${log.path}/${monitor.file.prefix}.log</file>
        <!--日志文件输出格式-->
        <encoder>
            <pattern>[%d{yyyy-MM-dd HH:mm:ss.SSS}] [%thread] [%level] [%logger{50}:%L] - %msg%n
            </pattern>
            <charset>UTF-8</charset>
        </encoder>
        <!-- 日志记录器的滚动策略,按日期,按大小记录 -->
        <rollingPolicy class="ch.qos.logback.core.rolling.TimeBasedRollingPolicy">
            <!-- 每天日志归档路径以及格式 -->
            <fileNamePattern>${log.path}/monitor/monitor-%d{yyyy-MM-dd}.%i.zip</fileNamePattern>
            <timeBasedFileNamingAndTriggeringPolicy
                    class="ch.qos.logback.core.rolling.SizeAndTimeBasedFNATP">
                <maxFileSize>500MB</maxFileSize>
            </timeBasedFileNamingAndTriggeringPolicy>
            <!--日志文件保留天数-->
            <maxHistory>7</maxHistory>
            <totalSizeCap>7GB</totalSizeCap>
            <cleanHistoryOnStart>true</cleanHistoryOnStart>
        </rollingPolicy>
    </appender>
2、重点来了,修改application.properties,增加我们自定义的变量myVar.ip。
# 日志路径
logging.file.path=./logs
# 日志名称前缀
my.log.prefix=monitor_${myVar.ip}
3、编写测试用例。
@SpringBootTest
class EnvDemoApplicationTests {

    @Value("${my.log.prefix}")
    private String prefix;

    @Test
    void contextLoads() {

        System.out.println("-----------------------------");
        System.out.println(prefix);
    }

}
4、这样就可以发布到仓库了。
# 打包
mvn clean install -Dmaven.test.skip=true
# 发布
mvn deploy -Dmaven.test.skip=true
五、小结
至此,我们就成功编写一个SpringBoot的Starter啦,本文作为下一个系列开篇起着非常重要的作用。下一篇《搭建大型分布式服务(三十一)基于JOLT实现业务型轻量级ETL工具》
加我加群一起交流学习!更多干货下载、项目源码和大厂内推等着你
 |  |


 522
522


 被折叠的 条评论
为什么被折叠?
被折叠的 条评论
为什么被折叠?
 到【灌水乐园】发言


