


为什么写这篇博客,其实是为了下篇博客服务的,原本写了篇ViewPager的,结果中间碰到clipChildren的问题,还因为ScaleType折腾了好久,所以我是被逼的!!!不过之前也确实没有搞清楚,没认真研究过ScaleType,每次写代码,习惯性的就将imageview的ScaleType设为CENTER_CROP,为什么呢?因为方便啊,CENTER_CROP可以直接填满整个View,而且是宽和高都是同比例放大。终于,这次继续将ImageView敲成CENTER_CROP,我栽了,尝到了恶果。
首先说下clipChildren,这是继承自ViewGroup的属性,我们先看官方文档:
Defines whether a child is limited to draw inside of its bounds or not. This is useful with animations that scale the size of the children to more than 100% for instance. In such a case, this property should be set to false to allow the children to draw outside of their bounds. The default value of this property is true.Must be a boolean value, either "true" or "false".
大致翻译一下:就是说这个属性决定了是否将子view限制它的界限之内绘制。例如想实现将子View扩大到超过100%的动画,这时候就比较有用。这时候,就需要将这个属性设置为false才可以让子View在界限之外进行绘制。而默认情况下,子View是被裁剪到它的界限内进行绘制的,默认值为true。
那这个属性大多用在什么地方呢,可以实现什么效果呢?其实,我们想要实现底部居中tab图标放大,或者下一篇博客使用ViewPager实现Galley的效果,都需要用到clipChildren这个属性。光说不练假把式,我们先看代码:
<RelativeLayout xmlns:android="http://schemas.android.com/apk/res/android"
    android:orientation="vertical" android:layout_width="match_parent"
    android:layout_height="match_parent"
    android:clipChildren="false">
    <LinearLayout
        android:layout_width="match_parent"
        android:layout_height="40dp"
        android:orientation="horizontal"
        android:layout_alignParentBottom="true"
        android:gravity="bottom">
        <ImageView
            android:layout_width="0dp"
            android:layout_height="match_parent"
            android:layout_weight="1"
            android:src="@mipmap/ic_launcher"
            android:background="#000000"/>
        <ImageView
            android:layout_width="0dp"
            android:layout_height="60dp"
            android:layout_weight="1"
            android:src="@mipmap/ic_launcher"
            android:background="#ff0000"/>
        <ImageView
            android:layout_width="0dp"
            android:layout_height="match_parent"
            android:layout_weight="1"
            android:src="@mipmap/ic_launcher"
            android:background="#000000"/>
    </LinearLayout>
</RelativeLayout>
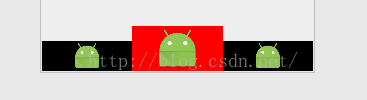
这个就是上面代码的运行效果。为了让我们中间的Tab突出出来,我特意将左右背景设为黑色,中间设为红色,真是效果很独特(丑)啊。我想通过以上的这个例子,大家也应该明白clipChildren的用处了吧,接下来我们就借着这个属性,去看看各种ScaleType到底是什么情况。
ScaleType包括八个枚举值,分别是CENTER,CENTER_CROP,CENTER_INSIDE,FIT_START,FIT_CENTER,FIT_END,FIT_XY,MATRIX。也没什么看代码的机会了,一次看个够吧:
<RelativeLayout xmlns:android="http://schemas.android.com/apk/res/android"
    android:orientation="vertical" android:layout_width="match_parent"
    android:layout_height="match_parent"
    android:clipChildren="false">
    <ImageView
        android:id="@+id/clip_children_img"
        android:layout_width="100dp"
        android:layout_height="100dp"
        android:layout_centerInParent="true"/>
</RelativeLayout>
ImageView img=(ImageView)findViewById(R.id.clip_children_img);
img.setImageResource(R.drawable.img1);
img.setScaleType(ImageView.ScaleType.CENTER);
img.setScaleType(ImageView.ScaleType.CENTER_INSIDE);
img.setScaleType(ImageView.ScaleType.CENTER_CROP);
img.setScaleType(ImageView.ScaleType.FIT_XY);
img.setScaleType(ImageView.ScaleType.FIT_START);
img.setScaleType(ImageView.ScaleType.FIT_END);
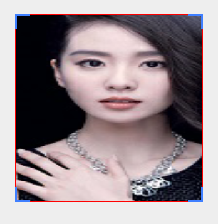
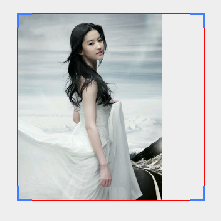
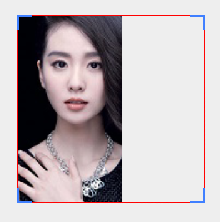
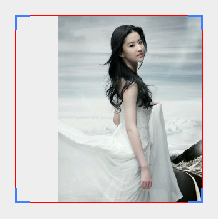
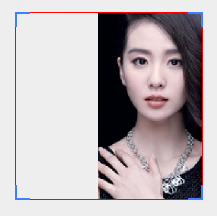
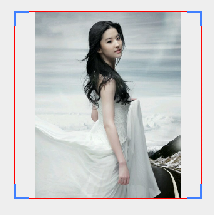
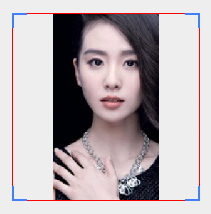
img.setScaleType(ImageView.ScaleType.FIT_CENTER);这里,我将clipChildren也设置为false了,这样我们就可以看清平常被我们截掉的图片。接下来我们一个个介绍,对于每种ScaleType,我们都用一大一小两张图片,依次看下效果。靠,我岂不是要截十六张图。接下来所有的图都是真机测试,然后在AndroidStudio进行截图的。而且为了让我们看的更加清晰,我还打开了开发者选项的布局边界。红色的框框就代表我们ImageView的边界,100dp*100dp。
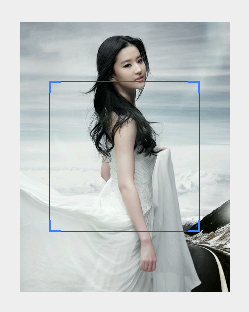
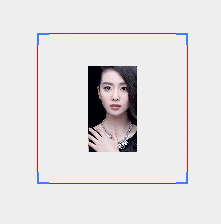
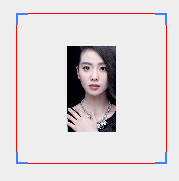
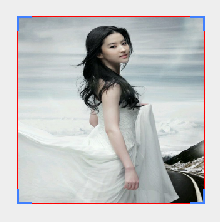
CENTER_INSIDE:Scale the image uniformly (maintain the image's aspect ratio) so that both dimensions (width and height) of the image will be equal to or less than the corresponding dimension of the view (minus padding). The image is then centered in the view. 保持图片的宽高比例,将图片同步调节,使得图片的尺寸(宽和高)能够等于或者小于相应的View的尺寸(减去padding之后)。之后图片将被置于view中央。
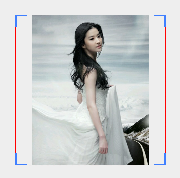
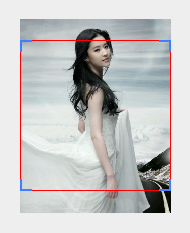
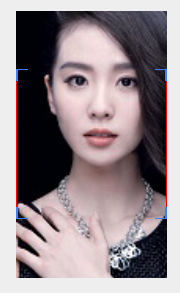
CENTER_CROP:Scale the image uniformly (maintain the image's aspect ratio) so that both dimensions (width and height) of the image will be equal to or larger than the corresponding dimension of the view (minus padding). The image is then centered in the view. 保持图片的宽高比例,将图片同步缩放,使得图片的宽高两种尺寸都能够等于或者大于相应的View的尺寸(减去padding之后)。之后图片将被放置在View中央。
FIT_XY:Scale the image using FILL.
FILL:Scale in X and Y independently, so that src matches dst exactly. This may change the aspect ratio of the src.将X和Y,也就是宽和高独立开来进行调节缩放操作,使得图片的尺寸能够完全匹配View的尺寸。这有可能会改变图片的宽高比例。
FIT_START:Scale the image using START.
START:Compute a scale that will maintain the original src aspect ratio, but will also ensure that src fits entirely inside dst. At least one axis (X or Y) will fit exactly. START aligns the result to the left and top edges of dst.计算出一个保持图片宽高比例的缩放比例,但是也要确保图片完全包括在View之内。最少其中一项,宽或高能够完全匹配。最后,将图片置于view的左上角。
FIT_END:Scale the image using END.
END:Compute a scale that will maintain the original src aspect ratio, but will also ensure that src fits entirely inside dst. At least one axis (X or Y) will fit exactly. END aligns the result to the right and bottom edges of dst.计算出一个保持图片宽高比的缩放比例,但是也要确保图片能够完全包括在View之内。最少其中一项,宽或者高能够完全匹配。最后,将图片置于View的右下角。
FIT_CENTER:Scale the image using CENTER.
CENTER:Compute a scale that will maintain the original src aspect ratio, but will also ensure that src fits entirely inside dst. At least one axis (X or Y) will fit exactly. The result is centered inside dst.计算出一个能够保持图片宽高比的缩放比例,但是也要确保图片能够完全包括在View之内。最少其中一项,宽或者高能够完全匹配。最后,将图片置于View的中央。
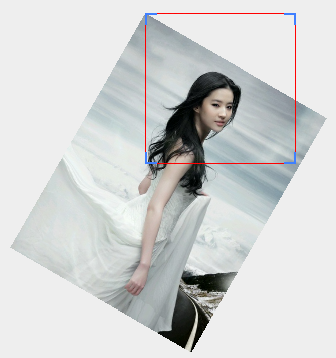
剩下最后一个ScaleType就是Matrix,就说下简单应用吧。
ImageView img=(ImageView)findViewById(R.id.clip_children_img);
img.setScaleType(ImageView.ScaleType.MATRIX);
img.setImageResource(R.drawable.img1);
Matrix matrix=new Matrix();
matrix.setRotate(30);
img.setImageMatrix(matrix);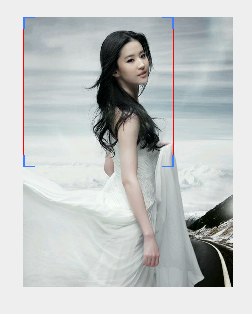
好了,终于写完了,这篇博客写的真的累啊,图书馆那个破网,我传一张图片就卡个半天,之后崩掉,我赶紧保存草稿。然后不断的重复,关键这篇博客还这么多图片,跪求点击,跪求回复啊,觉得有点用的,就给我留个言吧。


 939
939


 被折叠的 条评论
为什么被折叠?
被折叠的 条评论
为什么被折叠?
 到【灌水乐园】发言


