


一.引言
本篇文章是简单实现页面跳转的一个ArkTs的应用,较于基础,由于我也在学,希望也可以帮助到大家。
二.构建页面
由于我在之前发过了如何构建hello world工程,这里我就不再演示,本次构建页面是在hello world工程的基础上进行编写。
*第一个页面
工程同步完成后,在“Project”窗口,点击“entry > src > main > ets > pages”,打开“Index.ets”文件,进行页面的编写。针对本文中使用文本/按钮来实现页面跳转/返回的应用场景,页面均使用Row和Column组件来组建布局。对于更多复杂元素对齐的场景,可选择使用RelativeContainer组件进行布局。
// Index.ets
@Entry
@Component
struct Index {
  @State message: string = 'Hello World'

  build() {
    Row() {
      Column() {
        Text(this.message)
          .fontSize(50)
          .fontWeight(FontWeight.Bold)
          .alignRules({
          center: { anchor: '__container__', align: VerticalAlign.Center },
          middle: { anchor: '__container__', align: HorizontalAlign.Center }
        })
      }
      .width('100%')
    }
    .height('100%')
  }
}上部分是基于DevEco Studio NEXT Developer Beta1版本生成的hello world代码,要想实现页面跳转我们先进行第一个页面的编写。
添加按钮
在默认页面基础上,我们添加一个Button组件,作为按钮响应用户点击,从而实现跳转到另一个页面。如下:
@Entry
@Component
struct Index {
  @State message: string = 'Hello World';
  @State Next: string='Next';

  build() {
   Row(){
     Column(){
      Text(this.message)
        .id('HelloWorld')
        .fontSize(50)
        .fontWeight(FontWeight.Bold)
        .alignRules({
          center: { anchor: '__container__', align: VerticalAlign.Center },
          middle: { anchor: '__container__', align: HorizontalAlign.Center }
        })
      Button(){                                //添加按钮实现点击
        Text(this.Next)
          .fontSize(30)
          .fontWeight(FontWeight.Bold)
      }
      .type(ButtonType.Capsule)
      .margin({
        top: 20
      })
      .backgroundColor('#0D9FFB')
      .width('40%')
      .height('%5')
    }
     .width('100%')
   }
   .height('100%')
  }
}
button
1.Button(options: ButtonOptions),创建可以包含单个子组件的按钮,其中里面的参数options类型为BurronOptions配置按钮的显示样式。
2.Button(label: ResourceStr, options?: ButtonOptions),使用文本内容创建相应的按钮组件,此时Button无法包含子组件。参数label类型为ResourceStr,用来接受按钮文本内容,参数options类型为ButtonOptions与第一种相同,是配置按钮的显示样式,但与第一种不同的是这里并不是必填的内容,可以认为button()里面必须要有一个参数内容才可以。
ButtonOptions
1.type,ButtonType类型,描述按钮显示样式。
2.stateEffect,boolean类型,按钮按下时是否开启按压态显示效果,当设置为false时,按压效果关闭。
3.buttonStyle11+,ButtonStyleMode类型,描述按钮的样式和重要程度。默认值:ButtonStyleMode.EMPHASIZED。
4.controlSize11+,ControlSize 类型,描述按钮的尺寸。默认值:ControlSize.NORMAL。
5.role12+,ButtonRole类型,描述按钮的角色。默认值:ButtonRole.NORMAL
type
type(value: ButtonType),ButtonType,Button样式。默认值:ButtonType.Capsule。
Capsule,胶囊型按钮(圆角默认为高度的一半)。
Circle,圆形按钮。
Normal,普通按钮(默认不带圆角)。
fontSize
fontSize(value: Length),设置文本显示字号。Length,文本显示字号。
默认值:若controlSize的值为:controlSize.NORMAL,取'16fp',若controlSize的值为:controlSize.SMALL,取'12fp'。
fontWeight
fontWeight(value: number | FontWeight | string),设置文本的字体粗细,类型可为FontWeight | number | string,文本的字体粗细,number类型取值[100, 900],取值间隔为100,取值越大,字体越粗。默认值:400。
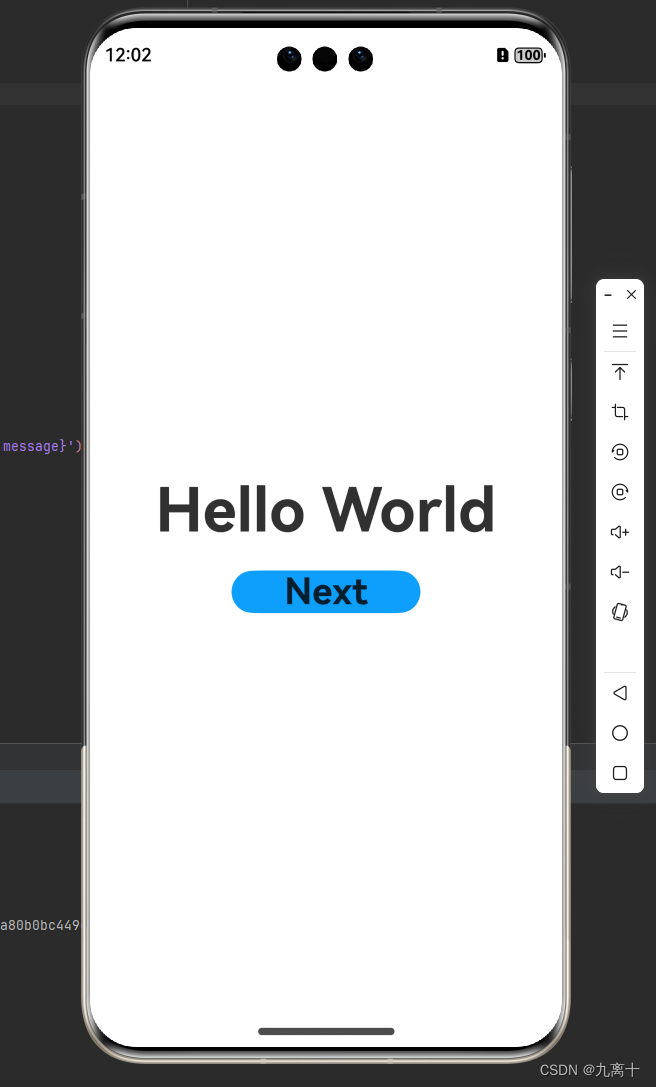
这里第一个页面是这样的:
构建第二个页面
同样的思路:
@Entry
@Component
struct second{
@State message:string='Hi here'
build() {
Row() {
Column() {
Text(this.message)
.fontSize(50)
.fontWeight(FontWeight.Bold)
Button() {
Text('Back')
.fontSize(25)
.fontWeight(FontWeight.Bold)
}
.type(ButtonType.Capsule)
.margin({
top: 20
})
.backgroundColor('#0D9FFB')
.width('40%')
.height('5%')
}
.width('100%')
}
.height('100%')
}
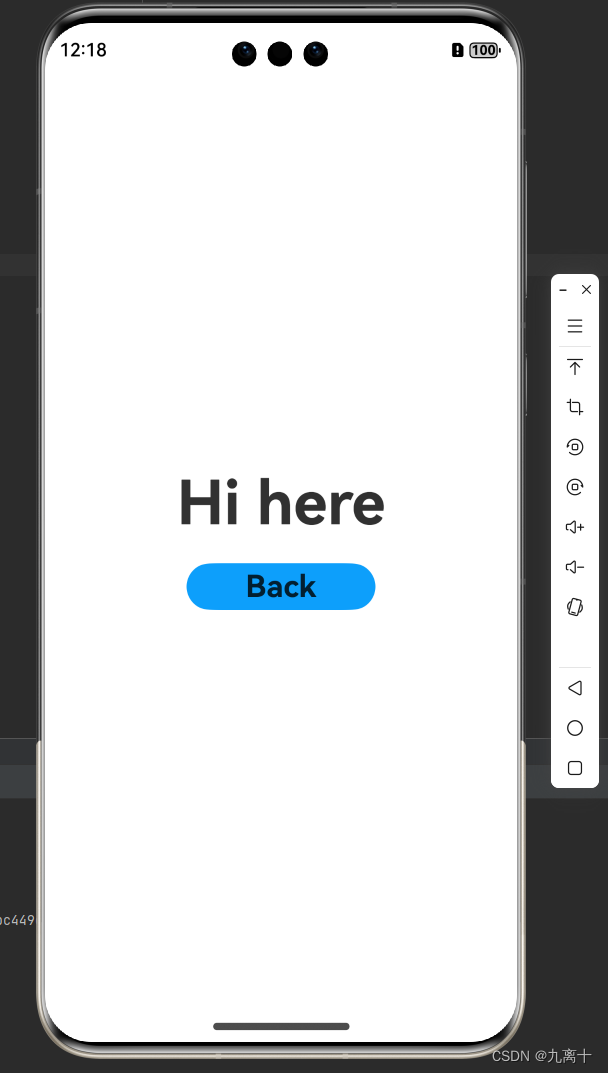
}第二个页面是这样的:
三.实现页面间的跳转
页面间的导航可以通过页面路由router来实现。页面路由router根据页面url找到目标页面,从而实现跳转。使用页面路由请导入router模块。如果需要实现更好的转场动效,推荐使用Navigation。
在第一个页面中,跳转按钮绑定onClick事件,点击按钮时跳转到第二页。
import { router } from '@kit.ArkUI';
import { BusinessError } from '@kit.BasicServicesKit';
在第一个页面开头加上页面路由模块。
router.pushUrl9+
1.pushUrl(options: RouterOptions跳转页面描述信息): Promise<void>,跳转到应用内的指定页面。返回值为Promise<void>,异常返回结果。
2.pushUrl(options: RouterOptions, callback: AsyncCallback<void>): void,跳转到应用内的指定页面。options:RouterOptions跳转页面描述信息。callback:AsyncCallback<void>,异常响应回调。
3.pushUrl(options: RouterOptions, mode: RouterMode): Promise<void>,跳转到应用内的指定页面。options:RouterOptions跳转页面描述信息。mode:RouterMode跳转页面使用的模式。
还有很多,这里不一一列举了,大家可以现查现用,记住主要的就可以。
在第一个页面中,跳转按钮绑定onClick事件,点击按钮时跳转到第二页。“Index.ets”文件的示例如下:
import {router} from '@kit.ArkUI';
import {BusinessError} from '@kit.BasicServicesKit';


@Entry
@Component
struct Index {
  @State message: string = 'Hello World';
  @State Next: string='Next';

  build() {
   Row(){
     Column(){
      Text(this.message)
        .id('HelloWorld')
        .fontSize(50)
        .fontWeight(FontWeight.Bold)
        .alignRules({
          center: { anchor: '__container__', align: VerticalAlign.Center },
          middle: { anchor: '__container__', align: HorizontalAlign.Center }
        })
      Button(){
        Text(this.Next)
          .fontSize(30)
          .fontWeight(FontWeight.Bold)
      }
      .type(ButtonType.Capsule)
      .margin({
        top: 20
      })
      .backgroundColor('#0D9FFB')
      .width('40%')
      .height('%5')
       .onClick(()=>{
         console.info('Succeeded in clicking the ‘next’ button.')
         router.pushUrl({url: 'pages/second'}).then(()=> {
           console.info('Succeed in jumping to the second page.')
         }).catch((err:BusinessError)=>{
           console.error('Failed to jump to the second page.Code is ${err.code},message is ${err.message}')
         })
       })
    }
     .width('100%')
   }
   .height('100%')
  }
}
第二个页面返回到第一个页面。
在第二个页面中,返回按钮绑定onClick事件,点击按钮时返回到第一页。如下:
import {router} from '@kit.ArkUI'
import {BusinessError} from '@kit.BasicServicesKit'

//second.ets
@Entry
@Component
struct second{
  @State message:string='Hi here'


build() {
  Row() {
    Column() {
      Text(this.message)
        .fontSize(50)
        .fontWeight(FontWeight.Bold)
      Button() {
        Text('Back')
          .fontSize(25)
          .fontWeight(FontWeight.Bold)
      }
      .type(ButtonType.Capsule)
      .margin({
        top: 20
      })
      .backgroundColor('#0D9FFB')
      .width('40%')
      .height('5%')
      .onClick(()=>{
        console.info(`Succeeded in clicking the 'Back' button.`)
        try {
          router.back()
          console.info('Succeeded in returning to the first page.')
        }catch (err){
          let code = (err as BusinessError).code;
          let message = (err as BusinessError).message;
          console.error(`Failed to return to the first page. Code is ${code}, message is ${message}`)
        }
      })
    }
    .width('100%')
  }
  .height('100%')
}
} 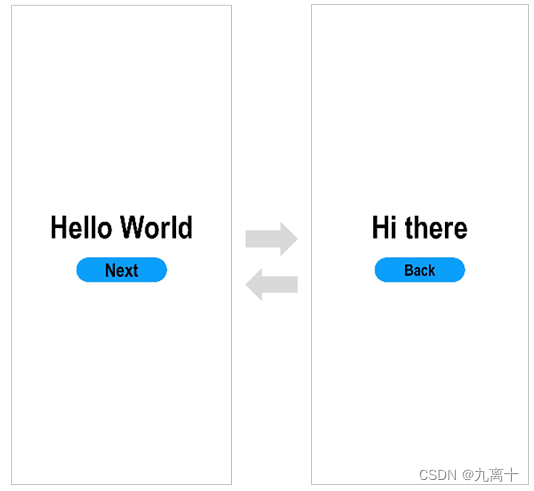
这样就可以实现页面转换了。


 被折叠的 条评论
为什么被折叠?
被折叠的 条评论
为什么被折叠?
 到【灌水乐园】发言


