


 本文详细指导如何在Ubuntu 18.04上安装必要的依赖(如GCC 7.3.0、Go 1.14.4),更新软件源,配置网络,安装Go语言环境,编译Free5GC及其组件,包括Upf,以及解决常见问题。涉及的操作包括代码克隆、环境配置、升级、go模块管理等。
1、代码获取
sudo apt-get install git
git clone --recursive -b v3.0.4 https://github.com/free5gc/free5gc.git
2、ubuntu环境搭建
2.1、开发环境要求
- OS: Ubuntu 18.04
- gcc 7.3.0
- Go 1.14.4 linux/amd64
- kernel version 5.0.0-23-generic (MUST for UPF)
2.2、更新apt 源
sudo apt-get update
sudo apt-get upgrade使用阿里云的开源镜像 https://opsx.alibaba.com/mirror
执行命令 sudo mv /etc/apt/sources.list /etc/apt/sources.list_backup 将 sources.list 文件备份。
执行 sudo vim /etc/apt/sources.list 编辑 sources.list 文件,将文件内容清空,并粘贴如下内容,保存退出
deb http://mirrors.aliyun.com/ubuntu/ bionic main restricted universe multiverse
deb-src http://mirrors.aliyun.com/ubuntu/ bionic main restricted universe multiverse
deb http://mirrors.aliyun.com/ubuntu/ bionic-security main restricted universe multiverse
deb-src http://mirrors.aliyun.com/ubuntu/ bionic-security main restricted universe multiverse
deb http://mirrors.aliyun.com/ubuntu/ bionic-updates main restricted universe multiverse
deb-src http://mirrors.aliyun.com/ubuntu/ bionic-updates main restricted universe multiverse
deb http://mirrors.aliyun.com/ubuntu/ bionic-proposed main restricted universe multiverse
deb-src http://mirrors.aliyun.com/ubuntu/ bionic-proposed main restricted universe multiverse
deb http://mirrors.aliyun.com/ubuntu/ bionic-backports main restricted universe multiverse
deb-src http://mirrors.aliyun.com/ubuntu/ bionic-backports main restricted universe multiverse
执行 sudo apt-get update 更新apt软件源
执行 sudo apt-get dist-upgrade 升级全部软件
2.3、安装gcc
apt install gcc
2.4 网络配置
安装ifconfig
sudo apt install net-tools
2.5、go语言开发环境
2.5.1、安装go
下载go1.14.4.linux-amd64板的go语言安装包,下载地址https://golang.google.cn/dl/
go1.14.4.linux-amd64.tar.gz
安装go
tar -C /usr/local -xzf go1.14.4.linux-amd64.tar.gz
2.5.2、建立go工作空间
mkdir -p ~/go/{bin,pkg,src}
echo 'export GOPATH=$HOME/go' >> ~/.bashrc
echo 'export GOROOT=/usr/local/go' >> ~/.bashrc
echo 'export PATH=$PATH:$GOPATH/bin:$GOROOT/bin' >> ~/.bashrc
source ~/.bashrc
2.5.3 查看是否安装成功
输入:go version
输出:go version go1.14.4 linux/amd64
2.5.4、go基础依赖包
下载基础依赖包https://github.com/marshhu/golang-package
解压放到$GOPATH/src目录下,运行以下命令:
go install github.com/mdempsky/gocode
go install github.com/uudashr/gopkgs/cmd/gopkgs
go install github.com/ramya-rao-a/go-outline
go install github.com/acroca/go-symbols
go install github.com/fatih/gomodifytags
go install github.com/josharian/impl
go install github.com/davidrjenni/reftools/cmd/fillstruct
go install github.com/haya14busa/goplay/cmd/goplay
go install github.com/godoctor/godoctor
go install github.com/go-delve/delve/cmd/dlv
go install github.com/stamblerre/gocode
go install github.com/rogpeppe/godef
go install github.com/sqs/goreturns
go install golang.org/x/tools/cmd/guru
go install golang.org/x/tools/cmd/gorename
go install golang.org/x/lint/golint
2.5.4、安装各个模块的依赖包
# 启用 Go Modules 功能
go env -w GO111MODULE=on
# 配置代理
go env -w GOPROXY=https://goproxy.io,direct
cd free5gc/
go mod download
3、free5gc代码编译
3.1、编译free5gc go语言部分
按照自带指导文件Free5gc/ README.md 进行go语言部分编译。
3.2、编译upf
按照自带指导文件Free5gc/ src/upf/readme.md 进行upf部分编译。
编译失败或者编译完之后遇到执行失败,可以重启一下虚拟机试试。
3.3、free5gc相关笔记
各个模块路径:free5gc/bin
各个模块可单独启动
启动全部模块:
cd free5gc
./run.sh
webui启动
cd free5gc/webconsole/
go run server.go 打开速度比较满,耐心等待
web登陆
Web:http://localhost:5000
Username:admin
Password:free5gc
4、虚拟机搭建常用操作
3.1、ubuntu和win10之间复制粘贴
sudo apt-get autoremove open-vm-tools
sudo apt-get install open-vm-tools-desktop
reboot
3.2、ubuntu 添加root用户
第一步:以普通用户登录系统,创建root用户的密码
在终端输入命令:sudo passwd root
然后输入你要设置的密码,这样就完成了设置root用户密码的步骤
第二步:修改文件/usr/share/lightdm/lightdm.conf.d/50-unity-greeter.conf文件,增加两行:
greeter-show-manual-login=true
all-guest=false
保存
第三步:进入/etc/pam.d目录,修改gdm-autologin和gdm-password文件
vi gdm-autologin
注释掉auth required pam_succeed_if.so user != root quiet_success这一行,保存
vi gdm-password
注释掉 auth required pam_succeed_if.so user != root quiet_success这一行,保存
第四步:修改/root/.profile文件
vi /root/.profile
将文件末尾的mesg n || true这一行修改成tty -s&&mesg n || true, 保存
第五步:重启系统,输入root用户名和密码,登录系统。
3.3、修改内核版本
应该使用高版本也可以
upf模块必需使用5.0.0-23-generic版本的内核,否则编译不过。
查看当前已经安装的内核镜像:dpkg --get-selections |grep linux-image
查询指定版本的linux镜像包:apt-cache search linux| grep 5.0.0-23
安装镜像:apt-get install linux-headers-5.0.0-23-generic linux-image-5.0.0-23-generic
查看内核启动顺序:grep menuentry /boot/grub/grub.cfg
修改内核启动顺序:gedit /etc/default/grub
将GRUB_DEFAULT=0 修改为 GRUB_DEFAULT="Advanced options for Ubuntu>Ubuntu, with Linux 5.0.0-23-generic"
grub配置生效:update-grub
重启ununtu:reboot
重启后检查内核版本:uname -r 显示
我没有修改成功。
3.4、vscode跳转和自动补全
1)安装go插件

2)首选项->设置 搜索docs tool
选择 gogetdoc,并在弹窗中安装gogetdoc
3)搜索use language server打勾
首选项->设置 搜索use language server

4)重启vscode
3.5、Vscode空格太小
在设置搜索框里输入font找到 Editor:Font Family在控制字体系列更改为:‘monospace’3.6、显示tab和空格
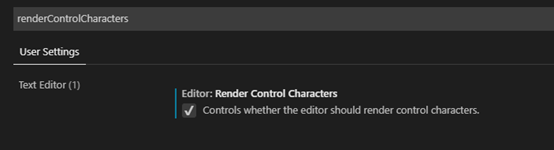
打开setting,在搜索框中输入renderControlCharacters,选中勾选框,即可显示tab.
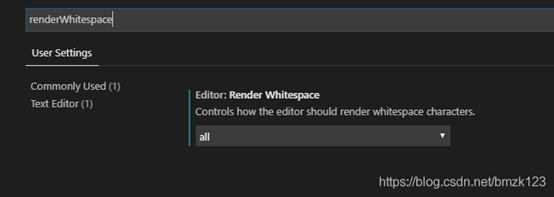
在搜索框中输入renderWhitespace,选择all,即可显示空格.


 3607
3607

 被折叠的 条评论
为什么被折叠?
被折叠的 条评论
为什么被折叠?
 到【灌水乐园】发言


