


一、项目搭建
1.搜索vue-admin-template,对于vue-admin-template是一个基于vue-cli脚手架搭建的后台管理框架,现在需要克隆源码;

2.在本地新建文件夹,命名。然后打开集成终端,克隆源码,使用 git clone https://github.com/PanJiaChen/vue-admin-template.git 命令;
3.下载依赖,使用cnpm install 命令;

4.运行项目,使用npm run dev命令;
5.对于目录结构不清楚的,可以参考:vue-element-admin文档

二、真实对接后台的流程
1.修改侧边栏logo

2.修改开发环境的基础路径,此时默认路径是这个项目本身给我们提供的,我们需要修改成自己的基础路径;


3.路径修改合适,修改接口路径,所有向后台的请求都维护在api文件夹中;


4.此时登录会报该用户不存在,是因为此时这个项目的用户名与你自己mysql的用户名不对银,选择src/views/login/index.vue,修改用户名和密码;

4.此时登录时,会弹出“Please enter the correct user name”的提示信息,这是系统对用户名进行的一个校验,此时,我们只需要去掉校验规则,就可以拿到请求和响应了;


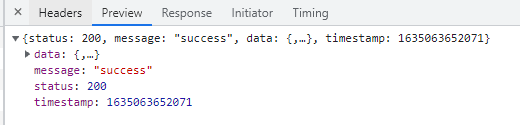
5.但是此时登录时,还是会报错误,此时我们去找src/utils/request.js,它里面封装了后台发送请求的数据;

   修改if (res.code !== 20000 )为if (res.status !== 200),但此时会报一个用户
未登录的提示,此时需要做一个登录用户,用户认证,此时继续回到request页面,对config.h
eaders['X-Token'] = getToken()里面的X-Token做一个替换,换成自己的“ Authorization”
6.登录成功后,发现头像和用户名不显示,这时,就需要去根据自己的后台去对接修改成相应的,才会显示,去status/modules/user.js下找到并修改就可以获取用户名和头像了;

三、路由配置
首先在src/router文件夹试进行路由的配置的;
 #一级路由
 {
    path: '/column',
    component: Layout,
    children: [
      {
        path: 'index',
        name: 'Column',
        component: () => import('@/pages/column/index'),
     //pages/column/index 这里是在src下新建一个pages页面用来存放我们建的所有页面;
     //column就是针对于栏目管理文件;
        meta: { title: '栏目管理', icon: '栏目' }
      }
    ]
  },
#二级路由
 {
    path: '/manager',
    component: Layout,
    // 重定向
    redirect: '/manager/custom',
    name: 'Manager',
    meta: { title: '账单管理', icon: '账单' },
    children: [
      {
        path: 'custom',
        name: 'Custom',
        component: () => import('@/pages/manager/custom/index.vue'),
        meta: { title: '顾客管理'}
      },
      {
        path: 'employee',
        name: 'Employee',
        component: () => import('@/pages/manager/employee/index.vue'),
        meta: { title: '员工管理'}
      },
      {
        path: 'system',
        name: 'System',
        component: () => import('@/pages/manager/system/index.vue'),
        meta: { title: '系统管理'}
      }
    ]
  },
这就二级路由的实现效果图: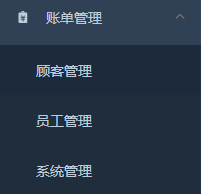
四、图标修改
使用后缀名为“.svg”的就可以对图标进行修改,推荐图标库。
五、封装
封装的目的:减少代码量,让代码具有可读性;
- 在request.js下进行封装:
	#1. 封装get方法
	export function get(url,{params:data}){
	  return service.get(url,data)
	}
	#2. 封装postJSON方法
	export function postJSON(url,data){
	  return service.post(url,data)
	}
	#3. 封装post方法 封装表单格式的数据
	export function post(url,data){
	  return service.post(url,qs.stringify(data))
	}
这里用到了qs,就需要引入qs这个第三方库,使用命令“cnpm install -Service qs”;
2. 引入
	import {get,post,postJSON} from '@/utils/request';
	export function login(data) {
	  // return request({
	  //   // url: '/vue-admin-template/user/login',
	  //   url: '/user/login',
	  //   method: 'post',
	  //   data
	  // })
	  // 重新封装,对于登录时默认调用postJSON格式的,所以
	  return postJSON('/user/login',data);
	}

	export function getInfo(token) {
	  // return request({
	  //   // url: '/vue-admin-template/user/info',
	  //   url: '/user/info',
	  //   method: 'get',
	  //   params: { token }
	  // })
	  // 使用get方法
	  return get('/user/info',{token});
	}

	export function logout() {
	  // 使用post方法,退出接口
	  return post('/user/logout');
	}
六、栏目管理
栏目管理页面
<template>
  <div>
    <!-- 按钮开始 -->
    <div>
      <el-button @click="toAdd" type="success" size="mini">添加</el-button>
    </div>
    <!-- 按钮结束 -->
    <!-- 表格开始 -->
    <div>
      <!-- {{tableData}}  使用这个可以查看到向后台请求的数据展示在页面上 -->
      <el-table :data="tableData" style="width: 100%">
        <el-table-column type="index" :index=1 label="序号" width="100"></el-table-column>
        <el-table-column prop="id" label="栏目编号" width="230"></el-table-column>
        <el-table-column prop="name" label="名称" width="230"> </el-table-column>
        <el-table-column prop="icon" label="图标" width="230">
          <!-- 使用作用域插槽,让图标显示出来 -->
          <template slot-scope="scope">
              <div>
                <!-- placement悬浮出现位置,slot的属性reference表示触发popover显示的HTML元素-->
                <el-popover placement="right" trigger="hover">
                  <el-image slot='reference' style="width: 50px; height: 50px" :src="scope.row.icon"></el-image>
                  <el-image style="width: 200px; height: 200px" :src="scope.row.icon"></el-image>
                </el-popover>
              </div>
          </template>
        </el-table-column>
        <el-table-column prop="num" label="排序号" width="230"> </el-table-column>
        <el-table-column label="操作" width="100">
          <template slot-scope="scope" >
            <el-button @click="toEdit(scope.row)" type="text" size="small">编辑</el-button>
            <el-button type="text" size="small" @click="toDelete(scope.row.id)">删除</el-button>
          </template>
        </el-table-column>
      </el-table>
    </div>
    <!-- 表格结束 -->
    <!-- 分页开始 -->
    <div class="page">
      <el-pagination
         @size-change="handleSizeChange"
         @current-change="handleCurrentChange"
         :current-page="params.page"
         :page-sizes="[5,10,15,20]"
         :page-size="params.pageSize"
         layout="total, sizes, prev, pager, next, jumper"
         :total="total">
      </el-pagination>
      <!-- 对于分页下面的英文怎么修改:main.js找到Vue.use(ElementUI, { locale }) 删除 { locale }-->
    </div>
    <!-- 分页结束 -->
    <!-- 模态框开始 -->
    <el-dialog :title="title" :visible.sync="visible">
      <el-form :model="form" :rules="rules" ref="myForm">
        <el-form-item label="栏目名称" :label-width="formLabelWidth" prop="name">
          <el-input v-model="form.name" autocomplete="off"></el-input>
        </el-form-item>
        <el-form-item label="序号" :label-width="formLabelWidth">
          <el-input v-model="form.num" autocomplete="off"></el-input>
        </el-form-item>
        <!-- 设置与上面对齐 -->
        <el-form-item label="图标" :label-width="formLabelWidth" prop="icon">
          <!-- 模态款里的上传下载图片栏,对于样式设置在里styles/index.css文件中 -->
          <el-upload class="avatar-uploader"
            :action="uploadFileURL"
            :show-file-list="false"
            :on-success="handleAvatarSuccess"
            :before-upload="beforeAvatarUpload">
            <img v-if="imageUrl" :src="form.icon" class="avatar">
            <i v-else class="el-icon-plus avatar-uploader-icon"></i>
          </el-upload>
        </el-form-item>
      </el-form>
      <div slot="footer" class="dialog-footer">
        <el-button @click="visible = false">取 消</el-button>
        <el-button type="primary" @click="toSubmit('myForm')">确 定</el-button>
      </div>
    </el-dialog>
    <!-- 模态框结束 -->
  </div>
</template>
<script>
import { showFileURL,uploadFileURL} from "@/utils/config"
import {pageQuery,saveOrUpdate,deleteById} from '@/api/column'
// import {get} from '@/api/column'
export default {
  data() {
    return {
        // 校验表单
        rules: {
          name: [
            { required: true, message: '请输入栏目名称', trigger: 'blur' },
          ],
          icon: [
            { required: true, message: '请上传栏目图标', trigger: 'blur' },
          ],
        },
        imageUrl:'',
        // 图片显示的基础路径
        showFileURL,
        // 文件上传的文件
        uploadFileURL,
        // 表格绑定的数据
        tableData:[],
        // 双向数据绑定表单
        form:{},
        // 控制表单控件宽度
        formLabelWidth:'80px',
        // 控制模态框的显示和隐藏
        visible:false,
        // 模态框title变量
        title: '',
        total:0,
        params:{
          page:1,
          pageSize:5
        }
    };
  },
  watch:{
    params:{
      handler(){
        this.queryPage();
      },
      deep:true
    }
  },
  created(){
      this.queryPage();
  },
  methods: {
    // 给删除按钮绑定事件
    toDelete(id){
      this.$confirm('此操作将永久删除该数据, 是否继续?', '提示', {
          confirmButtonText: '确定',
          cancelButtonText: '取消',
          type: 'warning'
        }).then(async () => {
          // async 要写在离他最近的地方
          // 确定删除  发送删除请求
          let res=await deleteById({id:id});
          // 删除后自动刷新
          this.queryPage();
          this.$message({
            type: 'success',
            message: '删除成功!'
          });
        }).catch(() => {
          // 点击取消 提示用户取消删除
          this.$message({
            type: 'info',
            message: '已取消删除'
          });
        });
    },
    // 给确定按钮绑定事件  执行保存(新增--空)或者更新(修改--id)操作
    // formName ===myForm
     toSubmit(formName) {
      this.$refs[formName].validate(async valid => {
        if (valid) {
          // 校验通过
          let res = await saveOrUpdate(this.form);
          this.visible = false;
          console.log(res);
          this.$message({
            message: res.message,
            type: "success"
          });
          // 刷新页面
          this.queryPage();
        } else {
          this.$message.error('保存失败');
          return false;
        }
      });
    },
    // 给编辑按钮绑定事件
    toEdit(row){
      this.visible=true;
      this.title='修改栏目信息';
      this.form={...row};
      this.imageUrl=this.form.icon;
    },
    // 给添加按钮绑定事件
    toAdd(){
      // 显示模态框
      this.visible=true;
      this.title='添加栏目信息';
      this.form={};
      this.imageUrl="";
    },
    // 分页数据查询
    async queryPage(){
      let temp={
        ...this.params,
        // 这解构了 page 和pageSize
      }
      // 之前的方法--》弊端:一个页面多次使用时,使用一次写一次,比较麻烦,所以使用了封装
      // get('/productCategory/pageQuery',temp).then(res =>{
      //   console.log(res);
      // })
      // es6做法 等请求拿到后再去响应
      let res=await pageQuery(temp);
      console.log(res);
      this.tableData=res.data.list;
      // 后台有多少数据就展示多少条
      this.total=res.data.total;
    },
    //处理每页显示的条数
    handleSizeChange(pageSize) {
      // console.log(`每页 ${val} 条`);
      this.params.pageSize=pageSize;
      // this.queryPage();
    },
    // 处理当前页
    handleCurrentChange(page) {
      // console.log(`当前页: ${val}`);
      this.params.page=page;
      // this.queryPage();
    },
    // 上传图片
    handleAvatarSuccess(res, file) {
      this.imageUrl = URL.createObjectURL(file.raw);
      console.log(res);
      // 展示图片 图片基础路径+图片
      this.form.icon=showFileURL+res.data.id;
    },
    beforeAvatarUpload(file) {
      const isJPG = file.type === 'image/jpeg';
      const isLt2M = file.size / 1024 / 1024 < 2;

      if (!isJPG) {
        this.$message.error('上传头像图片只能是 JPG 格式!');
      }
      if (!isLt2M) {
        this.$message.error('上传头像图片大小不能超过 2MB!');
      }
      return isJPG && isLt2M;
    }
  },
};
</script>
<style lang="sass">

</style>
栏目管理js 存放在src/api/column.js
// 封装后的代码具有可读性
import { get,post } from '@/utils/request';

// 封装根据id删除栏目请求
export function deleteById(data){
    return get('/productCategory/deleteById',data)
}

// 封装分页查询请求
export function pageQuery(data){
    return get('/productCategory/pageQuery',data)
}

// 封装一个保存或者更新请求
export function saveOrUpdate(data){
    return post('/productCategory/saveOrUpdate',data)
}


 2023
2023


 被折叠的 条评论
为什么被折叠?
被折叠的 条评论
为什么被折叠?
 到【灌水乐园】发言


