FFmpeg源代码简单分析 日志输出系统(av log 等)

分享一下我老师大神的人工智能教程!零基础,通俗易懂!http://blog.csdn.net/jiangjunshow

也欢迎大家转载本篇文章。分享知识,造福人民,实现我们中华民族伟大复兴!


=====================================================

FFmpeg的库函数源代码分析文章列表:

【架构图】

FFmpeg源代码结构图 - 解码

FFmpeg源代码结构图 - 编码

【通用】

FFmpeg 源代码简单分析:av_register_all()

FFmpeg 源代码简单分析:avcodec_register_all()

FFmpeg 源代码简单分析:内存的分配和释放(av_malloc()、av_free()等)

FFmpeg 源代码简单分析:常见结构体的初始化和销毁(AVFormatContext,AVFrame等)

FFmpeg 源代码简单分析:avio_open2()

FFmpeg 源代码简单分析:av_find_decoder()和av_find_encoder()

FFmpeg 源代码简单分析:avcodec_open2()

FFmpeg 源代码简单分析:avcodec_close()

【解码】

图解FFMPEG打开媒体的函数avformat_open_input

FFmpeg 源代码简单分析:avformat_open_input()

FFmpeg 源代码简单分析:avformat_find_stream_info()

FFmpeg 源代码简单分析:av_read_frame()

FFmpeg 源代码简单分析:avcodec_decode_video2()

FFmpeg 源代码简单分析:avformat_close_input()

【编码】

FFmpeg 源代码简单分析:avformat_alloc_output_context2()

FFmpeg 源代码简单分析:avformat_write_header()

FFmpeg 源代码简单分析:avcodec_encode_video()

FFmpeg 源代码简单分析:av_write_frame()

FFmpeg 源代码简单分析:av_write_trailer()

【其它】

FFmpeg源代码简单分析:日志输出系统(av_log()等)

FFmpeg源代码简单分析:结构体成员管理系统-AVClass

FFmpeg源代码简单分析:结构体成员管理系统-AVOption

FFmpeg源代码简单分析:libswscale的sws_getContext()

FFmpeg源代码简单分析:libswscale的sws_scale()

FFmpeg源代码简单分析:libavdevice的avdevice_register_all()

FFmpeg源代码简单分析:libavdevice的gdigrab

【脚本】

FFmpeg源代码简单分析:makefile

FFmpeg源代码简单分析:configure

【H.264】

FFmpeg的H.264解码器源代码简单分析:概述

=====================================================


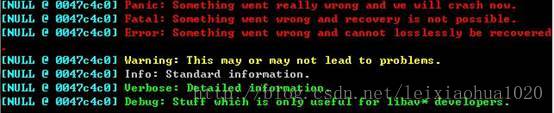
本文分析一下FFmpeg的日志(Log)输出系统的源代码。日志输出部分的核心函数只有一个:av_log()。使用av_log()在控制台输出日志的效果如下图所示。


函数调用结构图

FFmpeg日志输出系统的函数调用结构图如图所示。


av_log()

av_log()是FFmpeg中输出日志的函数。随便打开一个FFmpeg的源代码文件,就会发现其中遍布着av_log()函数。一般情况下FFmpeg类库的源代码中是不允许使用printf()这种的函数的,所有的输出一律使用av_log()。
av_log()的声明位于libavutil\log.h,如下所示。
/** * Send the specified message to the log if the level is less than or equal * to the current av_log_level. By default, all logging messages are sent to * stderr. This behavior can be altered by setting a different logging callback * function. * @see av_log_set_callback * * @param avcl A pointer to an arbitrary struct of which the first field is a *        pointer to an AVClass struct. * @param level The importance level of the message expressed using a @ref *        lavu_log_constants "Logging Constant". * @param fmt The format string (printf-compatible) that specifies how *        subsequent arguments are converted to output. */void av_log(void *avcl, int level, const char *fmt, ...) av_printf_format(3, 4);

这个函数的声明有两个地方比较特殊:

(1)函数最后一个参数是“…”。
在C语言中,在函数参数数量不确定的情况下使用“…”来代表参数。例如printf()的原型定义如下
int printf (const char*, ...);

后文中对此再作详细分析。

(2)它的声明后面有一个av_printf_format(3, 4)。有关这个地方的左右还没有深入研究,网上资料中说它的作用是按照printf()的格式检查av_log()的格式。
av_log()每个字段的含义如下:
avcl:指定一个包含AVClass的结构体。
level:log的级别
fmt:和printf()一样。
由此可见,av_log()和printf()的不同主要在于前面多了两个参数。其中第一个参数指定该log所属的结构体,例如AVFormatContext、AVCodecContext等等。第二个参数指定log的级别,源代码中定义了如下几个级别。
/** * Print no output. */#define AV_LOG_QUIET    -8/** * Something went really wrong and we will crash now. */#define AV_LOG_PANIC     0/** * Something went wrong and recovery is not possible. * For example, no header was found for a format which depends * on headers or an illegal combination of parameters is used. */#define AV_LOG_FATAL     8/** * Something went wrong and cannot losslessly be recovered. * However, not all future data is affected. */#define AV_LOG_ERROR    16/** * Something somehow does not look correct. This may or may not * lead to problems. An example would be the use of '-vstrict -2'. */#define AV_LOG_WARNING  24/** * Standard information. */#define AV_LOG_INFO     32/** * Detailed information. */#define AV_LOG_VERBOSE  40/** * Stuff which is only useful for libav* developers. */#define AV_LOG_DEBUG    48

从定义中可以看出来,随着严重程度逐渐下降,一共包含如下级别:AV_LOG_PANIC,AV_LOG_FATAL,AV_LOG_ERROR,AV_LOG_WARNING,AV_LOG_INFO,AV_LOG_VERBOSE,AV_LOG_DEBUG。每个级别定义的数值代表了严重程度,数值越小代表越严重。默认的级别是AV_LOG_INFO。此外,还有一个级别不输出任何信息,即AV_LOG_QUIET。

当前系统存在着一个“Log级别”。所有严重程度高于该级别的Log信息都会输出出来。例如当前的Log级别是AV_LOG_WARNING,则会输出AV_LOG_PANIC,AV_LOG_FATAL,AV_LOG_ERROR,AV_LOG_WARNING级别的信息,而不会输出AV_LOG_INFO级别的信息。可以通过av_log_get_level()获得当前Log的级别,通过另一个函数av_log_set_level()设置当前的Log级别。


av_log_get_level(), av_log_set_level()

av_log_get_level()的定义如下所示

/** * Get the current log level * * @see lavu_log_constants * * @return Current log level */int av_log_get_level(void);

可以通过av_log_set_level()设置当前Log的级别。

/** * Set the log level * * @see lavu_log_constants * * @param level Logging level */void av_log_set_level(int level);
上述两个函数的定义十分的简单,如下所示。
int av_log_get_level(void){    return av_log_level;}
void av_log_set_level(int level){    av_log_level = level;}
从代码中可以看出,以上两个函数主要操作了一个静态全局变量av_log_level。该变量用于存储当前系统Log的级别。它的定义如下所示。
static int av_log_level = AV_LOG_INFO;
下面我们看一下H.264编码的时候libx264的Log输出的示例:
 
下面回到av_log()函数的源代码。它的源代码位于libavutil\log.c,如下所示。
void av_log(void* avcl, int level, const char *fmt, ...){    AVClass* avc = avcl ? *(AVClass **) avcl : NULL;    va_list vl;    va_start(vl, fmt);    if (avc && avc->version >= (50 << 16 | 15 << 8 | 2) &&        avc->log_level_offset_offset && level >= AV_LOG_FATAL)        level += *(int *) (((uint8_t *) avcl) + avc->log_level_offset_offset);    av_vlog(avcl, level, fmt, vl);    va_end(vl);}
首先来提一下C语言函数中“…”参数的含义。与它相关还涉及到以下4个部分:
(1)va_list变量
(2)va_start()
(3)va_arg()
(4)va_end()
va_list是一个指向函数的参数的指针。va_start()用于初始化va_list变量。va_arg()用于返回可变参数。va_start()用于结束可变参数的获取。有关它们的用法可以参考一个小demo,如下所示。
#include <stdio.h>#include<stdarg.h>void fun(int a,...){ va_list pp; va_start(pp,a); do{  printf("param =%d\n",a);  a=va_arg(pp,int);//使 pp 指向下一个参数,将下一个参数的值赋给变量 a } while (a!=0);//直到参数为 0 时停止循环}void main(){ fun(20,40,60,80,0);}

有关这方面的知识很难用简短的语言描述清楚,因此不再详述。av_log()的源代码中,在va_start()和va_end()之间,调用了另一个函数av_vlog()。


av_vlog()

av_vlog()是一个FFmpeg的API函数。它的声明位于libavutil\log.h中,如下所示。
/** * Send the specified message to the log if the level is less than or equal * to the current av_log_level. By default, all logging messages are sent to * stderr. This behavior can be altered by setting a different logging callback * function. * @see av_log_set_callback * * @param avcl A pointer to an arbitrary struct of which the first field is a *        pointer to an AVClass struct. * @param level The importance level of the message expressed using a @ref *        lavu_log_constants "Logging Constant". * @param fmt The format string (printf-compatible) that specifies how *        subsequent arguments are converted to output. * @param vl The arguments referenced by the format string. */void av_vlog(void *avcl, int level, const char *fmt, va_list vl);


从声明中可以看出,av_vlog()和av_log()的参数基本上是一模一样的。唯一的不同在于av_log()中的“…”变成了av_vlog()中的va_list。

av_vlog()的定义位于libavutil\log.c中,如下所示。
void av_vlog(void* avcl, int level, const char *fmt, va_list vl){    void (*log_callback)(void*, int, const char*, va_list) = av_log_callback;    if (log_callback)        log_callback(avcl, level, fmt, vl);}
从定义中可以看出,av_vlog()简单调用了一个函数指针av_log_callback。av_log_callback是一个全局静态变量,定义如下所示。
static void (*av_log_callback)(void*, int, const char*, va_list) =av_log_default_callback;
从代码中可以看出,av_log_callback指针默认指向一个函数av_log_default_callback()。av_log_default_callback()即FFmpeg默认的Log函数。需要注意的是,这个Log函数是可以自定义的。按照指定的参数定义一个自定义的函数后,可以通过FFmpeg的另一个API函数av_log_set_callback()设定为Log函数。
av_log_set_callback()的声明如下所示。
/** * Set the logging callback * * @note The callback must be thread safe, even if the application does not use *       threads itself as some codecs are multithreaded. * * @see av_log_default_callback * * @param callback A logging function with a compatible signature. */void av_log_set_callback(void (*callback)(void*, int, const char*, va_list));
从声明中可以看出,需要指定一个参数为(void*, int, const char*, va_list),返回值为void的函数作为Log函数。
av_log_set_callback()的定义很简单,做了一个函数指针赋值的工作,如下所示。
void av_log_set_callback(void (*callback)(void*, int, const char*, va_list)){    av_log_callback = callback;}
例如,我们可以指定一个my_logoutput()函数作为Log的输出函数,就可以将Log信息输出到文本中(而不是屏幕上)。
void my_logoutput(void* ptr, int level, const char* fmt,va_list vl){ FILE *fp = fopen("my_log.txt","a+");    if(fp){     vfprintf(fp,fmt,vl);  fflush(fp);  fclose(fp); }   }
编辑好函数之后,使用av_log_set_callback()函数设置该函数为Log输出函数即可。
av_log_set_callback(my_logoutput);

av_log_default_callback()

下面我们看一下FFmpeg的默认Log输出函数av_log_default_callback()。它的定义如下。
void av_log_default_callback(void* ptr, int level, const char* fmt, va_list vl){    static int print_prefix = 1;    static int count;    static char prev[LINE_SZ];    AVBPrint part[4];    char line[LINE_SZ];    static int is_atty;    int type[2];    unsigned tint = 0;    if (level >= 0) {        tint = level & 0xff00;        level &= 0xff;    }    if (level > av_log_level)        return;#if HAVE_PTHREADS    pthread_mutex_lock(&mutex);#endif    format_line(ptr, level, fmt, vl, part, &print_prefix, type);    snprintf(line, sizeof(line), "%s%s%s%s", part[0].str, part[1].str, part[2].str, part[3].str);#if HAVE_ISATTY    if (!is_atty)        is_atty = isatty(2) ? 1 : -1;#endif    if (print_prefix && (flags & AV_LOG_SKIP_REPEATED) && !strcmp(line, prev) &&        *line && line[strlen(line) - 1] != '\r'){        count++;        if (is_atty == 1)            fprintf(stderr, "    Last message repeated %d times\r", count);        goto end;    }    if (count > 0) {        fprintf(stderr, "    Last message repeated %d times\n", count);        count = 0;    }    strcpy(prev, line);    sanitize(part[0].str);    colored_fputs(type[0], 0, part[0].str);    sanitize(part[1].str);    colored_fputs(type[1], 0, part[1].str);    sanitize(part[2].str);    colored_fputs(av_clip(level >> 3, 0, 6), tint >> 8, part[2].str);    sanitize(part[3].str);    colored_fputs(av_clip(level >> 3, 0, 6), tint >> 8, part[3].str);end:    av_bprint_finalize(part+3, NULL);#if HAVE_PTHREADS    pthread_mutex_unlock(&mutex);#endif}

av_log_default_callback()的代码是比较复杂的。其实如果我们仅仅是希望把Log信息输出到屏幕上,远不需要那么多代码,只需要简单打印一下就可以了。av_log_default_callback()之所以会那么复杂,主要是因为他还包含了很多的功能,比如说根据Log级别的不同将输出的文本设置成不同的颜色等等。下图显示了不同级别的Log不同的背景颜色。
下面看一下av_log_default_callback()的源代码大致的流程:
(1)如果输入参数level大于系统当前的日志级别av_log_level,表明不需要做任何处理,直接返回。
(2)调用format_line()设定Log的输出格式。
(3)调用colored_fputs()设定Log的颜色。

format_line(), av_log_format_line()

format_line()用于设定Log的输出格式。它本身并不是一个FFmpeg的API,但是FFmpeg有一个API函数av_log_format_line()调用了这个函数。av_log_format_line()的声明如下所示。
/** * Format a line of log the same way as the default callback. * @param line          buffer to receive the formated line * @param line_size     size of the buffer * @param print_prefix  used to store whether the prefix must be printed; *                      must point to a persistent integer initially set to 1 */void av_log_format_line(void *ptr, int level, const char *fmt, va_list vl,                        char *line, int line_size, int *print_prefix);

av_log_format_line()的定义如下所示。
void av_log_format_line(void *ptr, int level, const char *fmt, va_list vl,                        char *line, int line_size, int *print_prefix){    AVBPrint part[4];    format_line(ptr, level, fmt, vl, part, print_prefix, NULL);    snprintf(line, line_size, "%s%s%s%s", part[0].str, part[1].str, part[2].str, part[3].str);    av_bprint_finalize(part+3, NULL);}

从代码中可以看出,首先声明了一个AVBPrint类型的数组,其中包含了4个元素;接着调用format_line()设定格式;最后将设置格式后的AVBPrint数组中的4个元素连接起来。
在这里遇到了一个结构体AVBPrint,它的定义位于libavutil\bprint.h,如下所示。
/** * Buffer to print data progressively * * The string buffer grows as necessary and is always 0-terminated. * The content of the string is never accessed, and thus is * encoding-agnostic and can even hold binary data. * * Small buffers are kept in the structure itself, and thus require no * memory allocation at all (unless the contents of the buffer is needed * after the structure goes out of scope). This is almost as lightweight as * declaring a local "char buf[512]". * * The length of the string can go beyond the allocated size: the buffer is * then truncated, but the functions still keep account of the actual total * length. * * In other words, buf->len can be greater than buf->size and records the * total length of what would have been to the buffer if there had been * enough memory. * * Append operations do not need to be tested for failure: if a memory * allocation fails, data stop being appended to the buffer, but the length * is still updated. This situation can be tested with * av_bprint_is_complete(). * * The size_max field determines several possible behaviours: * * size_max = -1 (= UINT_MAX) or any large value will let the buffer be * reallocated as necessary, with an amortized linear cost. * * size_max = 0 prevents writing anything to the buffer: only the total * length is computed. The write operations can then possibly be repeated in * a buffer with exactly the necessary size * (using size_init = size_max = len + 1). * * size_max = 1 is automatically replaced by the exact size available in the * structure itself, thus ensuring no dynamic memory allocation. The * internal buffer is large enough to hold a reasonable paragraph of text, * such as the current paragraph. */typedef struct AVBPrint {    FF_PAD_STRUCTURE(1024,    char *str;         /**< string so far */    unsigned len;      /**< length so far */    unsigned size;     /**< allocated memory */    unsigned size_max; /**< maximum allocated memory */    char reserved_internal_buffer[1];    )} AVBPrint;

AVBPrint的注释代码很长,不再详细叙述。在这里只要知道他是用于打印字符串的缓存就可以了。它的名称BPrint的意思应该就是“Buffer to Print”。其中的str存储了将要打印的字符串。
format_line()函数的定义如下所示。
static void format_line(void *avcl, int level, const char *fmt, va_list vl,                        AVBPrint part[4], int *print_prefix, int type[2]){    AVClass* avc = avcl ? *(AVClass **) avcl : NULL;    av_bprint_init(part+0, 0, 1);    av_bprint_init(part+1, 0, 1);    av_bprint_init(part+2, 0, 1);    av_bprint_init(part+3, 0, 65536);    if(type) type[0] = type[1] = AV_CLASS_CATEGORY_NA + 16;    if (*print_prefix && avc) {        if (avc->parent_log_context_offset) {            AVClass** parent = *(AVClass ***) (((uint8_t *) avcl) +                                   avc->parent_log_context_offset);            if (parent && *parent) {                av_bprintf(part+0, "[%s @ %p] ",                         (*parent)->item_name(parent), parent);                if(type) type[0] = get_category(parent);            }        }        av_bprintf(part+1, "[%s @ %p] ",                 avc->item_name(avcl), avcl);        if(type) type[1] = get_category(avcl);        if (flags & AV_LOG_PRINT_LEVEL)            av_bprintf(part+2, "[%s] ", get_level_str(level));    }    av_vbprintf(part+3, fmt, vl);    if(*part[0].str || *part[1].str || *part[2].str || *part[3].str) {        char lastc = part[3].len && part[3].len <= part[3].size ? part[3].str[part[3].len - 1] : 0;        *print_prefix = lastc == '\n' || lastc == '\r';    }}

从代码中可以看出,其分别处理了AVBPrint类型数组part的4个元素。由此我们也可以看出FFmpeg一条Log可以分成4个组成部分。在这里涉及到几个与AVBPrint相关的函数,由于篇幅的关系,不再分析它们的源代码,仅仅列出它们的定义:
初始化AVBPrint的函数av_bprint_init()。
/** * Init a print buffer. * * @param buf        buffer to init * @param size_init  initial size (including the final 0) * @param size_max   maximum size; *                   0 means do not write anything, just count the length; *                   1 is replaced by the maximum value for automatic storage; *                   any large value means that the internal buffer will be *                   reallocated as needed up to that limit; -1 is converted to *                   UINT_MAX, the largest limit possible. *                   Check also AV_BPRINT_SIZE_* macros. */void av_bprint_init(AVBPrint *buf, unsigned size_init, unsigned size_max);

向AVBPrint添加一个字符串的函数av_bprintf()。
/** * Append a formatted string to a print buffer. */void av_bprintf(AVBPrint *buf, const char *fmt, ...) av_printf_format(2, 3);

向AVBPrint添加一个字符串的函数av_vbprintf (),注意与av_bprintf()的不同在于其第3个参数不一样。
/** * Append a formatted string to a print buffer. */void av_vbprintf(AVBPrint *buf, const char *fmt, va_list vl_arg);
我们可以瞄一眼av_bprintf()的定义,位于libavutil\bprint.c,如下所示。

void av_bprintf(AVBPrint *buf, const char *fmt, ...){    unsigned room;    char *dst;    va_list vl;    int extra_len;    while (1) {        room = av_bprint_room(buf);        dst = room ? buf->str + buf->len : NULL;        va_start(vl, fmt);        extra_len = vsnprintf(dst, room, fmt, vl);        va_end(vl);        if (extra_len <= 0)            return;        if (extra_len < room)            break;        if (av_bprint_alloc(buf, extra_len))            break;    }    av_bprint_grow(buf, extra_len);}

可以看出av_bprintf()实际上调用了系统的vsnprintf()完成了相应的功能。

看完以上几个与AVBPrint相关函数之后,就可以来看一下format_line()的代码了。例如,part[0]对应的是目标结构体的父结构体的名称(如果父结构体存在的话);其打印格式形如“[%s @ %p]”,其中前面的“%s”对应父结构体的名称,“%p”对应其所在的地址。part[1]对应的是目标结构体的名称;其打印格式形如“[%s @ %p]”,其中前面的“%s”对应本结构体的名称,“%p”对应其所在的地址。part[2]用于输出Log的级别,这个字符串只有在flag中设置AV_LOG_PRINT_LEVEL的时候才能打印。part[3]则是打印原本传送进来的文本。将format_line()函数处理后得到的4个字符串连接其来,就可以的到一条完整的Log信息。下面图显示了flag设置AV_LOG_PRINT_LEVEL后的打印出来的Log的格式。

默认情况下不设置flag打印出来的格式如下所示。
 

colored_fputs()

colored_fputs()函数用于将输出的文本“上色”并且输出。在这里有一点需要注意:Windows和Linux下控制台程序上色的方法是不一样的。Windows下是通过SetConsoleTextAttribute()方法给控制台中的文本上色;Linux下则是通过添加一些ANSI控制码完成上色。

Linux下控制台文字上色的方法

Linux下控制台颜色是通过添加专用数字来选择的。这些数字夹在 "\e["和 "m"之间。如果指定一个以上的数字,则用分号将它们分开。

举几个例子:

(1)第一个数字(31)为前景颜色(红色);第二个数字为(42)背景颜色(绿色)

echo -e "\e[31;42m"
(2)使用"\e[0m"序列将颜色重新设置为正常值
echo -e "\e[0m" 或 echo -e "\033[0m"
(3)颜色对应关系如下所示:
\e[30m -- \e[37m    设置前景色(字体颜色)
echo -e "\e[30m"    灰色
echo -e "\e[31m"    红色    
echo -e "\e[32m"    绿色
echo -e "\e[33m"    黄色
echo -e "\e[34m"    蓝色
echo -e "\e[35m"    紫色
echo -e "\e[36m"    淡蓝色
echo -e "\e[37m"    白色     

\e[40m -- \e[47m    设置背景色
echo -e "\e[40m"    灰色
echo -e "\e[41m"    红色
echo -e "\e[42m"    绿色
echo -e "\e[43m"    黄色
echo -e "\e[44m"    蓝色
echo -e "\e[45m"    紫色
echo -e "\e[46m"    淡蓝色
echo -e "\e[47m"    白色

具体到编程中,printf() 颜色设置示例代码如下所示。
int main(){printf("\e[31m Hello World. \e[0m \n"); // 红色字体return 0;}

Windows下控制台文字上色的方法
Windows下控制台颜色是通过SetConsoleTextAttribute()函数完成的。SetConsoleTextAttribute()函数的原型如下所示。
BOOL SetConsoleTextAttribute(HANDLE hConsoleOutput, WORD wAttributes);
其中2个参数的含义如下所示:
hConsoleOutput:指向控制台的句柄。
wAttributes:文本属性。

hConsoleOutput可以选择以下3种句柄:
STD_INPUT_HANDLE:   标准输入的句柄
STD_OUTPUT_HANDLE:  标准输出的句柄
STD_ERROR_HANDLE:   标准错误的句柄
wAttributes可以控制前景色和背景色:
FOREGROUND_BLUE:   字体颜色:蓝
FOREGROUND_GREEN:  字体颜色:绿
FOREGROUND_RED:   字体颜色:红
FOREGROUND_INTENSITY:  前景色高亮显示
BACKGROUND_BLUE:   背景颜色:蓝
BACKGROUND_GREEN:  背景颜色:绿
BACKGROUND_RED:   背景颜色:红
BACKGROUND_INTENSITY  背景色高亮显示
控制台文本上色demo代码如下所示。
/** * 雷霄骅 Lei Xiaohua * leixiaohua1020@126.com * http://blog.csdn.net/leixiaohua1020 */#include <stdio.h>#include <windows.h>int main(){ SetConsoleTextAttribute(GetStdHandle(STD_OUTPUT_HANDLE), FOREGROUND_RED); printf("red\n"); SetConsoleTextAttribute(GetStdHandle(STD_OUTPUT_HANDLE), FOREGROUND_GREEN); printf("green\n"); SetConsoleTextAttribute(GetStdHandle(STD_OUTPUT_HANDLE), FOREGROUND_BLUE); printf("blue\n"); SetConsoleTextAttribute(GetStdHandle(STD_OUTPUT_HANDLE), FOREGROUND_RED|FOREGROUND_GREEN); printf("red+green=yellow\n"); SetConsoleTextAttribute(GetStdHandle(STD_OUTPUT_HANDLE), FOREGROUND_RED|FOREGROUND_BLUE); printf("red+blue=purple\n"); SetConsoleTextAttribute(GetStdHandle(STD_OUTPUT_HANDLE), FOREGROUND_GREEN|FOREGROUND_BLUE); printf("green+blue=cyan\n"); SetConsoleTextAttribute(GetStdHandle(STD_OUTPUT_HANDLE), FOREGROUND_RED|BACKGROUND_GREEN); printf("Add background\n"); return 0;}

程序的运行结果如下图所示。
 

colored_fputs()源代码

下面看一下colored_fputs()函数的源代码。

static void colored_fputs(int level, int tint, const char *str){    int local_use_color;    if (!*str)        return;    if (use_color < 0)        check_color_terminal();    if (level == AV_LOG_INFO/8) local_use_color = 0;    else                        local_use_color = use_color;#if defined(_WIN32) && !defined(__MINGW32CE__) && HAVE_SETCONSOLETEXTATTRIBUTE    if (local_use_color)        SetConsoleTextAttribute(con, background | color[level]);    fputs(str, stderr);    if (local_use_color)        SetConsoleTextAttribute(con, attr_orig);#else    if (local_use_color == 1) {        fprintf(stderr,                "\033[%d;3%dm%s\033[0m",                (color[level] >> 4) & 15,                color[level] & 15,                str);    } else if (tint && use_color == 256) {        fprintf(stderr,                "\033[48;5;%dm\033[38;5;%dm%s\033[0m",                (color[level] >> 16) & 0xff,                tint,                str);    } else if (local_use_color == 256) {        fprintf(stderr,                "\033[48;5;%dm\033[38;5;%dm%s\033[0m",                (color[level] >> 16) & 0xff,                (color[level] >> 8) & 0xff,                str);    } else        fputs(str, stderr);#endif}

从colored_fputs()的源代码中可以看出如下流程:
首先判定根据宏定义系统的类型,如果系统类型是Windows,那么就调用SetConsoleTextAttribute()方法设定控制台文本的颜色,然后调用fputs()将Log记录输出到stderr(注意不是stdout);如果系统类型是Linux,则通过添加特定字符串的方式设定控制台文本的颜色,然后将Log记录输出到stderr。
至此FFmpeg的日志输出系统的源代码就分析完毕了。


雷霄骅
leixiaohua1020@126.com
http://blog.csdn.net/leixiaohua1020


给我老师的人工智能教程打call!http://blog.csdn.net/jiangjunshow
这里写图片描述
  • 0
    点赞
  • 2
    收藏
    觉得还不错? 一键收藏
  • 0
    评论

“相关推荐”对你有帮助么?

  • 非常没帮助
  • 没帮助
  • 一般
  • 有帮助
  • 非常有帮助
提交
评论
添加红包

请填写红包祝福语或标题

红包个数最小为10个

红包金额最低5元

当前余额3.43前往充值 >
需支付:10.00
成就一亿技术人!
领取后你会自动成为博主和红包主的粉丝 规则
hope_wisdom
发出的红包
实付
使用余额支付
点击重新获取
扫码支付
钱包余额 0

抵扣说明:

1.余额是钱包充值的虚拟货币,按照1:1的比例进行支付金额的抵扣。
2.余额无法直接购买下载,可以购买VIP、付费专栏及课程。

余额充值