


文章目录
简介
LayoutInflater.inflate()的作用类似于findViewById()
不同点是:
LayoutInflater.inflate()用于查找res/layout/下的xml布局文件,并且实例化。findViewById()是找xml布局文件下的具体widget控件(如Button)。
对于一个没有被载入或者想要动态载入的界面,都需要使用LayoutInflater.inflater()来载入.
获取LayoutInflater实例的三种方式:
- 调用
Activity的getLayoutInflater()
LayoutInflater inflater = getLayoutInflater();
LayoutInflater inflater = LayoutInflater.from(context);LayoutInflater inflater = LayoutInflater)context.getSystemService(Context.LAYOUT_INFLATER_SERVICE);
其实,这三种方式本质上是一样的,从源码中可以看出:
Activity.java:
    public LayoutInflater getLayoutInflater() {
        return getWindow().getLayoutInflater();
    }

     mWindow = new PhoneWindow(this, window, activityConfigCallback);
   --->
 PhoneWindow.java:
     public PhoneWindow(Context context) {
        super(context);
        mLayoutInflater = LayoutInflater.from(context);
    }
   --->
LayoutInflater .java:
	    public static LayoutInflater from(Context context) {
        LayoutInflater LayoutInflater =
                (LayoutInflater) context.getSystemService(Context.LAYOUT_INFLATER_SERVICE);
        if (LayoutInflater == null) {
            throw new AssertionError("LayoutInflater not found.");
        }
        return LayoutInflater;
    }
结论:这三种方法的本质都是调用
Context.getSystemService(Context.LAYOUT_INFLATER_SERVICE)这个方法。
inflate方法
三个参数的inflate方法
public View inflate(@LayoutRes int resource, @Nullable ViewGroup root, boolean attachToRoot)
1. root不为null,attachToRoot为true
当root不为null,attachToRoot为true时,表示将resource指定的布局添加到root中,添加的过程中resource所指定的布局的根节点的各个属性都是有效的。
例如:
activity_main.xml如下:
<?xml version="1.0" encoding="utf-8"?>
<RelativeLayout xmlns:android="http://schemas.android.com/apk/res/android"
android:layout_width="match_parent"
android:layout_height="match_parent">
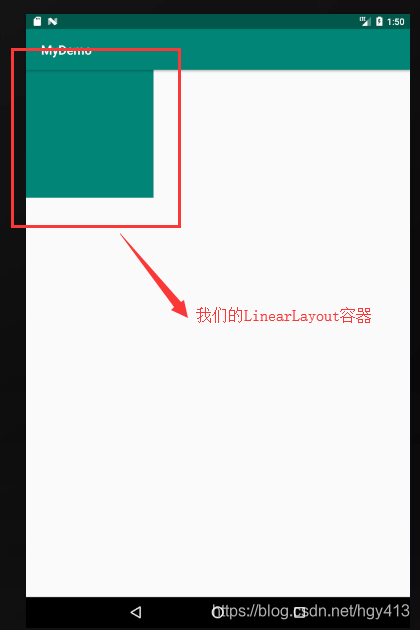
<LinearLayout
android:id="@+id/sub_linearLayout"
android:layout_width="200dp"
android:layout_height="200dp"
android:orientation="vertical"
android:background="@color/colorPrimary"
/>
</RelativeLayout>
对应的预览图如下:
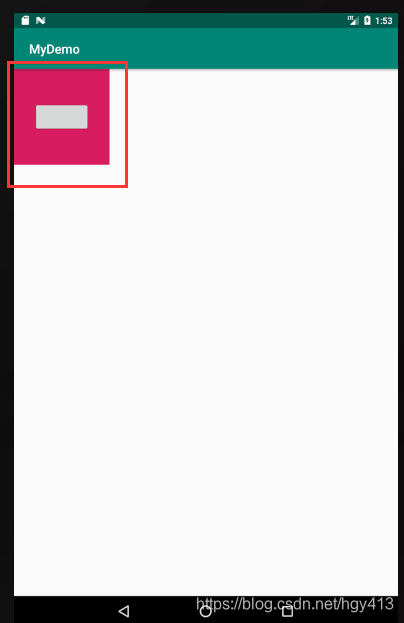
sub_linearlayout.xml如下:
<?xml version="1.0" encoding="utf-8"?>
<LinearLayout xmlns:android="http://schemas.android.com/apk/res/android"
    android:layout_width="150dp"
    android:layout_height="150dp"
    android:background="@color/colorAccent"
    android:gravity="center"
    android:orientation="vertical">

    <Button
        android:layout_width="wrap_content"
        android:layout_height="wrap_content" />
</LinearLayout>
对应的预览图如下:
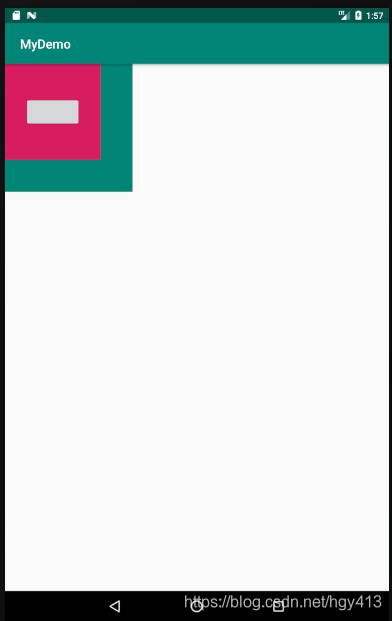
我们将sub_linearlayout.xml附加到activity_main.xml的sub_linearLayout控件中,以sub_linearLayout控件为root:
    protected void onCreate(Bundle savedInstanceState) {
        super.onCreate(savedInstanceState);
        setContentView(R.layout.activity_main);

        LinearLayout root = (LinearLayout) findViewById(R.id.sub_linearLayout);
        LayoutInflater inflater = LayoutInflater.from(this);
        inflater.inflate(R.layout.sub_linearlayout, root, true);
    }
最终效果图如下:
如果多写一行代码,如下:
    protected void onCreate(Bundle savedInstanceState) {
        super.onCreate(savedInstanceState);
        setContentView(R.layout.activity_main);

        LinearLayout root = (LinearLayout) findViewById(R.id.sub_linearLayout);
        LayoutInflater inflater = LayoutInflater.from(this);
        View v = inflater.inflate(R.layout.sub_linearlayout, root, true);
        root.addView(v);	// 多写这一行代码
    }
再运行,系统会抛如下异常:
java.lang.IllegalStateException: The specified child already has a parent. You must call removeView() on the child's parent first.
原因就是因为当attachToRoot为true时,会自动将第一个参数所指定的View添加到第二个参数所指定的root中。
2. root不为null,attachToRoot为false
当root不为null,而attachToRoot为false的话,表示不将第一个参数所指定的View添加到root中,
那么有的小伙伴可能就有疑问了,既然不添加到root中,我第二个参数直接给null不就可以了?
其实不然,这里涉及到另外一个问题:我们给控件所指定的layout_width和layout_height到底是什么意思?
该属性表示一个控件在容器中的大小,就是说这个控件必须在容器中,这个属性才有意义,否则无意义,从源码中也可以看出:
                    if (root != null) {
                        if (DEBUG) {
                            System.out.println("Creating params from root: " +
                                    root);
                        }
                        // Create layout params that match root, if supplied
                        params = root.generateLayoutParams(attrs);
                        if (!attachToRoot) {
                            // Set the layout params for temp if we are not
                            // attaching. (If we are, we use addView, below)
                            temp.setLayoutParams(params);
                        }
                    }
如果我想让sub_linearlayout.xml的android:layout_width="150dp"和android:layout_height="150dp"属性有效,又不想让其处于某一个容器中,那我就可以设置root不为null,而attachToRoot为false。即root会协助sub_linearlayout.xml的根节点生成布局参数,只有这一个作用。如下所示:
    protected void onCreate(Bundle savedInstanceState) {
        super.onCreate(savedInstanceState);
        setContentView(R.layout.activity_main);

        LinearLayout root = (LinearLayout) findViewById(R.id.sub_linearLayout);
        LayoutInflater inflater = LayoutInflater.from(this);
        View v = inflater.inflate(R.layout.sub_linearlayout, root, false);
        root.addView(v);
    }
注意,这时需要使用root.addView(v)来主动把inflater加入到root容器中,显示效果和上面一样。
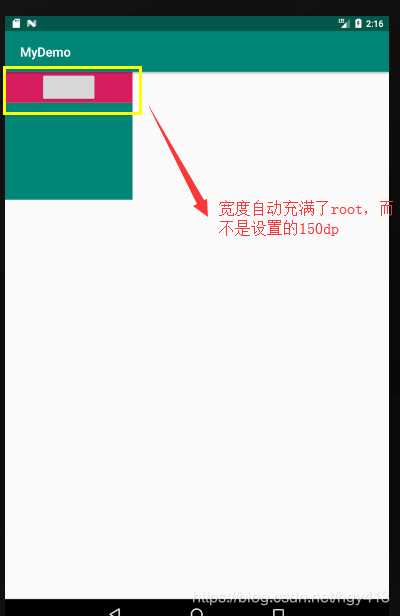
3. root为null,attachToRoot为false
前面也意味着如果我直接将sub_linearlayout.xml加载进来而不给它指定一个父布局root,则android:layout_width="150dp"和android:layout_height="150dp"属性将会失效(因为这个时候sub_linearlayout.xml将不处于任何容器中,那么它的根节点的宽高自然会失效)。如下所示:
    protected void onCreate(Bundle savedInstanceState) {
        super.onCreate(savedInstanceState);
        setContentView(R.layout.activity_main);

        LinearLayout root = (LinearLayout) findViewById(R.id.sub_linearLayout);
        LayoutInflater inflater = LayoutInflater.from(this);
        View v = inflater.inflate(R.layout.sub_linearlayout, null, false);
        root.addView(v);
    }
最终效果图如下:
二个参数的inflate方法
public View inflate(XmlPullParser parser, @Nullable ViewGroup root) {
        return inflate(parser, root, root != null);
    }
可以看出,它内部调用了三个参数的inflate方法:
root为null,等同于root为null,attachToRoot为false的三个参数的inflate方法。root不为null,等同于root不为null,attachToRoot为true的三个参数的inflate方法。
参考:
https://blog.csdn.net/biezhihua/article/details/43996289
https://blog.csdn.net/u012702547/article/details/52628453


 1454
1454

 被折叠的 条评论
为什么被折叠?
被折叠的 条评论
为什么被折叠?
 到【灌水乐园】发言


