


提示:文章写完后,目录可以自动生成,如何生成可参考右边的帮助文档
LLama Factory微调流程
官方GitHub链接
官方数据集说明
官方微调命令
安装LLama factory
git clone --depth 1 https://github.com/hiyouga/LLaMA-Factory.git
cd LLaMA-Factory
pip install -e ".[torch,metrics]"
总体上你可以把整个流程分为下面几个步骤:
1.准备微调的数据集和模型
2.读取模型和数据进行训练
3.使用命令或者脚本进行微调训练
4.加载微调的训练模型
一、准备微调的数据集和模型
1.下载模型
这里可以使用HuggingFace或者ModelScope提供的方法进行模型下载,这里给出ModelScope的下载方式, 如果要使用Qwen2请看3:
from modelscope import AutoModelForCausalLM, AutoTokenizer, snapshot_download
from modelscope import GenerationConfig
##cache_dir表示模型存储的目录
models_dir = "app/models"
model_dir = snapshot_download('qwen/Qwen-7B-Chat',cache_dir="app/models")
tokenizer = AutoTokenizer.from_pretrained(model_dir, trust_remote_code=True, cache_dir=models_dir)
model = AutoModelForCausalLM.from_pretrained(model_dir, device_map="cuda:0",trust_remote_code=True, cache_dir=models_dir).eval()
model.generation_config = GenerationConfig.from_pretrained(model_dir, trust_remote_code=True, cache_dir=models_dir)
response, history = model.chat(tokenizer, "你好!可以介绍一下大语言模型吗",history=None)
print(response)
2.读取本地模型
如果已经下载好模型也可以通过下面的代码测试一下是否正确读入
from modelscope import AutoModelForCausalLM, AutoTokenizer, snapshot_download
from modelscope import GenerationConfig
##model_dir表示模型存储的目录,是linux系统记得~/开头
model_dir = "绝对路径"
tokenizer = AutoTokenizer.from_pretrained(model_dir, trust_remote_code=True, cache_dir=models_dir)
model = AutoModelForCausalLM.from_pretrained(model_dir, device_map="cuda:0",trust_remote_code=True, cache_dir=models_dir).eval()
model.generation_config = GenerationConfig.from_pretrained(model_dir, trust_remote_code=True, cache_dir=models_dir)
response, history = model.chat(tokenizer, "你好!可以介绍一下大语言模型吗",history=None)
print(response)
3. Qwen2的模型下载和调用
from modelscope import AutoModelForCausalLM, AutoTokenizer, snapshot_download
from modelscope import GenerationConfig
from peft import PeftModel
##本地路径,也可以使用modelscope的模型id,自动下载
model_name = "app/models/Qwen/Qwen2-7B-Instruct"
device = "cuda" # the device to load the model onto

model = AutoModelForCausalLM.from_pretrained(
   model_name,
   torch_dtype="auto",
   device_map="auto"
)
lora_adapter_path = "LLaMA-Factory/saves/qwen2/lora/sft"
model = PeftModel.from_pretrained(model, lora_adapter_path)
tokenizer = AutoTokenizer.from_pretrained(model_name)

prompt = "你好!"
messages = [
   {"role": "system", "content": "You are a helpful assistant."},
   {"role": "user", "content": prompt}
]
text = tokenizer.apply_chat_template(
   messages,
   tokenize=False,
   add_generation_prompt=True
)
model_inputs = tokenizer([text], return_tensors="pt").to(device)

generated_ids = model.generate(
   **model_inputs,
   max_new_tokens=512
)
generated_ids = [
   output_ids[len(input_ids):] for input_ids, output_ids in zip(model_inputs.input_ids, generated_ids)
]

response = tokenizer.batch_decode(generated_ids, skip_special_tokens=True)[0]
print(response)
3.准备数据集
详细见官方数据集说明这里有你需要准备的数据集格式,准备好后将文件复制到LLaMA-Factory/data目录下,并且修改data_info.json加入你的数据集描述
"数据集名称": {
  "file_name": "data.json",
  "columns": {
    "prompt": "text"
  }
}
二、读取模型和数据进行训练
1.使用web ui
在LLama Factory目录下打开终端输入
llamafactory-cli webui
进入可视化微调界面:
注意:如果是本地模型此处一定是绝对路径
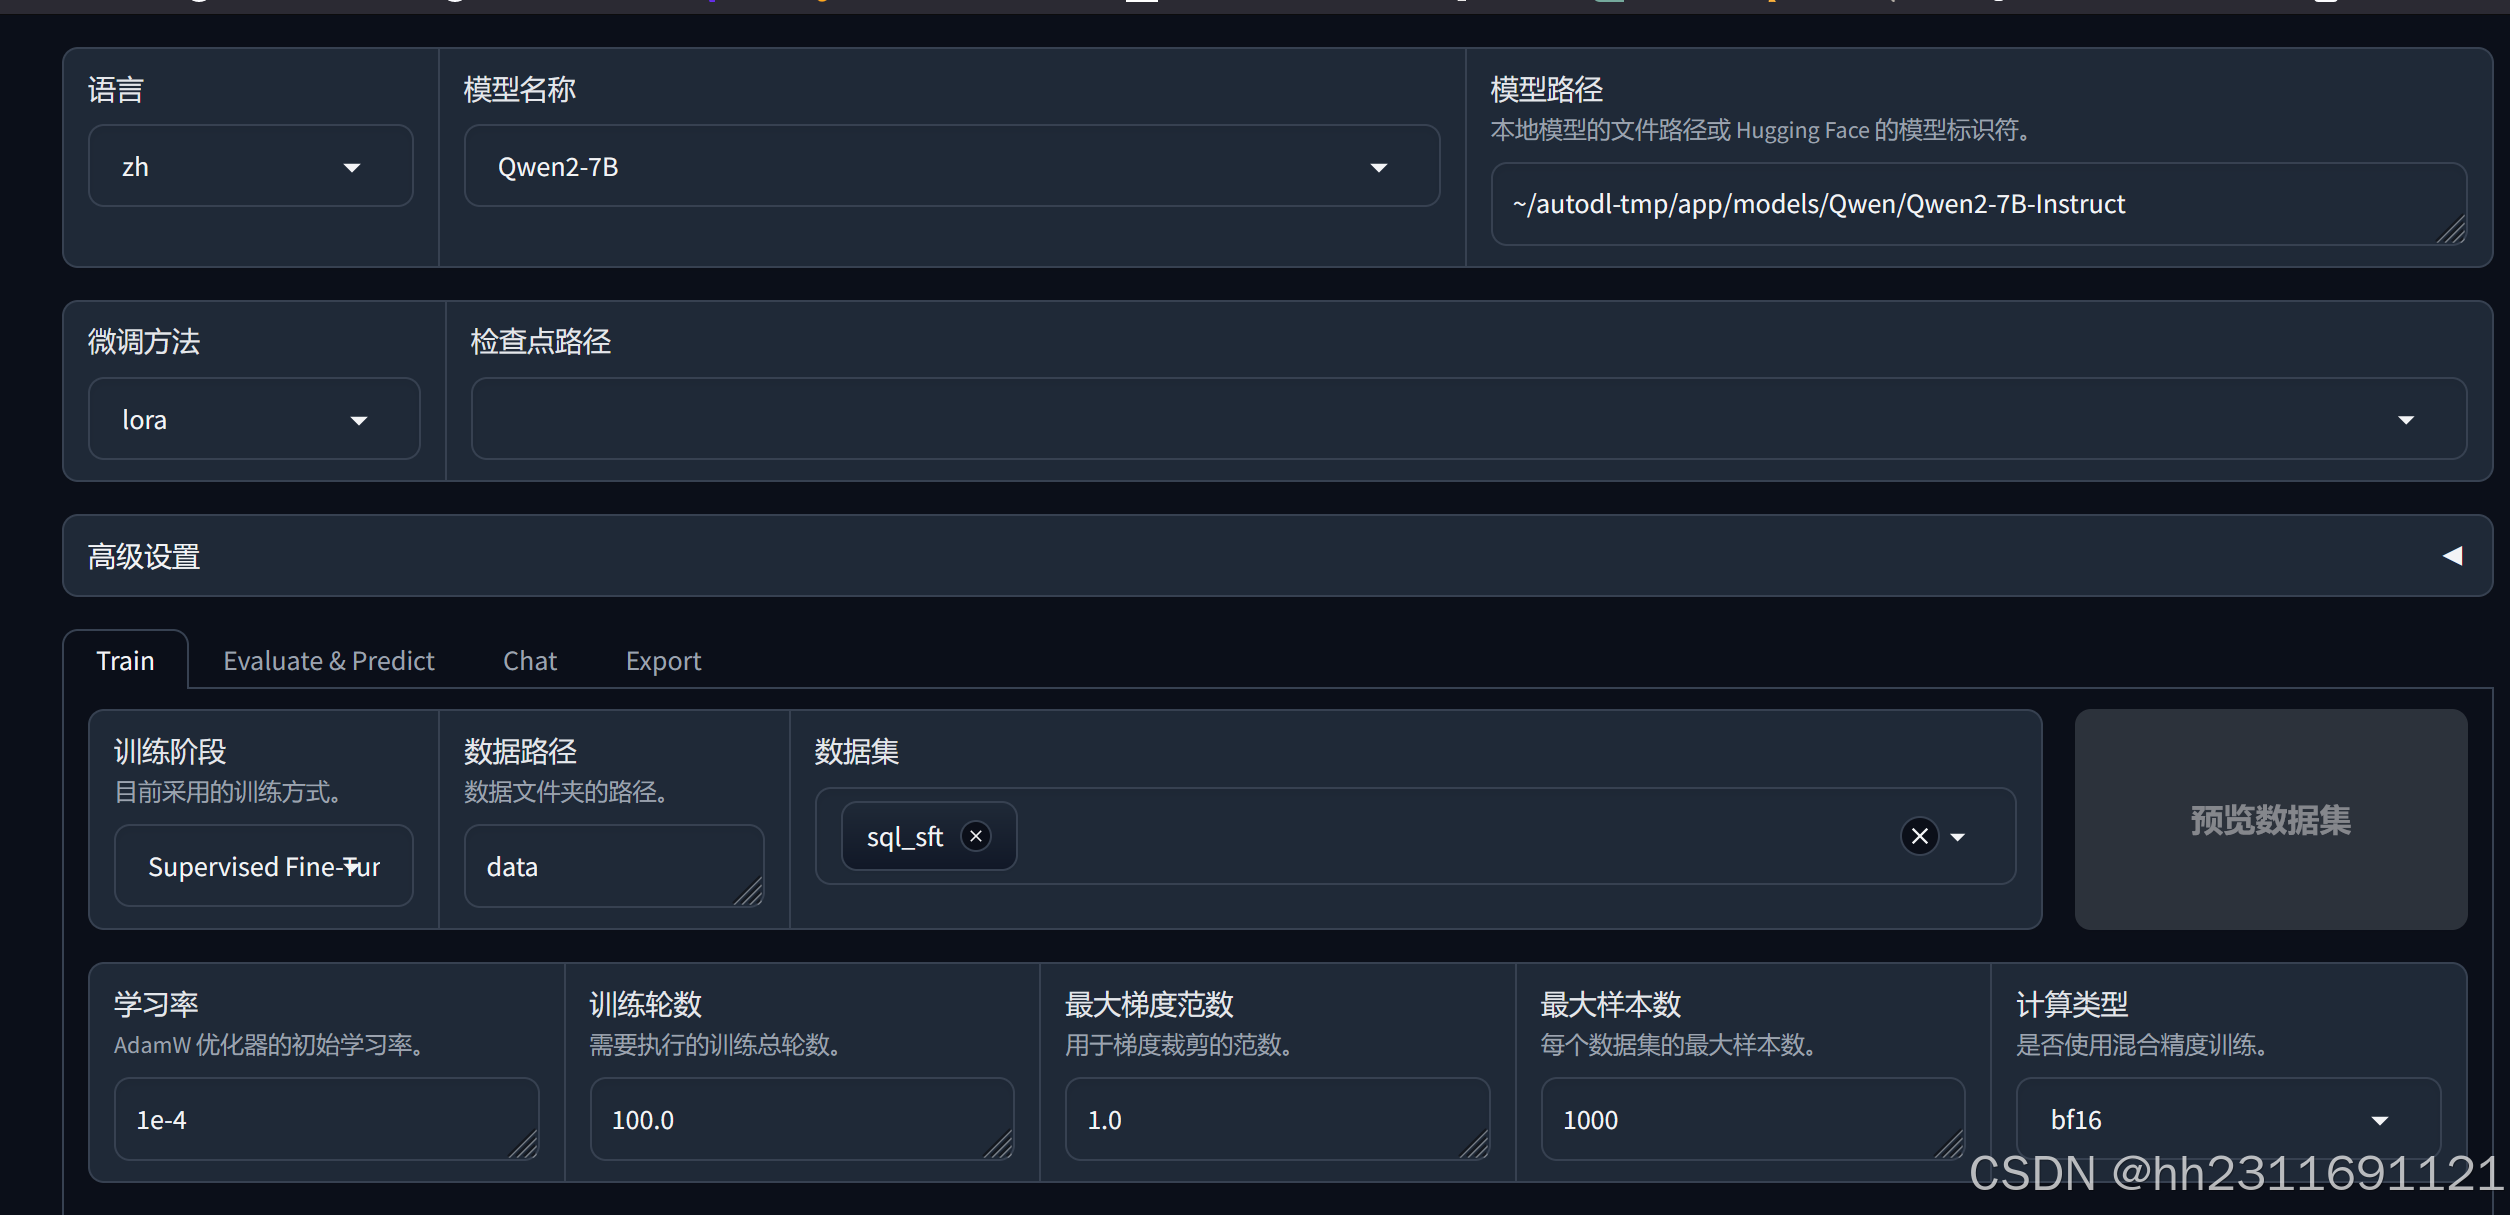 设置参数完成之后,可以通过预览命令获取训练命令输入到命令行执行,也可以在线执行
2.修改官方脚本(推荐)
在examples/train_qlora目录下,官方提供了许多的.yaml文件用于微调,我们只需要修改其中参数就可以使用。
我修改的一个版本
### model
###模型相对LLama-Factory的路径或者模型的Hub Id
model_name_or_path: ../app/models/Qwen/Qwen2-7B-Instruct
quantization_bit: 4
quantization_method: bitsandbytes  # choices: [bitsandbytes (4/8), hqq (2/3/4/5/6/8), eetq (8)]

### method
stage: sft
do_train: true
finetuning_type: lora
lora_target: all

### dataset
### 你在data_info中给你数据集起的名字
dataset: sql_sft
template: qwen
cutoff_len: 1024
max_samples: 1000
overwrite_cache: true
preprocessing_num_workers: 16

### output
### 训练完成之后的adaptor存储路径
output_dir: saves/qwen2/lora/sft
logging_steps: 10
save_steps: 500
plot_loss: true
overwrite_output_dir: true

### train
per_device_train_batch_size: 1
gradient_accumulation_steps: 8
learning_rate: 1.0e-4
num_train_epochs: 10.0
lr_scheduler_type: cosine
warmup_ratio: 0.1
bf16: true
ddp_timeout: 180000000

### eval
val_size: 0.1
per_device_eval_batch_size: 1
eval_strategy: steps
eval_steps: 500
之后通过
llamafactory-cli train examples\train_qlora\**.yaml
即可训练,具体见官方微调命令
第三,加载与推理
类似训练过程,我们可以修改examples\inferance\中的examples进行推理
#模型相对LLama-Factory的路径
model_name_or_path: ../app/models/Qwen/Qwen2-7B-Instruct
#训练的输出
adapter_name_or_path: saves/qwen2/lora/sft
#模型系列
template: qwen
finetuning_type: lora
修改完成之后类似的运行
llamafactory-cli chat examples\inferance\*.yaml
成功读取adapter

之后可以与模型进行对话了

Peft库应该可以直接读取在python中读取训练的adapter数据,但是暂时还没弄
下面给个简单的加载案例
from modelscope import AutoModelForCausalLM, AutoTokenizer, snapshot_download
from modelscope import GenerationConfig
from peft import PeftModel
model_name = "app/models/Qwen/Qwen2-7B-Instruct"
device = "cuda" # the device to load the model onto

model = AutoModelForCausalLM.from_pretrained(
   model_name,
   torch_dtype="auto",
   device_map="auto"
)
lora_adapter_path = "LLaMA-Factory/saves/qwen2/lora/sft"
model = PeftModel.from_pretrained(model, lora_adapter_path)
tokenizer = AutoTokenizer.from_pretrained(model_name)

prompt = "你好!"
messages = [
   {"role": "system", "content": "You are a helpful assistant."},
   {"role": "user", "content": prompt}
]
text = tokenizer.apply_chat_template(
   messages,
   tokenize=False,
   add_generation_prompt=True
)
model_inputs = tokenizer([text], return_tensors="pt").to(device)

generated_ids = model.generate(
   **model_inputs,
   max_new_tokens=512
)
generated_ids = [
   output_ids[len(input_ids):] for input_ids, output_ids in zip(model_inputs.input_ids, generated_ids)
]

response = tokenizer.batch_decode(generated_ids, skip_special_tokens=True)[0]
print(response)


 5766
5766


 被折叠的 条评论
为什么被折叠?
被折叠的 条评论
为什么被折叠?
 到【灌水乐园】发言


