


1 - 引言
之前我们学习了KNN分类器的原理,现在让我们将KNN分类器应用在计算机视觉中,学习如何使用这个算法来进行图片分类。
2 - 准备工作
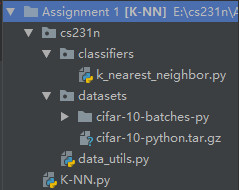
- 创建项目结构如图所示
- 在datasets文件中下载数据集Cifar-10
- k_nearest_neighbor.py代码如下:
import numpy as np
from numpy import *  # 导入numpy的库函数


class KNearestNeighbor(object):
    """ 一个使用L2距离的KNN分类器"""

    def __init__(self):
        pass

    def train(self, X, y):
        """
        KNN的训练就是读取数据并存储
        输入:
        - X : 是一个numpy类型的数组,维数是(num_train,D)
        - y : 是一个numpy类型的数组,维数是(N,)
        """
        self.X_train = X
        self.y_train = y

    def predict(self, X, k=1, num_loops=0):
        """
        选择计算距离的循环的方式来预测y的值
        输入:
        - X :一个numpy类型的数组,维数是(num_test,D)
        - k : 选择距离最小的数量
        -num_loops : 循环的方式
        返回:
        - y : 一个numpy类型的数组(num_test,)
        """
        if num_loops == 0:
            dists = self.compute_distances_no_loops(X)
        elif num_loops == 1:
            dists = self.compute_distances_one_loop(X)
        elif num_loops == 2:
            dists = self.compute_distances_two_loops(X)
        else:
            raise ValueError('Invalid value %d for num_loops' % num_loops)

        return self.predict_labels(dists, k=k)

    def compute_distances_two_loops(self, X):
        """
        使用两层循环来计算测试数据与每一个训练数据之间的距离
        输入:
        - X :一个numpy类型的数组,维数(num_test,D)
        返回:
        - dists : 一个numpy类型的数组,维数(num_test,num_train),dists[i,j]存储了test[i]到train[j]
        之间的距离
        """
        num_test = X.shape[0]
        num_train = self.X_train.shape[0]
        dists = np.zeros((num_test, num_train))
        for i in range(num_test):
            for j in range(num_train):
                distances = np.sqrt(np.sum(np.square(self.X_train[j] - X[i])))
                dists[i, j] = distances
        return dists

    def compute_distances_one_loop(self, X):
        """
        (利用python的广播机制)
        使用一层循环来计算测试数据与每一个训练数据之间的距离
        输入/输出:与两层循环一样
        """
        num_test = X.shape[0]
        num_train = self.X_train.shape[0]
        dists = np.zeros((num_test, num_train))
        for i in range(num_test):
            distances = np.sqrt(np.sum(np.square(self.X_train - X[i]), axis=1))
            dists[i, :] = distances
        return dists

    def compute_distances_no_loops(self, X):
        """
        (利用python的广播机制)
        计算距离不使用循环
        输入/输出:与两层循环一致
        """
        M = np.dot(X, self.X_train.T)
        nrow = M.shape[0]
        ncol = M.shape[1]
        #np.diag : 输出矩阵的对角线元素
        te = np.diag(np.dot(X, X.T))
        tr = np.diag(np.dot(self.X_train, self.X_train.T))
        te = np.reshape(np.repeat(te, ncol), M.shape)
        tr = np.reshape(np.repeat(tr, nrow), M.T.shape)
        sq = -2 * M + te + tr.T
        dists = np.sqrt(sq)
        # ans
        # M = np.dot(X, self.X_train.T)
        # te = np.square(X).sum(axis=1)
        # tr = np.square(self.X_train).sum(axis=1)
        # dists = np.sqrt(-2 * M + tr + np.matrix(te).T)
        # print(M.shape,te.shape,tr.shape,dists.shape)
        return dists

    def predict_labels(self, dists, k=1):
        """
        根据距离和K的数量来预测测试数据的标签
        输入:
        - dists : 一个numpy类型的数组,维数(num_test,num_train)
        - k : 根据 k 个最小距离进行预测
        返回:
        - y : 一个numpy类型的数组,维数(num_test,)
        """
        num_test = dists.shape[0]
        y_pred = np.zeros(num_test)
        for i in range(num_test):
            distances = dists[i, :]
            indexes = np.argsort(distances)
            closest_y = self.y_train[indexes[:k]]
            count = np.bincount(closest_y)
            y_pred[i] = np.argmax(count)
        return y_pred
- data_utils.py 代码如下:
from __future__ import print_function

from six.moves import cPickle as pickle
import numpy as np
import os
from scipy.ndimage import imread
import platform


def load_pickle(f):
    version = platform.python_version_tuple()
    if version[0] == '2':
        return pickle.load(f)
    elif version[0] == '3':
        return pickle.load(f, encoding='latin1')
    raise ValueError("invalid python version: {}".format(version))


def load_CIFAR_batch(filename):
    """ load single batch of cifar """
    with open(filename, 'rb') as f:
        datadict = load_pickle(f)
        X = datadict['data']
        Y = datadict['labels']
        X = X.reshape(10000, 3, 32, 32).transpose(0, 2, 3, 1).astype("float")
        Y = np.array(Y)
        return X, Y


def load_CIFAR10(ROOT):
    """ load all of cifar """
    xs = []
    ys = []
    for b in range(1, 6):
        f = os.path.join(ROOT, 'data_batch_%d' % (b,))
        X, Y = load_CIFAR_batch(f)
        xs.append(X)
        ys.append(Y)
    Xtr = np.concatenate(xs)
    Ytr = np.concatenate(ys)
    del X, Y
    Xte, Yte = load_CIFAR_batch(os.path.join(ROOT, 'test_batch'))
    return Xtr, Ytr, Xte, Yte


def get_CIFAR10_data(num_training=49000, num_validation=1000, num_test=1000,
                     subtract_mean=True):
    """
    Load the CIFAR-10 dataset from disk and perform preprocessing to prepare
    it for classifiers. These are the same steps as we used for the SVM, but
    condensed to a single function.
    """
    # Load the raw CIFAR-10 data
    cifar10_dir = 'cs231n/datasets/cifar-10-batches-py'
    X_train, y_train, X_test, y_test = load_CIFAR10(cifar10_dir)

    # Subsample the data
    mask = list(range(num_training, num_training + num_validation))
    X_val = X_train[mask]
    y_val = y_train[mask]
    mask = list(range(num_training))
    X_train = X_train[mask]
    y_train = y_train[mask]
    mask = list(range(num_test))
    X_test = X_test[mask]
    y_test = y_test[mask]

    # Normalize the data: subtract the mean image
    if subtract_mean:
        mean_image = np.mean(X_train, axis=0)
        X_train -= mean_image
        X_val -= mean_image
        X_test -= mean_image

    # Transpose so that channels come first
    X_train = X_train.transpose(0, 3, 1, 2).copy()
    X_val = X_val.transpose(0, 3, 1, 2).copy()
    X_test = X_test.transpose(0, 3, 1, 2).copy()

    # Package data into a dictionary
    return {
        'X_train': X_train, 'y_train': y_train,
        'X_val': X_val, 'y_val': y_val,
        'X_test': X_test, 'y_test': y_test,
    }


def load_tiny_imagenet(path, dtype=np.float32, subtract_mean=True):
    """
    Load TinyImageNet. Each of TinyImageNet-100-A, TinyImageNet-100-B, and
    TinyImageNet-200 have the same directory structure, so this can be used
    to load any of them.
    Inputs:
    - path: String giving path to the directory to load.
    - dtype: numpy datatype used to load the data.
    - subtract_mean: Whether to subtract the mean training image.
    Returns: A dictionary with the following entries:
    - class_names: A list where class_names[i] is a list of strings giving the
      WordNet names for class i in the loaded dataset.
    - X_train: (N_tr, 3, 64, 64) array of training images
    - y_train: (N_tr,) array of training labels
    - X_val: (N_val, 3, 64, 64) array of validation images
    - y_val: (N_val,) array of validation labels
    - X_test: (N_test, 3, 64, 64) array of testing images.
    - y_test: (N_test,) array of test labels; if test labels are not available
      (such as in student code) then y_test will be None.
    - mean_image: (3, 64, 64) array giving mean training image
    """
    # First load wnids
    with open(os.path.join(path, 'wnids.txt'), 'r') as f:
        wnids = [x.strip() for x in f]

    # Map wnids to integer labels
    wnid_to_label = {wnid: i for i, wnid in enumerate(wnids)}

    # Use words.txt to get names for each class
    with open(os.path.join(path, 'words.txt'), 'r') as f:
        wnid_to_words = dict(line.split('\t') for line in f)
        for wnid, words in wnid_to_words.iteritems():
            wnid_to_words[wnid] = [w.strip() for w in words.split(',')]
    class_names = [wnid_to_words[wnid] for wnid in wnids]

    # Next load training data.
    X_train = []
    y_train = []
    for i, wnid in enumerate(wnids):
        if (i + 1) % 20 == 0:
            print('loading training data for synset %d / %d' % (i + 1, len(wnids)))
        # To figure out the filenames we need to open the boxes file
        boxes_file = os.path.join(path, 'train', wnid, '%s_boxes.txt' % wnid)
        with open(boxes_file, 'r') as f:
            filenames = [x.split('\t')[0] for x in f]
        num_images = len(filenames)

        X_train_block = np.zeros((num_images, 3, 64, 64), dtype=dtype)
        y_train_block = wnid_to_label[wnid] * np.ones(num_images, dtype=np.int64)
        for j, img_file in enumerate(filenames):
            img_file = os.path.join(path, 'train', wnid, 'images', img_file)
            img = imread(img_file)
            if img.ndim == 2:
                ## grayscale file
                img.shape = (64, 64, 1)
            X_train_block[j] = img.transpose(2, 0, 1)
        X_train.append(X_train_block)
        y_train.append(y_train_block)

    # We need to concatenate all training data
    X_train = np.concatenate(X_train, axis=0)
    y_train = np.concatenate(y_train, axis=0)

    # Next load validation data
    with open(os.path.join(path, 'val', 'val_annotations.txt'), 'r') as f:
        img_files = []
        val_wnids = []
        for line in f:
            img_file, wnid = line.split('\t')[:2]
            img_files.append(img_file)
            val_wnids.append(wnid)
        num_val = len(img_files)
        y_val = np.array([wnid_to_label[wnid] for wnid in val_wnids])
        X_val = np.zeros((num_val, 3, 64, 64), dtype=dtype)
        for i, img_file in enumerate(img_files):
            img_file = os.path.join(path, 'val', 'images', img_file)
            img = imread(img_file)
            if img.ndim == 2:
                img.shape = (64, 64, 1)
            X_val[i] = img.transpose(2, 0, 1)

    # Next load test images
    # Students won't have test labels, so we need to iterate over files in the
    # images directory.
    img_files = os.listdir(os.path.join(path, 'test', 'images'))
    X_test = np.zeros((len(img_files), 3, 64, 64), dtype=dtype)
    for i, img_file in enumerate(img_files):
        img_file = os.path.join(path, 'test', 'images', img_file)
        img = imread(img_file)
        if img.ndim == 2:
            img.shape = (64, 64, 1)
        X_test[i] = img.transpose(2, 0, 1)

    y_test = None
    y_test_file = os.path.join(path, 'test', 'test_annotations.txt')
    if os.path.isfile(y_test_file):
        with open(y_test_file, 'r') as f:
            img_file_to_wnid = {}
            for line in f:
                line = line.split('\t')
                img_file_to_wnid[line[0]] = line[1]
        y_test = [wnid_to_label[img_file_to_wnid[img_file]] for img_file in img_files]
        y_test = np.array(y_test)

    mean_image = X_train.mean(axis=0)
    if subtract_mean:
        X_train -= mean_image[None]
        X_val -= mean_image[None]
        X_test -= mean_image[None]

    return {
        'class_names': class_names,
        'X_train': X_train,
        'y_train': y_train,
        'X_val': X_val,
        'y_val': y_val,
        'X_test': X_test,
        'y_test': y_test,
        'class_names': class_names,
        'mean_image': mean_image,
    }


def load_models(models_dir):
    """
    Load saved models from disk. This will attempt to unpickle all files in a
    directory; any files that give errors on unpickling (such as README.txt) will
    be skipped.
    Inputs:
    - models_dir: String giving the path to a directory containing model files.
      Each model file is a pickled dictionary with a 'model' field.
    Returns:
    A dictionary mapping model file names to models.
    """
    models = {}
    for model_file in os.listdir(models_dir):
        with open(os.path.join(models_dir, model_file), 'rb') as f:
            try:
                models[model_file] = load_pickle(f)['model']
            except pickle.UnpicklingError:
                continue
    return models
- 创建K-NN.py进行实验
3 - 具体步骤
首先为了了解数据集的构造,我们将数据集的维数输出。
创建K-NN.py文件并输入代码:
import random
import numpy as np
from cs231n.data_utils import load_CIFAR10
import matplotlib.pyplot as plt

#加载Cifar10数据集,并输出数据集的维数
cifar10_dir = 'cs231n/datasets/cifar-10-batches-py'
X_train,y_train,X_test,y_test = load_CIFAR10(cifar10_dir)

print('Training data shape', X_train.shape)
print('Training labels shape', y_train.shape)
print('Test data shape', X_test.shape)
print('Test labels shape', y_test.shape)
显示如下,Cifar-10数据集的训练集含有5万张32x32像素的彩色图片,测试集含有1万张图片,每张图像都带有标签,将它们分成了10类
Training data shape (50000, 32, 32, 3)
Training labels shape (50000,)
Test data shape (10000, 32, 32, 3)
Test labels shape (10000,)
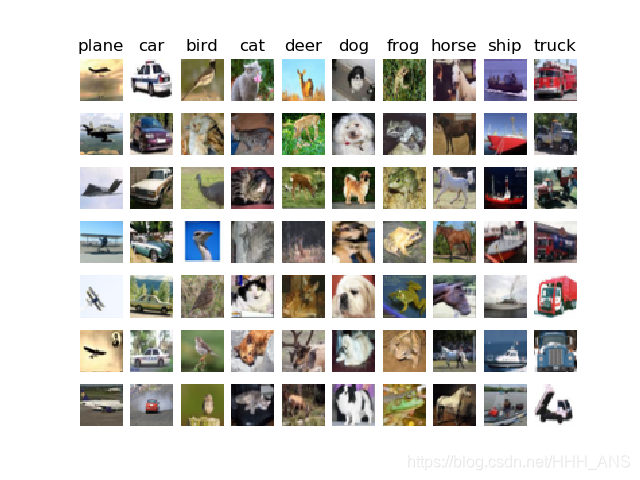
然后,我们取出一些数据来看看数据集里面的图片到底是什么样子
classes = ['plane', 'car', 'bird', 'cat', 'deer', 'dog', 'frog', 'horse', 'ship', 'truck']
num_classes = len(classes)
samples_per_class = 7  #每个类别采样个数
for y,cls in enumerate(classes):    #(0,plane),y返回元素位置,cls返回元素本身
    idxs = np.flatnonzero(y_train==y) #找出标签中y类的位置
    idxs = np.random.choice(idxs,samples_per_class,replace=False) #从中随机算出7个样本
    for i,idx in enumerate(idxs): #对所选样本的位置和样本所对应的图片在训练集中的位置进行循环
        plt_idx = i * num_classes + y + 1 #在子图中所占位置的计算
        plt.subplot(samples_per_class,num_classes,plt_idx) #说明要画的子图的编号
        plt.imshow(X_train[idx].astype('uint8')) #画图
        plt.axis('off')
        if i == 0:
            plt.title(cls) #写上类别名
plt.show()
因为全部的数据集图片数量太多了,为了高效的运行我们的代码,我们从中选出一个子集来进行后面的实验。
num_training = 5000
mask = list(range(num_training))
X_train = X_train[mask]
y_train = y_train[mask]

num_test = 500
mask = list(range(num_test))
X_test = X_test[mask]
y_test = y_test[mask]
#将图像数据转置成二维
X_train = np.reshape(X_train,(X_train.shape[0],-1))
X_test = np.reshape(X_test,(X_test.shape[0],-1))
print(X_train.shape,X_test.shape)
使用训练集5000张图片,测试集500张图片,3072是图像的维度乘积32x32x3
(5000, 3072) (500, 3072)
创建KNN分类器对象,并测试一下使用双层循环计算欧氏距离
from cs231n.classifiers.k_nearest_neighbor import KNearestNeighbor

classifier = KNearestNeighbor()
classifier.train(X_train,y_train)
dists = classifier.compute_distances_two_loops(X_test)
plt.imshow(dists, interpolation='none')
plt.show()
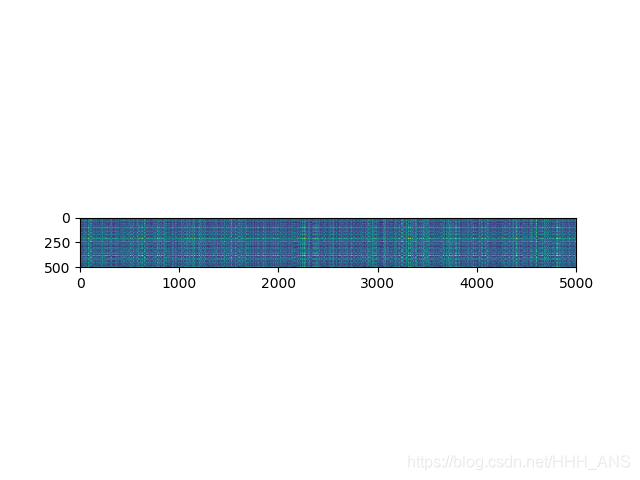
可以看到有一些行或者列明显颜色较浅(其中深色表示距离小,而浅色表示距离大)
我们将K设置为1(也就是最邻近法)测试一下准确率
y_test_pred = classifier.predict_labels(dists, k=1)

num_correct = np.sum(y_test_pred == y_test)

accuracy = float(num_correct) / num_test
print('Got %d / %d correct => accuracy: %f' % (num_correct, num_test, accuracy))
获得准确率只有27%
Got 137 / 500 correct => accuracy: 0.274000
我们使用交叉测试来寻找最佳的超参数K,这里我们使用了K折交叉验证(K-fold cross validation)
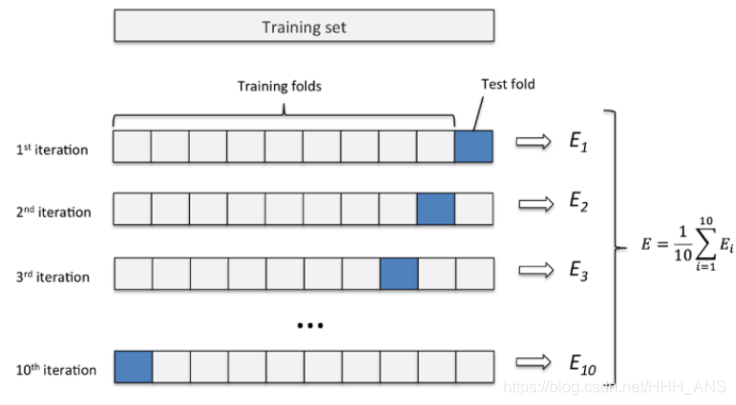
k 折交叉验证通过对 k 个不同分组训练的结果进行平均来减少方差,因此模型的性能对数据的划分就不那么敏感。
- 第一步,不重复抽样将原始数据随机分为 k 份。
- 第二步,每一次挑选其中 1 份作为测试集,剩余 k-1 份作为训练集用于模型训练。
- 第三步,重复第二步 k 次,这样每个子集都有一次机会作为测试集,其余机会作为训练集。在每个训练集上训练后得到一个模型,用这个模型在相应的测试集上测试,计算并保存模型的评估指标,
- 第四步,计算 k 组测试结果的平均值作为模型精度的估计,并作为当前 k 折交叉验证下模型的性能指标。
"""
使用交叉验证选出最优的超参数K

将训练数据切分,存储在X_train_folds和y_train_folds中
"""
num_folds = 5
k_choices = [1, 3, 5, 8, 10, 12, 15, 20, 50, 100]

X_train_folds = []
y_train_folds = []

X_train_folds=np.array_split(X_train,num_folds)
y_train_folds=np.array_split(y_train,num_folds)


k_to_accuracies = {}
for i in k_choices:
    k_to_accuracies[i]=[]
for ki in k_choices:
    for fi in range(num_folds):
        #prepare the data
        valindex=fi
        X_traini = np.vstack((X_train_folds[0:fi]+X_train_folds[fi+1:num_folds]))
        y_traini = np.hstack((y_train_folds[0:fi]+ y_train_folds[fi+1:num_folds]))

        X_vali=np.array(X_train_folds[valindex])
        y_vali = np.array(y_train_folds[valindex])
        num_val=len(y_vali)

        #initialize the KNN
        classifier = KNearestNeighbor()
        classifier.train(X_traini,y_traini)

        #calculate the accuracy
        dists = classifier.compute_distances_no_loops(X_vali)
        y_val_pred = classifier.predict_labels(dists, k=ki)
        num_correct = np.sum(y_val_pred == y_vali)
        accuracy = float(num_correct) / num_val
        k_to_accuracies[ki].append(accuracy)


# Print out the computed accuracies
for k in sorted(k_to_accuracies):
    for accuracy in k_to_accuracies[k]:
        print('k = %d, accuracy = %f' % (k, accuracy))

# plot the raw observations
for k in k_choices:
    accuracies = k_to_accuracies[k]
    plt.scatter([k] * len(accuracies), accuracies)

# plot the trend line with error bars that correspond to standard deviation
accuracies_mean = np.array([np.mean(v) for k,v in sorted(k_to_accuracies.items())])
accuracies_std = np.array([np.std(v) for k,v in sorted(k_to_accuracies.items())])
plt.errorbar(k_choices, accuracies_mean, yerr=accuracies_std)
plt.title('Cross-validation on k')
plt.xlabel('k')
plt.ylabel('Cross-validation accuracy')
plt.show()
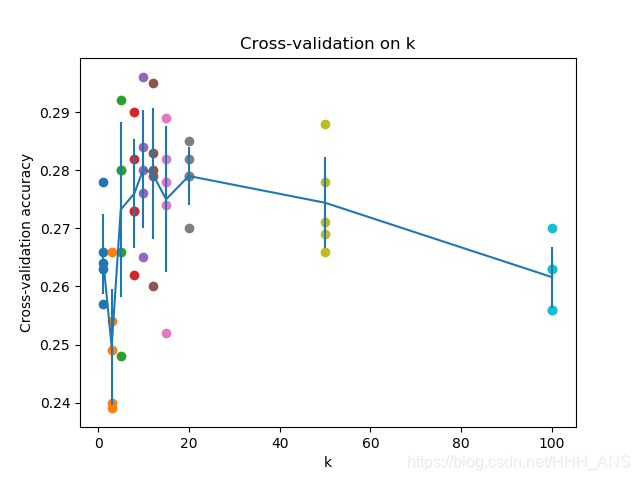
可以看到,在K=10时,准确率最高,但是也只有百分之20几,所以KNN算法不太适合用于图像识别,但是这是一个很好的例子来帮助我们理解如何使用算法来对图像进行分类。


 251
251


 被折叠的 条评论
为什么被折叠?
被折叠的 条评论
为什么被折叠?
 到【灌水乐园】发言


