


在QT中使用回调函数替代信号槽
前面讲了一堆,就是为了实现看到的这篇文章中的例子。由于对回调不懂,前前后后翻阅参考了一大堆优秀的博文,学了不少东西,可是。。。。哎,效果不理想,没信号槽快、稳定。
一、前言
在Qt中传数据,我们使用了一个信号和槽系统,但这并不意味着不能使用旧的经过验证的方法,即使用 CallBack回调函数功能。
事实上使用 CallBack 功能比信号和槽要快一些。并且当发送信号的对象在程序中被销毁并且不再使用时,信号理想地从槽中分离而言,回调可以更容易使用。
二、如何使用CALLBACK工作
假设A类包含B类的对象,B类有动作时想要通知到A类,B类应该有个设置回调函数的接口,A类应该定义相应的回调函数,将函数指针传递给B。
还是直接举例吧:
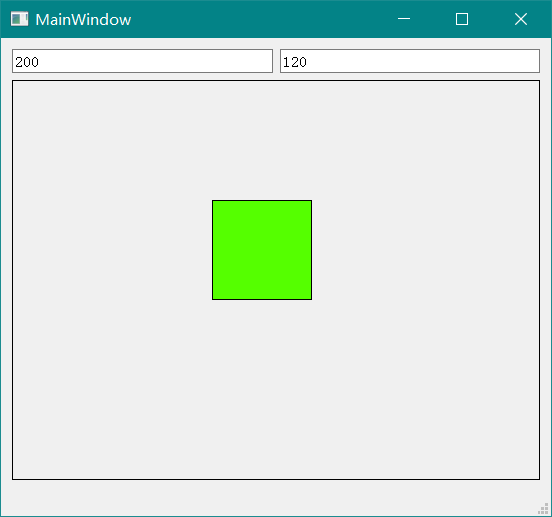
例如,将使用一个类,在图形场景中绘制一个正方形,并由W,A,S,D键控制。移动时,正方形必须将其坐标的数据发送到创建它的类。也就是说,它应该把这个类的函数作为它的 CallBack 函数。要做的程序效果如下,通过WASD控制方块移动,主窗口接收正方形的位置信息,并将位置信息填入QLineEdit:
程序及解释
小方块
Square.h
#pragma once

#include <QFrame>
#include <QKeyEvent>

typedef std::function<void(QPointF)> CallBack ;

class Square : public QFrame
{
    Q_OBJECT
public:
    explicit Square(QWidget *parent = nullptr);
    // 设置回调函数的函数
    void setCallbackFunc(CallBack fun);
protected:
    void keyPressEvent(QKeyEvent *e) override;

signals:
    void moved(QPointF point);
private:
    CallBack m_func;
};
Square.cpp
#include "Square.h"
#include "DebugTool.h"
#include <QPointF>
#include <QTime>
#include <QTimer>
Square::Square(QWidget* parent)
    : QFrame(parent)
{
    setAttribute(Qt::WA_StyledBackground);
    setFocusPolicy(Qt::StrongFocus);
}


// 注册回调函数
void Square::setCallbackFunc(CallBack func)
{
    m_func = func;
}

void Square::keyPressEvent(QKeyEvent* e)
{
    QPoint point = this->pos();

    int key = e->key();
    if (key == Qt::Key_W)
        point += QPoint(0, -2);
    if (key == Qt::Key_A)
        point += QPoint(-2, 0);
    if (key == Qt::Key_S)
        point += QPoint(0, 2);
    if (key == Qt::Key_D)
        point += QPoint(2, 0);
    //    cout << QTime::currentTime ();
    //    m_func(this->pos ());

    this->move(point);
    //    emit moved(point);    // 传统的信号槽
    m_func(point);      // 调用回调函数
}
主窗口
MainWindow.h
#pragma once

#include "Square.h"

#include <QMainWindow>

QT_BEGIN_NAMESPACE
namespace Ui { class MainWindow; }
QT_END_NAMESPACE

class MainWindow : public QMainWindow
{
    Q_OBJECT

public:
    MainWindow(QWidget *parent = nullptr);
    ~MainWindow();

private:
    Ui::MainWindow *ui;
    Square *m_square;           // 声明正方形 传输回调
    // 声明一个回调函数
    void getPosition(QPointF point);
};
MainWindow.cpp
#include "MainWindow.h"
#include "ui_MainWindow.h"
#include "DebugTool.h"

#include <QTime>
MainWindow::MainWindow(QWidget *parent)
    : QMainWindow(parent)
    , ui(new Ui::MainWindow)
{
    ui->setupUi(this);
    m_square = ui->square;
    CallBack func;
    func = std::bind(&MainWindow::getPosition,this,std::placeholders::_1);
    m_square->setCallbackFunc (func);
    ui->square->setFocus ();
    connect (ui->square,&Square::moved,this,&MainWindow::getPosition );
    getPosition (ui->square->pos ());
}

MainWindow::~MainWindow()
{
    delete ui;
}

void MainWindow::getPosition(QPointF point)
{
//    cout << QTime::currentTime();
    ui->edt_x->setText (QString::number (point.x ()));
    ui->edt_y->setText (QString::number (point.y ()));
}
MainWindow.ui
界面简化了,没有使用Graphics View 框架
<?xml version="1.0" encoding="UTF-8"?>
<ui version="4.0">
 <class>MainWindow</class>
 <widget class="QMainWindow" name="MainWindow">
  <property name="geometry">
   <rect>
    <x>0</x>
    <y>0</y>
    <width>800</width>
    <height>600</height>
   </rect>
  </property>
  <property name="windowTitle">
   <string>MainWindow</string>
  </property>
  <widget class="QWidget" name="centralwidget">
   <layout class="QGridLayout" name="gridLayout">
    <item row="0" column="0">
     <widget class="QLineEdit" name="edt_x"/>
    </item>
    <item row="0" column="1">
     <widget class="QLineEdit" name="edt_y"/>
    </item>
    <item row="1" column="0" colspan="2">
     <widget class="QWidget" name="widget" native="true">
      <property name="styleSheet">
       <string notr="true">border:1px solid black;</string>
      </property>
      <widget class="Square" name="square">
       <property name="geometry">
        <rect>
         <x>280</x>
         <y>120</y>
         <width>100</width>
         <height>100</height>
        </rect>
       </property>
       <property name="styleSheet">
        <string notr="true">background-color: rgb(85, 255, 0);</string>
       </property>
       <property name="frameShape">
        <enum>QFrame::NoFrame</enum>
       </property>
       <property name="frameShadow">
        <enum>QFrame::Raised</enum>
       </property>
      </widget>
     </widget>
    </item>
   </layout>
  </widget>
  <widget class="QMenuBar" name="menubar">
   <property name="geometry">
    <rect>
     <x>0</x>
     <y>0</y>
     <width>800</width>
     <height>26</height>
    </rect>
   </property>
  </widget>
  <widget class="QStatusBar" name="statusbar"/>
 </widget>
 <customwidgets>
  <customwidget>
   <class>Square</class>
   <extends>QFrame</extends>
   <header location="global">Square.h</header>
   <container>1</container>
  </customwidget>
 </customwidgets>
 <resources/>
 <connections/>
</ui>
总结
使用 std::function< T > 和 std::bind( ) 后,结果发现居然还没有信号槽快。


 530
530

 被折叠的 条评论
为什么被折叠?
被折叠的 条评论
为什么被折叠?
 到【灌水乐园】发言


