


安装FastDFS还需要安装libfastcommon作为前提条件,首先准备安装包FastDFS和libfastcommon。
libfastcommon下载地址: https://github.com/happyfish100/libfastcommon/releases
FastDFS的下载地址:https://github.com/happyfish100/fastdfs/releases
首先安装libfastcommon,得到libfastcommon-1.0.35.tar.gz后解压、编译、安装:
# tar xvf libfastcommon-1.0.35.tar.gz
# cd libfastcommon-1.0.35
# ./make.sh
# ./make.sh install
接着安装FastDFS,得到FastDFS_v5.09.tar.gz后解压:
#tar xvf FastDFS_v5.09.tar.gz#./make.sh # ./make.sh install安装成功后,可执行文件在/usr/bin/目录下,以fdfs_为前缀,配置文件在/etc/fdfs/目录下,当然,安装源文件的conf目录中也有几个其他的配置文件。
在/etc/fdfs查看生成的配置文件:
# cd /etc/fdfs
# ls
client.conf.sample storage.conf.sample tracker.conf.sample storage_ids.conf.sample# mv client.conf.sample client.conf
# mv storage.conf.sample storage.conf
# mv tracker.conf.sample tracker.conf
# mv storage_ids.conf.sample storage_ids.conf
tracker.conf 中修改以下几处,采用server id作为存储服务器标识,以便以后的迁移。
# the base path to store data and log files
base_path=/data/fdfs/base

# if use storage ID instead of IP address
# default value is false
# since V4.00
use_storage_id = true

# specify storage ids filename, can use relative or absolute path
# since V4.00
storage_ids_filename = storage_ids.conf

# id type of the storage server in the filename, values are:
## ip: the ip address of the storage server
## id: the server id of the storage server
# this paramter is valid only when use_storage_id set to true
# default value is ip
# since V4.03
id_type_in_filename = id
在storage.conf中修改,groupname暂定为group1,tracker_server改为内网地址
# the name of the group this storage server belongs to
#
# comment or remove this item for fetching from tracker server,
# in this case, use_storage_id must set to true in tracker.conf,
# and storage_ids.conf must be configed correctly.
group_name=group1

# the base path to store data and log files
base_path=/data/fdfs/base

# store_path#, based 0, if store_path0 not exists, it's value is base_path
# the paths must be exist
store_path0=/data/fdfs/store_group1

# tracker_server can ocur more than once, and tracker_server format is
#  "host:port", host can be hostname or ip address
tracker_server=192.168.183.128:22122
在storage_ids.conf文件中编辑:
# <id>  <group_name>  <ip_or_hostname>
 100001   group1  10.10.22.0
# 100002   group1  192.168.0.116
在client.conf中修改
# the base path to store log files
base_path=/data/fdfs/base

# tracker_server can ocur more than once, and tracker_server format is
#  "host:port", host can be hostname or ip address
tracker_server=192.168.183.128:22122

# if use storage ID instead of IP address
# same as tracker.conf
# valid only when load_fdfs_parameters_from_tracker is false
# default value is false
# since V4.05
use_storage_id = true

# specify storage ids filename, can use relative or absolute path
# same as tracker.conf
# valid only when load_fdfs_parameters_from_tracker is false
# since V4.05
storage_ids_filename = storage_ids.conf

#HTTP settings
http.tracker_server_port=8080

#use "#include" directive to include HTTP other settiongs
#include http.conf
启动tracker和storage
[root@iZ259rykn9vZ ~]# /usr/bin/fdfs_trackerd /etc/fdfs/tracker.conf
[root@iZ259rykn9vZ ~]# /usr/bin/fdfs_storaged /etc/fdfs/storage.conf
[root@iZ259rykn9vZ fdfs]# ps -ef|grep fdfs
root      1741     1  0 16:51 ?        00:00:00 /usr/local/FastDFS/bin/fdfs_trackerd /etc/fdfs/tracker.conf
root      1787     1  0 17:16 ?        00:00:00 /usr/local/FastDFS/bin/fdfs_storaged /etc/fdfs/storage.conf
root      1797 27704  0 17:17 pts/0    00:00:00 grep fdfs
EI,看来是启动成功了。
那下面来上传或者删除测试一下能不能用。
[root@iZ259rykn9vZ local]# /usr/bin/fdfs_test /etc/fdfs/client.conf upload /usr/local/86.jpg
This is FastDFS client test program v5.05

Copyright (C) 2008, Happy Fish / YuQing

FastDFS may be copied only under the terms of the GNU General
Public License V3, which may be found in the FastDFS source kit.
Please visit the FastDFS Home Page http://www.csource.org/
for more detail.

[2016-05-18 17:26:30] DEBUG - base_path=/root/fastdfsdata, connect_timeout=30, network_timeout=60, tracker_server_count=1, anti_steal_token=0, anti_steal_secret_key length=0, use_connection_pool=0, g_connection_pool_max_idle_time=3600s, use_storage_id=0, storage server id count: 0

tracker_query_storage_store_list_without_group:
	server 1. group_name=, ip_addr=12x.5x.x2.x9, port=23000

group_name=group1, ip_addr=12x.5x.x2.x9, port=23000
storage_upload_by_filename
group_name=group1, remote_filename=M00/00/00/eziEHVc8NUaABy2WAAC8HVEx1pI625.jpg
source ip address: 12x.5x.x2.x9
file timestamp=2016-05-18 17:26:30
file size=48157
file crc32=1362220690
example file url: http://12x.5x.x2.x9/group1/M00/00/00/eziEHVc8NUaABy2WAAC8HVEx1pI625.jpg
storage_upload_slave_by_filename
group_name=group1, remote_filename=M00/00/00/eziEHVc8NUaABy2WAAC8HVEx1pI625_big.jpg
source ip address: 12x.5x.x2.x9
file timestamp=2016-05-18 17:26:30
file size=48157
file crc32=1362220690
example file url: http://12x.5x.x2.x9/group1/M00/00/00/eziEHVc8NUaABy2WAAC8HVEx1pI625_big.jpg
这说明上传成功了。那再删除试试。删除文件需要完整的group_name和remote_filename。
[root@iZ259rykn9vZ local]# /usr/bin/fdfs_delete_file /etc/fdfs/client.conf group1/M00/00/00/eziEHVc8NUaABy2WAAC8HVEx1pI625.jpg
如果要添加多个group,只需添加多个storage.conf即可,修改其中的groupid,port ,tracker_server。然后使用以下方式启动OK。
/usr/bin/fdfs_storaged /etc/fdfs/storage.conf.*然后再看一下进程:
root      7086     1  0 15:31 ?        00:00:00 /usr/bin/fdfs_trackerd /etc/fdfs/tracker.conf
root      7150     1  0 15:48 ?        00:00:00 /usr/bin/fdfs_storaged /etc/fdfs/storage.group1.conf
root      7170     1  0 15:56 ?        00:00:00 /usr/bin/fdfs_storaged /etc/fdfs/storage.group2.conf
root      7181     1  0 15:56 ?        00:00:00 /usr/bin/fdfs_storaged /etc/fdfs/storage.group3.conf
root      7192     1  0 15:56 ?        00:00:00 /usr/bin/fdfs_storaged /etc/fdfs/storage.group4.conf
简略安装流程就完了。
下面安装一下nginx模块
安装fastdfs-nginx-module的依赖包:
yum install -y libevent-devel pcre-devel zlib-devel
下载fastdfs-nginx-module、nginx(http://nginx.org/en/download.html)源代码:
fastdfs-nginx-module:https://github.com/happyfish100/fastdfs-nginx-module
nginx:http://nginx.org/en/download.html
tar -xzvf nginx-1.12.0.tar.gz
cd nginx-1.12.0
./configure --prefix=/usr/local/nginx --add-module=/usr/local/fastdfs-nginx-module-master/src
make
编译没有成功,错误如下:
	/usr/local/fastdfs-nginx-module-master/src/ngx_http_fastdfs_module.c
In file included from /usr/local/fastdfs-nginx-module-master/src/ngx_http_fastdfs_module.c:6:0:
/usr/local/fastdfs-nginx-module-master/src/common.c: 在函数‘fdfs_http_request_handler’中:
/usr/local/fastdfs-nginx-module-master/src/common.c:1245:61: 错误:‘FDFSHTTPParams’没有名为‘support_multi_range’的成员
                 (pContext->range_count > 1 && !g_http_params.support_multi_range))
                                                             ^
make[1]: *** [objs/addon/src/ngx_http_fastdfs_module.o] 错误 1
make[1]: 离开目录“/usr/local/nginx-1.12.0”
make: *** [build] 错误 2
网上查了下资料,是因为fastdfs-nginx-module版本问题,我搭建的版本是Version 5.09 2016-12-29。作者还有一个5.10的发行版本,你如果没有下载最近的,整合nginx的时候可能会遇到这个问题。
遇到这个错误的原因是,在fastdfs-nginx-module的HISTORY中你可以看到:
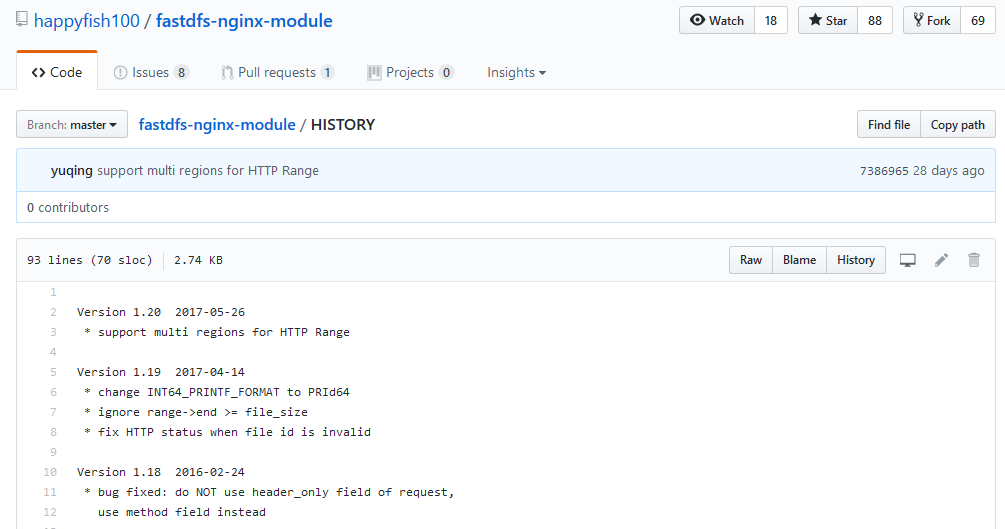
整合的时候,fastdfs-nginx-module中的support_multi_range在Version 5.10以下的版本中找不到。
Version 5.11对应的fastdfs-nginx-module的Version 1.20
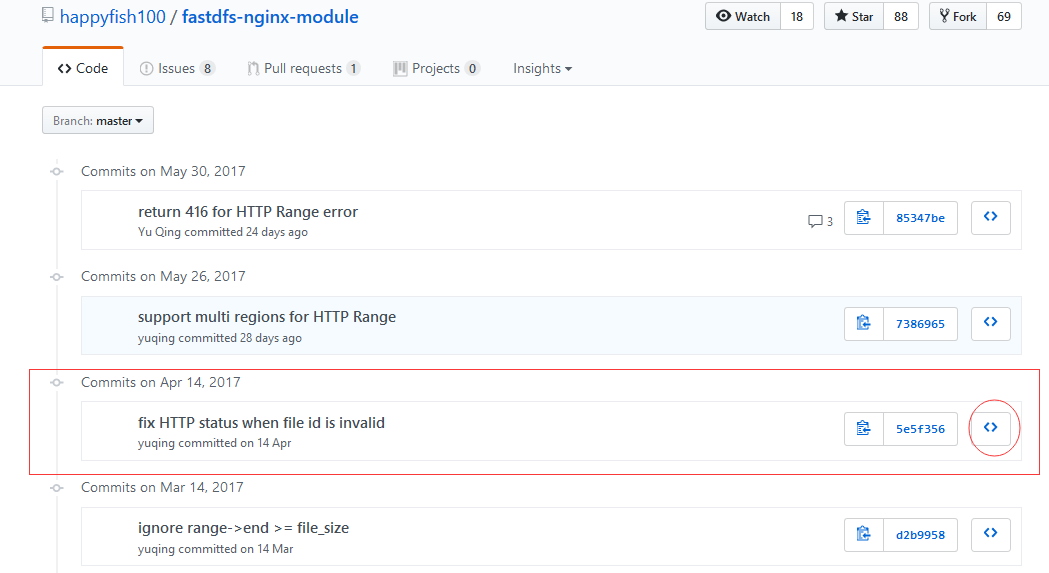
所以我这边fastdfs-nginx-module选择1.20以前的版本:
重新解压,config,编译等了一会,幸好,编译成功了,make install,Nginx安装成功了。
然后将fastdfs-nginx-module下的配置文件复制一份到/etc/fdfs/目录:
cp /usr/local/fastdfs-nginx-module/src/mod_fastdfs.conf /etc/fdfs/
修改Nginx配置文件
    server {
        listen       80;
        server_name  localhost;

        location ~ /group[0-9]/M00 {
            ngx_fastdfs_module;
        }
}# the base path to store log files
base_path=/data/fdfs/base
# if use storage ID instead of IP address
# same as tracker.conf
# valid only when load_fdfs_parameters_from_tracker is false
# default value is false
# since V1.13
use_storage_id = true
# store_path#, based 0, if store_path0 not exists, it's value is base_path
# the paths must be exist
# must same as storage.conf
store_path0=/data/fdfs/store_group1
#store_path1=/home/yuqing/fastdfs1
# if the url / uri including the group name
# set to false when uri like /M00/00/00/xxx
# set to true when uri like ${group_name}/M00/00/00/xxx, such as group1/M00/xxx
# default value is false
url_have_group_name = true
然后启动Nginx:
/usr/local/nginx/sbin/nginx
然后手动上传一图片:
# /usr/bin/fdfs_upload_file /etc/fdfs/client.conf ./QQ截图20170623110805.png
group1/M00/00/00/oYYBAFlKDieAeWa2AACnkZKtWGY917.png
在另外一主机浏览器测试,地址栏输入
http://192.168.183.128/group1/M00/00/00/oYYBAFlKDieAeWa2AACnkZKtWGY917.png
结果,其实是没反应的,啥都没有,直到超时结束。
猜测是因为防火墙的问题,查看进程:
# ps -ef|grep firewalld
root        637      1  0 6月19 ?       00:00:04 /usr/bin/python -Es /usr/sbin/firewalld --nofork --nopid
root      24040   6428  0 14:57 pts/0    00:00:00 grep --color=auto firewalld
先关了吧,
# service firewalld stop
然后再试一下,就真的可以了。


 1739
1739


 被折叠的 条评论
为什么被折叠?
被折叠的 条评论
为什么被折叠?
 到【灌水乐园】发言


