


在前面的文章《OpenCV中feature2D学习——SURF和SIFT算子实现特征点检测》中讲了利用SIFT和SURF算子进行特征点检测,这里尝试使用FAST算子来进行特征点检测。
FAST的全名是:Features from Accelerated Segment Test,主要特点值计算速度快,比已知的其他特征点检测算法要快很多倍,可用于计算机视觉应用的实时场景。目前以其高计算效率(computational performance)、高可重复性(highrepeatability)成为计算机视觉领域最流行的特征点检测方法。其缺点在于当图片中的噪点较多时,FAST算子的健壮性不好且算法的效果还依赖于一个阈值threshold,此外FAST算子不产生多尺度特征而且没有方向信息,这样就会失去旋转不变性。
FAST特征点检测的详细原理和过程可以参考:FAST特征点检测和图像处理特征不变算子系列之FAST算子(四)。相关论文:
[1] Edward Rosten and Tom Drummond,“Machine learning for high speed corner detection” in 9th European Conferenceon Computer Vision, vol. 1, 2006, pp. 430–443.
[2] Edward Rosten, Reid Porter, and TomDrummond, “Faster and better: a machine learning approach to corner detection”in IEEE Trans. Pattern Analysis and Machine Intelligence, 2010, vol 32, pp.105-119.
I、采用FAST函数进行特征检测
OpenCV中的FAST/FASTX函数用于FAST特征点检测。函数原型如下:
C++: void FAST(InputArray image, vector<KeyPoint>& keypoints, int threshold, bool nonmaxSuppression=true)
C++: void FASTX(InputArray image, vector<KeyPoint>& keypoints, int threshold, bool nonmaxSuppression, int type)
参数:
·image – 输入灰度图像。
·keypoints – 检测到的特征点。
·threshold – 中心像素的像素值和该像素周围的像素值之差的阈值。
·nonmaxSuppression – 是否对特征点采用极大值抑制。
·type – 像素邻域圆的三种类型:FastFeatureDetector::TYPE_9_16,FastFeatureDetector::TYPE_7_12, FastFeatureDetector::TYPE_5_8。
函数基本使用例子如下:
/**
* @概述: 使用FAST进行特征点检测
* @类和函数: FAST函数,FastFeatureDetector类
* @author: holybin
*/
#include <opencv2/core/core.hpp>
#include <opencv2/highgui/highgui.hpp>
#include <opencv2/imgproc/imgproc.hpp>
#include <opencv2/features2d/features2d.hpp>

using namespace cv;
using namespace std;

int main(int argc, char** argv)
{
	Mat img = imread("box_in_scene.png");

	vector<KeyPoint> keypoints;
	FAST(img, keypoints, 20);

	//-- 绘制特征点
	Mat img_keypoints;
	drawKeypoints(img, keypoints, img_keypoints, Scalar::all(-1), DrawMatchesFlags::DEFAULT);
	//-- 显示特征点
	imshow("Keypoints", img_keypoints);
	imwrite("fast_detection_result.png", img_keypoints);

	waitKey(0);
	return 0;
}
运行结果如图:

II、使用FastFeatureDetector进行FAST特征点检测
FastFeatureDetector继承自2D图像特征检测的虚基类FeatureDetector,专用于FAST特征检测,类似的还有如下类:
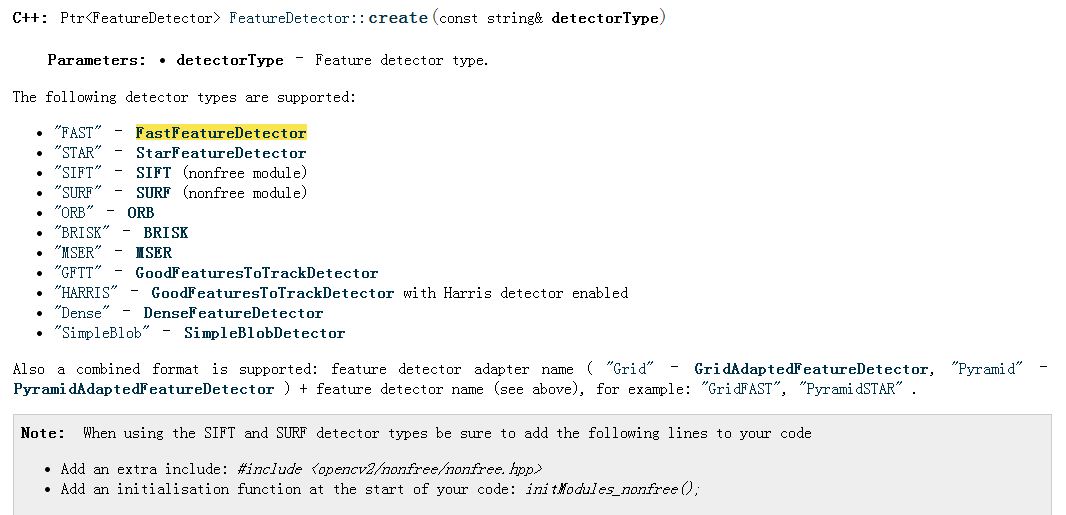
FastFeatureDetector的类定义如下:
class FastFeatureDetector : public FeatureDetector
{
public:
FastFeatureDetector( int threshold=1, bool nonmaxSuppression=true, type=FastFeatureDetector::TYPE_9_16 );
//可以看出FastFeatureDetector的构造函数默认的阈值为1,进行非极大值抑制,以及圆周像素为16个。
    virtual void read( const FileNode& fn );
virtual void write( FileStorage& fs ) const;
	//注意detect函数是定义于虚基类FeatureDetector中的。
protected:
    ...
};
FastFeatureDetector类的具体使用例子如下:
/**
* @概述: 使用FAST进行特征点检测
* @类和函数: FAST函数,FastFeatureDetector类
* @author: holybin
*/
#include <opencv2/core/core.hpp>
#include <opencv2/highgui/highgui.hpp>
#include <opencv2/imgproc/imgproc.hpp>
#include <opencv2/features2d/features2d.hpp>

using namespace cv;
using namespace std;

int main(int argc, char** argv)
{
	Mat img = imread("box_in_scene.png");

	vector<KeyPoint> keypoints;
	FastFeatureDetector fast(20);
	fast.detect(img,keypoints);

	//-- 绘制特征点
	Mat img_keypoints;
	drawKeypoints(img, keypoints, img_keypoints, Scalar::all(-1), DrawMatchesFlags::DEFAULT);
	//-- 显示特征点
	imshow("Keypoints", img_keypoints);
	imwrite("fast_detection_result.png", img_keypoints);

	waitKey(0);
	return 0;
}
运行结果如图:

这里注意到两种方法出来的效果不同,究其原因,在使用detect函数进行特征点检测时,实际调用的是FeatureDetector的各个派生类(这里是FastFeatureDetector类)中的detectImpl函数,参考detect函数源代码(位置 \OpenCV2.4.0\modules\features2d\src\detectors.cpp):
void FeatureDetector::detect( const Mat& image, vector<KeyPoint>& keypoints, const Mat& mask ) const
{
    keypoints.clear();

    if( image.empty() )
        return;

    CV_Assert( mask.empty() || (mask.type() == CV_8UC1 && mask.size() == image.size()) );

    detectImpl( image, keypoints, mask );//实际调用派生类的该函数
}
而派生类FastFeatureDetector中的detectImpl函数的源代码如下(位置 \OpenCV2.4.0\modules\features2d\src\fast.cpp):
void FastFeatureDetector::detectImpl( const Mat& image, vector<KeyPoint>& keypoints, const Mat& mask ) const
{
    Mat grayImage = image;
    if( image.type() != CV_8U ) cvtColor( image, grayImage, CV_BGR2GRAY );
    FAST( grayImage, keypoints, threshold, nonmaxSuppression );//调用FAST函数
    KeyPointsFilter::runByPixelsMask( keypoints, mask );
}
可以看到detectImpl函数调用了FAST函数来做特征点检测,而随后调用了runByPixelsMask函数来进行一些别的处理,因为所有的传入参数都是一致的,可以断定就是这些操作使得最后的检测结果不一样。但是具体操作我还不清楚,如果有大神知道望赐教。


 4315
4315


 被折叠的 条评论
为什么被折叠?
被折叠的 条评论
为什么被折叠?
 到【灌水乐园】发言


