


http://myandroidsolutions.blogspot.com/2012/11/android-custom-states-for-state-list.html
http://stackoverflow.com/questions/4336060/android-how-to-add-a-custom-button-state
https://groups.google.com/forum/#!topic/android-developers/uqr2BNI7NZo
In this tutorial I will show you how to make some custom states which will be used on an ImageButton. Of course, this states could be used for edit text and other too, but in my example I will use ImageButton :)
1. After you create a new project with the main activity called "MyActivity" go to res - values and create a new xml file called "attributes".
2. Now put the following code in the attributes.xml:
|
1
2
3
4
5
6
7
|
<
resources
>
<
declare-styleable
name
=
"CustomStates"
>
<
attr
name
=
"state_has_new_data"
format
=
"boolean"
/>
<
attr
name
=
"has_new_data"
format
=
"boolean"
/>
</
declare-styleable
>
</
resources
>
|
NOTE: The first attribute (the one with "state" prefix) is used in the selector drawable when you set the states and images for each state (see step 3) and the second attribute is used in the layout where you declare your custom image button (see step 5).
3. Now, if you don't have the drawable folder in res, you should create one. After you create the folder you have to create a image_button_selector.xml file inside the drawable folder. Before to put the code from below you should be sure you have the images which you want to use for image button (if you are doing the tutorial from scratch and want to use my images you can save them on your computer from here by right-clicking on each image and select Save image as)


Now put the following code in the
image_button_selector.xml file:
|
1
2
3
4
5
6
7
8
9
10
11
12
13
14
15
16
|
<?
xml
version
=
"1.0"
encoding
=
"utf-8"
?>
<
item
android:state_enabled
=
"true"
app:state_has_new_data
=
"false"
android:drawable
=
"@drawable/active_mail"
/>
<
item
android:state_enabled
=
"false"
app:state_has_new_data
=
"false"
android:drawable
=
"@drawable/inactive_mail"
/>
<
item
app:state_has_new_data
=
"true"
android:drawable
=
"@drawable/new_mail"
/>
</
selector
>
|
NOTE: Notice that in order to use your custom state you will have declare a second xmlns xmlns:app="http://schemas.android.com/apk/res/com.example which has at the end the name of you activity (mine is com.example).
4. Now you will have to create a new class called CustomStatesImageButton which extends ImageButton class and put the following code:
|
1
2
3
4
5
6
7
8
9
10
11
12
13
14
15
16
17
18
19
20
21
22
23
24
25
26
27
28
29
30
31
32
33
34
35
36
37
38
39
40
41
42
43
44
45
46
47
48
49
50
51
52
53
54
55
56
57
58
59
60
61
62
63
64
65
66
67
68
69
70
71
72
73
74
75
76
77
78
79
80
81
82
|
package
com.example;
import
android.content.Context;
import
android.content.res.TypedArray;
import
android.util.AttributeSet;
import
android.widget.ImageButton;
public
class
CustomStatesImageButton
extends
ImageButton {
// this is used when we want to merge our state with the ones from the system
private
static
final
int
[] HAS_NEW_DATA_STATE_SET = {R.attr.state_has_new_data};
private
boolean
hasNewData;
public
CustomStatesImageButton(Context context) {
super
(context);
}
public
CustomStatesImageButton(Context context, AttributeSet attrs) {
super
(context, attrs);
loadAttributes(context, attrs);
}
public
CustomStatesImageButton(Context context, AttributeSet attrs,
int
defStyle) {
super
(context, attrs, defStyle);
loadAttributes(context, attrs);
}
private
void
loadAttributes(Context context, AttributeSet attributeSet) {
// R.styleable.CustomStates is the id of the custom state and CustomStates it's the name of your styleable
// from attributes.xml
TypedArray typedArray = context.obtainStyledAttributes(attributeSet, R.styleable.CustomStates,
0
,
0
);
// R.styleable.CustomStates_has_new_data is an ID that is created automatically when you create your
// custom state list in attributes.xml
hasNewData = typedArray.getBoolean(R.styleable.CustomStates_has_new_data,
false
);
}
@Override
public
int
[] onCreateDrawableState(
int
extraSpace) {
final
int
[] drawableState =
super
.onCreateDrawableState(extraSpace +
1
);
if
(hasNewData) {
mergeDrawableStates(drawableState, HAS_NEW_DATA_STATE_SET);
}
return
drawableState;
}
@Override
public
void
setEnabled(
boolean
enabled) {
// If the image button was set to Has New Data state and then the user changed the state to Enabled
// then we have to make the hasNewData flag to false
if
(enabled) {
hasNewData =
false
;
}
super
.setEnabled(enabled);
// Call this to force a view to update its drawable state. This will cause drawableStateChanged to be
// called on this view. Views that are interested in the new state should call getDrawableState.
refreshDrawableState();
}
public
boolean
hasNewData(){
return
hasNewData;
}
// this method will be used when you will need to set your image button state in the code
public
void
setNewData(
boolean
hasNewData){
this
.hasNewData = hasNewData;
// Call this to force a view to update its drawable state. This will cause drawableStateChanged to be
// called on this view. Views that are interested in the new state should call getDrawableState.
refreshDrawableState();
}
}
|
|
1
2
3
4
5
6
7
8
9
10
11
12
13
14
15
16
17
18
19
20
21
|
<?
xml
version
=
"1.0"
encoding
=
"utf-8"
?>
android:orientation
=
"vertical"
android:layout_width
=
"fill_parent"
android:layout_height
=
"fill_parent"
>
<
com.example.CustomStatesImageButton
android:layout_width
=
"wrap_content"
android:layout_height
=
"wrap_content"
android:id
=
"@+id/custom_image_button"
android:background
=
"@drawable/image_button_selector"
app:has_new_data
=
"false"
/>
<
Button
android:layout_width
=
"wrap_content"
android:layout_height
=
"wrap_content"
android:id
=
"@+id/button"
android:text
=
"Change State"
/>
</
LinearLayout
>
|
As you can see from the above code you will have to put the name of your package and the name of the custom image button instead of ImageButton class. Also notice that you will have to use the second xmlns like you have seen at the step 3 in order to use our custom state app:has_new_data="false"
6. Now go to MyActivity class and put the following code:
|
1
2
3
4
5
6
7
8
9
10
11
12
13
14
15
16
17
18
19
20
21
22
23
24
25
26
27
28
29
30
31
32
33
34
35
36
37
38
39
40
41
42
43
44
45
46
|
package
com.example;
import
android.app.Activity;
import
android.os.Bundle;
import
android.view.View;
import
android.widget.Button;
public
class
MyActivity
extends
Activity {
// create an enum to hold the states of the image button
enum
States{
ENABLED,
DISABLED,
NEW_MAIL
}
// initialize the enum with the Enabled state
States enumStates = States.ENABLED;
@Override
public
void
onCreate(Bundle savedInstanceState) {
super
.onCreate(savedInstanceState);
setContentView(R.layout.main);
Button button = (Button)findViewById(R.id.button);
final
CustomStatesImageButton imageButton = (CustomStatesImageButton)findViewById(R.id.custom_image_button);
// when you click on the Change State button your image from the image button will change
button.setOnClickListener(
new
View.OnClickListener() {
@Override
public
void
onClick(View view) {
if
(enumStates == States.ENABLED){
imageButton.setEnabled(
false
);
enumStates = States.DISABLED;
}
else
if
(enumStates == States.DISABLED){
imageButton.setNewData(
true
);
enumStates = States.NEW_MAIL;
}
else
if
(enumStates == States.NEW_MAIL){
imageButton.setEnabled(
true
);
enumStates = States.ENABLED;
}
}
});
}
}
|
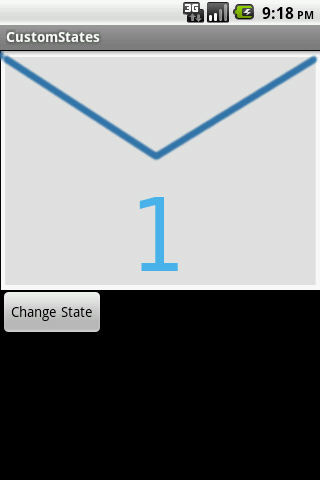
NOTE: Don't laugh too much of my mail buttons :P. I created them myself and I didn't pay very much attention to their design and size because I thought that the purpose of this tutorial is to show you how to make custom states not beautiful buttons :P


 1万+
1万+

 被折叠的 条评论
为什么被折叠?
被折叠的 条评论
为什么被折叠?
 到【灌水乐园】发言


