Android Jetpack Compose基础之Compose视图结构

引言:Compose视图是如何构成的,如何运行在传统的View上的呢

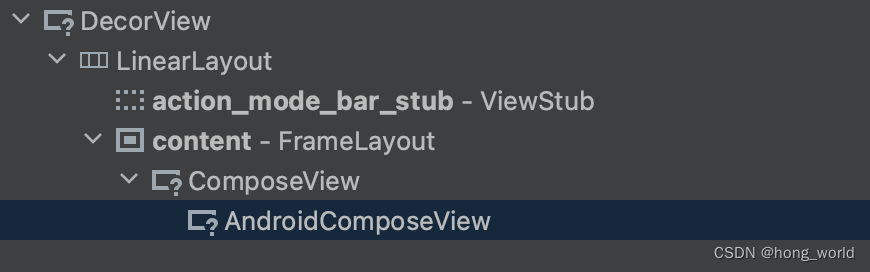
Compose ui是由视图树组成,树是由LayoutNode构成,Composable最终统一由CompseView进行管理,ComposeView是连接传统View和Compose的桥梁。通过布局查看器查看布局结构如下
请添加图片描述
接下来一次介绍它们

什么是AbstractComposeView

它有三个子类ComposeView、DialogLayout、PopupLayout子类,分别对应Android下Activity、Dialog、Popup的window窗口,它是对Android系统下的各类窗口进行适配,并生成对应的Compose。

ComposeView它又是什么 (ViewGroup)

它继承自AbstractComposeView,负责对Android平台的Activity的窗口进行适配;
1、ComposeView接入传统的View视图后,内部的ui都在Compose内部完成,来自AndroidComposeView的绘制,测量布局、手势事件分发都是下沉到LayoutNode去完成

class ComposeView @JvmOverloads constructor(
    context: Context,
    attrs: AttributeSet? = null,
    defStyleAttr: Int = 0
) : AbstractComposeView(context, attrs, defStyleAttr) {}

AndroidComposeView作用

它是ComposeView唯一的子节点,它也是一个ViewGroup,也是LayoutNode视图树的持有者它的结构如下

internal class AndroidComposeView(
    context: Context,
    override val coroutineContext: CoroutineContext
) : ViewGroup(context), Owner, ViewRootForTest, PositionCalculator, DefaultLifecycleObserver {
    override val root = LayoutNode().also {
        it.measurePolicy = RootMeasurePolicy
        it.density = density
        // Composed modifiers cannot be added here directly
        it.modifier = Modifier
            .then(semanticsModifier)
            .then(rotaryInputModifier)
            .then(focusOwner.modifier)
            .then(keyInputModifier)
            .then(dragAndDropModifierOnDragListener.modifier)
    }
    //...
    override fun onResume(owner: LifecycleOwner) {}
    override fun onAttach(node: LayoutNode) {}
    override fun onDetach(node: LayoutNode) {}
    override fun dispatchKeyEvent(event: AndroidKeyEvent): Boolean {}
    //...
}

AndroidComposeView它的创建过程

1、在Activity中的onCreate方法中调用ComposeActivity的拓展函数setContent方法

public fun ComponentActivity.setContent(
    parent: CompositionContext? = null,
    content: @Composable () -> Unit
) {
    val existingComposeView = window.decorView
        .findViewById<ViewGroup>(android.R.id.content)
        .getChildAt(0) as? ComposeView

    if (existingComposeView != null) with(existingComposeView) {
        setParentCompositionContext(parent)
        setContent(content)
    } else ComposeView(this).apply {
        // Set content and parent **before** setContentView
        // to have ComposeView create the composition on attach
        setParentCompositionContext(parent)
        setContent(content)
        // Set the view tree owners before setting the content view so that the inflation process
        // and attach listeners will see them already present
        setOwners()
        setContentView(this, DefaultActivityContentLayoutParams)
    }
}

2、然后调用ComposeView中的setContent方法创建AndroidComposeView视图,调用细节如下

1、setContent方法调用ComposeView父类AbstractComposeView 中的createComposition方法
2、调用AbstractComposeView 中的ensureCompositionCreated方法,方法内调用
3、调用AbstractComposeView 中的setContent方法创建AndroidComposeView
//ComposeView源码如下
class ComposeView @JvmOverloads constructor(
    context: Context,
    attrs: AttributeSet? = null,
    defStyleAttr: Int = 0
) : AbstractComposeView(context, attrs, defStyleAttr) {
	//...
    fun setContent(content: @Composable () -> Unit) {
        shouldCreateCompositionOnAttachedToWindow = true
        this.content.value = content
        if (isAttachedToWindow) {
            createComposition()
        }
    }
}
	//调用AbstractComposeView 中的createComposition方法
    fun createComposition() {
        check(parentContext != null || isAttachedToWindow) {
            "createComposition requires either a parent reference or the View to be attached" +
                "to a window. Attach the View or call setParentCompositionReference."
        }
        ensureCompositionCreated()
    }
	//调用AbstractComposeView 中的ensureCompositionCreated方法
    private fun ensureCompositionCreated() {
        if (composition == null) {
            try {
                creatingComposition = true
                //调用AbstractComposeView 中的setContent方法创建AndroidComposeView
                composition = setContent(resolveParentCompositionContext()) {
                    Content()
                }
            } finally {
                creatingComposition = false
            }
        }
    }
    
    internal fun AbstractComposeView.setContent(
    parent: CompositionContext,
    content: @Composable () -> Unit
): Composition {
    GlobalSnapshotManager.ensureStarted()
    val composeView =
        if (childCount > 0) {
            getChildAt(0) as? AndroidComposeView
        } else {
            removeAllViews(); null
        } ?: AndroidComposeView(context, parent.effectCoroutineContext).also {
            addView(it.view, DefaultLayoutParams)
        }
    return doSetContent(composeView, parent, content)
}

Compose模块划分

1、在开发阶段:Studio提供静态代码检测,和ui的实时预览
2、编译阶段:Compose plugin 会对@Composable注解进行预处理,通过代码插入提高编码效率
3、在运行阶段:Compose被分为了四层,从上至下依次为:
Material:基于Material design系统实现各种的Composable、主题、图标,如果app遵循Material design设计,则使用该层进行构建

Foundation:提供基础的Compsable,例如Row、Columun、LazyColumn等布局ui,以及特定的手势识别等通用功能

UI:包含很多功能,例如ui-text、ui-tooling等,构成了上层Compsable运行的基础,例如Compsable的测量、布局、绘制、事件、Modifier管理

Runtime:核心模块,Compose是通过ui树进的diff驱动洁面刷新的,此模块提供了基本的ui树的管理能力,如果只需要树的管理能力,不需要ui,则可以在此层进行构建

------笔记 End------

  • 28
    点赞
  • 25
    收藏
    觉得还不错? 一键收藏
  • 1
    评论
Jetpack Compose SubcomposeLayout 是 Jetpack Compose 中的一个布局组件,它可以让你在一个布局中嵌套另一个布局,并且可以对嵌套的布局进行灵活的控制。 使用 SubcomposeLayout,你可以将一个布局划分为多个子布局,并根据需要动态地添加、删除或替换子布局。这对于需要根据不同的条件显示不同的布局结构非常有用。 要使用 SubcomposeLayout,首先你需要实现一个 SubcomposeLayoutModifier,它是一个用于管理子布局的修饰符。在这个修饰符中,你可以定义子布局的数量、位置和大小,并将它们传递给具体的子布局组件。 接下来,在你的布局中使用 SubcomposeLayout 组件,并将你实现的 SubcomposeLayoutModifier 应用到它上面。然后,在 SubcomposeLayoutModifier 中,你可以使用 subcompose 函数来创建和管理子布局。 例如,下面是一个简单的示例,展示了如何使用 SubcomposeLayout 来实现一个具有动态子视图的布局: ```kotlin @Composable fun DynamicLayout() { val state = remember { mutableStateOf(true) } SubcomposeLayout { constraints -> val subcompose = subcompose { if (state.value) { Text("First View") } else { Text("Second View") } } val sublayout = subcompose.first() layout(sublayout.measure(constraints)) { sublayout.place(0, 0) } } } ``` 在这个示例中,我们使用 SubcomposeLayout 创建了一个布局,并在布局中根据 `state` 的值动态选择显示不同的文本视图。当 `state` 的值为 `true` 时,显示 "First View",否则显示 "Second View"。 总结来说,Jetpack Compose SubcomposeLayout 是一个非常强大的布局组件,可以帮助你实现动态的子布局结构,使你的界面更加灵活和可扩展。

“相关推荐”对你有帮助么?

  • 非常没帮助
  • 没帮助
  • 一般
  • 有帮助
  • 非常有帮助
提交
评论 1
添加红包

请填写红包祝福语或标题

红包个数最小为10个

红包金额最低5元

当前余额3.43前往充值 >
需支付:10.00
成就一亿技术人!
领取后你会自动成为博主和红包主的粉丝 规则
hope_wisdom
发出的红包
实付
使用余额支付
点击重新获取
扫码支付
钱包余额 0

抵扣说明:

1.余额是钱包充值的虚拟货币,按照1:1的比例进行支付金额的抵扣。
2.余额无法直接购买下载,可以购买VIP、付费专栏及课程。

余额充值