


一、View动画的实现原理
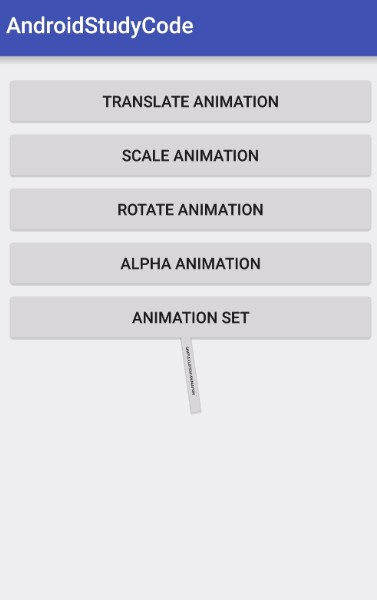
View 动画的简单使用,以平移动画为例
TranslateAnimation translateAnimation = new TranslateAnimation(0, 0, 200, 200);
translateAnimation.setDuration(1000);
// 开始动画
view.startAnimation(translateAnimation);
看看View里面的startAnimation()方法
public void startAnimation(Animation animation) {
    animation.setStartTime(Animation.START_ON_FIRST_FRAME);
    setAnimation(animation);
    invalidate();
}

public void setAnimation(Animation animation) {
    mCurrentAnimation = animation;
    if (animation != null) {
        animation.reset();
    }
}
先是调用View.setAnimation(Animation)方法给自己设置一个Animation对象,这个对象是View类中的一个名为mCurrentAnimation的成员变量。
然后它调用invalidate()来重绘自己。
调用 invalidate() 方法之后,会让 ViewRootImpl 调用 scheduleTraversals() 发起一个重绘请求,通过 Choreographer 发送一个异步消息,同时在 Choreographer 中处理消息,最终回调到 performTraversals() 执行重绘。
当执行 performTraversals() 方法后,会进行重绘,最终会调用 view 的 draw() 函数进行绘制,在绘制函数中如果发现 getAnimation() 不为 null,将进行动画绘制,执行 applyLegacyAnimation() 方法
下面来看看View.draw(Canvas, ViewGroup, long)
boolean draw(Canvas canvas, ViewGroup parent, long drawingTime) {

    // ......

    // 得到前面设置的Animation,也就是我们需要执行的动画
    final Animation a = getAnimation();
    if (a != null) {
        // 执行动画
        more = drawAnimation(parent, drawingTime, a, scalingRequired);
        concatMatrix = a.willChangeTransformationMatrix();
        if (concatMatrix) {
            mPrivateFlags3 |= PFLAG3_VIEW_IS_ANIMATING_TRANSFORM;
        }
        transformToApply = parent.getChildTransformation();
    } else {
         // ......
    }

    // ......

    return more;
}
下面我们来看看动画的执行流程
private boolean drawAnimation(ViewGroup parent, long drawingTime,
        Animation a, boolean scalingRequired) {
    Transformation invalidationTransform;
    final int flags = parent.mGroupFlags;
    final boolean initialized = a.isInitialized();
    if (!initialized) {
        // 动画的初始化
        a.initialize(mRight - mLeft, mBottom - mTop, parent.getWidth(), parent.getHeight());
        a.initializeInvalidateRegion(0, 0, mRight - mLeft, mBottom - mTop);
        if (mAttachInfo != null) a.setListenerHandler(mAttachInfo.mHandler);
        onAnimationStart();
    }

    final Transformation t = parent.getChildTransformation();
    boolean more = a.getTransformation(drawingTime, t, 1f);
    if (scalingRequired && mAttachInfo.mApplicationScale != 1f) {
        if (parent.mInvalidationTransformation == null) {
            parent.mInvalidationTransformation = new Transformation();
        }
        invalidationTransform = parent.mInvalidationTransformation;
        // 执行动画
        a.getTransformation(drawingTime, invalidationTransform, 1f);
    } else {
        invalidationTransform = t;
    }

    if (more) {
        if (!a.willChangeBounds()) {
            if ((flags & (ViewGroup.FLAG_OPTIMIZE_INVALIDATE | ViewGroup.FLAG_ANIMATION_DONE)) ==
                    ViewGroup.FLAG_OPTIMIZE_INVALIDATE) {
                parent.mGroupFlags |= ViewGroup.FLAG_INVALIDATE_REQUIRED;
            } else if ((flags & ViewGroup.FLAG_INVALIDATE_REQUIRED) == 0) {
                // The child need to draw an animation, potentially offscreen, so
                // make sure we do not cancel invalidate requests
                parent.mPrivateFlags |= PFLAG_DRAW_ANIMATION;
                parent.invalidate(mLeft, mTop, mRight, mBottom);
            }
        } else {
            if (parent.mInvalidateRegion == null) {
                parent.mInvalidateRegion = new RectF();
            }
            final RectF region = parent.mInvalidateRegion;
            a.getInvalidateRegion(0, 0, mRight - mLeft, mBottom - mTop, region,
                    invalidationTransform);

            // The child need to draw an animation, potentially offscreen, so
            // make sure we do not cancel invalidate requests
            parent.mPrivateFlags |= PFLAG_DRAW_ANIMATION;

            final int left = mLeft + (int) region.left;
            final int top = mTop + (int) region.top;
            parent.invalidate(left, top, left + (int) (region.width() + .5f),
                    top + (int) (region.height() + .5f));
        }
    }
    return more;
}
在上面的代码中看到,会调用用 Animation 的 initialize() 方法以及 getTransformation() 方法 ,在 getTransformation() 中会调用 applyTransformation() 方法。
这个方法TranslateAnimation没有实现,我们看看它的父类Animation的getTransformation()方法。
Animation在其getTransformation函数被调用时会计算一帧动画数据,并且我们需要了解Animation的下面属性。
mStartTime:动画实际开始时间
mStartOffset:动画延迟时间
mFillEnabled:mFillBefore及mFillAfter是否使能
mFillBefore:动画结束之后是否需要进行应用动画
mFillAfter:动画开始之前是否需要进行应用动画
mDuration:单次动画运行时长
mRepeatMode:动画重复模式(RESTART、REVERSE)
mRepeatCount:动画重复次数(INFINITE,直接值)
mInterceptor:动画插间器
mListener:动画开始、结束、重复回调监听器
准备工作完毕,我们来具体看看代码实现。
public boolean getTransformation(long currentTime, Transformation outTransformation,
        float scale) {
    mScaleFactor = scale;
    return getTransformation(currentTime, outTransformation);
}

public boolean getTransformation(long currentTime, Transformation outTransformation) {
    // 若startTime为START_ON_FIRST_FRAME(值为-1)时,将startTime设定为curTime
    if (mStartTime == -1) {
        mStartTime = currentTime;
    }

    final long startOffset = getStartOffset();
    final long duration = mDuration;
    float normalizedTime;
    if (duration != 0) {
        // 计算当前动画进度
        normalizedTime = ((float) (currentTime - (mStartTime + startOffset))) /
                (float) duration;
    } else {
        // time is a step-change with a zero duration
        normalizedTime = currentTime < mStartTime ? 0.0f : 1.0f;
    }

    final boolean expired = normalizedTime >= 1.0f;
    mMore = !expired;

    if (!mFillEnabled) normalizedTime = Math.max(Math.min(normalizedTime, 1.0f), 0.0f);

    if ((normalizedTime >= 0.0f || mFillBefore) && (normalizedTime <= 1.0f || mFillAfter)) {
        if (!mStarted) {
            // 若当前为第一帧动画,触发mListener.onAnimationStart
            fireAnimationStart();
            mStarted = true;
            if (USE_CLOSEGUARD) {
                guard.open("cancel or detach or getTransformation");
            }
        }

        if (mFillEnabled) normalizedTime = Math.max(Math.min(normalizedTime, 1.0f), 0.0f);

        if (mCycleFlip) {
            normalizedTime = 1.0f - normalizedTime;
        }
        // 根据插间器mInterpolator调整动画进度
        final float interpolatedTime = mInterpolator.getInterpolation(normalizedTime);
        // 执行动画
        applyTransformation(interpolatedTime, outTransformation);
    }


    // 是否动画执行完成
    if (expired) {
        // 是否重复执行动画
        if (mRepeatCount == mRepeated) {
            if (!mEnded) {
                mEnded = true;
                guard.close();
                // 触发mListener.onAnimationEnd
                fireAnimationEnd();
            }
        } else {
            if (mRepeatCount > 0) {
                mRepeated++;
            }

            if (mRepeatMode == REVERSE) {
                mCycleFlip = !mCycleFlip;
            }

            mStartTime = -1;
            mMore = true;
            // mListener.onAnimationRepeat
            fireAnimationRepeat();
        }
    }

    if (!mMore && mOneMoreTime) {
        mOneMoreTime = false;
        return true;
    }

    return mMore;
}
从上面,我们知道两点:
1、插值器可以控制动画执行的进度
2、真正的每一帧动画是在applyTransformation() 方法中。
二、View动画的自定义实现
从上面可以看到实现自定义的动画,我们只需要实现applyTransformation()就可以了。
我们首先来说说动画的原理。
实际上我们平常利用 Matrix 来进行 Translate(平移)、Scale(缩放)、Rotate(旋转)的操作,就是在操作着这个矩阵中元素的数值来达到我们想要的效果。
Matrix 是 Android SDK 提供的一个矩阵类,它代表一个 3 X 3 的矩阵
Translate(平移)、Scale(缩放)、Rotate(旋转)的基本矩阵运算。
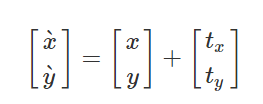
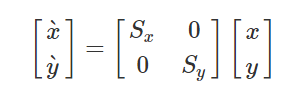
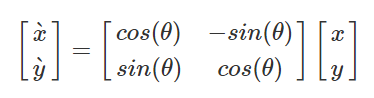
如上,可以依次看到平移、缩放、旋转的矩阵,其中
x’,y’)表示执行操作后的点的坐标,(x,y)表示执行操作前的点的坐标
tx、ty 分别表示x轴、y轴上平移的距离,Sx、Sy 分别表示x轴、y轴上的缩放比例
θ 则表示旋转角度
计算机图形应用涉及到几何变换,主要包括平移、旋转、缩放。以矩阵表达式来计算这些变换时,平移是矩阵相加,旋转和缩放则是矩阵相乘。为了方便计算,所以引入齐次坐标,将平移的加法合并用乘法表示。所以,上面的2 X 2 的矩阵经过一番变换后,成了下面这样的。


一个 Matrix 共有 9 个元素,那么它每个元素的值发生改变会起到什么作用呢?按照前面所示的齐次坐标转换得到 3 X 3 的矩阵和 Android 文档提供的官方结构相对应,我们不难看出下面的对应关系。
从这我们可以看出这个 Matrix 结构中的每个参数发挥着如下作用:
MTRANS_X、MTRANS_Y 同时控制着 Translate
MSCALE_X、MSCALE_Y 同时控制着 Scale
MSCALE_X、MSKEW_X、MSCALE_Y、MSKEW_Y 同时控制着 Rotate
从名称上看,我们可以顺带看出 MSKEW_X、MSKEW_Y 同时控制着 Skew
理解了上面使用Matrix来进行动画操作之后,我们下面就可以进行动画的自定义了。
public class SimpleCustomAnimation extends Animation {

    private int mWidth, mHeight;

    @Override
    public void initialize(int width, int height, int parentWidth, int parentHeight) {
        super.initialize(width, height, parentWidth, parentHeight);
        this.mWidth = width;
        this.mHeight = height;
    }

    @Override
    protected void applyTransformation(float interpolatedTime, Transformation t) {
        Matrix matrix = t.getMatrix();
        matrix.preScale(interpolatedTime, interpolatedTime);//缩放
        matrix.preRotate(interpolatedTime * 360);//旋转
        //下面的Translate组合是为了将缩放和旋转的基点移动到整个View的中心,不然系统默认是以View的左上角作为基点
        matrix.preTranslate(-mWidth / 2, -mHeight / 2);
        matrix.postTranslate(mWidth / 2, mHeight / 2);
    }
}
Matrix 复合变换中 pre 、 post 等操作与其对应的矩阵发生的左乘、右乘变化。
四、通过调用栈来验证上面分析的执行过程
上面分析了整个执行过程,下面我们可以通过调用栈来看看这个过程是否正确的。方法很简单。
在上面的SimpleCustomAnimation的applyTransformation方法中,我们打印一下栈的信息,这样,我们就可以知道从View.startAnimation()到最终执行动画的一帧applyTransformation()的方法调用过程。
参考文章:
Android Animation运行原理详解


 1092
1092

 被折叠的 条评论
为什么被折叠?
被折叠的 条评论
为什么被折叠?
 到【灌水乐园】发言


