


最近的项目使用到了spring boot,相比之前使用spring来说,的确方便很多,不再需要单独引入各个jar包依赖,只需引入spring boot 需要的起步依赖即可,spring boot的自动配置会帮我们要依赖的事情做完。spring boot还支持条件化配置,即可以使用自定义配置覆盖自动配置。比如:
    @Bean
    @ConditionalOnMissingBean({JdbcOperations.class})
    public JdbcTemplate jdbcTemplate() {
        return new JdbcTemplate(this.dataSource);
    }
这里使用到条件化注解@ConditionalOnMissingBean,意思是如果classpath下找不到JdbcOperations(即JdbcTemplate实现的接口)的bean实例时候才会去创建JdbcTemplate的bean。如果已经存在了JdbcOperations的实例,这个自动配置是不生效的,会被覆盖。
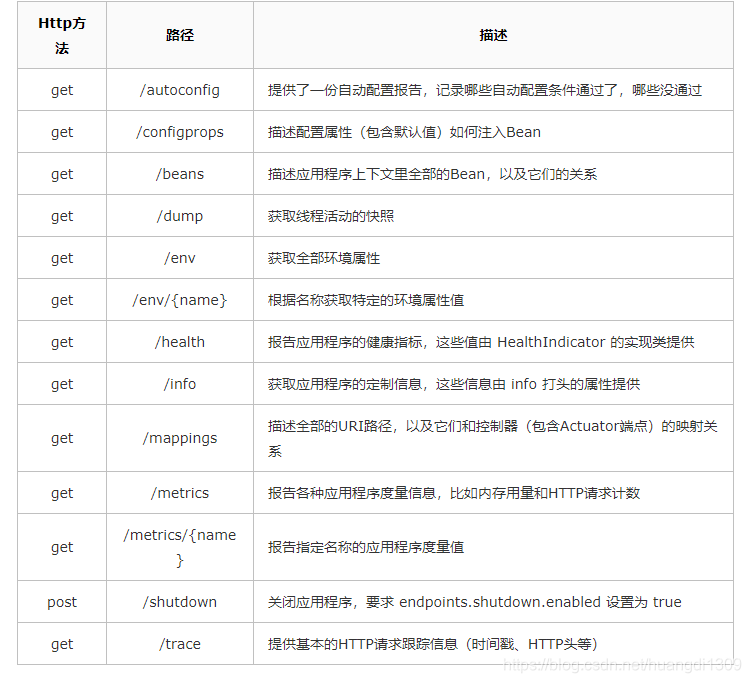
这里主要说spring boot的一个监控组件Actuator,它可以监控你的应用程序情况。有了actuator你可以知道bean在spring上下文是如何组装在一起的,时刻了解环境属性信息,获取运行时度量信息快照等。
Actuator提供13个端点,可以分为三大类:配置端点、度量端点和其他端点:如下图
Gradle依赖如下:
compile ‘org.springframework.boot:spring-boot-starter-actuator’
maven引入以下依赖:
org.springframework.boot
spring-boot-starter-actuator
在yml文件加上:
management:
  context-path: /mgmt
启动application后浏览器输入:http://localhost:8080/mgmt/autoconfig 查看条件配置通过和未通过的bean
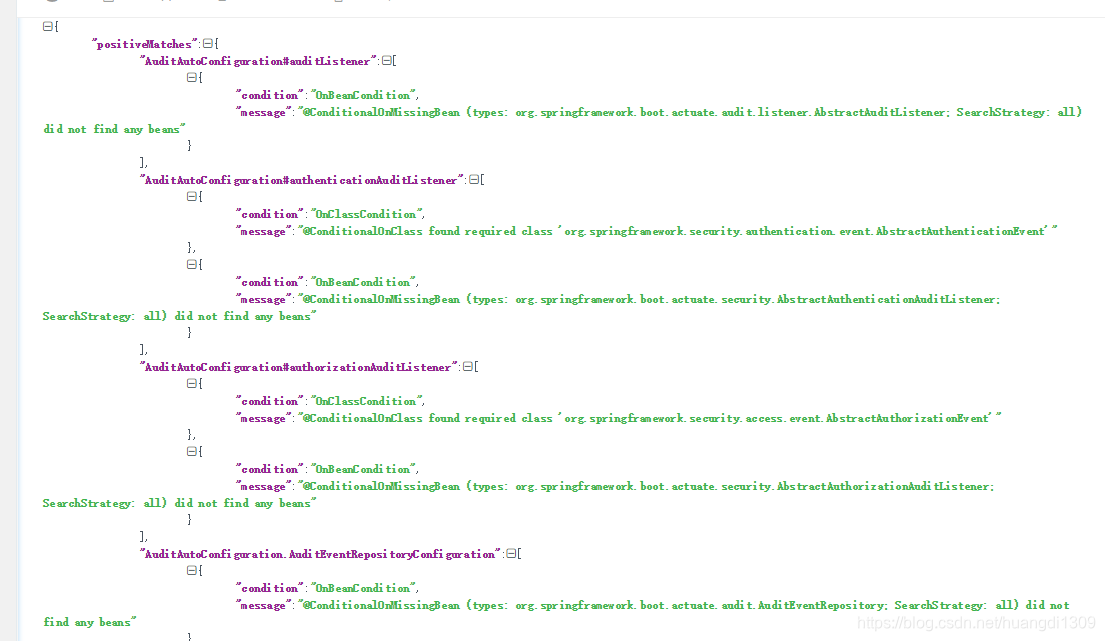
其它的端点一样可以通过此方式查看。
监控作为系统重要的一部分,不可能向所有人开放,因此需要控制权限,spring security可以做到控制。
引入起步依赖:
compile("org.springframework.boot:spring-boot-starter-security")
import org.springframework.beans.factory.annotation.Autowired;
import org.springframework.context.annotation.Configuration;
import org.springframework.security.config.annotation.authentication.builders.AuthenticationManagerBuilder;
import org.springframework.security.config.annotation.web.builders.HttpSecurity;
import org.springframework.security.config.annotation.web.configuration.WebSecurityConfigurerAdapter;
import org.springframework.security.core.userdetails.UserDetails;
import org.springframework.security.core.userdetails.UserDetailsService;
import org.springframework.security.core.userdetails.UsernameNotFoundException;

@Configuration
public class SecurityConfig extends WebSecurityConfigurerAdapter {

  @Autowired
  private ReaderRepository readerRepository;

  @Override
  protected void configure(HttpSecurity http) throws Exception {
    http
      .authorizeRequests()
        .antMatchers("/").access("hasRole('READER')")
        .antMatchers("/mgmt/**").access("hasRole('ADMIN')")
        .antMatchers("/**").permitAll()
      .and()
      .formLogin()
        .loginPage("/login")
        .failureUrl("/login?error=true");
  }

  @Override
  protected void configure(
              AuthenticationManagerBuilder auth) throws Exception {
    auth
      .userDetailsService(new UserDetailsService() {
        @Override
        public UserDetails loadUserByUsername(String username)
            throws UsernameNotFoundException {
          UserDetails user = readerRepository.findOne(username);
          if (user != null) {
            return user;
          }
          throw new UsernameNotFoundException("User '" + username + "' not found.");
        }
      })
      .and()
      .inMemoryAuthentication()
        .withUser("manager").password("s3cr3t").roles("ADMIN");
  }

}
这样内存分配了一个拥有ROLE_ADMIN角色的用户,只有有这个角色的用户才有权限访问actuator端点。
actuator的metres提供度量信息(metrics端点)可以帮助我们更好的了解应用程序情况,但是有时候我们还需要额外的度量信息,这时候可以自定义。CounterService接口定义了3个方法,分别用来增加、减少、重置特定名称的度量值,如下:
public interface CounterService{
  void increment(String metricName);
  void decrement(String metricName);
  void reset(String metricName);
}
还可以通过GaugeService接口的submit方法将某个值记录到指定名称的度量值里。
public interface GaugeService{
  void submit(String metricName, double value);
}
查看actuator还能通过连接远程shell方式。
gradle依赖将compile 'org.springframework.boot:spring-boot-starter-actuator’换成
compile("org.springframework.boot:spring-boot-starter-remote-shell")
启动程序后,通过ssh连接,每次启动程序会生成密码,格式为:
Using default security password: a3fca416-76ed-4098-bf8a-285988841693
查看端点:autoconfig(支持autoconfig、beans、metrics),其它端点可以通过endpoint invoke xxx
支持如下端点
比如要看health,则 endpoint invoke health
autoconfig端点如下图:
如图: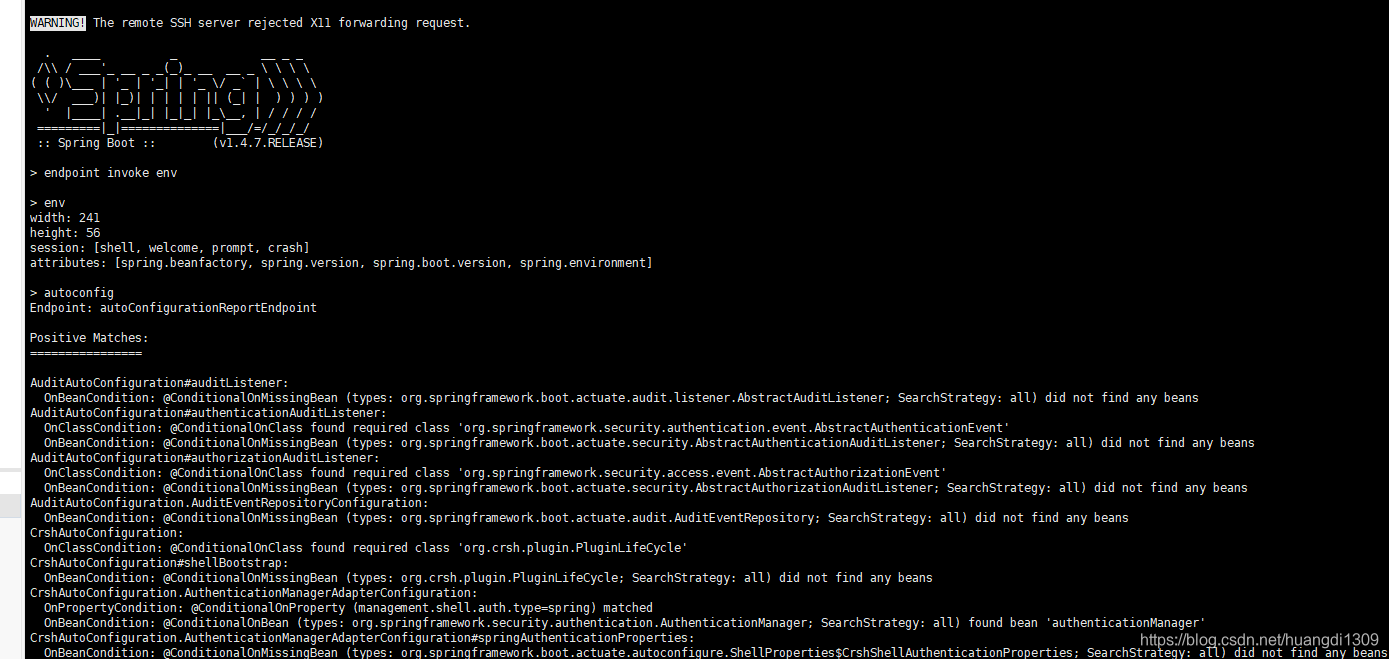
如果不想开启所有端点,可以通过properties或在yml里配置
endpoints:
  metrics:
    enabled: false
如果只想开启metrics,其它都关闭
endpoints:
  enabled: false
  metrics:
    enabled: true
分割线-------------------------------------------------------------------------------------------------------------------------
这几天又发现还可以通过图形界面来监控应用,特意来补充下
服务发现是使用的consul,所有的spring boot应用都注册到consul上,主要通过引入spring-boot-admin-starter-client:2.0.4 以及 spring-boot-admin-starter-server:2.0.4来实现
注意:需要启动consul服务端 这里就不做说明了,-_-
服务端(独立的一个应用)配置如下:
bulid.gradle引入依赖:
    compile ('de.codecentric:spring-boot-admin-starter-server:2.0.4')
    compile ('org.springframework.boot:spring-boot-starter-security')
    compile ('io.netty:netty-transport-native-epoll:4.1.15.Final')
yml文件:
server:
  port: 19500
  logger:
    level:
      console: INFO

consul-server-ip-address: 192.168.x.xx #consul服务地址

management:
  endpoints:
    beans:
      enabled: false
    web:
      exposure:
        include: "*"
  endpoint:
      health:
        show-details: ALWAYS

spring:
  application:
    name: server-ms-admin
  cloud:
    consul:
      host: ${consul-server-ip-address}
      port: 18300
      discovery:
        prefer-ip-address: true
        service-name: ${spring.application.name}
        hostname: ${spring.cloud.client.ip-address}
        port: ${server.port}
        health-check-interval: 10s
        heartbeat:
          enabled: true
  profiles:
    active:
      - secure
  boot:
    admin:
      discovery:
        ignored-services:server-ms-admin, consul


---
spring:
  profiles: insecure

---
spring:
  profiles: secure
  security:
    user:
      name: "admin"  # 设置用户名和密码
      password: "123"
启动application
@SpringBootApplication
@EnableDiscoveryClient
@EnableAdminServer
public class AdminApplication {

    public static void main(String[] args) {
        SpringApplication.run(AdminApplication.class, args);
    }

}
再起一个被监控的应用程序
配置如下:
(其实就是引入用maven引入即可,下面是使用gradle构建
org.springframework.boot:spring-boot-starter-web、、org.springframework.boot:spring-boot-starter-security、 de.codecentric:spring-boot-admin-starter-client:2.0.4、org.springframework.cloud:spring-cloud-starter-consul-discovery、org.springframework.boot:spring-boot-starter-actuator:2.0.6.RELEASE)
buildscript {
    ext {
        springBootVersion = '2.0.6.RELEASE'
    }
    repositories {
        maven { url 'http://maven.aliyun.com/nexus/content/groups/public/' }
        maven { url 'https://plugins.gradle.org/m2/' }
    }
    dependencies {
        classpath("org.springframework.boot:spring-boot-gradle-plugin:${springBootVersion}")
    }
}

plugins {
    id 'java'
}

sourceCompatibility = 1.8
targetCompatibility = 1.8

apply plugin: 'java'
apply plugin: 'idea'
apply plugin: 'org.springframework.boot'
apply plugin: 'io.spring.dependency-management'


group 'com.xx.server'
version = moduleVersion

dependencies {
    compile("org.springframework.boot:spring-boot-starter-web")
    compile('org.springframework.boot:spring-boot-starter-log4j2')
    compile('org.springframework.boot:spring-boot-starter-security')
    compile('de.codecentric:spring-boot-admin-starter-client:2.0.4')

    compile('org.springframework.cloud:spring-cloud-starter-consul-discovery')


    compile("org.springframework.boot:spring-boot-starter-actuator:2.0.6.RELEASE")


}

dependencyManagement {
    imports {
        mavenBom "org.springframework.cloud:spring-cloud-dependencies:${springCloudVersion}"
    }
}
同样起一个application应用
@SpringBootApplication
@EnableDiscoveryClient
public class Application  {

    public static void main(String[] args) {
        SpringApplication.run(Application.class, args);
    }
因为spring boot接入spring security后默认每一个请求都需要验证,使用需要加入以下配置(开始也是因为没加折腾很久。。。。。。)
@Configuration
public class SecurityConfig extends WebSecurityConfigurerAdapter {

    @Override
    protected void configure(HttpSecurity http) throws Exception {
        http.authorizeRequests().anyRequest().permitAll()
                .and().csrf().disable();
    }

}
yml如下:
server:
  port: 19900
  logger:
    level:
      console: INFO


consul-server-ip-address: 192.168.X.XX

management:
  security:
    enabled: false
  endpoints:
    beans:
      enabled: false
    web:
      exposure:
        include: "*"


spring:
  #security:
    #user:
      #name: "admin"
      #password: "123"
  application:
    name: kp-huangtest
  messages:
    basename: i18n/messages
    encoding: utf-8
  cloud:
    consul:
      host: ${consul-server-ip-address}
      port: 18500
      discovery:
        prefer-ip-address: true
        service-name: ${spring.application.name}
        hostname: ${spring.cloud.client.ip-address}
        port: ${server.port}
        health-check-interval: 10s
        heartbeat:
          enabled: true
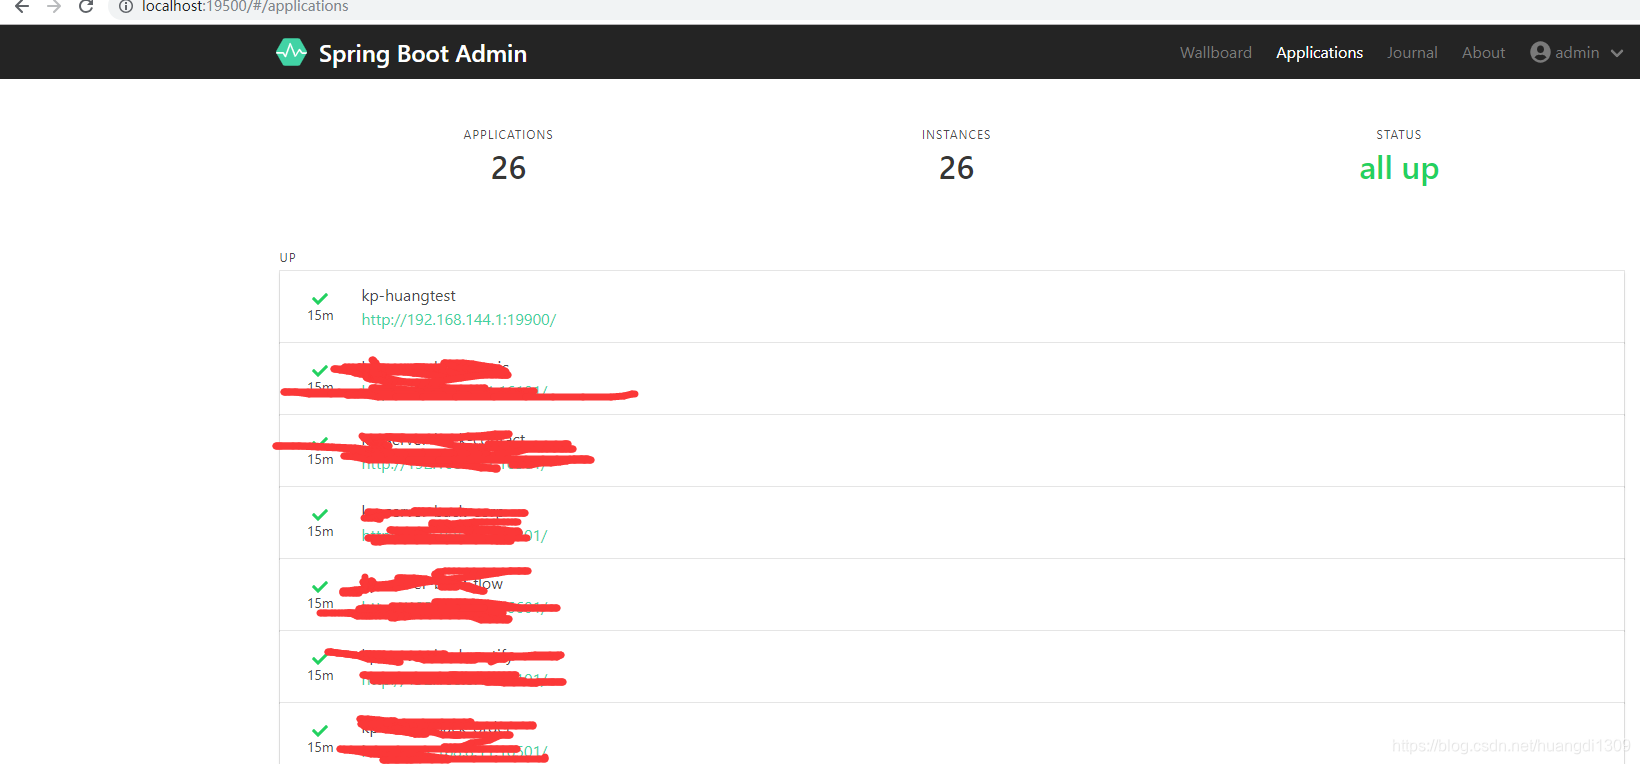
启动应用程序通过访问:
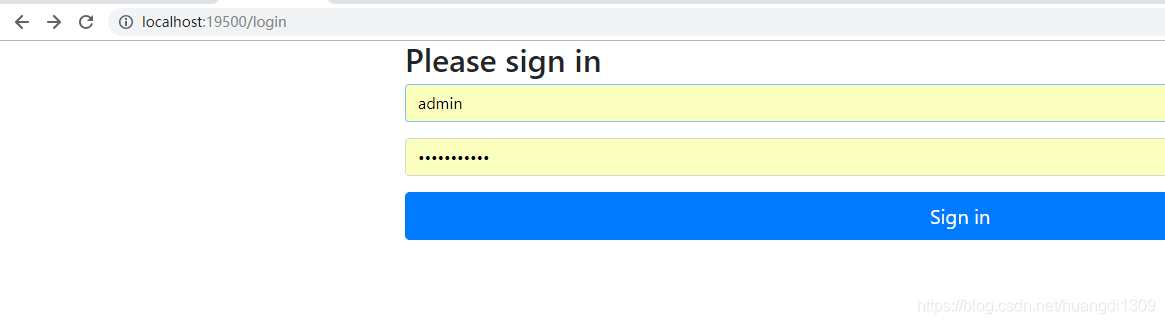
输入用户名密码登录进去看到如下:
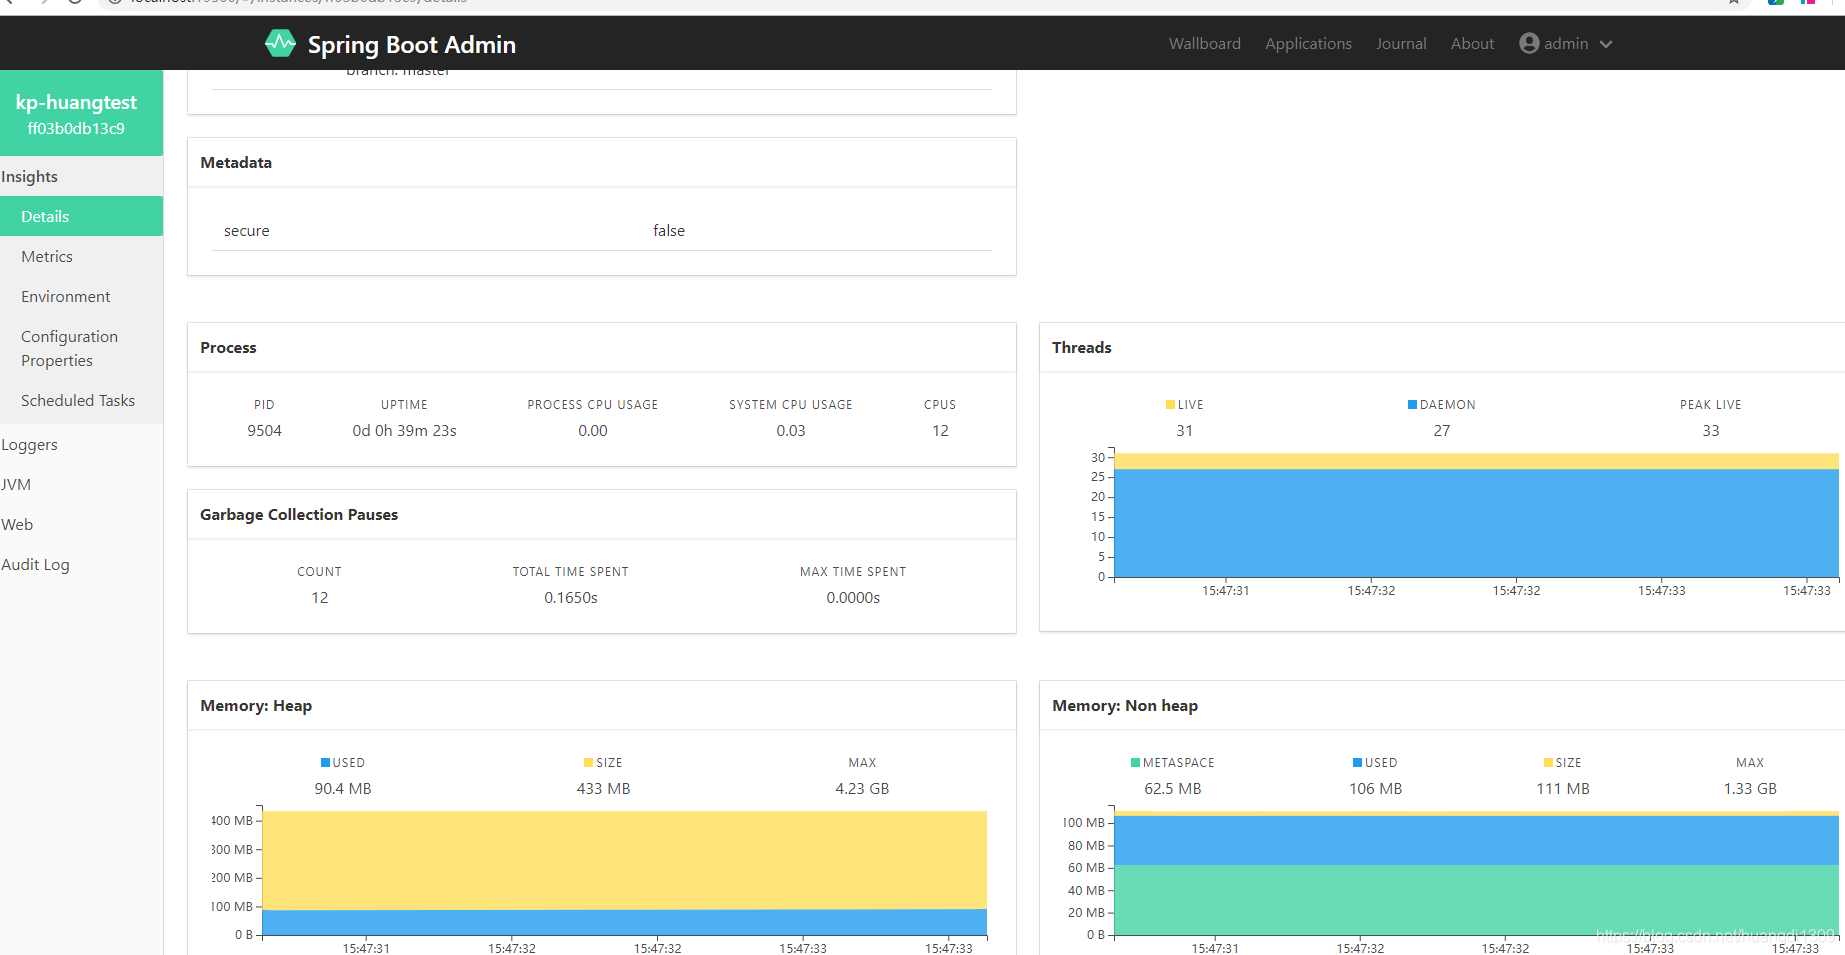
点进去其中一个看到各个监控端点信息:
以上就是此次总结的所有内容,可能有错,请大神指正,谢谢!


 1559
1559


 被折叠的 条评论
为什么被折叠?
被折叠的 条评论
为什么被折叠?
 到【灌水乐园】发言


