


 本文详细介绍Android Vector图形资源的使用方法,包括Vector的优势、语法、在不同Android版本中的兼容方案及如何构建动态Vector动画。
Android Vector在android5.0开始google提供了Vector的支持,到现在为止google已经提供了低版本的兼容,Vector的技术也越来越完善,因此日后在android中使用Vector是一个趋势。
Android Vector的优势:
Vector图像可以自动进行适配,不需要通过分辨率来设置不同的图片,一套解决问题
Vector图像可以大幅减少图像的体积,同样一张图,用Vector来实现,可能只有PNG的几十分之一
使用简单,UI设计师只用导出SVG格式或PSD格式,从而使用as直接转换成Vector图像。
功能强大,不用写很多代码就可以实现非常复杂的动画
成熟、稳定,前端已经非常广泛的进行使用了
Vector语法简介
Path指令解析如下所示:
支持的指令:
M = moveto(M X,Y) :将画笔移动到指定的坐标位置
L = lineto(L X,Y) :画直线到指定的坐标位置、
H = horizontal lineto(H X):画水平线到指定的X坐标位置
V = vertical lineto(V Y):画垂直线到指定的Y坐标位置
C = curveto(C X1,Y1,X2,Y2,ENDX,ENDY):三次贝赛曲线
S = smooth curveto(S X2,Y2,ENDX,ENDY)
Q = quadratic Belzier curve(Q X,Y,ENDX,ENDY):二次贝赛曲线
T = smooth quadratic Belzier curveto(T ENDX,ENDY):映射
A = elliptical Arc(A RX,RY,XROTATION,FLAG1,FLAG2,X,Y):弧线
Z = closepath():关闭路径
使用原则:
坐标轴为以(0,0)为中心,X轴水平向右,Y轴水平向下
所有指令大小写均可。大写绝对定位,参照全局坐标系;小写相对定位,参照父容器坐标系
指令和数据间的空格可以省略
同一指令出现多次可以只用一个
注意,'M'处理时,只是移动了画笔, 没有画任何东西。 它也可以在后面给出上同时绘制不连续线。
AS生成vector,使用as系统图标
在androidStudio其实已经有很多系统使用的图标了,我们在使用时其实可以不用UI再次进行切图,直接使用就是了!
- 使用步骤:File->New->Vector Asset;(如果选择Image Assets导出的是PNG格式图片)

- 然后选择Material Icon,然后点击小机器人

- 这里有所有的系统图片,选择你想用的就好了

- 例如我使用的是一个五角星,显示效果如下:
mImageview.setImageResource(R.drawable.ic_star_black_24dp);
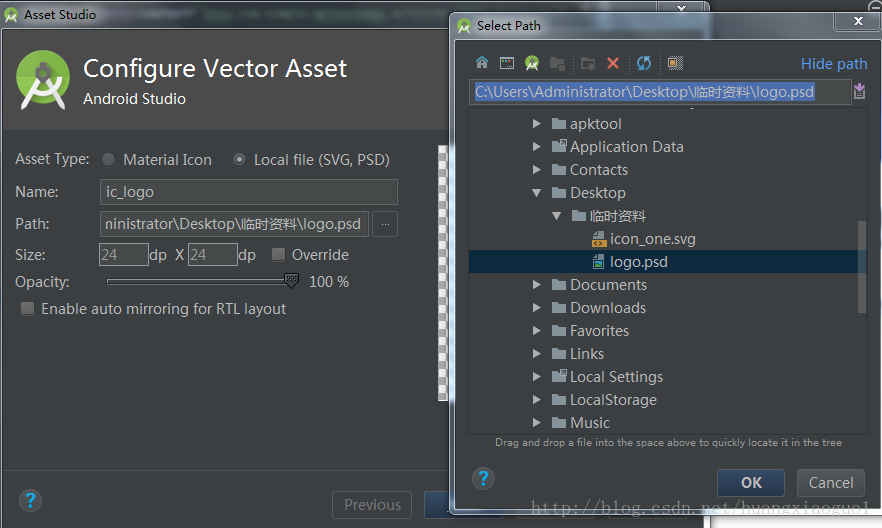
使用外部SVG(PSD)导入vector
File->New->Vector Asset;(如上图,这里不再给图)
然后选择Local file,然后选择path
- 兼容anroid5.0以下
在app的build.glide中

android {

    defaultConfig {
        vectorDrawables.useSupportLibrary = true
    }
}

在Application中

/**
     * 兼容5.0以下系统
     */
    static {
        /*获取当前系统的android版本号*/
        int currentapiVersion = android.os.Build.VERSION.SDK_INT;
        if (currentapiVersion < 21)//适配android5.0以下
            AppCompatDelegate.setCompatVectorFromResourcesEnabled(true);
    }
AppCompat23.2的兼容
从AppCompat23.2开始,Google开始支持在低版本上使用Vector。
implementation 'com.android.support:appcompat-v7:26.1.0'- 在控件中使用
对于ImageView这样的控件,要兼容Vector图像,只需要将之前的android:src属性,换成app:srcCompat即可

<ImageView
    android:id="@+id/imageview"
    app:layout_heightPercent="50%"
    app:layout_widthPercent="100%"
    app:srcCompat="@drawable/ic_icon_one" />

在代码中设置:

mImageview.setImageResource(R.drawable.ic_icon_one);
在TextView中使用:

   <!--在5.0以下Textview不能这样使用-->
    <!--<TextView-->
    <!--android:id="@+id/textview"-->
    <!--android:layout_gravity="bottom"-->
    <!--android:background="@drawable/ic_icon_one"-->
    <!--android:text="我是Textview"-->
    <!--app:layout_heightPercent="50%"-->
    <!--app:layout_widthPercent="100%" />-->

因此Textview(包括Butten等控件)中使用Vector只能使用代码设置:

 mTextview = (TextView) findViewById(R.id.textview);

 mTextview.setBackgroundResource(R.drawable.ic_icon_one);
Vector在布局选择器中的使用
- 首先构建两个Vector
vector1.xml
<vector xmlns:android="http://schemas.android.com/apk/res/android"
    android:width="24dp"
    android:height="24dp"
    android:viewportHeight="24.0"
    android:viewportWidth="24.0">
    <path
        android:fillColor="#FF000000"
        android:pathData="M14.59,8L12,10.59 9.41,8 8,9.41 10.59,12 8,14.59 9.41,16 12,13.41 14.59,16 16,14.59 13.41,12 16,9.41 14.59,8zM12,2C6.47,2 2,6.47 2,12s4.47,10 10,10 10,-4.47 10,-10S17.53,2 12,2zM12,20c-4.41,0 -8,-3.59 -8,-8s3.59,-8 8,-8 8,3.59 8,8 -3.59,8 -8,8z" />
</vector>
vector2.xml
<vector xmlns:android="http://schemas.android.com/apk/res/android"
    android:width="24dp"
    android:height="24dp"
    android:viewportHeight="24.0"
    android:viewportWidth="24.0">
    <path
        android:fillColor="#fa0303"
        android:pathData="M14.59,8L12,10.59 9.41,8 8,9.41 10.59,12 8,14.59 9.41,16 12,13.41 14.59,16 16,14.59 13.41,12 16,9.41 14.59,8zM12,2C6.47,2 2,6.47 2,12s4.47,10 10,10 10,-4.47 10,-10S17.53,2 12,2zM12,20c-4.41,0 -8,-3.59 -8,-8s3.59,-8 8,-8 8,3.59 8,8 -3.59,8 -8,8z" />
</vector>- 创建选择器
selector.xml
<?xml version="1.0" encoding="utf-8"?>
<selector xmlns:android="http://schemas.android.com/apk/res/android">
    <item android:drawable="@drawable/vector2" android:state_pressed="true" />
    <item android:drawable="@drawable/vector1" />
</selector>
- 使用选择器
<?xml version="1.0" encoding="utf-8"?>
<android.support.percent.PercentFrameLayout xmlns:android="http://schemas.android.com/apk/res/android"
    xmlns:tools="http://schemas.android.com/tools"
    android:layout_width="match_parent"
    android:layout_height="match_parent"
    tools:context="tsou.com.simple.mytestdemo.SVGButtenActivity">

    <Button
        android:id="@+id/butten"
        android:layout_width="100dp"
        android:layout_height="100dp"
        android:layout_gravity="center"
        android:background="@drawable/selector" />

    <RadioButton
        android:layout_width="wrap_content"
        android:layout_height="wrap_content"
        android:layout_margin="10dp"
        android:button="@drawable/selector"
        android:text="我是RadioButton" />
</android.support.percent.PercentFrameLayout>
动态Vector(使用Vector实现动画)
- 使用Vector构建动画内容
<vector xmlns:android="http://schemas.android.com/apk/res/android"
    android:width="120dp"
    android:height="120dp"
    android:viewportHeight="24.0"
    android:viewportWidth="24.0">

    <group android:name="left">
        <path
            android:fillColor="#FF000000"
            android:pathData="M9.01,14L2,14v2h7.01v3L13,15l-3.99,-4v3"/>
    </group>

    <group android:name="right">
        <path
            android:fillColor="#FF000000"
            android:pathData="M14.99,13v-3L22,10L22,8h-7.01L14.99,5L11,9l3.99,4"/>
    </group>

</vector>
可以发现,这里的Vector图像比之前我们看见的要多了一个group标签。group标签的作用有两个:
对Path进行分组,由于我们后面需要针对Path进行动画,所以可以让具有同样动画效果的Path在同一个Group中;

拓展动画效果,单个的path标签是没有translateX和translateY属性的,因此无法使用属性动画来控制path translateY,而group标签是有的,所以我们需要先将相关的path标签元素包裹在一个个的group标签中.
- 动画效果
anim_left.xml
<objectAnimator xmlns:android="http://schemas.android.com/apk/res/android"
    android:duration="1000"
    android:interpolator="@android:interpolator/anticipate_overshoot"
    android:propertyName="translateX"
    android:repeatCount="infinite"
    android:repeatMode="reverse"
    android:valueFrom="0"
    android:valueTo="-10"
    android:valueType="floatType" />
anim_right.xml
<objectAnimator
    xmlns:android="http://schemas.android.com/apk/res/android"
    android:duration="1000"
    android:interpolator="@android:interpolator/anticipate_overshoot"
    android:propertyName="translateX"
    android:repeatCount="infinite"
    android:repeatMode="reverse"
    android:valueFrom="0"
    android:valueTo="10"
    android:valueType="floatType"/>
- 动态Vector
<animated-vector
    xmlns:android="http://schemas.android.com/apk/res/android"
    xmlns:tools="http://schemas.android.com/tools"
    android:drawable="@drawable/ic_arrow"
    tools:targetApi="lollipop">

    <target
        android:name="left"
        android:animation="@animator/anim_left"/>

    <target
        android:name="right"
        android:animation="@animator/anim_right"/>

</animated-vector>
- 使用动画
 private void initView() {
        mImageview = (ImageView) findViewById(R.id.imageview);
        AnimatedVectorDrawableCompat animatedVectorDrawableCompat = AnimatedVectorDrawableCompat.create(
                this, R.drawable.animated_vector
        );
        mImageview.setImageDrawable(animatedVectorDrawableCompat);
        ((Animatable) mImageview.getDrawable()).start();


    }
在线将普通图像转换为Android Vector Drawable:http://inloop.github.io/svg2android/
使用SVG的编辑器来进行SVG图像的编写:http://editor.method.ac/


 1264
1264

 被折叠的 条评论
为什么被折叠?
被折叠的 条评论
为什么被折叠?
 到【灌水乐园】发言


