


学习目标:在ubuntu18.04 系统上面使用ffmpeg完成视频的采集与H.264硬件编码,抽帧。
学习历程:
话接上篇chapter1,本篇主要完成ffmpeg的本地编译,分为两个阶段:
1. ffmpeg,ffplay可正常录制和播放桌面和h264视频文件。
2. ffmpeg,ffplay可以通过硬件加速的方式编码h264视频文件。
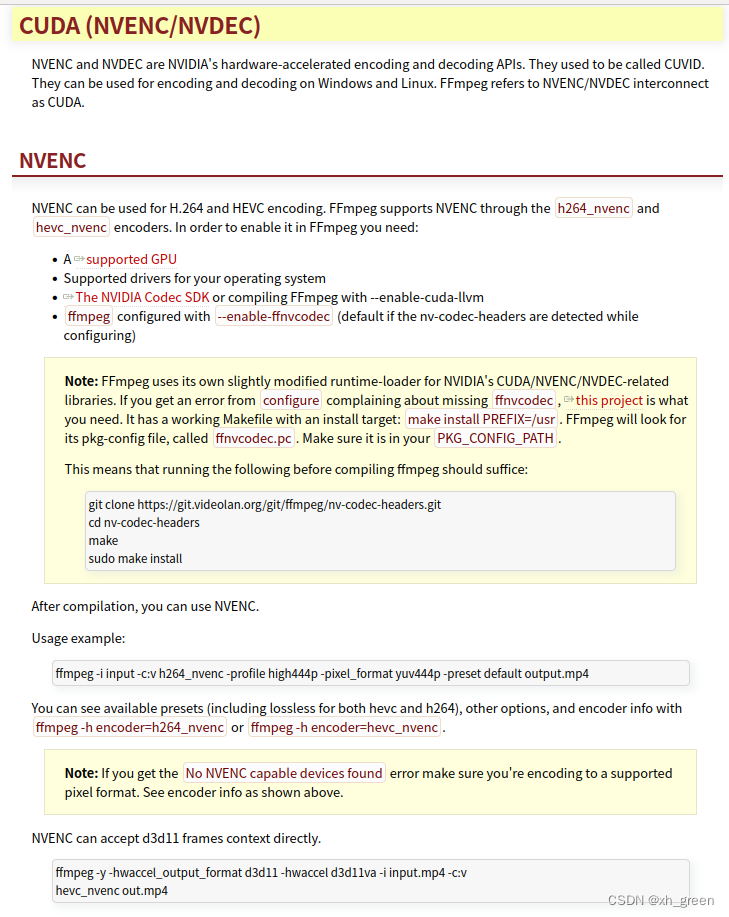
一、在ffmpeg官网找到关于硬件加速编译的操作流程,并找到对应CUDA (NVENC/NVDEC)。
HWAccelIntro – FFmpeg https://trac.ffmpeg.org/wiki/HWAccelIntro如下为官网截图,对硬件加速编码的环境准备做了介绍,我们按照操作执行。
1. 进入Nvidia GPU官网,找到对应的显卡型号,看其硬件加速的编码支持。

可以看出我的750Ti支持H.264编码,不支持H.265编码。
2. 按照Nvidia 官网中对ffmpeg的介绍,进行环境的编译安装。

./configure --enable-nonfree --enable-cuda-nvcc --enable-libnpp --extra-cflags=-I/usr/local/cuda/include --extra-ldflags=-L/usr/local/cuda/lib64 --disable-static --enable-shared在执行如上配置的时候会出现找不到nvcc的错误,需要配置cuda的环境变量。
$ vi /etc/profile
// 加入cuda的环境变量
export CUDA_HOME=/usr/local/cuda-11.0
export PATH=/usr/local/cuda-11.0/bin:$PATH
export LD_LIBRARY_PATH=/usr/local/cuda-11.0/lib:$LD_LIBRARY_PATH
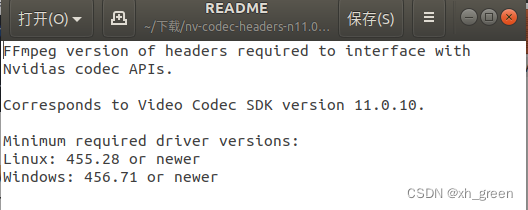
$ source /etc/profile另外,编译的过程中,还会出现ffnv-codec-headers版本不匹配的情况,这时候就需要去找到正确的版本了(ffnv-codec-headers是Nvidia准备的一些头文件,供ffmpeg编译使用) 。
可以在如下的链接中找到对应的版本,下载安装(或者直接在google搜索ffnv-codec-headers历史版本也能搜索到)。
Releases · FFmpeg/nv-codec-headers · GitHubautomatic mirror of https://git.videolan.org/?p=ffmpeg/nv-codec-headers.git - Releases · FFmpeg/nv-codec-headershttps://github.com/FFmpeg/nv-codec-headers/releases在下载的文件包的ReadMe.md中,会有关于使用的驱动最小需求版本的说明,我选择的nv-codec-headers版本是nv-codec-headers-n9.1.23.3
另外,为了能够顺利的使用这些库和ffmpeg工具,我把这些库文件拷贝到了/usr/lib目录下面。
sudo cp -vf /usr/local/lib/libav*.so* /usr/local/lib/libsw*.so* /usr/lib/如上步骤完成之后,就能够进行ffplay和ffprobe的使用了。
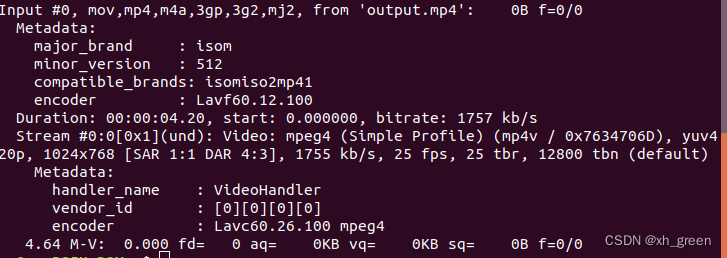
3. 测试,使用ffmpeg进行录屏的操作。
ffmpeg -video_size 1024x768 -framerate 25 -f x11grab -i :0.0+00,00 output.mp4对 录制的视频查看,其使用的是mpeg4编码方式。
二、使用H264完成硬件编码。
使用H264的编码方式录制屏幕,系统会报错,告知没有找到对应的编码器。
ffmpeg -video_size 1024x768 -framerate 25 -f x11grab -c:v libx264 -i :0.0+00,00 output.mp4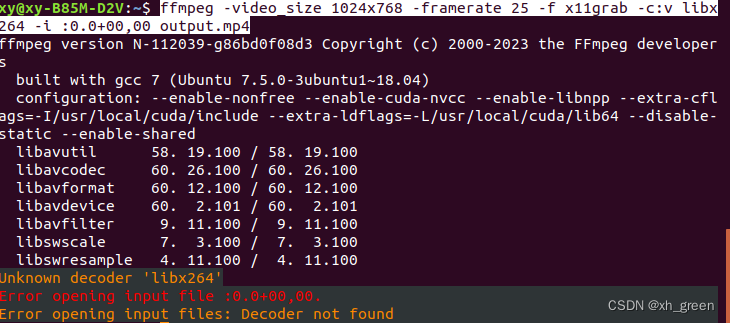
如下就需要对相应的编码器进行安装了。
1. 安装libx264
如下链接提供了ffmpeg对应以依赖库的安装方法
CompilationGuide/Ubuntu – FFmpeghttps://trac.ffmpeg.org/wiki/CompilationGuide/Ubuntu
libx264
H.264 video encoder. See the H.264 Encoding Guide for more information and usage examples.
Requires
ffmpegto be configured with--enable-gpl--enable-libx264.If your repository provides
libx264-devversion ≥ 118 then you can install that instead of compiling:sudo apt-get install libx264-devOtherwise you can compile:
cd ~/ffmpeg_sources && \
git -C x264 pull 2> /dev/null || git clone --depth 1 https://code.videolan.org/videolan/x264.git && \
cd x264 && \
PATH="$HOME/bin:$PATH" PKG_CONFIG_PATH="$HOME/ffmpeg_build/lib/pkgconfig" ./configure --prefix="$HOME/ffmpeg_build" --bindir="$HOME/bin" --enable-static --enable-pic && \
PATH="$HOME/bin:$PATH" make && \
make install
a. 安装libx264
sudo apt-cache search libx264
sudo apt-get install libx264-152
sudo apt-get install libx264-dev
b. 重新编译ffmpeg
cd /ffmpeg-dev/
sudo make uninstall
sudo make clean
sudo rm -vf /usr/lib/libav*.so* /usr/lib/libsw*.so*

./configure --enable-nonfree --enable-cuda-nvcc --enable-libnpp --enable-gpl --enable-libx264 --extra-cflags=-I/usr/local/cuda/include --extra-ldflags=-L/usr/local/cuda/lib64 --disable-static --enable-shared
sudo make -j32
sudo make install
sudo cp -vf /usr/local/lib/libav*.so* /usr/local/lib/libsw*.so* /usr/lib
注意此次编译多了一个库文件libpostproc.so,需要拷贝到/usr/lib目录
sudo cp -vf /usr/local/lib/libpostproc*.so* /usr/lib这时用ffmpeg -codecs | grep -i 264 就能看到我们的编码器了
xy@xy-B85M-D2V:~/ffmpeg-nv/ffmpeg$ ffmpeg -codecs | grep 264
ffmpeg version N-112039-g86bd0f08d3 Copyright (c) 2000-2023 the FFmpeg developers
built with gcc 7 (Ubuntu 7.5.0-3ubuntu1~18.04)
configuration: --enable-nonfree --enable-cuda-nvcc --enable-libnpp --enable-gpl --enable-libx264 --extra-cflags=-I/usr/local/cuda/include --extra-ldflags=-L/usr/local/cuda/lib64 --disable-static --enable-shared
libavutil 58. 19.100 / 58. 19.100
libavcodec 60. 26.100 / 60. 26.100
libavformat 60. 12.100 / 60. 12.100
libavdevice 60. 2.101 / 60. 2.101
libavfilter 9. 11.100 / 9. 11.100
libswscale 7. 3.100 / 7. 3.100
libswresample 4. 11.100 / 4. 11.100
libpostproc 57. 2.100 / 57. 2.100
DEV.LS h264 H.264 / AVC / MPEG-4 AVC / MPEG-4 part 10 (decoders: h264 h264_v4l2m2m) (encoders: libx264 libx264rgb h264_v4l2m2m h264_vaapi)
2. 安装硬编码器以及cuda加速器
但是仍然没有h264_nvenc和nvenc_h264,下面看怎么去加上。
PKG_CONFIG_PATH=/usr/local/lib/pkgconfig ./configure --enable-nonfree --enable-cuda-nvcc --enable-libnpp --enable-gpl --enable-libx264 --extra-cflags=-I/usr/local/cuda-11.0/include --extra-ldflags=-L/usr/local/cuda-11.0/lib64 --disable-static --enable-shared --enable-cuda --enable-cuvid --enable-nvenc
错误处理:
ERROR: cuvid requested, but not all dependencies are satisfied: ffnvcodec
更新最新的nv-codec-headers解决了<猜想降级ffmpeg应该可以解决,找时间试一下>
因为没有找到nv-codec-headers的pkgconfig路径,在配置前加上绝对路径即可:
PKG_CONFIG_PATH=/usr/local/lib/pkgconfig
如果还有错误,就用普通权限安装一下 nv-codec-headers
ERROR: failed checking for nvcc.
使用sudo ./configuration会报错,用普通权限就好,去掉sudo
这时候的编译报错基本上都和权限有关系了,来回切换,总能编译过。
先用管理员权限编译 make -j 32,当遇到nvcc错误的时候,改为sudo make -j 32编译,当后面再出现doc文件生成错误的时候,再切换成管理员权限即可。
安装完成如上的内容后,再去ffmpeg -codecs | grep -i nv就能看到我们的硬件编码器了
xy@xy-B85M-D2V:~/ffmpeg-nv/ffmpeg$ ffmpeg -codecs | grep nv
ffmpeg version N-112039-g86bd0f08d3 Copyright (c) 2000-2023 the FFmpeg developers
built with gcc 7 (Ubuntu 7.5.0-3ubuntu1~18.04)
configuration: --enable-nonfree --enable-cuda-nvcc --enable-libnpp --enable-gpl --enable-libx264 --extra-cflags=-I/usr/local/cuda-11.0/include --extra-ldflags=-L/usr/local/cuda-11.0/lib64 --disable-static --enable-shared --enable-cuda --enable-cuvid --enable-nvenc
libavutil 58. 19.100 / 58. 19.100
libavcodec 60. 26.100 / 60. 26.100
libavformat 60. 12.100 / 60. 12.100
libavdevice 60. 2.101 / 60. 2.101
libavfilter 9. 11.100 / 9. 11.100
libswscale 7. 3.100 / 7. 3.100
libswresample 4. 11.100 / 4. 11.100
libpostproc 57. 2.100 / 57. 2.100
DEV.L. av1 Alliance for Open Media AV1 (decoders: av1 av1_cuvid) (encoders: av1_nvenc)
D.V.L. dsicinvideo Delphine Software International CIN video
DEV.LS h264 H.264 / AVC / MPEG-4 AVC / MPEG-4 part 10 (decoders: h264 h264_v4l2m2m h264_cuvid) (encoders: libx264 libx264rgb h264_nvenc h264_v4l2m2m h264_vaapi)
DEV.L. hevc H.265 / HEVC (High Efficiency Video Coding) (decoders: hevc hevc_v4l2m2m hevc_cuvid) (encoders: hevc_nvenc hevc_v4l2m2m hevc_vaapi)
D.V.L. idcin id Quake II CIN video (decoders: idcinvideo)
D.VIL. wnv1 Winnov WNV1
D.AIL. twinvq VQF TwinVQ
同时也能看到我们的硬件加速支持库了,cuda
xy@xy-B85M-D2V:~/ffmpeg-nv/ffmpeg$ ffmpeg -hwaccels
ffmpeg version N-112039-g86bd0f08d3 Copyright (c) 2000-2023 the FFmpeg developers
built with gcc 7 (Ubuntu 7.5.0-3ubuntu1~18.04)
configuration: --enable-nonfree --enable-cuda-nvcc --enable-libnpp --enable-gpl --enable-libx264 --extra-cflags=-I/usr/local/cuda-11.0/include --extra-ldflags=-L/usr/local/cuda-11.0/lib64 --disable-static --enable-shared --enable-cuda --enable-cuvid --enable-nvenc
libavutil 58. 19.100 / 58. 19.100
libavcodec 60. 26.100 / 60. 26.100
libavformat 60. 12.100 / 60. 12.100
libavdevice 60. 2.101 / 60. 2.101
libavfilter 9. 11.100 / 9. 11.100
libswscale 7. 3.100 / 7. 3.100
libswresample 4. 11.100 / 4. 11.100
libpostproc 57. 2.100 / 57. 2.100
Hardware acceleration methods:
vdpau
cuda
vaapi
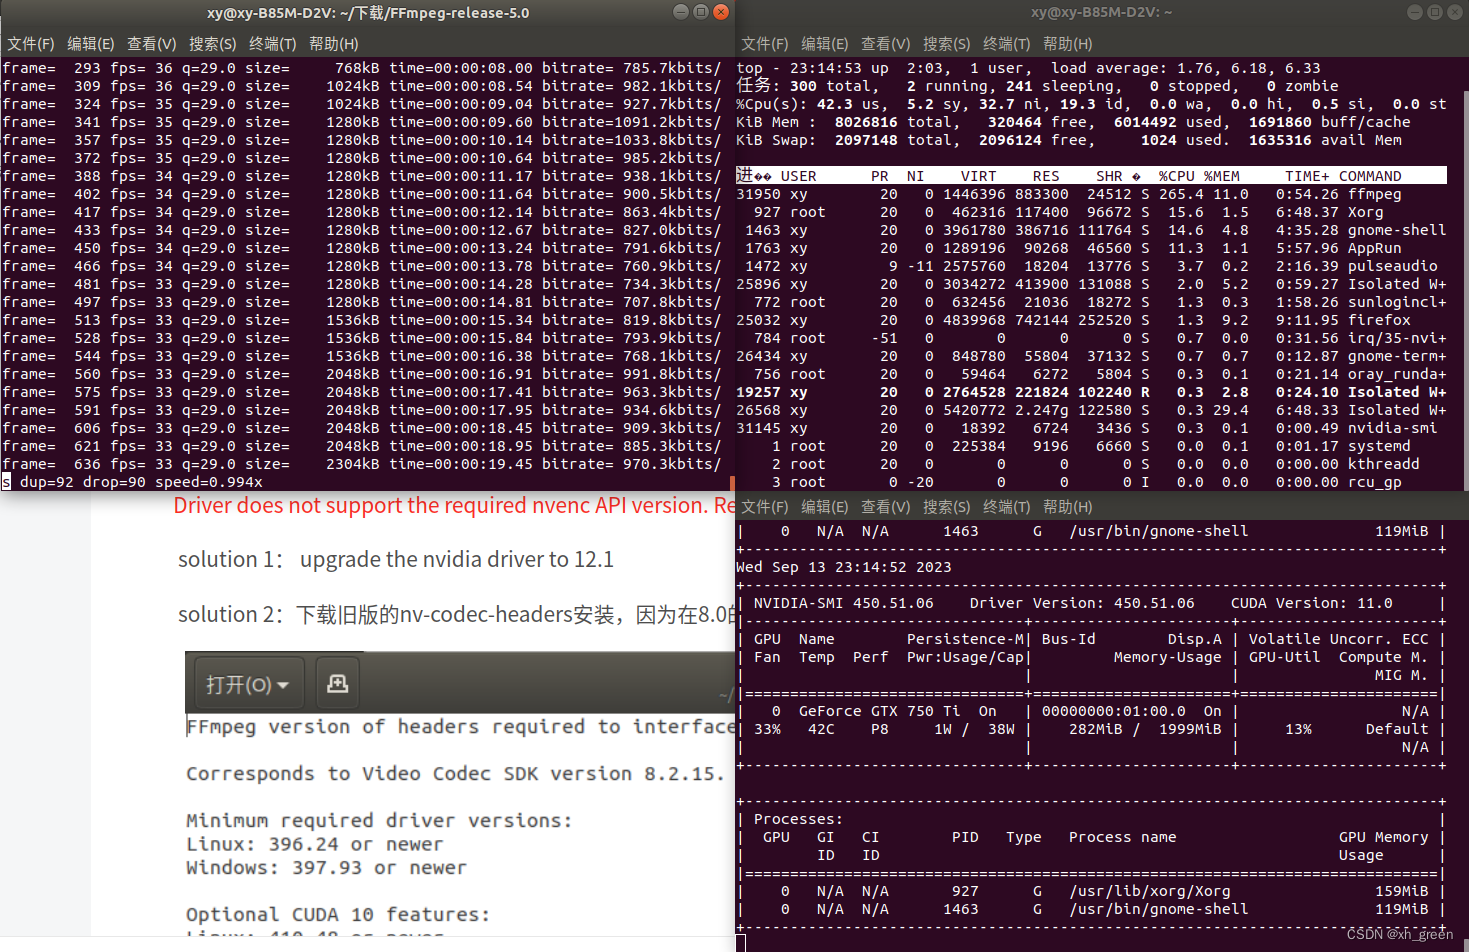
三、测试硬件加速
当使用硬件加速指令录制屏幕时,出现了错误
ffmpeg -hwaccel cuda -f x11grab -i :0.0+00,00 -c:v h264_nvenc -preset slow output_h264_nvenc.mp4Driver does not support the required nvenc API version. Required: 12.1 Found: 10.0
上面说的API version就是指nv-codec-headers 版本,现在从github下载的是最新版本12.1
solution 1: upgrade the nvidia driver,就是将驱动和CUDA Toolkit做更新。
solution 2:下载旧版的nv-codec-headers安装,安装好后重新编译ffmpeg。
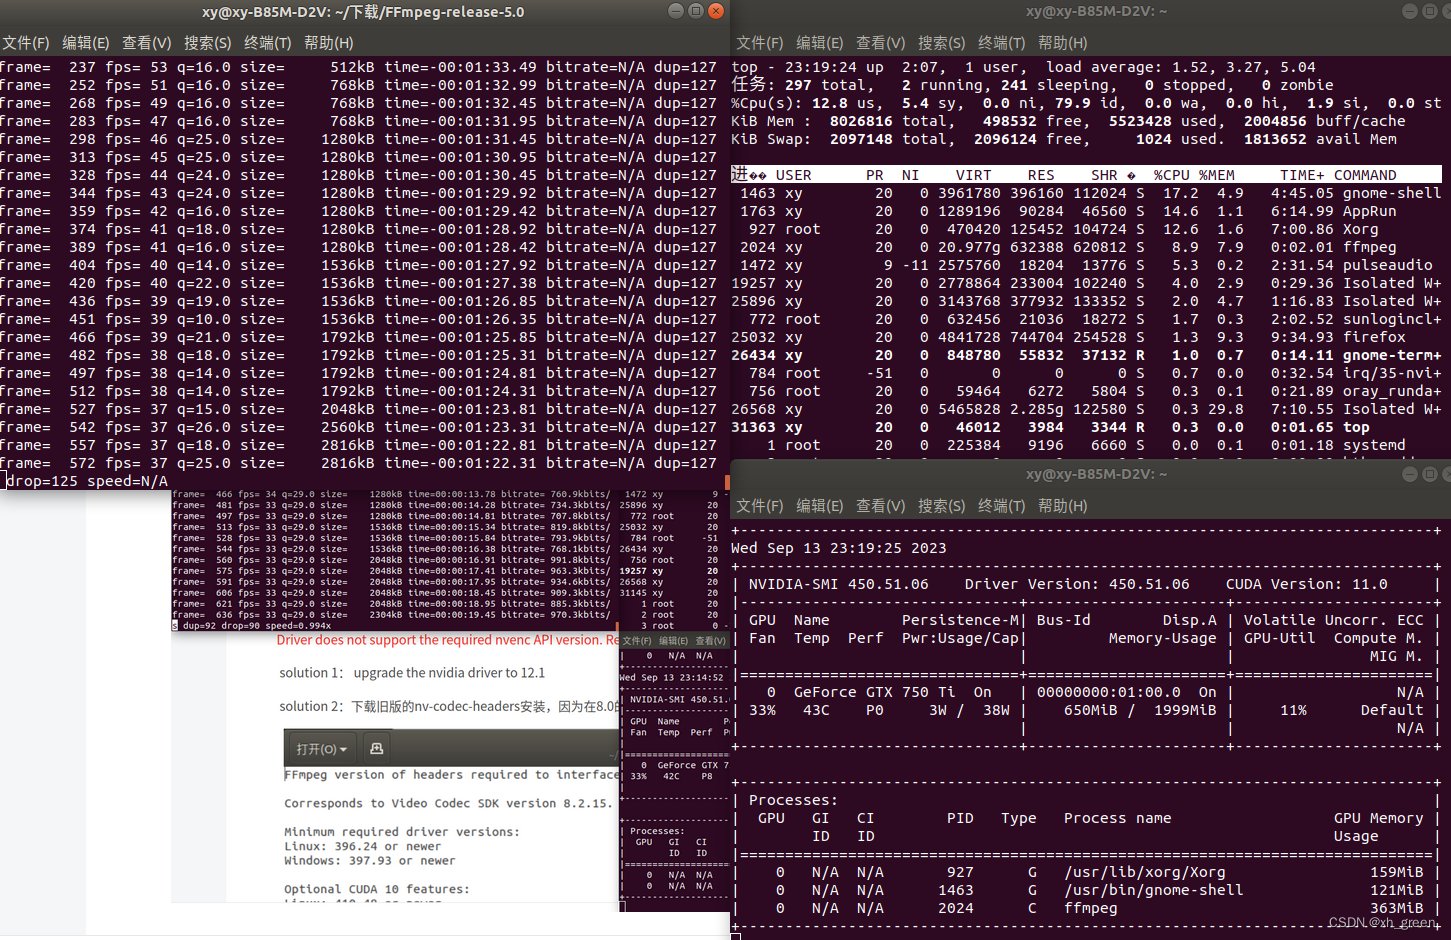
方案一显然太费时间,先从方案二开始,下载旧版本的nv-codec-headers(nv-codec-headers-n10.0.26.2)Releases · FFmpeg/nv-codec-headers · GitHubautomatic mirror of https://git.videolan.org/?p=ffmpeg/nv-codec-headers.git - Releases · FFmpeg/nv-codec-headershttps://github.com/FFmpeg/nv-codec-headers/releases但是在做./configuration配置的时候,就开始报错了。
ERROR: cuvid requested, but not all dependencies are satisfied: ffnvcodec

If you think configure made a mistake, make sure you are using the latest
version from Git.  If the latest version fails, report the problem to the
ffmpeg-user@ffmpeg.org mailing list or IRC #ffmpeg on irc.freenode.net.
Include the log file "ffbuild/config.log" produced by configure as this will help
solve the problem.
思来想去唯一的可能就是ffmpeg与nv-codec-headers也存在版本对应关系,目前用的ffmpeg是5.1,遂将ffmpeg从4.3挨个去实验,最后5.0编译通过,完美解决。
不开硬件加速和硬件编码,测试可以看出CPU占用很高。开启硬件加速和编码后,CPU占用几乎可以忽略了。
总结对环境搭建很重要:
ffmpeg版本与nv-codec-headers存在版本对应关系(暂没找到对应关系,手动试出来的)
Nvidia 驱动与CUDA Toolkit存在版本对应关系(通过nvidia-smi能看到支持的最到CUDA版本)
Nvidia 驱动与nv-codec-headers也存在版本对应关系(在nv-codec-heanders的ReadMe.md中能找到)


 1万+
1万+

 被折叠的 条评论
为什么被折叠?
被折叠的 条评论
为什么被折叠?
 到【灌水乐园】发言


