简介 源代码及其来源
RPi.GPIO是Python的一个module( 模块 ), 树莓派官方系统默认已经安装, 仍在不断更新中, 截至20160314, 最新版0.6.2, 适配了树莓派3, 访问 python主页 .
源代码(也有教程的链接)公布在Sourceforge上: 点 这里 查看源代码.
简介及注意事项:
A module to control Raspberry Pi GPIO channels.
This package provides a class to control the GPIO on a Raspberry Pi.
Note that this module is unsuitable for real-time or timing critical applications. This is because you can not predict when Python will be busy garbage collecting. It also runs under the Linux kernel which is not suitable for real time applications - it is multitasking O/S and another process may be given priority over the CPU, causing jitter in your program. If you are after true real-time performance and predictability, buy yourself an Arduino http://www.arduino.cc !
Note that the current release does not support SPI, I2C, hardware PWM or serial functionality on the RPi yet. This is planned for the near future - watch this space! One-wire functionality is also planned.
Although hardware PWM is not available yet, software PWM is available to use on all channels.
大致含义是: 这个包提供了操作树莓派GPIO的一个类, 不是实时的, 不支持硬件的SPI,I2C,PWM等, 但软件PWM可以在所有通道使用. 如果想要实时控制, 推荐Arduino.
源代码包中可以看到下列文件:
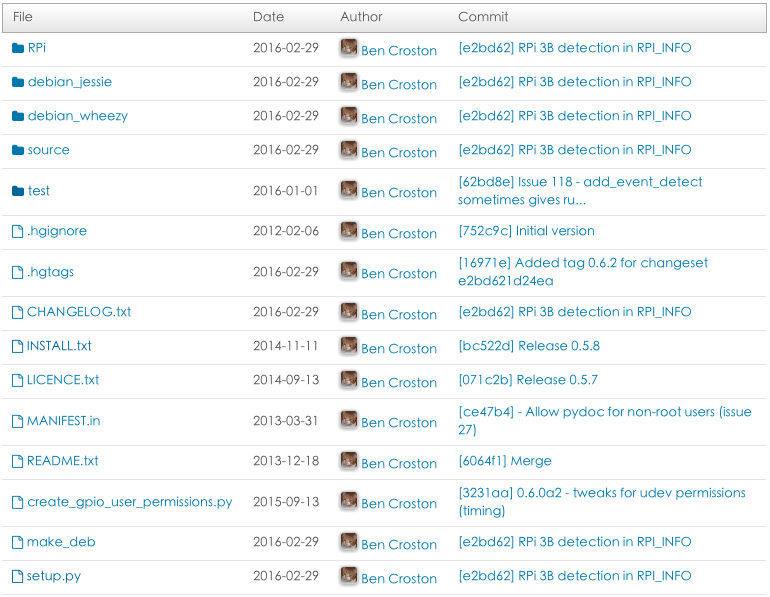
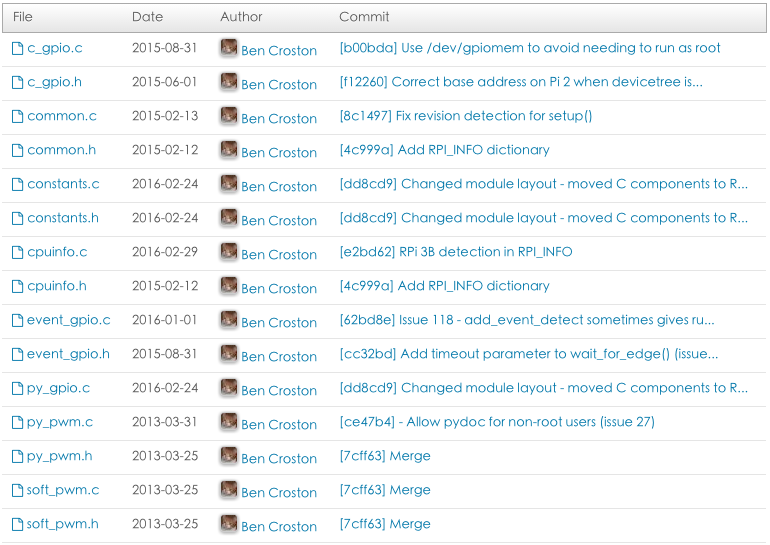
source文件夹中放置了 C语言操作底层寄存器以及外设封装的源码, 感兴趣的可以下载下来研究一下:
test文件夹中放了test.py, 大量的测试代码, 很有参考价值:

树莓派官方系统默认已经安装了Python和RPi.GPIO, 树莓派终端输入命令 python --version 可查看Python版本, 输入命令 python 启动python, 输入 import RPi.GPIO as GPIO 导入RPi.GPIO模块.
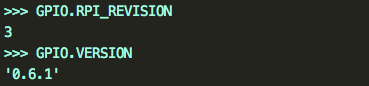
To discover information about your RPi:
<code class="hljs avrasm has-numbering" style="display: block; padding-top: 0px; padding-right: 0px; padding-bottom: 0px; padding-left: 0px; background-image: initial; background-attachment: initial; background-origin: initial; background-clip: initial; background-color: transparent; color: inherit; box-sizing: border-box; font-family: 'Source Code Pro', monospace;font-size:undefined; white-space: pre; border-top-left-radius: 0px; border-top-right-radius: 0px; border-bottom-right-radius: 0px; border-bottom-left-radius: 0px; word-wrap: normal; background-position: initial initial; background-repeat: initial initial; ">GPIO<span class="hljs-preprocessor" style="color: rgb(68, 68, 68); box-sizing: border-box; ">.RPI</span>_INFO</code><ul class="pre-numbering" style="box-sizing: border-box; position: absolute; width: 50px; background-color: rgb(238, 238, 238); top: 0px; left: 0px; margin-top: 0px; margin-right: 0px; margin-bottom: 0px; margin-left: 0px; padding-top: 6px; padding-right: 0px; padding-bottom: 40px; padding-left: 0px; border-right-width: 1px; border-right-style: solid; border-right-color: rgb(221, 221, 221); list-style-type: none; list-style-position: initial; list-style-image: initial; text-align: right; "><li style="box-sizing: border-box; padding-top: 0px; padding-right: 5px; padding-bottom: 0px; padding-left: 5px; ">1</li></ul><ul class="pre-numbering" style="box-sizing: border-box; position: absolute; width: 50px; background-color: rgb(238, 238, 238); top: 0px; left: 0px; margin-top: 0px; margin-right: 0px; margin-bottom: 0px; margin-left: 0px; padding-top: 6px; padding-right: 0px; padding-bottom: 40px; padding-left: 0px; border-right-width: 1px; border-right-style: solid; border-right-color: rgb(221, 221, 221); list-style-type: none; list-style-position: initial; list-style-image: initial; text-align: right; "><li style="box-sizing: border-box; padding-top: 0px; padding-right: 5px; padding-bottom: 0px; padding-left: 5px; ">1</li></ul>

To discover the Raspberry Pi board revision:
<code class="hljs bash has-numbering" style="display: block; padding-top: 0px; padding-right: 0px; padding-bottom: 0px; padding-left: 0px; background-image: initial; background-attachment: initial; background-origin: initial; background-clip: initial; background-color: transparent; color: inherit; box-sizing: border-box; font-family: 'Source Code Pro', monospace;font-size:undefined; white-space: pre; border-top-left-radius: 0px; border-top-right-radius: 0px; border-bottom-right-radius: 0px; border-bottom-left-radius: 0px; word-wrap: normal; background-position: initial initial; background-repeat: initial initial; ">GPIO.RPI_INFO[<span class="hljs-string" style="color: rgb(0, 136, 0); box-sizing: border-box; ">'P1_REVISION'</span>]
GPIO.RPI_REVISION    <span class="hljs-comment" style="color: rgb(136, 0, 0); box-sizing: border-box; ">#(deprecated 弃用)</span></code><ul class="pre-numbering" style="box-sizing: border-box; position: absolute; width: 50px; background-color: rgb(238, 238, 238); top: 0px; left: 0px; margin-top: 0px; margin-right: 0px; margin-bottom: 0px; margin-left: 0px; padding-top: 6px; padding-right: 0px; padding-bottom: 40px; padding-left: 0px; border-right-width: 1px; border-right-style: solid; border-right-color: rgb(221, 221, 221); list-style-type: none; list-style-position: initial; list-style-image: initial; text-align: right; "><li style="box-sizing: border-box; padding-top: 0px; padding-right: 5px; padding-bottom: 0px; padding-left: 5px; ">1</li><li style="box-sizing: border-box; padding-top: 0px; padding-right: 5px; padding-bottom: 0px; padding-left: 5px; ">2</li></ul><ul class="pre-numbering" style="box-sizing: border-box; position: absolute; width: 50px; background-color: rgb(238, 238, 238); top: 0px; left: 0px; margin-top: 0px; margin-right: 0px; margin-bottom: 0px; margin-left: 0px; padding-top: 6px; padding-right: 0px; padding-bottom: 40px; padding-left: 0px; border-right-width: 1px; border-right-style: solid; border-right-color: rgb(221, 221, 221); list-style-type: none; list-style-position: initial; list-style-image: initial; text-align: right; "><li style="box-sizing: border-box; padding-top: 0px; padding-right: 5px; padding-bottom: 0px; padding-left: 5px; ">1</li><li style="box-sizing: border-box; padding-top: 0px; padding-right: 5px; padding-bottom: 0px; padding-left: 5px; ">2</li></ul>
To discover the version of RPi.GPIO:
<code class="hljs avrasm has-numbering" style="display: block; padding-top: 0px; padding-right: 0px; padding-bottom: 0px; padding-left: 0px; background-image: initial; background-attachment: initial; background-origin: initial; background-clip: initial; background-color: transparent; color: inherit; box-sizing: border-box; font-family: 'Source Code Pro', monospace;font-size:undefined; white-space: pre; border-top-left-radius: 0px; border-top-right-radius: 0px; border-bottom-right-radius: 0px; border-bottom-left-radius: 0px; word-wrap: normal; background-position: initial initial; background-repeat: initial initial; ">GPIO<span class="hljs-preprocessor" style="color: rgb(68, 68, 68); box-sizing: border-box; ">.VERSION</span></code><ul class="pre-numbering" style="box-sizing: border-box; position: absolute; width: 50px; background-color: rgb(238, 238, 238); top: 0px; left: 0px; margin-top: 0px; margin-right: 0px; margin-bottom: 0px; margin-left: 0px; padding-top: 6px; padding-right: 0px; padding-bottom: 40px; padding-left: 0px; border-right-width: 1px; border-right-style: solid; border-right-color: rgb(221, 221, 221); list-style-type: none; list-style-position: initial; list-style-image: initial; text-align: right; "><li style="box-sizing: border-box; padding-top: 0px; padding-right: 5px; padding-bottom: 0px; padding-left: 5px; ">1</li></ul><ul class="pre-numbering" style="box-sizing: border-box; position: absolute; width: 50px; background-color: rgb(238, 238, 238); top: 0px; left: 0px; margin-top: 0px; margin-right: 0px; margin-bottom: 0px; margin-left: 0px; padding-top: 6px; padding-right: 0px; padding-bottom: 40px; padding-left: 0px; border-right-width: 1px; border-right-style: solid; border-right-color: rgb(221, 221, 221); list-style-type: none; list-style-position: initial; list-style-image: initial; text-align: right; "><li style="box-sizing: border-box; padding-top: 0px; padding-right: 5px; padding-bottom: 0px; padding-left: 5px; ">1</li></ul>
RPi.GPIO使用说明
像学一门语言第一个程序是”Hello World”一样, 搞硬件的第一个任务是 点灯(Blink). 先来看下点灯的程序吧:
<code class="hljs python has-numbering" style="display: block; padding-top: 0px; padding-right: 0px; padding-bottom: 0px; padding-left: 0px; background-image: initial; background-attachment: initial; background-origin: initial; background-clip: initial; background-color: transparent; color: inherit; box-sizing: border-box; font-family: 'Source Code Pro', monospace;font-size:undefined; white-space: pre; border-top-left-radius: 0px; border-top-right-radius: 0px; border-bottom-right-radius: 0px; border-bottom-left-radius: 0px; word-wrap: normal; background-position: initial initial; background-repeat: initial initial; "><span class="hljs-comment" style="color: rgb(136, 0, 0); box-sizing: border-box; ">#!/usr/bin/python</span>
<span class="hljs-keyword" style="color: rgb(0, 0, 136); box-sizing: border-box; ">import</span> RPi.GPIO <span class="hljs-keyword" style="color: rgb(0, 0, 136); box-sizing: border-box; ">as</span> GPIO
<span class="hljs-keyword" style="color: rgb(0, 0, 136); box-sizing: border-box; ">import</span> sys
<span class="hljs-keyword" style="color: rgb(0, 0, 136); box-sizing: border-box; ">import</span> time
LED = <span class="hljs-number" style="color: rgb(0, 102, 102); box-sizing: border-box; ">21</span>
<span class="hljs-function" style="box-sizing: border-box; "><span class="hljs-keyword" style="color: rgb(0, 0, 136); box-sizing: border-box; ">def</span> <span class="hljs-title" style="box-sizing: border-box; ">main</span><span class="hljs-params" style="color: rgb(102, 0, 102); box-sizing: border-box; ">()</span>:</span>
    GPIO.setwarnings(<span class="hljs-keyword" style="color: rgb(0, 0, 136); box-sizing: border-box; ">False</span>)
    GPIO.setmode(GPIO.BCM)
    GPIO.setup(LED,GPIO.OUT)
    <span class="hljs-keyword" style="color: rgb(0, 0, 136); box-sizing: border-box; ">while</span> (<span class="hljs-keyword" style="color: rgb(0, 0, 136); box-sizing: border-box; ">True</span>):
        GPIO.output(LED,<span class="hljs-keyword" style="color: rgb(0, 0, 136); box-sizing: border-box; ">True</span>)
        time.sleep(<span class="hljs-number" style="color: rgb(0, 102, 102); box-sizing: border-box; ">0.5</span>)
        GPIO.output(LED,<span class="hljs-keyword" style="color: rgb(0, 0, 136); box-sizing: border-box; ">False</span>)
        time.sleep(<span class="hljs-number" style="color: rgb(0, 102, 102); box-sizing: border-box; ">0.5</span>)
main()</code><ul class="pre-numbering" style="box-sizing: border-box; position: absolute; width: 50px; background-color: rgb(238, 238, 238); top: 0px; left: 0px; margin-top: 0px; margin-right: 0px; margin-bottom: 0px; margin-left: 0px; padding-top: 6px; padding-right: 0px; padding-bottom: 40px; padding-left: 0px; border-right-width: 1px; border-right-style: solid; border-right-color: rgb(221, 221, 221); list-style-type: none; list-style-position: initial; list-style-image: initial; text-align: right; "><li style="box-sizing: border-box; padding-top: 0px; padding-right: 5px; padding-bottom: 0px; padding-left: 5px; ">1</li><li style="box-sizing: border-box; padding-top: 0px; padding-right: 5px; padding-bottom: 0px; padding-left: 5px; ">2</li><li style="box-sizing: border-box; padding-top: 0px; padding-right: 5px; padding-bottom: 0px; padding-left: 5px; ">3</li><li style="box-sizing: border-box; padding-top: 0px; padding-right: 5px; padding-bottom: 0px; padding-left: 5px; ">4</li><li style="box-sizing: border-box; padding-top: 0px; padding-right: 5px; padding-bottom: 0px; padding-left: 5px; ">5</li><li style="box-sizing: border-box; padding-top: 0px; padding-right: 5px; padding-bottom: 0px; padding-left: 5px; ">6</li><li style="box-sizing: border-box; padding-top: 0px; padding-right: 5px; padding-bottom: 0px; padding-left: 5px; ">7</li><li style="box-sizing: border-box; padding-top: 0px; padding-right: 5px; padding-bottom: 0px; padding-left: 5px; ">8</li><li style="box-sizing: border-box; padding-top: 0px; padding-right: 5px; padding-bottom: 0px; padding-left: 5px; ">9</li><li style="box-sizing: border-box; padding-top: 0px; padding-right: 5px; padding-bottom: 0px; padding-left: 5px; ">10</li><li style="box-sizing: border-box; padding-top: 0px; padding-right: 5px; padding-bottom: 0px; padding-left: 5px; ">11</li><li style="box-sizing: border-box; padding-top: 0px; padding-right: 5px; padding-bottom: 0px; padding-left: 5px; ">12</li><li style="box-sizing: border-box; padding-top: 0px; padding-right: 5px; padding-bottom: 0px; padding-left: 5px; ">13</li><li style="box-sizing: border-box; padding-top: 0px; padding-right: 5px; padding-bottom: 0px; padding-left: 5px; ">14</li><li style="box-sizing: border-box; padding-top: 0px; padding-right: 5px; padding-bottom: 0px; padding-left: 5px; ">15</li></ul><ul class="pre-numbering" style="box-sizing: border-box; position: absolute; width: 50px; background-color: rgb(238, 238, 238); top: 0px; left: 0px; margin-top: 0px; margin-right: 0px; margin-bottom: 0px; margin-left: 0px; padding-top: 6px; padding-right: 0px; padding-bottom: 40px; padding-left: 0px; border-right-width: 1px; border-right-style: solid; border-right-color: rgb(221, 221, 221); list-style-type: none; list-style-position: initial; list-style-image: initial; text-align: right; "><li style="box-sizing: border-box; padding-top: 0px; padding-right: 5px; padding-bottom: 0px; padding-left: 5px; ">1</li><li style="box-sizing: border-box; padding-top: 0px; padding-right: 5px; padding-bottom: 0px; padding-left: 5px; ">2</li><li style="box-sizing: border-box; padding-top: 0px; padding-right: 5px; padding-bottom: 0px; padding-left: 5px; ">3</li><li style="box-sizing: border-box; padding-top: 0px; padding-right: 5px; padding-bottom: 0px; padding-left: 5px; ">4</li><li style="box-sizing: border-box; padding-top: 0px; padding-right: 5px; padding-bottom: 0px; padding-left: 5px; ">5</li><li style="box-sizing: border-box; padding-top: 0px; padding-right: 5px; padding-bottom: 0px; padding-left: 5px; ">6</li><li style="box-sizing: border-box; padding-top: 0px; padding-right: 5px; padding-bottom: 0px; padding-left: 5px; ">7</li><li style="box-sizing: border-box; padding-top: 0px; padding-right: 5px; padding-bottom: 0px; padding-left: 5px; ">8</li><li style="box-sizing: border-box; padding-top: 0px; padding-right: 5px; padding-bottom: 0px; padding-left: 5px; ">9</li><li style="box-sizing: border-box; padding-top: 0px; padding-right: 5px; padding-bottom: 0px; padding-left: 5px; ">10</li><li style="box-sizing: border-box; padding-top: 0px; padding-right: 5px; padding-bottom: 0px; padding-left: 5px; ">11</li><li style="box-sizing: border-box; padding-top: 0px; padding-right: 5px; padding-bottom: 0px; padding-left: 5px; ">12</li><li style="box-sizing: border-box; padding-top: 0px; padding-right: 5px; padding-bottom: 0px; padding-left: 5px; ">13</li><li style="box-sizing: border-box; padding-top: 0px; padding-right: 5px; padding-bottom: 0px; padding-left: 5px; ">14</li><li style="box-sizing: border-box; padding-top: 0px; padding-right: 5px; padding-bottom: 0px; padding-left: 5px; ">15</li></ul>
LED接在BCM编号方式下的21引脚, 每隔0.5s亮一次, time.sleep(), 延时秒数. 类似Arduino中的delay(), 当然,后者是延时的ms数.
具体每句话的意思, 往下面看:
Importing the module ( 导入模块 )
To import the RPi.GPIO module(导入RPi.GPIO模块):
<code class="hljs haskell has-numbering" style="display: block; padding-top: 0px; padding-right: 0px; padding-bottom: 0px; padding-left: 0px; background-image: initial; background-attachment: initial; background-origin: initial; background-clip: initial; background-color: transparent; color: inherit; box-sizing: border-box; font-family: 'Source Code Pro', monospace;font-size:undefined; white-space: pre; border-top-left-radius: 0px; border-top-right-radius: 0px; border-bottom-right-radius: 0px; border-bottom-left-radius: 0px; word-wrap: normal; background-position: initial initial; background-repeat: initial initial; "><span class="hljs-import" style="box-sizing: border-box; "><span class="hljs-keyword" style="color: rgb(0, 0, 136); box-sizing: border-box; ">import</span> RPi.GPIO <span class="hljs-keyword" style="color: rgb(0, 0, 136); box-sizing: border-box; ">as</span> GPIO</span></code><ul class="pre-numbering" style="box-sizing: border-box; position: absolute; width: 50px; background-color: rgb(238, 238, 238); top: 0px; left: 0px; margin-top: 0px; margin-right: 0px; margin-bottom: 0px; margin-left: 0px; padding-top: 6px; padding-right: 0px; padding-bottom: 40px; padding-left: 0px; border-right-width: 1px; border-right-style: solid; border-right-color: rgb(221, 221, 221); list-style-type: none; list-style-position: initial; list-style-image: initial; text-align: right; "><li style="box-sizing: border-box; padding-top: 0px; padding-right: 5px; padding-bottom: 0px; padding-left: 5px; ">1</li></ul><ul class="pre-numbering" style="box-sizing: border-box; position: absolute; width: 50px; background-color: rgb(238, 238, 238); top: 0px; left: 0px; margin-top: 0px; margin-right: 0px; margin-bottom: 0px; margin-left: 0px; padding-top: 6px; padding-right: 0px; padding-bottom: 40px; padding-left: 0px; border-right-width: 1px; border-right-style: solid; border-right-color: rgb(221, 221, 221); list-style-type: none; list-style-position: initial; list-style-image: initial; text-align: right; "><li style="box-sizing: border-box; padding-top: 0px; padding-right: 5px; padding-bottom: 0px; padding-left: 5px; ">1</li></ul>
To import the module and check to see if it is successful( 判断检查导入模块是否成功, 可能需要超级用户权限执行: sudo python xx.py ):
<code class="hljs python has-numbering" style="display: block; padding-top: 0px; padding-right: 0px; padding-bottom: 0px; padding-left: 0px; background-image: initial; background-attachment: initial; background-origin: initial; background-clip: initial; background-color: transparent; color: inherit; box-sizing: border-box; font-family: 'Source Code Pro', monospace;font-size:undefined; white-space: pre; border-top-left-radius: 0px; border-top-right-radius: 0px; border-bottom-right-radius: 0px; border-bottom-left-radius: 0px; word-wrap: normal; background-position: initial initial; background-repeat: initial initial; "><span class="hljs-keyword" style="color: rgb(0, 0, 136); box-sizing: border-box; ">try</span>:
    <span class="hljs-keyword" style="color: rgb(0, 0, 136); box-sizing: border-box; ">import</span> RPi.GPIO <span class="hljs-keyword" style="color: rgb(0, 0, 136); box-sizing: border-box; ">as</span> GPIO
<span class="hljs-keyword" style="color: rgb(0, 0, 136); box-sizing: border-box; ">except</span> RuntimeError:
    print(<span class="hljs-string" style="color: rgb(0, 136, 0); box-sizing: border-box; ">"Error importing RPi.GPIO!  This is probably because you need superuser privileges.  You can achieve this by using 'sudo' to run your script"</span>)</code><ul class="pre-numbering" style="box-sizing: border-box; position: absolute; width: 50px; background-color: rgb(238, 238, 238); top: 0px; left: 0px; margin-top: 0px; margin-right: 0px; margin-bottom: 0px; margin-left: 0px; padding-top: 6px; padding-right: 0px; padding-bottom: 40px; padding-left: 0px; border-right-width: 1px; border-right-style: solid; border-right-color: rgb(221, 221, 221); list-style-type: none; list-style-position: initial; list-style-image: initial; text-align: right; "><li style="box-sizing: border-box; padding-top: 0px; padding-right: 5px; padding-bottom: 0px; padding-left: 5px; ">1</li><li style="box-sizing: border-box; padding-top: 0px; padding-right: 5px; padding-bottom: 0px; padding-left: 5px; ">2</li><li style="box-sizing: border-box; padding-top: 0px; padding-right: 5px; padding-bottom: 0px; padding-left: 5px; ">3</li><li style="box-sizing: border-box; padding-top: 0px; padding-right: 5px; padding-bottom: 0px; padding-left: 5px; ">4</li></ul><ul class="pre-numbering" style="box-sizing: border-box; position: absolute; width: 50px; background-color: rgb(238, 238, 238); top: 0px; left: 0px; margin-top: 0px; margin-right: 0px; margin-bottom: 0px; margin-left: 0px; padding-top: 6px; padding-right: 0px; padding-bottom: 40px; padding-left: 0px; border-right-width: 1px; border-right-style: solid; border-right-color: rgb(221, 221, 221); list-style-type: none; list-style-position: initial; list-style-image: initial; text-align: right; "><li style="box-sizing: border-box; padding-top: 0px; padding-right: 5px; padding-bottom: 0px; padding-left: 5px; ">1</li><li style="box-sizing: border-box; padding-top: 0px; padding-right: 5px; padding-bottom: 0px; padding-left: 5px; ">2</li><li style="box-sizing: border-box; padding-top: 0px; padding-right: 5px; padding-bottom: 0px; padding-left: 5px; ">3</li><li style="box-sizing: border-box; padding-top: 0px; padding-right: 5px; padding-bottom: 0px; padding-left: 5px; ">4</li></ul>
Pin numbering ( 引脚编号 )
There are two ways of numbering the IO pins on a Raspberry Pi within RPi.GPIO. The first is using the BOARD numbering system. This refers to the pin numbers on the P1 header of the Raspberry Pi board. The advantage of using this numbering system is that your hardware will always work, regardless of the board revision of the RPi. You will not need to rewire your connector or change your code.
The second numbering system is the BCM numbers. This is a lower level way of working - it refers to the channel numbers on the Broadcom SOC. You have to always work with a diagram of which channel number goes to which pin on the RPi board. Your script could break between revisions of Raspberry Pi boards.
大致含义: 树莓派引脚有BOARD和BCM两种编号方式( 使用python时? 似乎使用C还有一种wringPi编号方式 ), BOARD具有很好的适用性( 不用看接口图,数引脚1~40就可以接线 ), 不论树莓派1 2 3, 都不用修改代码, 吼啊! BCM编号方式换个版本再接线时数引脚是不行的, 需要看下下面的接口图…不难看出推荐用BOARD编号方式. 但很多程序中使用BCM方式.
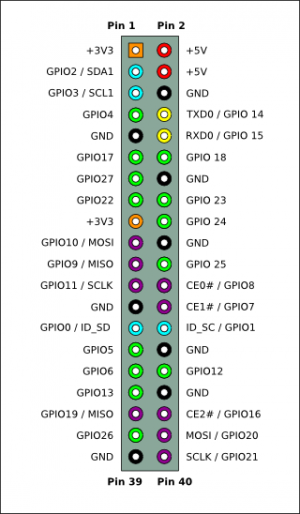
下面给出一张树莓派2B的硬件接口图( 来源找不到了,侵删 ):
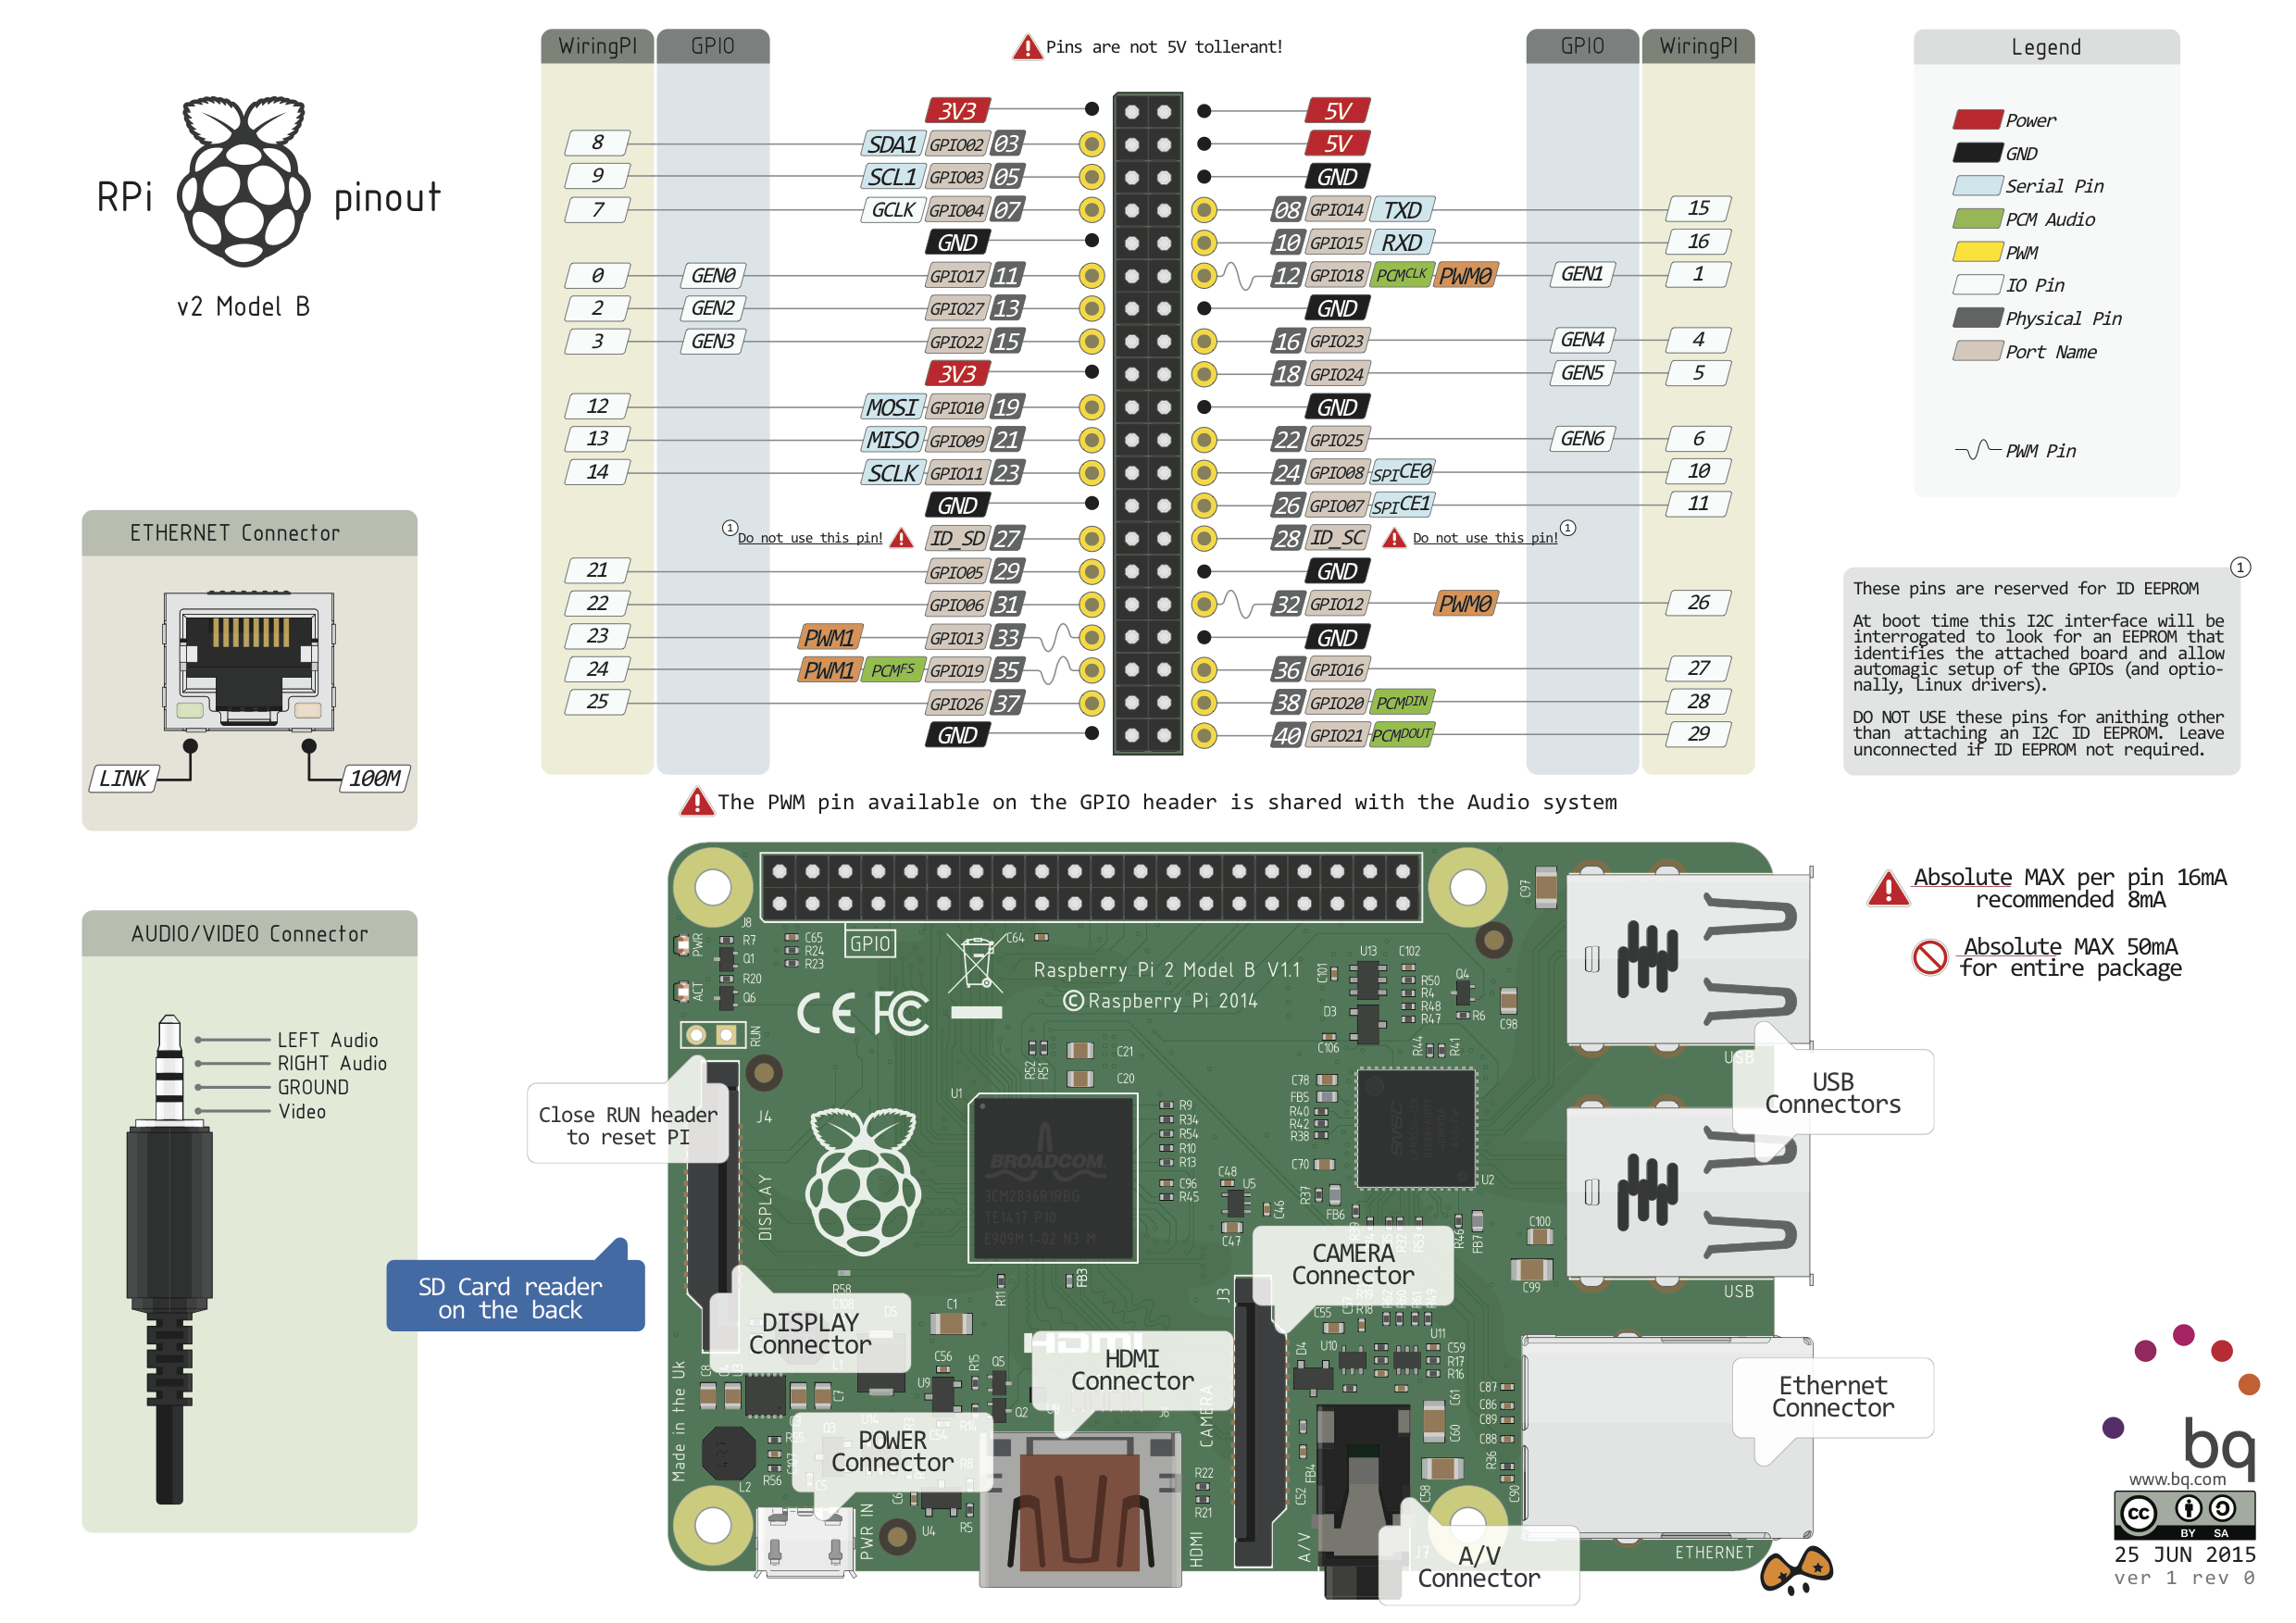
图中的GPIOxx的方框即是BCM编码方式, 直接写数字的深灰框是BOARD编码方式, 如BCM编码方式的 GPIO02 对应BOARD编码方式的 3.
只需要使用BCM编号方式时, 用下面这两张好了, 不眼花:
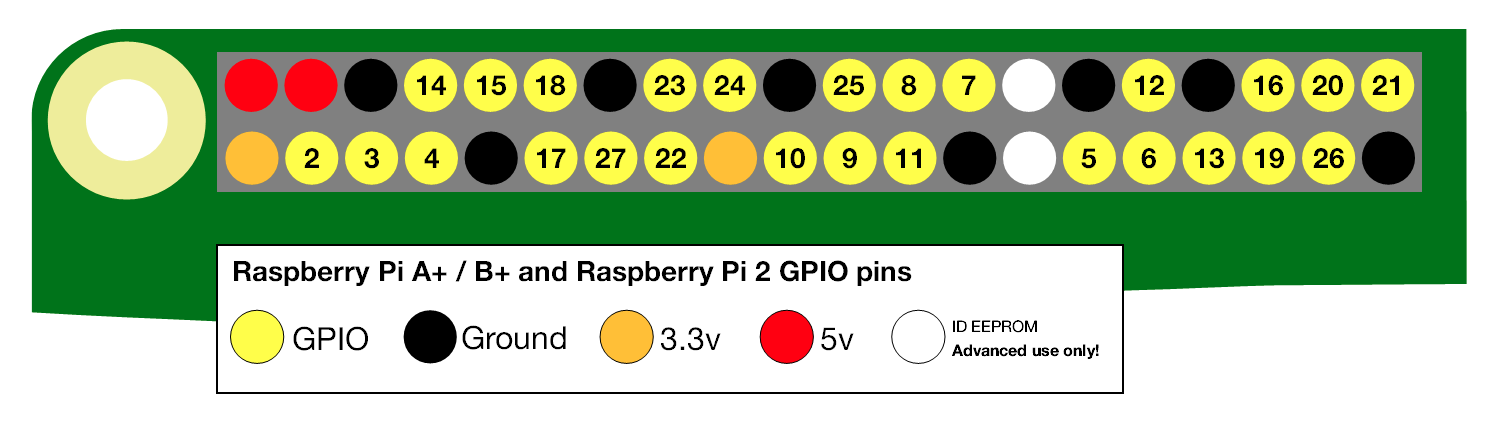
图片来源:
https://www.raspberrypi.org/documentation/usage/gpio-plus-and-raspi2/README.md
http://elinux.org/RPi_Low-level_peripherals#I.C2.B2C


 本文详细介绍了如何使用Python的RPi.GPIO模块控制树莓派的GPIO引脚,包括导入模块、引脚编号、设置输入输出、清理引脚、轮询检测、边缘检测和软件PWM等功能,适合树莓派初学者和硬件爱好者。
 最低0.47元/天 解锁文章


 1061
1061

 被折叠的 条评论
为什么被折叠?
被折叠的 条评论
为什么被折叠?
 到【灌水乐园】发言


