


刚开始接触Android的时候都知道使用setContentview(resId)可以将layout作为当前的Activity显示出来,可是有没有想过这个方法做了什么,Activity怎么把这个layout显示出来的?这个layout和我们的Activity有什么直接或间接关系呢?这篇文章就为你揭开setContentview设置的Activity的UI构成。
Activity UI构成
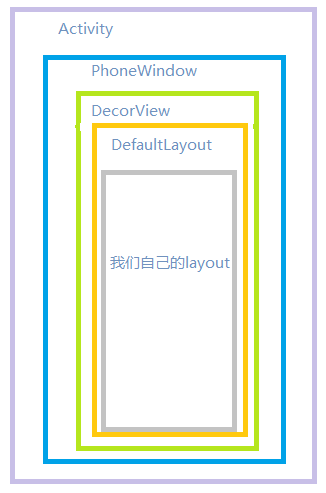
先拿出答案:
其实Activity并不是在对象里面添加了一个部局文件那样简单。
我们所用的布局文件其实是通过PhoneWindow放到了DecorView的mContentParent里面,最终形成了我们看到的。
下面开始详解了,准备好了么(^o^)/~
* step 1 : Activity的setContentView
public void setContentView(int layoutResID) {
        getWindow().setContentView(layoutResID);
        initWindowDecorActionBar();
    }
getWindow() 返回的是PhoneWindow对象,下面源码为证。不想看的,可以跳过这一部分。
  1 final void attach(Context context, ActivityThread aThread,
      2         Instrumentation instr, IBinder token, int ident,
      3         Application application, Intent intent, ActivityInfo info,
      4         CharSequence title, Activity parent, String id,
      5         Object lastNonConfigurationInstance,
      6         HashMap lastNonConfigurationChildInstances,
      7         Configuration config) {
      8     attachBaseContext(context);
      9
     10     mWindow = PolicyManager.makeNewWindow(this);
     11     mWindow.setCallback(this);
     12     if (info.softInputMode != WindowManager.LayoutParams.SOFT_INPUT_STATE_UNSPECIFIED) {
     13         mWindow.setSoftInputMode(info.softInputMode);
     14     }
     15     mUiThread = Thread.currentThread();
     16
     17     mMainThread = aThread;
     18     mInstrumentation = instr;
     19     mToken = token;
     20     mIdent = ident;
     21     mApplication = application;
     22     mIntent = intent;
     23     mComponent = intent.getComponent();
     24     mActivityInfo = info;
     25     mTitle = title;
     26     mParent = parent;
     27     mEmbeddedID = id;
     28     mLastNonConfigurationInstance = lastNonConfigurationInstance;
     29     mLastNonConfigurationChildInstances = lastNonConfigurationChildInstances;
     30
     31     mWindow.setWindowManager(null, mToken, mComponent.flattenToString());
     32     if (mParent != null) {
     33         mWindow.setContainer(mParent.getWindow());
     34     }
     35     mWindowManager = mWindow.getWindowManager();
     36     mCurrentConfig = config;
第10行,调用了PolicyManager这个类
public final class PolicyManager {
        private static final String POLICY_IMPL_CLASS_NAME =
            "com.android.internal.policy.impl.Policy";

        private static final IPolicy sPolicy;

       '''
        // The static methods to spawn new policy-specific objects
        public static Window makeNewWindow(Context context) {
            return sPolicy.makeNewWindow(context);
        }
    '''
}方法makeNewWindow中调用了IPolicy#makeNewWindow(context),IPolicy的具体实现是Policy。
33
34
35// Simple implementation of the policy interface that spawns the right
36// set of objects
37public class More ...Policy implements IPolicy {
38    private static final String TAG = "PhonePolicy";
39
40    private static final String[] preload_classes = {
41        "com.android.internal.policy.impl.PhoneLayoutInflater",
42        "com.android.internal.policy.impl.PhoneWindow",
43        "com.android.internal.policy.impl.PhoneWindow$1",
44        "com.android.internal.policy.impl.PhoneWindow$DialogMenuCallback",
45        "com.android.internal.policy.impl.PhoneWindow$DecorView",
46        "com.android.internal.policy.impl.PhoneWindow$PanelFeatureState",
47        "com.android.internal.policy.impl.PhoneWindow$PanelFeatureState$SavedState",
48    };
49
50    static {
51        // For performance reasons, preload some policy specific classes when
52        // the policy gets loaded.
53        for (String s : preload_classes) {
54            try {
55                Class.forName(s);
56            } catch (ClassNotFoundException ex) {
57                Log.e(TAG, "Could not preload class for phone policy: " + s);
58            }
59        }
60    }
61
62    public Window makeNewWindow(Context context) {
63        return new PhoneWindow(context);
64    }
65
...
77}
step 2 : PhoneWindow
OK!在第63行可以看到是返回了PhoneWindow对象, 然后调用PhoneWindow的setContentView(int layoutResID)方法。
public void setContentView(int layoutResID) {
    265         if (mContentParent == null) {
    266             installDecor();
    267         } else {
    268             mContentParent.removeAllViews();
    269         }
    270         mLayoutInflater.inflate(layoutResID, mContentParent);
    271         final Callback cb = getCallback();
    272         if (cb != null && !isDestroyed()) {
    273             cb.onContentChanged();
    274         }
    275     }
    276
小段总结 Activity的setContentView调用了PhoneWindow的setContentView(int layoutResID)将我们要显示的布局文件添加到屏幕上的。
在270行中可以看到我们要添加到屏幕上的layoutResID被添加到mContentParent,那么这个mContentParent是个什么?我们到installDecor()方法中看看。
- step 4 分析mContentParent以及mDecor:
//成员变量
        // This is the top-level view of the window, containing the window decor.
       private DecorView mDecor;

      1 private void installDecor() {
      2         if (mDecor == null) {
      3             mDecor = generateDecor();
      4             ....
      9         }
     10         if (mContentParent == null) {
     11             mContentParent = generateLayout(mDecor);
                ...

    }
在第11行看到是依据创建的mDecor调用generateLayout(mDecor)方法生成了mContentParent。
* mDecor是什么?
    还记得开头讲的DecorView么?就是这个家伙。看下PhoneWindow成员变量的注释。
    <pre>
     // This is the top-level view of the window, containing the window decor.
    private DecorView mDecor;

    // This is the view in which the window contents are placed. It is either
    // mDecor itself, or a child of mDecor where the contents go.
    private ViewGroup mContentParent;
    </pre>
* step 5 : DecorView
* DecorView就是窗口的最上面的view,他是PhoneWindow的内部类。看看generateDecor()方法怎么创建出mDecor.
protected DecorView generateDecor() {
            return new DecorView(getContext(), -1);
        }
DecorView的一个对象,那么、、
private final class DecorView extends FrameLayout implements RootViewSurfaceTaker {

        /* package */int mDefaultOpacity = PixelFormat.OPAQUE;

        /** The feature ID of the panel, or -1 if this is the application's DecorView */
        private final int mFeatureId;


        public DecorView(Context context, int featureId) {
            super(context);
            mFeatureId = featureId;

            mShowInterpolator = AnimationUtils.loadInterpolator(context,
                    android.R.interpolator.linear_out_slow_in);
            mHideInterpolator = AnimationUtils.loadInterpolator(context,
                    android.R.interpolator.fast_out_linear_in);

            mBarEnterExitDuration = context.getResources().getInteger(
                    R.integer.dock_enter_exit_duration);
        }
        ...
    }
哎呀,原来DecorView最终也不过是FrameLayout的子类。
step 6 : 继续分析step4
回到step4中我们看看包裹我们布局的mContentParent是怎么被 generateLayout(mDecor)方法创建的。
 /**
     * The ID that the main layout in the XML layout file should have.
     */
     public static final int ID_ANDROID_CONTENT = com.android.internal.R.id.content;
 1 protected ViewGroup generateLayout(DecorView decor) {
  2         // Apply data from current theme.
  3
  4         TypedArray a = getWindowStyle();
  5         ...........
  6
  7         if (a.getBoolean(R.styleable.Window_windowFullscreen, false)) {
  8             setFlags(FLAG_FULLSCREEN, FLAG_FULLSCREEN & (~getForcedWindowFlags()));
  9         }
 10
 11         ''''''''
 12
 13         // Inflate the window decor.
 14
 15         int layoutResource;
 16        '''''''''
 17        if ((features & (1 << FEATURE_ACTION_BAR)) != 0) {
 18                 layoutResource = a.getResourceId(
 19                         R.styleable.Window_windowActionBarFullscreenDecorLayout,
 20                         R.layout.screen_action_bar);
 21             } else {
 22                 layoutResource = R.layout.screen_title;
 23             }
 24             // System.out.println("Title!");
 25         } else if ((features & (1 << FEATURE_ACTION_MODE_OVERLAY)) != 0) {
 26             layoutResource = R.layout.screen_simple_overlay_action_mode;
 27         } else {
 28             // Embedded, so no decoration is needed.
 29             layoutResource = R.layout.screen_simple;
 30             // System.out.println("Simple!");
 31         }
 32
 33         mDecor.startChanging();
 34
 35         View in = mLayoutInflater.inflate(layoutResource, null);
 36         decor.addView(in, new ViewGroup.LayoutParams(MATCH_PARENT, MATCH_PARENT));
 37         mContentRoot = (ViewGroup) in;
 38
 39         ViewGroup contentParent = (ViewGroup)findViewById(ID_ANDROID_CONTENT);
 40         if (contentParent == null) {
 41             throw new RuntimeException("Window couldn't find content container view");
 42         }
 43         ''''''
 44
 45         // Remaining setup -- of background and title -- that only applies
 46         // to top-level windows.
 47         if (getContainer() == null) {
 48             final Drawable background;
 49             if (mBackgroundResource != 0) {
 50                 background = getContext().getDrawable(mBackgroundResource);
 51             } else {
 52                 background = mBackgroundDrawable;
 53             }
 54             mDecor.setWindowBackground(background);
 55
 56             final Drawable frame;
 57             if (mFrameResource != 0) {
 58                 frame = getContext().getDrawable(mFrameResource);
 59             } else {
 60                 frame = null;
 61             }
 62             mDecor.setWindowFrame(frame);
 63
 64             mDecor.setElevation(mElevation);
 65             mDecor.setClipToOutline(mClipToOutline);
 66
 67             if (mTitle != null) {
 68                 setTitle(mTitle);
 69             }
 70
 71             if (mTitleColor == 0) {
 72                 mTitleColor = mTextColor;
 73             }
 74             setTitleColor(mTitleColor);
 75         }
 76
 77         mDecor.finishChanging();
 78
 79         return contentParent;
 80     }
拓展知识(可以略过) :在第4行,方法getWindowStyle()返回当前主题的状态栏或者屏幕的属性,比如是否显示APP全屏、是否显示APP的标题,等等。例如:这里第7、8行就是判断当前的Activity主题是否让Activity全屏。
代码量较多,我们捡重要的说说。先看看最终返回的是什么?是contentParent,这个东西是个局部变量,只在第39行被赋值过。这里的findViewById()是在父类Window中的,看看Window#findViewById(ID__ANDROID __CONTENT)执行了什么。
public View findViewById(@IdRes int id) {
        return getDecorView().findViewById(id);
    }
OK.是在generateLayout(DecorView decor)的decor中是查找ID为ID__ANDROID __CONTENT(也就是id为content,可以看line1上面一行的成员变量)的view。可是,刚才我们知道(step4)传过来的decor是new出来的空的FrameLayout对象,里面没有任何东西的,从哪里找content这个id呢?非也!且看line35、和line36,decor里面添加了一个资源ID为layoutResource的布局。这个layoutResource也是一个成员变量,在line15创建,然后在后面一些代码中进行赋值。赋值后根据将layoutResource填充的布局文件放到decor中。而layoutResource中有一个id为content的layout就是mContentParent,也就是setContentView(int layoutId)中layoutId存放的地方。
顾名思义,我们要为content添加布局,所以起名setContentView,是不是明白了许多、。。
刚才提到的layoutResource的赋值,从我留下的line17~line27就可以看出两种布局。就拿line22 来说,看看
screen_title.xml
    <LinearLayout xmlns:android="http://schemas.android.com/apk/res/android"
        android:orientation="vertical"
        android:fitsSystemWindows="true">
        <!-- Popout bar for action modes -->
        <ViewStub android:id="@+id/action_mode_bar_stub"
                  android:inflatedId="@+id/action_mode_bar"
                  android:layout="@layout/action_mode_bar"
                  android:layout_width="match_parent"
                  android:layout_height="wrap_content"
                  android:theme="?attr/actionBarTheme" />
        <FrameLayout
            android:layout_width="match_parent"
            android:layout_height="?android:attr/windowTitleSize"
            style="?android:attr/windowTitleBackgroundStyle">
            <TextView android:id="@android:id/title"
                style="?android:attr/windowTitleStyle"
                android:background="@null"
                android:fadingEdge="horizontal"
                android:gravity="center_vertical"
                android:layout_width="match_parent"
                android:layout_height="match_parent" />
        </FrameLayout>
        <FrameLayout android:id="@android:id/content"
            android:layout_width="match_parent"
            android:layout_height="0dip"
            android:layout_weight="1"
            android:foregroundGravity="fill_horizontal|top"
            android:foreground="?android:attr/windowContentOverlay" />
    </LinearLayout>
我们要放到Activity中的布局最终被放到了content这个id的Framelayout中了。
setContentView(int layoutId)总结
- 我们要显示在Activity中的布局通过PhoneWindow拿到当前Activity的主题。同时,创建默认的布局添加到DecorView中,然后再将我们的布局文件添加到DecorView中的id为content的这个XML中。
写在最后
现在再看这个,是不是明白了许多?O(∩_∩)O哈哈~


 643
643


 被折叠的 条评论
为什么被折叠?
被折叠的 条评论
为什么被折叠?
 到【灌水乐园】发言


