


Linux 之旅 21:编译安装软件

图源:pexcel
开源软件的安装与升级
可执行文件
通常,源代码只有被编译成二进制的可执行文件后才能在操作系统上被用户直接运行,比如:
[icexmoon@xyz ~]$ file /bin/bash
/bin/bash: ELF 64-bit LSB executable, x86-64, version 1 (SYSV), dynamically linked (uses shared libs), for GNU/Linux 2.6.32, BuildID[sha1]=85e3da5a087950e7aaeb7893c056218a8874d2e5, stripped
[icexmoon@xyz ~]$ file backup_system.sh
backup_system.sh: Bourne-Again shell script, ASCII text executable
前者/bin/bash是一个64位的二进制可执行文件,后者backup_system.sh虽然是一个可执行文件,却是一个ASCII文本文件,而非二进制文件,本质上其实是一个脚本,运行的时候也是依赖于/bin/bash才能执行。
事实上编程语言也分为两大类,编译型语言如C++、C、C#之类,所编写的程序都是需要将源码便以为二进制文件后才能运行。而解释型语言,如Java、PHP、Python之类,只需要准备好源码和安装相应的解释器就可以运行程序。
通常来说前者的优点是执行效率高(毕竟已经编译成了二进制的机器码),在运行时不需要语言环境。缺点则是和硬件平台的关系紧密,不能跨平台。后者的优点是硬件无关,可以跨平台,且一般来说可以很方便地通过修改源码来添加功能。缺点则是依赖于语言环境,需要安装好对应语言的解释器和相关工具,甚至是指定版本的解释器。
这两种语言编写的程序优缺点都很明显,所以一般来说用途也泾渭分明,比如商业软件多是前者编写,开源项目多是后者编写,但也并非只有对立,比如Python的解释器CPython中,为了提高基础容器list、dict等的执行效率,就是直接将其用C编译为二进制文件予以调用。
说回到Linux上的可执行文件,Linux上虽然多使用开源软件,但也并非所有的开源软件都使用解释型语言编写,因为效率或其它方面的考虑,相当一部分程序是用编译型语言编写的。而因为前边说的,编译型语言编写的程序是硬件相关的,而发行商显然不可能针对种类繁多的硬件平台一一进行编译并提供可执行文件,所以一般来说只会提供源码,而这就需要我们在下载源码后自行编译。
在Linux平台上,对于C语言编写的程序,使用最多的编译器是gcc,编译过程可以用以下图示说明:
[外链图片转存失败,源站可能有防盗链机制,建议将图片保存下来直接上传(img-PeBJ0yFP-1631446096221)(https://image2.icexmoon.xyz/image/source_to_binary.gif)]
图源:鸟哥的Linux私房菜
make与configure
make是一个可以帮助我们简化编译过程的工具,它会读取源码目录下的makefile文件自动化地完成源码编译工作。但是,makefile并不会直接随源码附送,因为每个硬件平台是不一样的,自然编译步骤也会不太一样,这就意味着根据不同的平台,需要不同的makefile。
为了解决这一问题,软件开发商会随源码一起提供一个用户电脑环境监测程序,一般会命名为configure或config。这个程序在运行后会检查用户的电脑环境,并生成一个适合当前电脑环境的makefile,然后就可以使用make工具进行编译工作了。
使用configure与make进行编译工作的过程可以用下图表示:
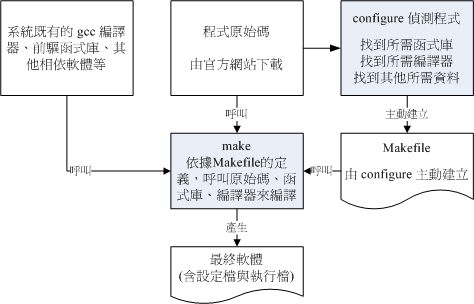
图源:鸟哥的Linux私房菜
Tarball
为了节省网络带宽和存储空间,源码一般都会被打包和压缩,以*.tar.gz或*.tar.bz2的方式提供,所以会被称为Tarball。
一般会包含以下内容:
- 源码文件
- 环境监测程序(
configure或config等) - 软件的说明和安装手册(
INSTALL或README)
软件的升级与安装
对于软件的升级与安装,现代的Linux发行版多使用包管理器,如Redhat系的yum和Ubuntu系的apt,使用包管理器可以很方便地在线下载和升级软件。
但是依然存在需要手动下载和安装软件的情况,比如包管理器的仓库中没有的小众软件,或者仓库中有,但是版本比较老,你需要最新的版本等。
自己下载源码然后安装就相对麻烦很多了,需要我们前边说过的编译环节,整个步骤主要有:
- 从发型商那里下载
Tarball。 - 解压
Tarball。 - 使用
gcc等编译工具进行编译(生成object files)。 - 使用
gcc将目标文件(object file)与函数库进行链接,生成可执行文件。 - 将生成的可执行文件和相关配置文件部署到指定目录,完成安装。
其中第3、4步可以使用make和configure等工具简化。
示例
Hello World
这里通过编写、编译一个最简单的C程序的方式说明最简单的编译步骤。
一般Linux发行版不会默认安装gcc等编译工具,所以首先需要安装相关工具:
[root@xyz ~]# yum groupinstall 'Development Tools'
已加载插件:fastestmirror, langpacks
没有安装组信息文件
Maybe run: yum groups mark convert (see man yum)
Loading mirror speeds from cached hostfile
 * base: mirrors.aliyun.com
 ...省略
大多数初学者的第一个程序都是从Hello World开始的,下面是C语言版的Hello World:
[root@xyz ~]# mkdir workspace
[root@xyz ~]# cd workspace/
[root@xyz workspace]# vim hello.c
[root@xyz workspace]# cat hello.c
#include <stdio.h>
int main (void){
        printf("Hello World!\n");
        return 0;
}
下面使用gcc编译并执行:
[root@xyz workspace]# gcc hello.c
[root@xyz workspace]# ll
总用量 16
-rwxr-xr-x. 1 root root 8360 9月  12 15:55 a.out
-rw-r--r--. 1 root root   76 9月  12 15:55 hello.c
[root@xyz workspace]# ./a.out
Hello World!
默认情况下gcc可以自动编译并处理程序对函数库的链接,并生成一个可执行文件a.out。
当然你也可以逐步处理,并生成一个指定名称的可执行文件:
[root@xyz workspace]# gcc -c hello.c
[root@xyz workspace]# ll
总用量 20
-rwxr-xr-x. 1 root root 8360 9月  12 15:55 a.out
-rw-r--r--. 1 root root   76 9月  12 15:55 hello.c
-rw-r--r--. 1 root root 1496 9月  12 16:04 hello.o
[root@xyz workspace]# gcc -o hello hello.o
[root@xyz workspace]# ll
总用量 32
-rwxr-xr-x. 1 root root 8360 9月  12 15:55 a.out
-rwxr-xr-x. 1 root root 8360 9月  12 16:05 hello
-rw-r--r--. 1 root root   76 9月  12 15:55 hello.c
-rw-r--r--. 1 root root 1496 9月  12 16:04 hello.o
[root@xyz workspace]# ./hello
Hello World!
其中gcc -c是编译源码并生成相应的目标文件,但并不会链接到函数库。gcc -o是将多个编译好的目标文件链接到函数库,并输出为一个指定名称的可执行文件。
多源码程序的编译
上面是最简单的程序,只有一个源码文件,大多数情况下程序会有多个源码文件组成,下面看一个稍微复杂点的例子:
[root@xyz workspace]# mkdir hello2
[root@xyz workspace]# cd hello2/
[root@xyz hello2]# vim main.c
[root@xyz hello2]# vim how_are_you.c
[root@xyz hello2]# cat main.c
#include <stdio.h>
int main (void){
        printf("Hello Wolrd!\n");
        howAreYou();
        return 0;
}
[root@xyz hello2]# cat how_are_you.c
#include <stdio.h>
void howAreYou(void){
        printf("how are you!\n");
}
编译并运行:
[root@xyz hello2]# gcc -c main.c how_are_you.c
[root@xyz hello2]# gcc -o hello2 main.o how_are_you.o
[root@xyz hello2]# ./hello2
Hello Wolrd!
how are you!
gcc还可以添加其它参数实现更多功能,比如:
[root@xyz hello2]# gcc -O -c main.c how_are_you.c
在编译的时候使用-O参数可以优化编译结果,当然可能会话费更长的时间。
如果要让编译器输出编译过程中的相关提示信息:
[root@xyz hello2]# gcc -Wall -c main.c how_are_you.c
main.c: 在函数‘main’中:
main.c:4:2: 警告:隐式声明函数‘howAreYou’ [-Wimplicit-function-declaration]
  howAreYou();
  ^
上边的警告是因为没有使用
include语句引用所致。
链接函数库
C语言可以引入各种附带的标准库,如上边程序中使用的#include <stdio.h>,就是引入的标准I/O库。下面展示在程序中引入其他函数库的示例:
函数库也称为链接库,分为静态和动态,比如Windows上的
dll一般被称作动态链接库。
[root@xyz hello2]# cd ..
[root@xyz workspace]# mkdir sin
[root@xyz workspace]# cd sin
[root@xyz sin]# vim sin.c
[root@xyz sin]# cat sin.c
#include <stdio.h>
#include <math.h>
int main (void){
        float value;
        value = sin (3.14/2);
        printf("%f\n",value);
        return 0;
}
[root@xyz sin]# gcc sin.c
[root@xyz sin]# ./a.out
1.000000
因为引入的两个库stdio和math都是标准库,所以无需通过额外参数进行定位,但如果是第三方库,就可能需要指定库所在的目录和名称了,比如:
[root@xyz sin]# gcc sin.c -lm -L/lib -L/lib64
[root@xyz sin]# ./a.out
1.000000
其中-l用于指定函数库名称,比如-lm就是指定引入libm.so函数库(lib和.so省略),-L用于指定函数库的检索目录,/lib和/lib64是默认的函数库保存目录。
此外,函数库对应的头文件也有默认保存目录,是/usr/include,如果是使用这个目录下的头文件,是不需要额外指定的,但如果不是,同样需要指定头文件的检索路径:
[root@xyz sin]# gcc sin.c -I /src/include
gcc的简易用法
这里将gcc的简易用法进行总结:
- 将源码编译为目标文件:
gcc -c hello.c - 优化编译结果的执行效率:
gcc -O -c hello.c - 指定第三方函数库和头文件:
gcc sin.c -lm -L/lib64 -I/usr/include - 链接函数库并输出可执行文件:
gcc -o hello hello.o - 编译时输出提示信息:
gcc hello.c -Wall
其中-O或-Wall这些非必要参数被称作标识(FLAGS),因为这里使用的是C语言,所以也叫做CFLAGS。
make
为什么要使用make
这里使用鸟哥的私房菜中的案例进行说明,先下载并解压示例代码:
[root@xyz sin]# cd ..
[root@xyz workspace]# mkdir make_test
[root@xyz workspace]# cd make_test/
[root@xyz make_test]# wget http://linux.vbird.org/linux_basic/0520source/main.tgz
--2021-09-12 16:50:02--  http://linux.vbird.org/linux_basic/0520source/main.tgz
正在解析主机 linux.vbird.org (linux.vbird.org)... 140.116.44.180
正在连接 linux.vbird.org (linux.vbird.org)|140.116.44.180|:80... 已连接。
已发出 HTTP 请求,正在等待回应... 200 OK
长度:518 [application/x-gzip]
正在保存至: “main.tgz”
...省略
[root@xyz make_test]# tar -xzvf main.tgz
cos_value.c
haha.c
main.c
sin_value.c
编译并测试:
[root@xyz make_test]# gcc -c main.c
[root@xyz make_test]# gcc -c haha.c cos_value.c sin_value.c
[root@xyz make_test]# gcc -o main main.o haha.o cos_value.o sin_value.o -lm
[root@xyz make_test]# ./main


Please input your name: icexmoon

Please enter the degree angle (ex> 90): 30


Hi, Dear icexmoon, nice to meet you.
The Sin is:  0.50
The Cos is:  0.87
如果我们修改了源码,就要将以上的过程重新来一遍,当然如果使用make会更加简单:
[root@xyz make_test]# vim makefile
[root@xyz make_test]# cat makefile
main: main.o haha.o sin_value.o cos_value.o
        gcc -o main main.o haha.o sin_value.o cos_value.o -lm
[root@xyz make_test]# rm -f main *.o
[root@xyz make_test]# ll
总用量 24
-rw-r--r--. 1  500  500 184 9月   4 2015 cos_value.c
-rw-r--r--. 1  500  500 101 6月   9 2009 haha.c
-rw-r--r--. 1  500  500 291 6月   9 2009 main.c
-rw-r--r--. 1 root root 518 9月   4 2015 main.tgz
-rw-r--r--. 1 root root  99 9月  12 16:58 makefile
-rw-r--r--. 1  500  500 186 9月   4 2015 sin_value.c
[root@xyz make_test]# make
cc    -c -o main.o main.c
cc    -c -o haha.o haha.c
cc    -c -o sin_value.o sin_value.c
cc    -c -o cos_value.o cos_value.c
gcc -o main main.o haha.o sin_value.o cos_value.o -lm
[root@xyz make_test]# ./main


Please input your name: icexmoon

Please enter the degree angle (ex> 90): 25


Hi, Dear icexmoon, nice to meet you.
The Sin is:  0.42
The Cos is:  0.91
这里因为是第一次运行make进行编译,为了确保重新编译并生成可执行文件,所以将手动编译生成的.o文件和main文件都删除了之后才运行make,如果是之后再修改源码并编译,就不需要这样了,可以直接运行make:
[root@xyz make_test]# vim main.c
[root@xyz make_test]# make
cc    -c -o main.o main.c
gcc -o main main.o haha.o sin_value.o cos_value.o -lm
[root@xyz make_test]# make
make: “main”是最新的。
相对于手动编译,使用make有以下好处:
- 简化编译时需要执行的命令。
- 如果修改了源码,
make仅会对涉及的源码进行重新编译,而不需要对所有文件都重新编译。 - 可以自动处理源码和函数库的依赖关系后生成可执行文件。
makefile的基本语法
makefile的基本语法为:
目标(target): 目标文件1 目标文件2
<tab>   gcc -o 可执行文件 目标文件1 目标文件2
第一行的:前的部分可以理解为“action”或"function",实际上对应的是使用make时附加的参数,如果不附加参数,就是对应的main,这点和C语言的函数定义和调用是类似的。
第二行以Tab开头,可以看做是函数实际的内容。
再看一个例子,假如我们要给make在编译当前程序的时候添加一个清理编译环境的功能:
[root@xyz make_test]# ll
总用量 52
-rw-r--r--. 1  500  500  184 9月   4 2015 cos_value.c
-rw-r--r--. 1 root root 1760 9月  12 16:59 cos_value.o
-rw-r--r--. 1  500  500  101 6月   9 2009 haha.c
-rw-r--r--. 1 root root 1536 9月  12 16:59 haha.o
-rwxr-xr-x. 1 root root 8824 9月  12 17:04 main
-rw-r--r--. 1  500  500  313 9月  12 17:04 main.c
-rw-r--r--. 1 root root 2312 9月  12 17:04 main.o
-rw-r--r--. 1 root root  518 9月   4 2015 main.tgz
-rw-r--r--. 1 root root   99 9月  12 16:58 makefile
-rw-r--r--. 1  500  500  186 9月   4 2015 sin_value.c
-rw-r--r--. 1 root root 1760 9月  12 16:59 sin_value.o
[root@xyz make_test]# vim makefile
[root@xyz make_test]# cat makefile
main: main.o haha.o sin_value.o cos_value.o
        gcc -o main main.o haha.o sin_value.o cos_value.o -lm
clean:
        rm -f main main.o haha.o sin_value.o cos_value.o
[root@xyz make_test]# make clean
rm -f main main.o haha.o sin_value.o cos_value.o
[root@xyz make_test]# ll
总用量 24
-rw-r--r--. 1  500  500 184 9月   4 2015 cos_value.c
-rw-r--r--. 1  500  500 101 6月   9 2009 haha.c
-rw-r--r--. 1  500  500 313 9月  12 17:04 main.c
-rw-r--r--. 1 root root 518 9月   4 2015 main.tgz
-rw-r--r--. 1 root root 156 9月  12 17:15 makefile
-rw-r--r--. 1  500  500 186 9月   4 2015 sin_value.c
[root@xyz make_test]# make
cc    -c -o main.o main.c
cc    -c -o haha.o haha.c
cc    -c -o sin_value.o sin_value.c
cc    -c -o cos_value.o cos_value.c
gcc -o main main.o haha.o sin_value.o cos_value.o -lm
make clean实际上是执行了makefile文件中定义的clean:这个“函数”,而make则执行的是main。
除了分别执行makefile中定义的“函数”以外,也可以同时在一行make命令中依次执行:
[root@xyz make_test]# make clean main
rm -f main main.o haha.o sin_value.o cos_value.o
cc    -c -o main.o main.c
cc    -c -o haha.o haha.c
cc    -c -o sin_value.o sin_value.c
cc    -c -o cos_value.o cos_value.c
gcc -o main main.o haha.o sin_value.o cos_value.o -lm
实际上makefile有点像是一个语法比较特别的shell脚本,除了上边这些语法以外,还支持使用#进行注释,或者是定义和使用变量:
[root@xyz make_test]# vim makefile
[root@xyz make_test]# cat makefile
# this is all object files
OBJ_FILES = main.o haha.o sin_value.o cos_value.o
main: ${OBJ_FILES}
        gcc -o main ${OBJ_FILES} -lm
clean:
        rm -f main ${OBJ_FILES}
[root@xyz make_test]# make clean main
rm -f main main.o haha.o sin_value.o cos_value.o
cc    -c -o main.o main.c
cc    -c -o haha.o haha.c
cc    -c -o sin_value.o sin_value.c
cc    -c -o cos_value.o cos_value.c
gcc -o main main.o haha.o sin_value.o cos_value.o -lm
语法与shell略有不同,比如赋值符号=两边可以有空格,而且字符串也无需""包裹等。
此外,gcc在执行的时候会读取CFLAGS这个环境变量,如果是使用make调用gcc进行编译,这个环境变量可以通过make命令行指定,也可以通过在makefile文件中指定:
[root@xyz make_test]# CFLAGS='-Wall' make clean main
rm -f main main.o haha.o sin_value.o cos_value.o
cc -Wall   -c -o main.o main.c
main.c: 在函数‘main’中:
main.c:10:2: 警告:格式 ‘%s’ expects argument of type ‘char *’, but argument 2 has type ‘char (*)[15]’ [-Wformat=]
  scanf  ("%s", &name );
  ^
main.c:13:2: 警告:隐式声明函数‘haha’ [-Wimplicit-function-declaration]
  haha( name );
...省略
[root@xyz make_test]# vi makefile
[root@xyz make_test]# cat makefile
# this is all object files
OBJ_FILES = main.o haha.o sin_value.o cos_value.o
CFLAGS = -Wall
main: ${OBJ_FILES}
        gcc -o main ${OBJ_FILES} -lm
clean:
        rm -f main ${OBJ_FILES}
[root@xyz make_test]# make clean main
rm -f main main.o haha.o sin_value.o cos_value.o
cc -Wall   -c -o main.o main.c
main.c: 在函数‘main’中:
main.c:10:2: 警告:格式 ‘%s’ expects argument of type ‘char *’, but argument 2 has type ‘char (*)[15]’ [-Wformat=]
  scanf  ("%s", &name );
  ^
main.c:13:2: 警告:隐式声明函数‘haha’ [-Wimplicit-function-declaration]
  haha( name );
  ^
main.c:14:2: 警告:隐式声明函数‘sin_value’ [-Wimplicit-function-declaration]
  sin_value( angle );
  ^
main.c:15:2: 警告:隐式声明函数‘cos_value’ [-Wimplicit-function-declaration]
  cos_value( angle );
此外,在makefile中,可以使用$@表示当前的目标(函数名):
[root@xyz make_test]# vim makefile
[root@xyz make_test]# cat makefile
# this is all object files
OBJ_FILES = main.o haha.o sin_value.o cos_value.o
CFLAGS = -Wall
main: ${OBJ_FILES}
        gcc -o $@ ${OBJ_FILES} -lm
clean:
        rm -f main ${OBJ_FILES}
这里的$@就代表main。
Tarball的管理与建议
安装的基本步骤
基本上,使用源码安装的步骤有:
- 获取源码,并将Tarball解压到
/usr/local/src - 查看解压出的INSTALL或README文件获悉安装事项
- 根据INSTALL或README中的安装说明安装相关的依赖软件
- 用附带的环境检测程序(
configure或config)生成makefile文件 - 使用
make进行编译并生成可执行文件 - 使用
make install将生成的可执行文件和相关配置文件部署到指定目录
总的来说,除了使用tar命令进行解压以外,主要涉及的命令有:
./configuremake clean:这个命令不一定需要执行,如果当前目录下没有编译残留的话makemake install
安装的建议事项
一般来说,随Linux发行版默认安装的软件会安装到/usr目录下,而用户自己安装的软件应当保存在/usr/local目录下。因为man会检查/usr/local/man下的帮助文档,如果你是安装到建议目录下,就可以很顺利地通过man命令查看对应的帮助文档。而源码我们建议安装(解压)到/usr/local/src目录下。
所以对于Tarball手动安装程序,有以下建议:
-
将Tarball解压的源码放置在
/usr/local/src -
将编译后的程序安装在
/usr/local -
为了方便卸载,最好为程序建立单独的目录,比如
/usr/local/soft1 -
因为步骤3,我们可能需要在
man page中添加查找规则:在
/etc/man_db.conf中的40~50行左右添加MANPATH_MAP /usr/local/soft1/bin /usr/local/soft1/man
一个简单的示例
这里通过安装ntp进行演示,可以通过这里访问ntp的官方下载页面,我这里下载的版本是4.2.8:
[root@xyz make_test]# cd /tmp
[root@xyz tmp]# wget http://www.eecis.udel.edu/~ntp/ntp_spool/ntp4/ntp-4.2/ntp-4.2.8p15.tar.gz
...省略
长度:7015970 (6.7M) [application/x-gzip]
正在保存至: “ntp-4.2.8p15.tar.gz”

100%[===========================================================================================>] 7,015,970   2.14MB/s 用时 3.1s

2021-09-12 17:52:50 (2.14 MB/s) - 已保存 “ntp-4.2.8p15.tar.gz” [7015970/7015970])
解压
[root@xyz tmp]# cd /usr/local/src/
[root@xyz src]# tar -xzvf /tmp/ntp-4.2.8p15.tar.gz
ntp-4.2.8p15/
ntp-4.2.8p15/lib/
ntp-4.2.8p15/sntp/
ntp-4.2.8p15/Makefile.am
ntp-4.2.8p15/configure
ntp-4.2.8p15/configure.ac
ntp-4.2.8p15/aclocal.m4
ntp-4.2.8p15/Makefile.in
ntp-4.2.8p15/config.h.in
...省略
[root@xyz src]# ll
总用量 4
drwxrwxr-x. 23 3000 3000 4096 6月  23 2020 ntp-4.2.8p15
[root@xyz src]# cd ntp-4.2.8p15/
[root@xyz ntp-4.2.8p15]# ll
总用量 7368
-rw-rw-r--.  1 3000 3000   50365 6月  23 2020 aclocal.m4
drwxr-xr-x.  2 3000 3000      76 9月  12 18:00 adjtimed
-rw-rw-r--.  1 3000 3000     605 6月  23 2011 bincheck.mf
-rwxrwxr-x.  1 3000 3000    4801 6月  17 2015 bootstrap
-rwxrwxr-x.  1 3000 3000    4252 3月   4 2020 build
-rw-rw-r--.  1 3000 3000  261573 6月  23 2020 ChangeLog
...省略
[root@xyz ntp-4.2.8p15]# less README
运行环境检测程序
虽然简单地运行./configure就可以生成makefile,但如果要让安装的程序符合我们某些特别的需要,比如安装到指定目录,或者添加一些特殊的功能,就需要在运行./configure时添加一些额外的参数,这些参数的使用方式可以参考./configure --help:
[root@xyz ntp-4.2.8p15]# ./configure --help | less
[root@xyz ntp-4.2.8p15]# ./configure --prefix=/usr/local/ntp --enable-all-clocks --enable-parse-clocks
checking for a BSD-compatible install... /bin/install -c
checking whether build environment is sane... yes
checking for a thread-safe mkdir -p... /bin/mkdir -p
checking for gawk... gawk
checking whether make sets $(MAKE)... yes
checking whether make supports nested variables... yes
checking whether make supports nested variables... (cached) yes
...省略
[root@xyz ntp-4.2.8p15]# ll -d Makefile
-rw-r--r--. 1 root root 35032 9月  12 18:07 Makefile
编译并安装
[root@xyz ntp-4.2.8p15]# make
Compiling with GCC now generates lots of new warnings.

Don't be concerned. They're just warnings.

Don't send bug reports about the warnings, either.

Feel free to send patches that fix these warnings, though.
...省略
[root@xyz ntp-4.2.8p15]# make
Compiling with GCC now generates lots of new warnings.

Don't be concerned. They're just warnings.

Don't send bug reports about the warnings, either.

Feel free to send patches that fix these warnings, though.
...省略
[root@xyz ntp-4.2.8p15]# make install
cd ./html && \
../scripts/build/checkHtmlFileDates
cd . && \
./scripts/build/checkChangeLog
make  install-recursive
make[1]: 进入目录“/usr/local/src/ntp-4.2.8p15”
Making install in scripts
make[2]: 进入目录“/usr/local/src/ntp-4.2.8p15/scripts”
Making install in build
make[3]: 进入目录“/usr/local/src/ntp-4.2.8p15/scripts/build”
make[4]: 进入目录“/usr/local/src/ntp-4.2.8p15/scripts/build”
...省略
[root@xyz ntp-4.2.8p15]# ll -d /usr/local/ntp/
drwxr-xr-x. 6 root root 57 9月  12 18:16 /usr/local/ntp/
使用path进行增量更新
如果需要对现有软件更新,最简单的方式当然是完整更新,即下载最新的安装包,进行覆盖安装(可能需要按安装说明的指点删除某些旧的目录)。但除了这种方式,还可以使用path进行增量更新。
在Linux之旅 9:正则表达式与文件格式化中我们介绍过
path和diff工具。
这里使用鸟哥的Linux私房菜提供的示例进行练习:
[root@xyz tmp]# cd /tmp
[root@xyz tmp]# mkdir path_test
[root@xyz tmp]# cd path_test/
[root@xyz path_test]# wget http://linux.vbird.org/linux_basic/0520source/main-0.1.tgz
--2021-09-12 18:30:29--  http://linux.vbird.org/linux_basic/0520source/main-0.1.tgz
正在解析主机 linux.vbird.org (linux.vbird.org)... 140.116.44.180
正在连接 linux.vbird.org (linux.vbird.org)|140.116.44.180|:80... 已连接。
已发出 HTTP 请求,正在等待回应... 200 OK
长度:703 [application/x-gzip]
正在保存至: “main-0.1.tgz”

100%[===========================================================================================>] 703         --.-K/s 用时 0s

2021-09-12 18:30:36 (57.4 MB/s) - 已保存 “main-0.1.tgz” [703/703])
[root@xyz path_test]# wget http://linux.vbird.org/linux_basic/0520source/main_0.1_to_0.2.patch
--2021-09-12 18:34:04--  http://linux.vbird.org/linux_basic/0520source/main_0.1_to_0.2.patch
正在解析主机 linux.vbird.org (linux.vbird.org)... 140.116.44.180
正在连接 linux.vbird.org (linux.vbird.org)|140.116.44.180|:80... 已连接。
已发出 HTTP 请求,正在等待回应... 200 OK
长度:1538 (1.5K) [application/x-troff-man]
正在保存至: “main_0.1_to_0.2.patch”
100%[===========================================================================================>] 1,538        379B/s 用时 37s

2021-09-12 18:34:47 (42.1 B/s) - 已保存 “main_0.1_to_0.2.patch” [1538/1538])
解压并测试旧版本程序:
[root@xyz path_test]# tar -xzvf main-0.1.tgz
main-0.1/
main-0.1/haha.c
main-0.1/Makefile
main-0.1/sin_value.c
main-0.1/main.c
main-0.1/cos_value.c
[root@xyz path_test]# cd main-0.1/
[root@xyz main-0.1]# make clean main
rm -f main main.o haha.o sin_value.o cos_value.o
cc    -c -o main.o main.c
cc    -c -o haha.o haha.c
cc    -c -o sin_value.o sin_value.c
cc    -c -o cos_value.o cos_value.c
gcc -o main main.o haha.o sin_value.o cos_value.o -lm
[root@xyz main-0.1]# ./main

version 0.1

Please input your name: icexmoon

Please enter the degree angle (ex> 90): 25


Hi, Dear icexmoon, nice to meet you.
The Sin is:  0.42
The Cos is:  0.91
查看path文件内容:
[root@xyz main-0.1]# cd ..
[root@xyz path_test]# ll
总用量 8
drwxr-xr-x. 2  500  500  166 9月  12 18:36 main-0.1
-rw-r--r--. 1 root root  703 9月   4 2015 main-0.1.tgz
-rw-r--r--. 1 root root 1538 9月   4 2015 main_0.1_to_0.2.patch
[root@xyz path_test]# cat main_0.1_to_0.2.patch
diff -Naur main-0.1/cos_value.c main-0.2/cos_value.c
--- main-0.1/cos_value.c        2015-09-04 14:46:59.200444001 +0800
+++ main-0.2/cos_value.c        2015-09-04 14:47:10.215444000 +0800
@@ -7,5 +7,5 @@
 {
        float value;
        value = cos ( angle / 180. * pi );
-       printf ("The Cos is: %5.2f\n",value);
+       printf ("The cos(%f) is: %5.2f\n",angle, value);
...省略
使用path文件增量更新:
[root@xyz path_test]# ll
总用量 12
drwxr-xr-x. 2  500  500  166 9月  12 18:36 main-0.1
-rw-r--r--. 1 root root 1270 9月  12 18:42 main-0.1.rej
-rw-r--r--. 1 root root  703 9月   4 2015 main-0.1.tgz
-rw-r--r--. 1 root root 1538 9月   4 2015 main_0.1_to_0.2.patch
[root@xyz path_test]# cd main-0.1/
[root@xyz main-0.1]# patch -p1 < ../main_0.1_to_0.2.patch
patching file cos_value.c
patching file main.c
patching file Makefile
patching file sin_value.c
[root@xyz main-0.1]# make clean main
rm -f main main.o haha.o sin_value.o cos_value.o
cc    -c -o main.o main.c
cc    -c -o haha.o haha.c
cc    -c -o sin_value.o sin_value.c
cc    -c -o cos_value.o cos_value.c
gcc -o main main.o haha.o sin_value.o cos_value.o -lm
[root@xyz main-0.1]# ./main

version 0.2

Please input your name: icexmoon

Please enter the degree angle (ex> 90): 25


Hi, Dear icexmoon, nice to meet you.
The sin(25.000000) is:  0.42
The cos(25.000000) is:  0.91
这里patch的参数-p1指的是增量更新比对文件的时候忽略path文件中的前几层路径,比如path文件中的新旧文件路径是diff -Naur main-0.1/cos_value.c main-0.2/cos_value.c,-p1就是忽略第一层路径,也就是会更新./cos_value文件。
看起来似乎不错,使用一个较小的path文件就可以更新程序,而无需下载完整代码,但是问题是这种更新一般仅能用于小版本更新,比如2.1.1更新到2.1.2,如果你有好几个版本没更新了,是没法用这种方式直接从2.1.1更新到2.2.0的,一般来说这种情况反而是直接下载完整包覆盖安装比较快和方便。
函数库
函数库,或者叫链接库,简单的说就是一些作为公共组件的第三方工具函数集合。如果经常玩游戏的话,应当知道Windows平台往往需要安装一个DirectX才能玩游戏,那个也可以看做是一个大型函数库,涉及一些图形渲染之类的3D游戏能用的都的功能,这样游戏开发者就能省很多事了,不必什么都要自己写。
总体来说函数库分为静态和动态两种,他们的区别在于:
-
静态函数库:
在编译源码的时候,会直接将引用的静态函数库添加到程序本体中,也就是说生成的可执行文件本身包含了引用的静态函数库。这样做的好处在于,程序不依赖于外部函数库,可以独立运行,也就是说客户机有没有程序引用的函数库都不影响程序的运行。但缺点在于如果函数库更新了,就需要程序的发行商重新编译打包程序进行分发。
-
动态函数库:
在编译源码的时候,程序会以链接的方式对引用的动态函数库进行链接,生成的可执行文件中是不包含所引用的函数库的,而是以链接的方式使用。这么做的好处在于一来生成的程序本体比较小,二来如果外部的函数库更新了,程序自然会使用新版本的函数库。但缺点是程序依赖外部的函数库,如果函数库被删除或者缺失,就会导致程序无法运行。
此外,在Linux中,静态函数库通常以libxxx.a进行命名,动态函数库则以libxxx.so进行命名。此外,默认情况下大部分函数库都保存在/lib与/lib64目录。
解析程序的函数库
可以使用ldd命令查看程序引用了哪些动态函数库:
[root@xyz main-0.1]# whereis passwd
passwd: /usr/bin/passwd /etc/passwd /usr/share/man/man1/passwd.1.gz /usr/share/man/man5/passwd.5.gz
[root@xyz main-0.1]# ldd /usr/bin/passwd
        linux-vdso.so.1 =>  (0x00007ffff392d000)
        libuser.so.1 => /lib64/libuser.so.1 (0x00007fef74387000)
        libgobject-2.0.so.0 => /lib64/libgobject-2.0.so.0 (0x00007fef74136000)
        libglib-2.0.so.0 => /lib64/libglib-2.0.so.0 (0x00007fef73e20000)
        libpopt.so.0 => /lib64/libpopt.so.0 (0x00007fef73c16000)
        libpam.so.0 => /lib64/libpam.so.0 (0x00007fef73a07000)
        libpam_misc.so.0 => /lib64/libpam_misc.so.0 (0x00007fef73803000)
        libaudit.so.1 => /lib64/libaudit.so.1 (0x00007fef735da000)
        libselinux.so.1 => /lib64/libselinux.so.1 (0x00007fef733b3000)
        libpthread.so.0 => /lib64/libpthread.so.0 (0x00007fef73197000)
        libc.so.6 => /lib64/libc.so.6 (0x00007fef72dc9000)
        libgmodule-2.0.so.0 => /lib64/libgmodule-2.0.so.0 (0x00007fef72bc5000)
        libcrypt.so.1 => /lib64/libcrypt.so.1 (0x00007fef7298e000)
        libpcre.so.1 => /lib64/libpcre.so.1 (0x00007fef7272c000)
        libffi.so.6 => /lib64/libffi.so.6 (0x00007fef72524000)
        libdl.so.2 => /lib64/libdl.so.2 (0x00007fef72320000)
        libcap-ng.so.0 => /lib64/libcap-ng.so.0 (0x00007fef7211a000)
        /lib64/ld-linux-x86-64.so.2 (0x00007fef747ad000)
        libfreebl3.so => /lib64/libfreebl3.so (0x00007fef71f17000)
也可以使用ldd查看一个动态链接库引用的其它动态链接库:
[root@xyz main-0.1]# ldd -v /lib64/libuser.so.1
        linux-vdso.so.1 =>  (0x00007fff1f78d000)
        libgmodule-2.0.so.0 => /lib64/libgmodule-2.0.so.0 (0x00007f46988cc000)
        libgobject-2.0.so.0 => /lib64/libgobject-2.0.so.0 (0x00007f469867b000)
        libglib-2.0.so.0 => /lib64/libglib-2.0.so.0 (0x00007f4698365000)
-v参数可以查看更多的版本变更信息。
软件的完整性验证
有时候可能因为这样或那样的原因无法直接通过官网下载软件的源码或安装包,但通过第三方网站下载的我们又不放心,担心被人种了木马或者后门什么的,这时候就可以使用官网提供的MD5或者SHA1等校验码来进行完整性验证:
[root@xyz tmp]# wget http://www.eecis.udel.edu/~ntp/ntp_spool/ntp4/ntp-4.2/ntp-4.2.8p15.tar.gz.md5
--2021-09-12 19:11:41--  http://www.eecis.udel.edu/~ntp/ntp_spool/ntp4/ntp-4.2/ntp-4.2.8p15.tar.gz.md5
正在解析主机 www.eecis.udel.edu (www.eecis.udel.edu)... 128.4.31.8
...省略
[root@xyz tmp]# cat ntp-4.2.8p15.tar.gz.md5
MD5 (ntp-4.2.8p15.tar.gz) = e1e6b23d2fc75cced41801dbcd6c2561
[root@xyz tmp]# md5sum ntp-4.2.8p15.tar.gz
e1e6b23d2fc75cced41801dbcd6c2561  ntp-4.2.8p15.tar.gz
ntp-4.2.8p15.tar.gz.md5是一个md5校验文件,里边包含md5值,可以手动查看比对,也可以:
[root@xyz tmp]# md5sum -c ntp-4.2.8p15.tar.gz.md5 ntp-4.2.8p15.tar.gz
ntp-4.2.8p15.tar.gz: 确定
除了验证文件的完整性以外,我们还可以利用这个特性来检查系统有没有被入侵,比如将关键文件,如/etc/shadow、/bin/login这些容易被黑客在入侵后串改的文件进行MD5,然后记录下来,并定期比对有没有发生变化,如果有,及时提醒管理员进行处理。
以上就是关于Linux上手动安装软件的全部内容,谢谢阅读。


 405
405


 被折叠的 条评论
为什么被折叠?
被折叠的 条评论
为什么被折叠?
 到【灌水乐园】发言


