


uitls.py 工具类合集
import os
import shutil
import cv2
import matplotlib.pyplot as plt  # 绘图工具
import numpy as np  # 数值计算工具包
import random


# 自己简单封装一下图片显示函数
def cv_show(img, name="img"):
    cv2.imshow(name, img)
    cv2.waitKey(0)
    cv2.destroyAllWindows()


# 复制文件
def copyFile(srcfile, dstpath):
    '''
    :param srcfile:  被复制文件全路径名
    :param dstpath:  复制到的路径
    :return:
    '''
    if not os.path.isfile(srcfile):
        print("%s not exist!" % (srcfile))  # 文件不存在
    else:
        fpath, fname = os.path.split(srcfile)  # 分离文件名和路径
        if not os.path.exists(dstpath):
            os.makedirs(dstpath)  # 创建路径(多级路径都可以创建)
        newname = fname
        spl = fname.split('.')
        i = 1
        while os.path.exists(os.path.join(dstpath, newname)):
            newname = f'{spl[0]}-{i}.{spl[1]}'  # 重名就重命名
            i += 1
        shutil.copy(srcfile, os.path.join(dstpath, newname))  # 复制文件


# 返回所有目录下所有图片文件  可递归访问
def show_files(base_path, all_files=[]):
    file_list = os.listdir(base_path)
    # 准备循环判断每个元素是否是文件夹还是文件,是文件的话,把名称传入list,是文件夹的话,递归
    for file in file_list:
        # 利用os.path.join()方法取得路径全名,并存入cur_path变量,否则每次只能遍历一层目录
        cur_path = os.path.join(base_path, file)
        # 判断是否是文件夹
        if os.path.isdir(cur_path):
            show_files(cur_path, all_files)
        else:  # os.path.splitext(path)[-1] 获取后缀名
            if not os.path.splitext(file)[-1] in ['.jpg', '.png', '.bmp', '.jpeg', '.jfif']:
                continue
            else:
                all_files.append(cur_path)
    return all_files


# 封装一下 直接展示多张图片  可以读好再传进来 但是得plt.imread()读 不能cv2.imread()因为二者RGB通道顺序不一样
def plt_shows(M, imgs):
    ''' 传入文件路径即可
        参数M表示一行几个
    '''
    N = int(np.ceil(len(imgs) / M))
    # 形成NxM大小的画布
    for i in range(len(imgs)):
        img = imgs[i]
        if type(img) is str: img = plt.imread(imgs[i])
        plt.subplot(N, M, i + 1)  # 表示第i张图片,下标只能从1开始,不能从0,
        plt.imshow(img)
        # 下面两行是消除每张图片自己单独的横纵坐标,不然每张图片会有单独的横纵坐标,影响美观
        plt.xticks([])
        plt.yticks([])
    plt.show()


# 封装一下 直接展示1张图片 可以读好再传进来 但是得plt.imread()读 不能cv2.imread()因为二者RGB通道顺序不一样
def plt_show(img):
    if type(img) is str: img = plt.imread(img)
    plt.subplot(1, 1, 1)  # 表示第i张图片,下标只能从1开始,不能从0,
    plt.imshow(img)
    # 下面两行是消除每张图片自己单独的横纵坐标,不然每张图片会有单独的横纵坐标,影响美观
    plt.xticks([])
    plt.yticks([])
    plt.show()


# 重新创建目录
def reMakeDir(dir):
    if os.path.exists(dir):
        shutil.rmtree(dir)
    os.mkdir(dir)


# 单个目录下的全路径名
def allPath(dir):
    files = []
    for name in os.listdir(dir):
        file = os.path.join(dir, name)
        files.append(file)
    return files


# 从一个目录中随机抽取出rate*100%的样本
def randomSelect(file_dir, out_dir, rate=0.1):
    # file_dir = 'C:/data/task1and4new/version01'
    # out_dir = 'C:/data/task1and4new/version01_0.1'
    # rate = 0.1
    count = 0
    for dir in os.listdir(file_dir):
        files = os.listdir(file_dir + '/' + dir)
        n = int(len(files) * rate)  # 随机抽取数量 rate*100%
        print('-----------', dir)
        randomFiles = random.sample(files, n)  # list(files)中随机抽取n个元素
        for file in randomFiles:
            filepath = os.path.join(file_dir, dir, file)
            copypath = os.path.join(out_dir, dir)
            copyFile(filepath, copypath)
            print('copy', filepath, 'to', copypath, 'successfully!')
    print(count)
plt直接显示一张或者多张图片
import os
import cv2
import matplotlib.pyplot as plt
import numpy as np


# 自己简单封装一下图片显示函数
def cv_show(img,name='img'):
    cv2.imshow(name,img)
    cv2.waitKey(0)
    cv2.destroyAllWindows()


# 封装一下 直接展示多张图片  可以读好再传进来 但是得plt.imread()读 不能cv2.imread()因为二者RGB通道顺序不一样
def plt_shows(M,imgs):
    ''' 传入文件路径即可
        参数M表示一行几个
    '''
    N = int(np.ceil(len(imgs)/M))
    #形成NxM大小的画布
    for i in range(len(imgs)):
        img = imgs[i]
        if type(img) is str: img = plt.imread(imgs[i])
        plt.subplot(N,M,i+1)#表示第i张图片,下标只能从1开始,不能从0,
        plt.imshow(img)
        #下面两行是消除每张图片自己单独的横纵坐标,不然每张图片会有单独的横纵坐标,影响美观
        plt.xticks([])
        plt.yticks([])
    plt.show()

# 封装一下 直接展示1张图片 可以读好再传进来 但是得plt.imread()读 不能cv2.imread()因为二者RGB通道顺序不一样
def plt_show(img):
    if type(img) is str: img = plt.imread(img)
    plt.subplot(1,1,1)#表示第i张图片,下标只能从1开始,不能从0,
    plt.imshow(img)
    #下面两行是消除每张图片自己单独的横纵坐标,不然每张图片会有单独的横纵坐标,影响美观
    plt.xticks([])
    plt.yticks([])
    plt.show()
目录相关
重新创建目录
def reMakeDir(dir):
    if os.path.exists(dir):
        shutil.rmtree(dir)
    os.mkdir(dir)
单个目录下的全路径名
def allPath(dir):
    files = []
    for name in os.listdir(dir):
        file = os.path.join(dir,name)
        files.append(file)
    return files
从一个目录中随机抽取出xx%的样本
import cv2
import shutil
import os
import random

def copyFile(srcfile, dstpath):
    '''
    :param srcfile:  被复制文件名
    :param dstpath:  复制到的路径
    :return:
    '''
    if not os.path.isfile(srcfile):
        print("%s not exist!" % (srcfile))  # 文件不存在
    else:
        fpath, fname = os.path.split(srcfile)  # 分离文件名和路径
        if not os.path.exists(dstpath):
            os.makedirs(dstpath)  # 创建路径(多级路径都可以创建)
        newname = fname
        spl = fname.split('.')
        i = 1
        while os.path.exists(os.path.join(dstpath, newname)):
            newname = f'{spl[0]}-{i}.{spl[1]}'  # 重名就重命名
            i += 1
        shutil.copy(srcfile, os.path.join(dstpath, newname))  # 复制文件

## main
file_dir = 'C:/data/task1and4new/version01'
out_dir = 'C:/data/task1and4new/version01_0.1'
count = 0
for dir in os.listdir(file_dir):
    files = os.listdir(file_dir+'/'+dir)
    n = int(len(files)*0.1) # 随机抽取数量 10%
    print('-----------',dir)
    randomFiles = random.sample(files,n) # list(files)中随机抽取n个元素
    for file in randomFiles:
        filepath = os.path.join(file_dir,dir,file)
        copyFile(filepath,out_dir+'/'+dir)
        print('copy',filepath,'to',copypath,'successfully!')

print(count)
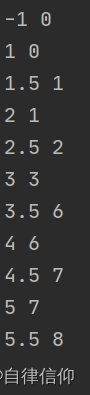
二分法,失败时严格返回应该插入的位置下标
# 二分法本身可以没有递归  失败就返回该插入的位置
def binarySearch(data, k):
    i, j = 0, len(data) - 1 # i,j是严格合法下标的上下限值
    while i <= j: # 等号不能少 否则比最大的值还大时返回 len(data)-1 而非 len(data)
        mid = (i + j) // 2
        if data[mid] == k:
            return mid
        elif k < data[mid]:
            j = mid - 1
        else:
            i = mid + 1
    return i  # 失败的位置就是该插入的位置  #此时 i>j即i=j+1 也就是应该插入的位置


if __name__ == '__main__':
    data = [1, 2, 3, 3, 3, 3, 4, 5]
    k = 6

    test = [-1, 1, 1.5, 2, 2.5, 3, 3.5, 4, 4.5, 5, 5.5]
    for i in test:
        print(i, binarySearch(data, i))
Permutation 全排列
python 全排列,permutations函数
itertools.permutations(iterable, r=None)
连续返回由 iterable 元素生成长度为 r 的排列。
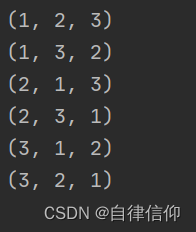
import itertools

n = 3
for i in itertools.permutations(range(1,n+1)):
    print(i)
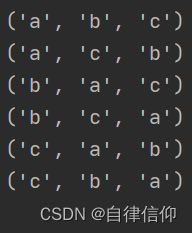
import itertools

if __name__ == '__main__':
    data = 'abc'
    for i in itertools.permutations(data):
        print(i)
import itertools

if __name__ == '__main__':
    data = 'abcd'
    for i in itertools.permutations(data, 3):
        print(i)
('a', 'b', 'c')
('a', 'b', 'd')
('a', 'c', 'b')
('a', 'c', 'd')
('a', 'd', 'b')
('a', 'd', 'c')
('b', 'a', 'c')
('b', 'a', 'd')
('b', 'c', 'a')
('b', 'c', 'd')
('b', 'd', 'a')
('b', 'd', 'c')
('c', 'a', 'b')
('c', 'a', 'd')
('c', 'b', 'a')
('c', 'b', 'd')
('c', 'd', 'a')
('c', 'd', 'b')
('d', 'a', 'b')
('d', 'a', 'c')
('d', 'b', 'a')
('d', 'b', 'c')
('d', 'c', 'a')
('d', 'c', 'b')


 3027
3027

 被折叠的 条评论
为什么被折叠?
被折叠的 条评论
为什么被折叠?
 到【灌水乐园】发言


