


前端核心代码:
<script src="jquery-1.8.0.min.js" type="text/javascript"></script>
<script src="ajaxfileupload.js" type="text/javascript"></script>

<img id="xmTanImg" width="50%" height="50%" />
<input type="file" name="receipts" id="receipts" οnchange="showTheImg(this)"/>
<button οnclick="ajaxFileUpload()">上传</button>
<script>
//选择图片,马上预览
function showTheImg(obj) {
   var file = obj.files[0];
   console.log(file.path);
   $("#qrImg").val(new Date().getTime()+"_"+file.name);
   console.log("file.size = " + file.size);  //file.size 单位为byte
   var reader = new FileReader();
   //读取文件过程方法
   reader.onloadstart = function (e) {
      console.log("开始读取....");
   }
   reader.onprogress = function (e) {
      console.log("正在读取中....");
   }
   reader.onabort = function (e) {
      console.log("中断读取....");
   }
   reader.onerror = function (e) {
      console.log("读取异常....");
   }
   reader.onload = function (e) {
      console.log("成功读取....");
      var img = document.getElementById("xmTanImg");
      img.src = e.target.result;
      //或者 img.src = this.result;  //e.target == this
   }
   reader.readAsDataURL(file);
}
//图片上传
function ajaxFileUpload() {
   var filename = $("#qrImg").val();
   $.ajaxFileUpload({
      fileElementId: "receipts",    //需要上传的文件域的ID,即<input type="file">的ID。
      url: "tmBaseOrderController.do?uploadReceipts", //后台方法的路径
      data: {filename:filename},	//上传文件的名字
      type: "post",   //当要提交自定义参数时,这个参数要设置成post
      dataType: "json",   //服务器返回的数据类型。可以为xml,script,json,html。如果不填写,jQuery会自动判断。
      secureuri: false,   //是否启用安全提交,默认为false。
      async : true,   //是否是异步
      success: function(data) {   //提交成功后自动执行的处理函数,参数data就是服务器返回的数据。
         tip("上传成功");
      },
      error: function(data, status, e) {  //提交失败自动执行的处理函数。
         console.error(e);
         tip("上传失败")
         return false;
      }
   });
}
</script>
后端核心代码:
@RequestMapping(params = "uploadReceipts")
   @ResponseBody
   public Map<String, Object> uploadReceipts(HttpServletRequest request) throws Exception {
      String filename = request.getParameter("filename"); //文件名
      MultipartHttpServletRequest multipartRequest = (MultipartHttpServletRequest) request;
      CommonsMultipartFile file = (CommonsMultipartFile) multipartRequest.getFile("receipts");
      Map<String, Object> result = new HashMap<>();
      String path =ResourceUtil.getConfigByName("receiptspath");	//存放文件的目录地址
      File fdir = new File(path);
      if (!fdir.exists()){	//  文件夹不存在则创建
         fdir.mkdirs();
      }
      try {
         String newName = filename;
         File tempFile = new File(fdir.getPath()+File.separator+newName);
         file.transferTo(tempFile);
         result.put("msg", "success");
      }catch (Exception e){
         result.put("msg", "fail"); //文件上传失败
      }
      return result;
   }
因为在开发过程中,总是会上传新的war包,所以若把附件目录设在项目路径下的话每次解压war包得先把附件备份出来,等war包解压完毕再把附件粘贴上去,太麻烦。。所以最好把附件文件夹放在与项目同级的目录下,这样解压war包不会影响到附件的读取,那么如何读取项目同级文件夹下的附件呢?
只需配置Tomcat的映射路径,就可以直接访问了:
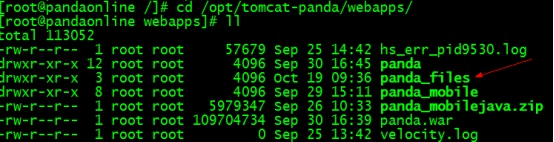
首先,我先在项目(panda)同级新建一个目录(panda_files)
编辑tomcat/conf
下的
server.xml
文件
只需在<Host appBase="webapps">标签下添加一条
<Context docBase="/opt/tomcat-panda/webapps/panda_files" path="/" reloadable="false" crossContext="true"/>
就可通过 http://localhost:8080/panda_files 访问到 panda_files 目录
Tomcat的映射路径原理:
<Host appBase="webapps">
<Context path="" docBase="ROOT" debug="0"/>
<Context path="/sample" docBase="sample" debug="0" reloadbale="true"/>
<Context path="" docBase="D:\JavaWork\servlet\servlet" debug="0" reloadbale="true"/>
</Host>
path:Host的虚拟目录
docBase:映射的物理目录的地址,可指定相对路径,相对appBase下,也可以指定绝对路径(例如:D:\Workes\tomcat\webapps)。如果无此项则默认为appBase/ROOT
Context一:path=""(注意不是path="/"),相当于是这个Host的虚拟根目录,docBase则指出了物理目录的位置为相对于appBase下的ROOT目录。因此在访问在浏览器中输入http://localhost:8080/,则访问到的是webapps下的ROOT目录。
Context二:如果你访问http://localhost:8080/sample/ ,则会访问到appBase/sample里的内容。
Context三:path="",指的是这是Host的虚拟根目录,而docBase指出物理目录是个绝对地址,因为如果你访问http://localhost:8080/,则会访问到的是D:JavaWork/servlet/servlet里的内容


 142
142

 被折叠的 条评论
为什么被折叠?
被折叠的 条评论
为什么被折叠?
 到【灌水乐园】发言


