


ios自带的切图好像是大小固定,爱用不用。满足不了需求,只能自己仿一个。
核心思路是ScrollView做拖动,根据contentoffset 算位置,确定切图区域,layer.mask做透明区域。
没做demo,复制粘贴不可用,需求请摘核心代码
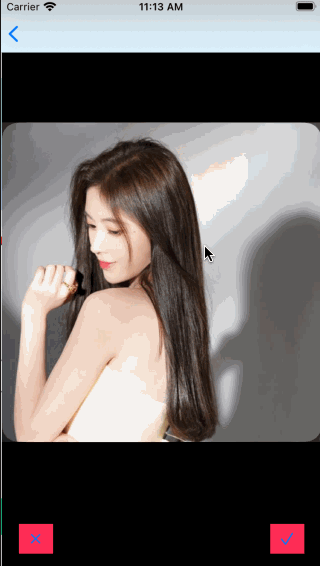
切图界面
import Foundation
import UIKit
class ViewClipping: ViewBase {
    //状态栏高度
	let statusBarHeight = UIApplication.statusBarHeight;
	//导航栏高度
	let navigationHeight = (statusBarHeight + 44)
	let WIDTH:CGFloat = UIScreen.main.bounds.width
	let HEIGHT:CGFloat = UIScreen.main.bounds.height
    var img:UIImage!
    var img_w:CGFloat!//原图宽
    var img_h:CGFloat!//原图高
    var img_temp_w:CGFloat!
    var img_temp_h:CGFloat!
    var img_temp:UIImageView!
    var x:CGFloat!
    var y:CGFloat!
    var scroll:UIScrollView!
    var isFrame:Bool!
    override func viewDidLoad() {
        view.backgroundColor = .black
    }
    func InitData(image:UIImage,isFrame:Bool = false){
        self.img = image
        self.isFrame = isFrame
        img_w = CGFloat(img.cgImage!.width)
        img_h = CGFloat(img.cgImage!.height)
        InitUI()
    }
    func InitUI(){

        if(img_w >= img_h){
            img_temp_h = WIDTH
            img_temp_w = img_temp_h * (img_w / img_h)
            x = (WIDTH - img_temp_w)/2
            y = (HEIGHT - WIDTH)/2
        }else{
            img_temp_w = WIDTH
            img_temp_h = img_temp_w * (img_h / img_w)
            x = 0
            y = (HEIGHT - img_temp_h)/2
        }
        scroll = UIScrollView(frame: CGRect(x: 0, y: 0, width: WIDTH, height: HEIGHT))
        scroll.alwaysBounceVertical = true
        scroll.alwaysBounceHorizontal = true
        scroll.showsVerticalScrollIndicator = false
        scroll.showsHorizontalScrollIndicator = false
        if(img_w == img_h){
            scroll.contentSize = CGSize(width: img_temp_w , height: img_temp_h )
            img_temp = UIImageView(frame: CGRect(x: 0, y: (HEIGHT - WIDTH)/2 - navigationHeight, width: img_temp_w, height: img_temp_h))
            img_temp.image = img.scaleImage(scaleSize: (WIDTH) / img_h )
        }else{
            if( img_w >= img_h){
                scroll.contentSize = CGSize(width: img_temp_w , height: HEIGHT - navigationHeight )
                img_temp = UIImageView(frame: CGRect(x: 0, y: (HEIGHT - WIDTH)/2 - navigationHeight, width: img_temp_w, height: img_temp_h))
                img_temp.image = img.scaleImage(scaleSize: (WIDTH ) / img_h )
                scroll.setContentOffset(CGPoint(x: (img_temp_w - WIDTH)/2, y: 0), animated: false)
            }else{
                scroll.contentSize = CGSize(width: img_temp_w , height: img_temp_h + (HEIGHT - WIDTH) - navigationHeight)
                let zhanweiImg = UIImageView(frame: CGRect(x: 0, y: 0, width: img_temp_w, height: (HEIGHT - WIDTH)/2 - navigationHeight))
                scroll.addSubview(zhanweiImg)
                img_temp = UIImageView(frame: CGRect(x: 0, y: (HEIGHT - WIDTH)/2 - navigationHeight, width: img_temp_w, height: img_temp_h))
                img_temp.image = img.scaleImage(scaleSize: (WIDTH ) / img_w )
                scroll.setContentOffset(CGPoint(x: 0, y: (img_temp_h - WIDTH)/2), animated: false)
            }
        }
        view.addSubview(scroll)
        scroll.addSubview(img_temp)
        InitFrame()
        InitBottomBtn()
    }

    func InitFrame(){
        let viewmask = ViewClipMask(frame: CGRect(x: 0, y: 0, width: WIDTH, height: HEIGHT))
        viewmask.InitUI(isframe:isFrame)
        view.addSubview(viewmask)

    }

    func InitBottomBtn(){
        let btn_cancel = UIButton(frame: CGRect(x: 20, y: HEIGHT - 50, width: 40, height: 35))
        btn_cancel.backgroundColor = .systemPink
        btn_cancel.setImage(UIImage(systemName: "multiply"), for: .normal)
        btn_cancel.addTarget(self, action: #selector(ClickCancle(_:)), for: .touchUpInside)
        view.addSubview(btn_cancel)

        let btn_save = UIButton(frame: CGRect(x: WIDTH - 20 - 40, y: HEIGHT - 50, width: 40, height: 35))
        btn_save.backgroundColor = .systemPink
        btn_save.setImage(UIImage(systemName: "checkmark"), for: .normal)
        btn_save.addTarget(self, action: #selector(ClickSave(_:)), for: .touchUpInside)
        view.addSubview(btn_save)
    }

    @objc func ClickCancle(_ btn:UIButton){
        self.navigationController?.popViewController(animated: true)
    }

    @objc func ClickSave(_ btn:UIButton){
        let tempx:CGFloat = scroll.contentOffset.x
        let tempy:CGFloat = scroll.contentOffset.y + navigationHeight
        //先把选定区域裁切下来
        var imgT = img_temp.captureImageInPos(rect: CGRect(x: tempx, y: tempy, width: WIDTH, height: WIDTH))
        let tempname = isFrame ? "frameImage" : "bgImage"
        let url:URL = DataMgr.Instance.GetUrl(name: tempname)
        scroll.contentSize = CGSize(width: WIDTH, height: WIDTH)
        img_temp.frame = CGRect(x: tempx, y: (HEIGHT - WIDTH)/2 - navigationHeight, w: WIDTH, h: WIDTH)
        //我需要的图片像素需求不高,将裁切下来的图生成为一个屏幕宽度一半的正方形图
        img_temp.image = imgT?.reSizeImage(reSize: CGSize(width: WIDTH/2, height: WIDTH/2))
        //以上的一部分是为了方便开发时候显示验证用的,可优化,看关键步骤即可
        if(isFrame){
            //相框中间透明,加上定好的mask,重新绘图,有alpha通道,只能存pngdata了,压缩方案待调研
            imgT = img_temp.GetFrameMask().captureImage(size: CGSize(width: WIDTH/2, height: HEIGHT/2))
            //自己的保存数据方法
            DataMgr.Instance.SaveImgByUrl(url: url, img: imgT!)
        }else{
            //没有直接切圆角是为了存jpg  方便使用自带的压缩方案
            imgT = img_temp.captureImage(size: CGSize(width: WIDTH/2, height: HEIGHT/2))
            DataMgr.Instance.SaveImgByUrl(url: url, img: imgT!)
        }
        //保存到相册
        //        UIImageWriteToSavedPhotosAlbum(imgT!, self, #selector(saveError(_:didFinishSavingWithError:contextInfo:)), nil)
    }
    @objc func saveError(_ image: UIImage, didFinishSavingWithError error: Error?, contextInfo: UnsafeRawPointer) {
            print("Save finished!")
    }
}
切图界面的Mask (点击穿透)
import Foundation
import UIKit
class ViewClipMask: UIView {
    func InitUI(isframe:Bool = false){
        // 不能直接加在最底层viewController.view上面,会黑掉 后面没东西显示了
        // 不能直接加在最底层viewController.view上面,会黑掉 后面没东西显示了
        backgroundColor = .clear
         let backgroundView = UIView(frame: bounds)
         backgroundView.backgroundColor =  UIColor.init(red: 0, green: 0, blue: 0, alpha: 0.6)
         addSubview(backgroundView)

         let maskLayer = CAShapeLayer()
            maskLayer.fillRule = CAShapeLayerFillRule.evenOdd //  奇偶层显示规则

         let basicPath = UIBezierPath(rect: frame) // 底层

        let maskPath = UIBezierPath(roundedRect: CGRect(x: 0, y: (HEIGHT-WIDTH)/2 , width: WIDTH, height: WIDTH ),cornerRadius:20) //自定义的遮罩图形
         basicPath.append(maskPath) // 重叠
        if(isframe){
            let maskPath1 = UIBezierPath(roundedRect: CGRect(x: 20, y: (HEIGHT-WIDTH)/2 + 20 , width: WIDTH - 40, height: WIDTH - 40 ),cornerRadius:40) //自定义的遮罩图形
            basicPath.append(maskPath1)
        }
         maskLayer.path = basicPath.cgPath
         backgroundView.layer.mask = maskLayer
    }

    /**
     *  iOS中的pointInside:withEvent:方法是用来判断当前的点击或者触摸事件的点是否在当前的view中,
        它被hitTest:withEvent:调用,通过对每个子视图调用pointInside:withEvent:决定最终哪个视图来响应此事件。
        如果一个子视图的pointInside:withEvent:返回NO,说明这个子视图不会响应点击事件,
        然后就去寻找更深层的子视图来找到最终响应触摸事件;
        返回YES就说明子视图能响应点击事件(但不一定是子视图本身响应,若子视图还有子视图的话,还会继续循环去找最终响应事件的子子视图)
     *  @param point 点击的位置
     *  @param event
     *  @return 是否往下传递
     */
    override func point(inside point: CGPoint, with event: UIEvent?) -> Bool {
        let alpha :CGFloat = alphaOfPointFromLayer(point: point)
        /*  那么pixel数组中唯一元素的值就是手指触摸点那一个像素的alpha值,
         *  做归一化为与0.6比较,如果小于0.6就表明手指触摸点是透明的,
         *  这时候返回NO就能够实现穿透效果,相反大于0.6就不会穿透
         *  BOOL transparent = alpha < 0.6f;
         */
        let transparent = alpha <= 0.6;
        return !transparent;
    }
    /**
     *  获取图片的一个像素点的Alpha值
     *  @param point 图片的位置
     *  @return 对于像素点的Alpha值
     */
    func alphaOfPointFromLayer(point: CGPoint) -> CGFloat {
               var pixel = [UInt8](repeatElement(0, count: 4))
               let colorSpace = CGColorSpaceCreateDeviceRGB()
               let context = CGContext(data: &pixel, width: 1, height: 1, bitsPerComponent: 8, bytesPerRow: 4, space: colorSpace, bitmapInfo: CGImageAlphaInfo.premultipliedLast.rawValue)
               context?.setBlendMode(.copy)
               context?.translateBy(x: -point.x, y: -point.y)
               if let context = context {
                   layer.render(in: context)
               }
               let alpha = CGFloat(pixel[3]) / CGFloat(255.0)
               return alpha
   }
}
切图绘图,改变图片大小等拓展方法
extension UIView {
    /// 截屏Image
    func captureImage(size:CGSize)-> UIImage? {

        // 参数①:截屏区域  参数②:是否透明  参数③:清晰度
        UIGraphicsBeginImageContextWithOptions(frame.size, false, 0.0)
        layer.render(in: UIGraphicsGetCurrentContext()!)
        let image = UIGraphicsGetImageFromCurrentImageContext()

        UIGraphicsEndImageContext()
        return image
    }
    //带偏移的截图
     func captureImageInPos( rect: CGRect) -> UIImage? {
      UIGraphicsBeginImageContext(rect.size)
      guard let context = UIGraphicsGetCurrentContext() else { return nil }
      context.translateBy(x: -rect.minX, y: -rect.minY)
        self.draw(.zero)
      let croppedImage = UIGraphicsGetImageFromCurrentImageContext()
      UIGraphicsEndImageContext()
      return croppedImage
    }
}


extension UIImage {
    /**
     *  重设图片大小
     */
    func  reSizeImage(reSize: CGSize )-> UIImage  {
        //UIGraphicsBeginImageContext(reSize);
        UIGraphicsBeginImageContextWithOptions (reSize, false , UIScreen .main.scale);
        //绘制图片
        self.draw(in: CGRect(x: 0,
                              y: 0,
                              width: reSize.width,
                              height: reSize.height))
        let  reSizeImage: UIImage  =  UIGraphicsGetImageFromCurrentImageContext ()!
        UIGraphicsEndImageContext ();
        return  reSizeImage;
    }

    /**
     *  等比率缩放
     */
    func  scaleImage(scaleSize: CGFloat )-> UIImage  {
        let  reSize = CGSize(width: self .size.width * scaleSize, height: self .size.height * scaleSize)
        return  reSizeImage(reSize: reSize)
    }
}


//方框的遮罩, 根据自己的需求加UIBezierPath  大致就是一层透明一层显示
extension  UIImageView{
    @discardableResult func GetFrameMask(boardWidth:CGFloat = 15,cornerRadius:CGFloat = 40)->UIImageView{
        let maskLayer = CAShapeLayer()
           maskLayer.fillRule = CAShapeLayerFillRule.evenOdd //  奇偶层显示规则

        let basicPath = UIBezierPath(rect:self.bounds) // 底层

        let maskPath0 = UIBezierPath(roundedRect: CGRect(x: 0 , y: 0, width: self.frame.width, height: self.frame.height),cornerRadius:0) //自定义的遮罩图形
        basicPath.append(maskPath0) // 重叠
        let maskPath = UIBezierPath(roundedRect: CGRect(x: 0 , y: 0, width: self.frame.width, height:self.frame.height),cornerRadius:cornerRadius) //自定义的遮罩图形
        basicPath.append(maskPath) // 重叠

        let maskPath1 = UIBezierPath(roundedRect: CGRect(x: boardWidth, y: boardWidth, width: self.frame.width - boardWidth*2, height: self.frame.height - boardWidth*2),cornerRadius:cornerRadius) //自定义的遮罩图形
       basicPath.append(maskPath1)
       maskLayer.path = basicPath.cgPath
       self.layer.mask = maskLayer
        return self
    }


}


//状态栏高度
extension UIApplication{
    static var statusBarHeight:CGFloat{
        let window = UIApplication.shared.windows.filter {$0.isKeyWindow}.first
        let height = window?.windowScene?.statusBarManager?.statusBarFrame.height ?? 0
        return height
    }
}


 1717
1717


 被折叠的 条评论
为什么被折叠?
被折叠的 条评论
为什么被折叠?
 到【灌水乐园】发言


