


前面在使用Fragment的时候,我们通常都要重写他的onCreateView方法,这个方法的方法的使用如下:
public View onCreateView(LayoutInflater inflater, ViewGroup container,Bundle savedInstanceState) {
return inflater.inflate(R.layout.fragment1,container,false);
}
可以看到我们通常都是调用LayoutInflater的inflate方法来获得这个View的,但是传入的这些参数到底是干什么的呢?我们有必要去看看android源码是怎么实现的了:
从android官方API中我们可以看到LayoutInflater共有四个inflate方法:

这四个方法最终都会调用public View inflate(XmlPullParser parser, ViewGroup root, boolean attachToRoot)这个方法,所以我们只需要看看这个方法源码就可以了:
这个方法的前面大半部分是通过XmlPullParser进行xml解析并且对解析的结果进行各种判断的,不是本方法的重点,我们仅看重要部分:
if (TAG_MERGE.equals(name)) {
    if (root == null || !attachToRoot) {
        throw new InflateException("<merge /> can be used only with a valid "
                + "ViewGroup root and attachToRoot=true");
    }

    rInflate(parser, root, attrs, false);
} else {
    // Temp is the root view that was found in the xml
    View temp;
    if (TAG_1995.equals(name)) {
        temp = new BlinkLayout(mContext, attrs);
    } else {
        temp = createViewFromTag(root, name, attrs);
    }

    ViewGroup.LayoutParams params = null;

    if (root != null) {
        if (DEBUG) {
            System.out.println("Creating params from root: " +
                    root);
        }
        // Create layout params that match root, if supplied
        params = root.generateLayoutParams(attrs);
        if (!attachToRoot) {
            // Set the layout params for temp if we are not
            // attaching. (If we are, we use addView, below)
            temp.setLayoutParams(params);
        }
    }
    rInflate(parser, temp, attrs, true);
    if (root != null && attachToRoot) {
        root.addView(temp, params);
    }
    if (root == null || !attachToRoot) {
        result = temp;
    }
}
第1行TAG_MERGE等于name,不管root和attachToRoot的值,都会执行rInflate方法,这个方法的源码是:
void rInflate(XmlPullParser parser, View parent, final AttributeSet attrs,
            boolean finishInflate) throws XmlPullParserException, IOException {

        final int depth = parser.getDepth();
        int type;

        while (((type = parser.next()) != XmlPullParser.END_TAG ||
                parser.getDepth() > depth) && type != XmlPullParser.END_DOCUMENT) {

            if (type != XmlPullParser.START_TAG) {
                continue;
            }

            final String name = parser.getName();

            if (TAG_REQUEST_FOCUS.equals(name)) {
                parseRequestFocus(parser, parent);
            } else if (TAG_INCLUDE.equals(name)) {
                if (parser.getDepth() == 0) {
                    throw new InflateException("<include /> cannot be the root element");
                }
                parseInclude(parser, parent, attrs);
            } else if (TAG_MERGE.equals(name)) {
                throw new InflateException("<merge /> must be the root element");
            } else if (TAG_1995.equals(name)) {
                final View view = new BlinkLayout(mContext, attrs);
                final ViewGroup viewGroup = (ViewGroup) parent;
                final ViewGroup.LayoutParams params = viewGroup.generateLayoutParams(attrs);
                rInflate(parser, view, attrs, true);
                viewGroup.addView(view, params);
            } else {
                final View view = createViewFromTag(parent, name, attrs);
                final ViewGroup viewGroup = (ViewGroup) parent;
                final ViewGroup.LayoutParams params = viewGroup.generateLayoutParams(attrs);
                rInflate(parser, view, attrs, true);
                viewGroup.addView(view, params);
            }
        }

        if (finishInflate) parent.onFinishInflate();
    }
重点看第25~30行以及32~36行代码,我们发现两者都会获取到父视图,并且递归的调用自己,递归结束后将自己添加到ViewGroup中,这样就将父视图下的所有子元素全部添加到ViewGroup中,最终形成一个DOM结构,最后把这个DOM结构的最顶层的根布局返回;
回到inflate方法,当TAG_MERGE不等于name的时候,第11行会首先判断当前name是否是blink内核(android4.4以上采用blink内核),如果是的话调用BlinkLayout构造函数生成当前子视图的View,如果不是blink内核的话,会调用createViewFromTag这个方法将节点名和参数传递进去,通过这些参数构造出一个View并且返回,来看看他的源码:
View createViewFromTag(View parent, String name, AttributeSet attrs) {
        if (name.equals("view")) {
            name = attrs.getAttributeValue(null, "class");
        }

        if (DEBUG) System.out.println("******** Creating view: " + name);

        try {
            View view;
            if (mFactory2 != null) view = mFactory2.onCreateView(parent, name, mContext, attrs);
            else if (mFactory != null) view = mFactory.onCreateView(name, mContext, attrs);
            else view = null;

            if (view == null && mPrivateFactory != null) {
                view = mPrivateFactory.onCreateView(parent, name, mContext, attrs);
            }

            if (view == null) {
                if (-1 == name.indexOf('.')) {
                    view = onCreateView(parent, name, attrs);
                } else {
                    view = createView(name, null, attrs);
                }
            }

            if (DEBUG) System.out.println("Created view is: " + view);
            return view;

        } catch (InflateException e) {
            throw e;

        } catch (ClassNotFoundException e) {
            InflateException ie = new InflateException(attrs.getPositionDescription()
                    + ": Error inflating class " + name);
            ie.initCause(e);
            throw ie;

        } catch (Exception e) {
            InflateException ie = new InflateException(attrs.getPositionDescription()
                    + ": Error inflating class " + name);
            ie.initCause(e);
            throw ie;
        }
    }
可以看到这个方法中会判断工厂中是否存在该View,如果存在的话,则直接调用onCreateView方法获取到该View即可,如果不存在的话,则会通过createView来反射创建该View;
回到inflate方法,第19行首先会判断是否存在父视图,如果存在的话,则在25行获得子视图的布局参数,这里的attrs是通过XmlPullParser解析到的子视图资源文件中的xml标签所对应的set集合,第26行通过判断attachToRoot如果是false的话,则只将temp(是一个声明为View的局部变量)的最外层layout属性设置为是子视图的,其他部分还是显示的父视图的;
如果root非空,并且attachToRoot为true的话,则会将当前子视图添加到父视图中;
 if (root != null && attachToRoot) {
           root.addView(temp, params);
 }
 if (root == null || !attachToRoot) {
            result = temp;
 }
在列举实例之前,我们给出以下结论:
(1)如果root为null,attachToRoot将失去作用,设置任何值将没什么意义;
(2)如果root非null,attachToRoot为true,则会为加载的布局指定一个父布局,即会将当前view添加到父view中;
(3)如果root非null,attachToRoot为false,则会将布局文件最外层的所有layout属性进行设置,当该view被添加到父view的时候,父view的最外层layout属性将会改为子view的layout属性;
下面通过实例来一一验证:
定义parent.xml作为父视图:
<?xml version="1.0" encoding="utf-8"?>
<LinearLayout xmlns:android="http://schemas.android.com/apk/res/android"
    android:id="@+id/fatherLinearLayout"
    android:layout_width="match_parent"
    android:layout_height="match_parent"
    android:orientation="vertical"
    android:background="#00ff00" >
    <TextView
        android:layout_width="wrap_content"
        android:layout_height="wrap_content"
        android:text="这是父视图"/>
</LinearLayout><?xml version="1.0" encoding="utf-8"?>
<LinearLayout xmlns:android="http://schemas.android.com/apk/res/android"
android:layout_width="200dp"
android:layout_height="400dp"
android:orientation="vertical"
android:background="#ffff00" >
<TextView
android:layout_width="wrap_content"
android:layout_height="wrap_content"
android:text="这是子视图"/>
</LinearLayout>第一种方式:inflate(view,null)
public class LayoutInflaterActivity extends Activity {
	@Override
	protected void onCreate(Bundle savedInstanceState) {
		super.onCreate(savedInstanceState);
		View parentView = (View) getLayoutInflater().inflate(R.layout.parent, null);
		LinearLayout.LayoutParams l = (LayoutParams)parentView.getLayoutParams();
		if(l != null)
		{
			System.out.println(l.width);
			System.out.println(l.height);
		}
		parentView = (ViewGroup) getLayoutInflater().inflate(R.layout.child, null);
		l = (LayoutParams)parentView.getLayoutParams();
		if(l != null)
		{
			System.out.println("after:  "+l.width);
			System.out.println("after:  "+l.height);
		}
		setContentView(parentView);
	}
}
输出结果:
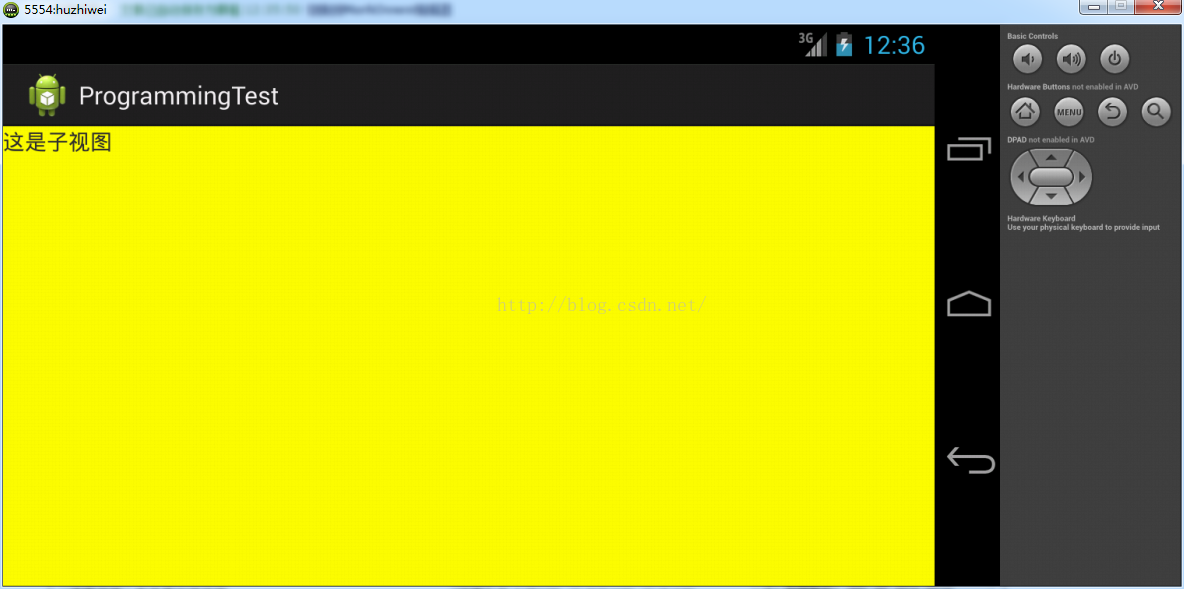
可以看到Logcat中没有任何输出,这里我们输出了调用inflate(view, null)前后的layout属性,发现均为null,说明子view对父view的layout属性没有任何影响,很多人会问父view的布局文件parent.xml中的LinearLayout有layout属性了呀,为什么不显示出来,这个问题我们后面单独来分析,现在只要知道inflate(view, null)这种方法子View是对父View没什么影响的;
第二种方式:inflate(view,root)
public class LayoutInflaterActivity extends Activity {
	@Override
	protected void onCreate(Bundle savedInstanceState) {
		super.onCreate(savedInstanceState);
		View parentView = (View) getLayoutInflater().inflate(R.layout.parent, null);
		LinearLayout.LayoutParams l = (LayoutParams)parentView.getLayoutParams();
		if(l != null)
		{
			System.out.println(l.width);
			System.out.println(l.height);
		}
		parentView = (ViewGroup) getLayoutInflater().inflate(R.layout.child, (ViewGroup)parentView);
		l = (LayoutParams)parentView.getLayoutParams();
		if(l != null)
		{
			System.out.println("after:  "+l.width);
			System.out.println("after:  "+l.height);
		}
		setContentView(parentView);
	}
}
输出结果:
这种方式的输出结果和inflate(view,root,true)是一致的,这点从inflate的重载方法中可以看出来,同样的,我们在调用inflate(view,root)之前也分别打印了layout属性,发现此时Logcat中还是没有任何输出,这也就说明inflate(view,root)或者inflate(view,root,true)只是将子view添加到了父view上面了,但是并不会改变父view的layout属性;
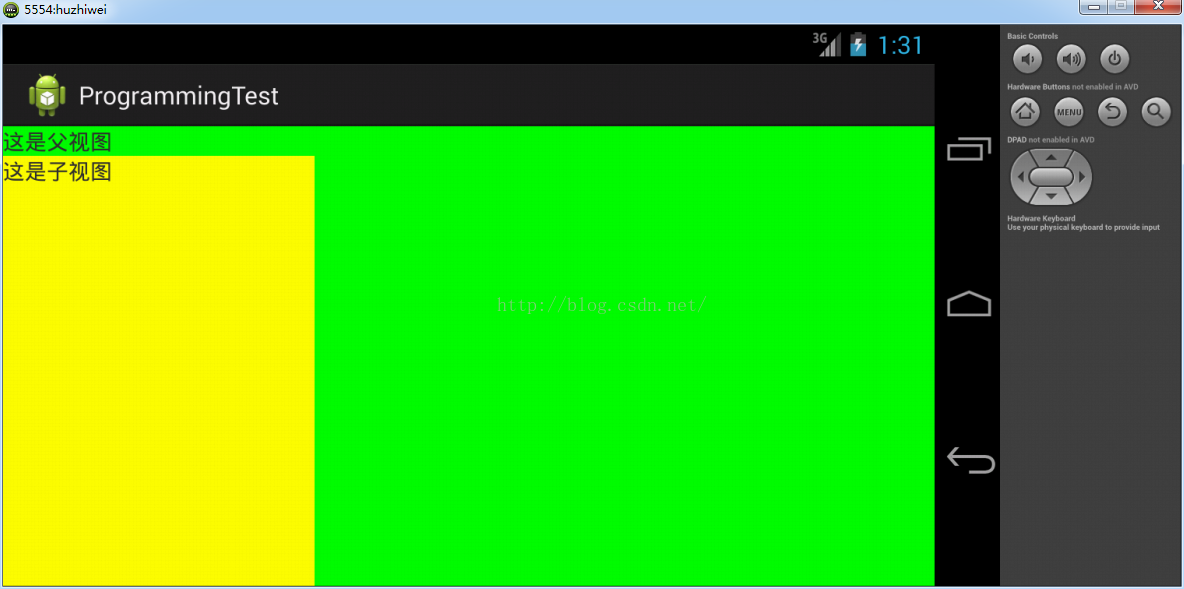
第三种方式:inflate(view,root,false)
public class LayoutInflaterActivity extends Activity {
	@Override
	protected void onCreate(Bundle savedInstanceState) {
		super.onCreate(savedInstanceState);
		View parentView = (View) getLayoutInflater().inflate(R.layout.parent, null);
		LinearLayout.LayoutParams l = (LayoutParams)parentView.getLayoutParams();
		if(l != null)
		{
			System.out.println(l.width);
			System.out.println(l.height);
		}
		parentView = (ViewGroup) getLayoutInflater().inflate(R.layout.child, (ViewGroup)parentView,false);
		l = (LayoutParams)parentView.getLayoutParams();
		if(l != null)
		{
			System.out.println("after:  "+l.width);
			System.out.println("after:  "+l.height);
		}
		setContentView(parentView);
	}
}
输出结果:
很多人看到这点都会说这个和之前的inflate(view,null),不是一样的吗?如果此时你去查看Logcat输出会发现竟然会有输出,我先贴出我的输出:

05-12 01:36:10.094: I/System.out(1656): after: 400
05-12 01:36:10.094: I/System.out(1656): after: 800
咦?这里怎么会修改掉父view的layout属性呢?在调用inflate(view,root,false)之前是没有任何输出的,调用之后直接把子view的layout属性赋给了父view的最外层layout,这也就验证了我们前面的结论,从源码中也能找到答案,inflate方法的源码第29行在root非null,attachToRoot为false的情况下执行了setLayoutParams方法,将params参数设置到了inflate方法将要返回的view中,而params的值正好就是通过generateLayoutParams方法获得的,generateLayoutParams的参数attrs是子view的,那也就意味着将子view的layout属性设置到了我们要返回的view中,也就出现了刚刚我们Logcat的输出了;
Ok,inflate的源码讲解结束啦,由于水平有限,有不对的地方望大神指点;


 544
544

 被折叠的 条评论
为什么被折叠?
被折叠的 条评论
为什么被折叠?
 到【灌水乐园】发言


