


相信大家都用过LayoutInflater(布局填充器),以前我常见这两种方式:
1. mInflater.inflate(R.layout.item, parent, false);
2. mInflater.inflate(R.layout.item, null);
最开始我用这个是在ListView的适配器中的getView()方法中,后来在Activity的动态加载布局中也用过。当时也没觉得两种有什么区别,只是觉得两个参数的简单好用,和三个参数的没看出什么不同,从些之后就再没用过三个参数的(只能说自己年少轻狂)。
后来在一个项目中用RecyclerView加载item,在适配器的getView()中用到inflate,我当时习惯性写两个参数,最后运行的时候悲剧了,显示不全,然后就是各种调试、clean、rebuild,然并卵,只好一行一行看,猜测是不是这一行出的问题。
调试到了inflate()方法,抱着试试的心态,把两个参数改成三个参数,run,出来了,欧耶…,不太相信这是真是,再改成两个参数试试,item又显示不全了,再改回三个参数,显示完整了。这下认定是inflate的原因了。陷入思考中,为什么两个参数和三个参数结果不同呢,以前我都是用的两个参数,屡试不爽的 ,这可真是毁三观呀。
研究两者的区别吧,先去看下源码吧,以前很不喜欢看源码,觉得满篇的英文,看起来很费劲,还浪费时间,还不如直接百度(其实现在比较喜欢用谷歌);后来慢慢喜欢上看源码了,一方面觉得逼格更高一点,更重要的是,可以学到大神们的编程思想(吹个牛逼哈,反正看完源码,就觉得自己写的都是喳喳,总之看源码是一种提升技能的法宝)。
言回正转,去看
源码
这是三个参数的:
public View inflate(@LayoutRes int resource, @Nullable ViewGroup root, boolean attachToRoot) {
        final Resources res = getContext().getResources();
        if (DEBUG) {
            Log.d(TAG, "INFLATING from resource: \"" + res.getResourceName(resource) + "\" ("
                    + Integer.toHexString(resource) + ")");
        }

        final XmlResourceParser parser = res.getLayout(resource);
        try {
            return inflate(parser, root, attachToRoot);
        } finally {
            parser.close();
        }
    }
这是两个参数的
public View inflate(@LayoutRes int resource, @Nullable ViewGroup root) {
        return inflate(resource, root, root != null);
    }
嘻嘻!,这不是引用了三个参数的嘛,有意思。如果把我之前两个参数的转换成三个参数的,就是:
mInflater.inflate(R.layout.item, null, null != null);

也就是:

mInflater.inflate(R.layout.item, null, false);
突然想起来,如果两个参数时,第二个参数不为空,改为parent呢
inflater.inflate(R.layout.item, parent);

因为本质是引用三个参数的:

inflater.inflate(R.layout.item, parent, parent!= null);

也就是:

inflater.inflate(R.layout.item, parent, true);
所以,现在本质上有6种排列组合,其实有两种本质上一样,算4种:
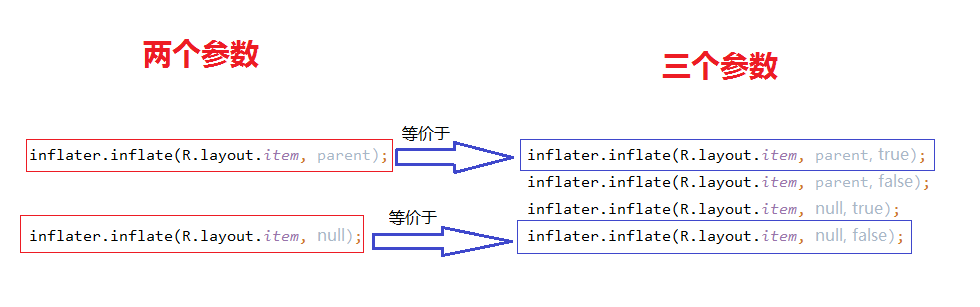
其实都是三个参数的排列组合,再回到源码,三个参数的源码,这次看注释。
/**
     * Inflate a new view hierarchy from the specified xml resource. Throws
     * {@link InflateException} if there is an error.
     *
     * @param resource ID for an XML layout resource to load (e.g.,
     *        <code>R.layout.main_page</code>)
     * @param root Optional view to be the parent of the generated hierarchy (if
     *        <em>attachToRoot</em> is true), or else simply an object that
     *        provides a set of LayoutParams values for root of the returned
     *        hierarchy (if <em>attachToRoot</em> is false.)
     * @param attachToRoot Whether the inflated hierarchy should be attached to
     *        the root parameter? If false, root is only used to create the
     *        correct subclass of LayoutParams for the root view in the XML.
     * @return The root View of the inflated hierarchy. If root was supplied and
     *         attachToRoot is true, this is root; otherwise it is the root of
     *         the inflated XML file.
     */
把第二个参数的注释专门贴出来:
Optional view to be the parent of the generated hierarchy (if
 attachToRoot is true),  or else simply an object that provides
  a set of LayoutParams values forroot of the returned hierarchy
   (if attachToRoot is false.)
看看金山词霸怎么说:
可选视图是生成的层次结构的父(如果attachtoroot是真的),或者干脆一个对象,
提供了一套用于返回层次结构的根的LayoutParams值(如果attachtoroot是假的。)唉,这些翻译就是这么没有,说了等于没说,不过还是有一点点收获的。现在遇到了点困难,去看看百度上怎么说,找到了一篇文章,说的还不错:三个案例带你看懂LayoutInflater中inflate方法两个参数和三个参数的区别。
—————–分割线——————
自己动手,创建一个项目,布局文件activity_main.xml(注意LinearLayout有id)
<?xml version="1.0" encoding="utf-8"?>
<LinearLayout
    xmlns:android="http://schemas.android.com/apk/res/android"
    android:id="@+id/linearLayout_main"
    android:layout_width="match_parent"
    android:layout_height="match_parent"
    android:orientation="vertical">
</LinearLayout>
再写一个布局:item_linearlayout:(宽高写死,都是200dp)
<?xml version="1.0" encoding="utf-8"?>
<LinearLayout xmlns:android="http://schemas.android.com/apk/res/android"
              android:layout_width="200dp"
              android:layout_height="200dp"
              android:background="#500000ff"
              android:orientation="vertical">

    <Button
        android:layout_width="wrap_content"
        android:layout_height="wrap_content"
        android:text="我是一个按钮"/>

</LinearLayout>
最后是MainActivity:
public class MainActivity extends AppCompatActivity {

    @Override
    protected void onCreate(Bundle savedInstanceState) {
        super.onCreate(savedInstanceState);
        setContentView(R.layout.activity_main);
        //父容器
        LinearLayout parent = (LinearLayout) findViewById(linearLayout_main);
        //获取布局填充器
        LayoutInflater inflater = LayoutInflater.from(this);
        //获取子布局,并动态加载进父容器中
        View child = inflater.inflate(R.layout.item_linearlayout, parent, false);
        parent.addView(child);

    }
}
运行结果:
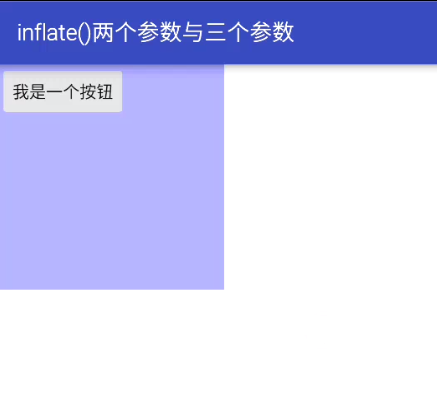
这个是我们理想中的结果,接下来修改一下,改成两个参数。
//获取子布局,并动态加载进父容器中
        View child = inflater.inflate(R.layout.item_linearlayout, null);
        parent.addView(child);
运行结果:

我去,这。。。。
先别震惊,还没完呢,还记得三个参数中第三个参数我用的是false,如果改成true呢,
这次没有运行结果图了,报错了。
Caused by: java.lang.IllegalStateException:
 The specified child already has a parent.
You must call removeView() on the child's parent first.
非法状态异常,指定的child已经有一个父容器了。你必须先用chile的父容器调用removeView()。
关于这个异常,我又去扒了源码上第三个参数的注释:
Whether the inflated hierarchy should be attached to the root
parameter? If false, root is only used to create the correct
 subclass of LayoutParams for the root view in the XML.
意思就是如果是true,这个item布局直接就绑定在父容器上了,不用手动添加了。原来如此,修改下代码,把最后一句话注释了,:
//获取子布局,并动态加载进父容器中
        View child = inflater.inflate(R.layout.item_linearlayout, parent, true);
        //parent.addView(child);
这下运行就正常了。
总结
最后拿3个参数来总结下:
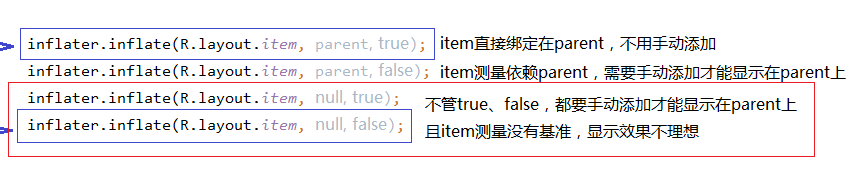
总之一句话,推荐用下边这种方式:
inflater.inflate(R.layout.item, parent, false);


 9241
9241

 被折叠的 条评论
为什么被折叠?
被折叠的 条评论
为什么被折叠?
 到【灌水乐园】发言


