Qt
已经提供了一些可以和视图类配合使用的模型:
|
QStringListModel
|
保存一系列字符串
|
|
QStandardItemModel
|
保存有任意继承关系的数据
|
|
QDirModel
|
对本地文件系统进行的封装
|
|
QSqlQueryModel
|
对SQL查询结果进行的封装
|
|
QSqlTableModel
|
封装一个SQL表
|
|
QSqlRelationalTableModel
|
封装带有外键的SQL表
|
|
QSortFilterProxyModel
|
排序或者顾虑一个模型的封装
|
在本节中,我们将会讨论QStringListModle,QDirModel和QSortFilterProxyModel的使用。SQL有关的模型将在第13章介绍。
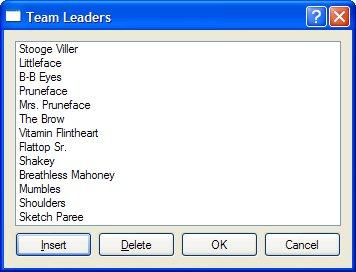
首先我们看一个简单的对话框,用户可以增加爱,删除编辑一个QStringList,每一个字符串代表一个项目领导。
Figure 10.6. The Team Leaders application

下面是其构造函数的一部分:
TeamLeadersDialog::TeamLeadersDialog(const QStringList &leaders,
QWidget *parent)
: QDialog(parent)
{
model = new QStringListModel(this);
model->setStringList(leaders);
listView = new QListView;
listView->setModel(model);
listView->setEditTriggers(QAbstractItemView::AnyKeyPressed
| QAbstractItemView::DoubleClicked);
...
}
首先我们创建一个QStringListModel,然后用传递来得参数leaders作为模型的数据。然后我们创建一个QListView,把刚才创建的模型作为这个视图的模型。调用setEditTriggers()允许用户通过敲击键盘或者双击它。缺省情况下,QListView没有编辑触发器,是只读的。
void TeamLeadersDialog::insert()
{
int row = listView->currentIndex().row();
model->insertRows(row, 1);
QModelIndex index = model->index(row);
listView->setCurrentIndex(index);
listView->edit(index);
}
当用户点击了insert按钮,槽函数insert()就会被调用。这个函数首先得到列表中当前项目的所在行数,模型中每一个数据项都有一个对应的模型索引(model index),有一个QModelIndex对象表示。在下一节我们再详细讨论这个类。现在我们需要知道的是一个索引有三个主要组成对象:行,列,一个指向实际数据的指针。对一个一维列表,索引得列数总是为0。
一旦确定了行数,我们就在这个位置插入一新行。插入操作时是在模型上实现的。模型会自动刷新列表视图。然后,我们把新插入的行作为当前行。并把当前行设为编辑状态,就像用户点击了键盘或者双击了项目一样。
void TeamLeadersDialog::del()
{
model->removeRows(listView->currentIndex().row(), 1);
}
在构造函数中,Delete按钮发出的cliecked()信号和del()函数连接。因为我们只是删除当前行,调用函数removeRows(),当前索引的行号和要删除的行数作为参数。和插入操作一样,模型类负责通知视图的更新。
QStringList TeamLeadersDialog::leaders() const
{
return model->stringList();
}
当对话框关闭时,函数leaders()能够得到编辑过的字符列表。
TeadLeaderDialog
可以作为一个通用的字符列表编辑对话框,只要改变窗口标题就可以了。另一个经常使用的是显示文件列表或者目录。下一个例子我们使用了QDirModel,这个类封装了计算机的文件系统,能够显示(或者隐藏)各种文件属性。这个模型类能够根据文件种类进行过滤,按照不同的方式进行排序等。
Figure 10.7. The Directory Viewer application

首先看类的构造函数,首先了model和view的创建和其他需要的设置。
DirectoryViewer::DirectoryViewer(QWidget *parent)
: QDialog(parent)
{
model = new QDirModel;
model->setReadOnly(false);
model->setSorting(QDir::DirsFirst | QDir::IgnoreCase | QDir::Name);
treeView = new QTreeView;
treeView->setModel(model);
treeView->header()->setStretchLastSection(true);
treeView->header()->setSortIndicator(0, Qt::AscendingOrder);
treeView->header()->setSortIndicatorShown(true);
treeView->header()->setClickable(true);
QModelIndex index = model->index(QDir::currentPath());
treeView->expand(index);
treeView->scrollTo(index);
treeView->resizeColumnToContents(0);
...
}
一旦创建了model,我们设置它可编辑,并且设置排序方式。然后创建一个QTreeView显示model的数据。设置用户能够控制QTreeView的标题列顺序。设置标题列可点击,用户能够根据点击的任何一列排序,升序或者降序。然后得到当前目录的index,调用expand()和scrollTo()使它可见。调用函数resizeColumnToContents()让第一列宽度足够显示所有的文字,而不是使用(…)
在构造函数的其他部分,我们把CreateDirectory按钮和Remove按钮的点击信号和各自的槽函数连接起来。注意我们没有Rename按钮,因为不需要,用户可以敲击F2后键入新的名称,model会自动为我们保存。
void DirectoryViewer::createDirectory()
{
QModelIndex index = treeView->currentIndex();
if (!index.isValid())
return;
QString dirName = QInputDialog::getText(this,
tr("Create Directory"),
tr("Directory name"));
if (!dirName.isEmpty()) {
if (!model->mkdir(index, dirName).isValid())
QMessageBox::information(this, tr("Create Directory"),
tr("Failed to create the directory"));
}
}
用户点击CreateDirectory后,显示输入对话框,在对话框中输入目录名称。我们打算把新目录建在当前目录的下面。QDirModel::mkdir()函数创建一个新目录,参数为父目录的index和要创建的目录名称。如果创建成功,就返回新创建目录的index。如果失败,则返回一个不合法的index。
void DirectoryViewer::remove()
{
QModelIndex index = treeView->currentIndex();
if (!index.isValid())
return;
bool ok;
if (model->fileInfo(index).isDir()) {
ok = model->rmdir(index);
} else {
ok = model->remove(index);
}
if (!ok)
QMessageBox::information(this, tr("Remove"),
tr("Failed to remove %1").arg(model->fileName(index)));
}
如果用户点击了Remove按钮,我们就删除当前index关联的文件或者目录。vQDir可以实现删除操作,QDirModel提供了这个操作的方便函数。
本节的最后一个例子讨论QSortFilterProxyModel的使用。与其他Qt提供的model不同,这个model封装了一个现有的model,对已有的model和view之间传递的数据进行控制。在我们的这个例子中,已有的model为一个QStringListModel,用一系列QColor::colorNames()对model进行初始化。用户可以在一个QLineEdit控件中键入要过滤从字符串,用一个组合框确定这个字符串的解析方式(正则表达式,通配符等)
Figure 10.8. The Color Names application

下面是ColorNameDialog对话框的一部分:
ColorNamesDialog::ColorNamesDialog(QWidget *parent)
: QDialog(parent)
{
sourceModel = new QStringListModel(this);
sourceModel->setStringList(QColor::colorNames());
proxyModel = new QSortFilterProxyModel(this);
proxyModel->setSourceModel(sourceModel);
proxyModel->setFilterKeyColumn(0);
listView = new QListView;
listView->setModel(proxyModel);
...
syntaxComboBox = new QComboBox;
syntaxComboBox->addItem(tr("Regular expression"), QRegExp::RegExp);
syntaxComboBox->addItem(tr("Wildcard"), QRegExp::Wildcard);
syntaxComboBox->addItem(tr("Fixed string"), QRegExp::FixedString);
...
}
The QStringListModel is created and populated in the usual way. This is followed by the construction of the QSortFilterProxyModel. We pass the underlying model using setSourceModel() and tell the proxy to filter based on column 0 of the original model. The QComboBox::addItem() function accepts an optional "data" argument of type QVariant; we use this to store the QRegExp::PatternSyntax value that corresponds to each item's text.
void ColorNamesDialog::reapplyFilter()
{
QRegExp::PatternSyntax syntax =
QRegExp::PatternSyntax(syntaxComboBox->itemData(
syntaxComboBox->currentIndex()).toInt());
QRegExp regExp(filterLineEdit->text(), Qt::CaseInsensitive, syntax);
proxyModel->setFilterRegExp(regExp);
}
The reapplyFilter() slot is invoked whenever the user changes the filter string or the pattern syntax combobox. We create a QRegExp using the text in the line edit. Then we set its pattern syntax to the one stored in the syntax combobox's current item's data. When we call setFilterRegExp(), the new filter becomes active and the view is automatically updated.


 3079
3079

 被折叠的 条评论
为什么被折叠?


