


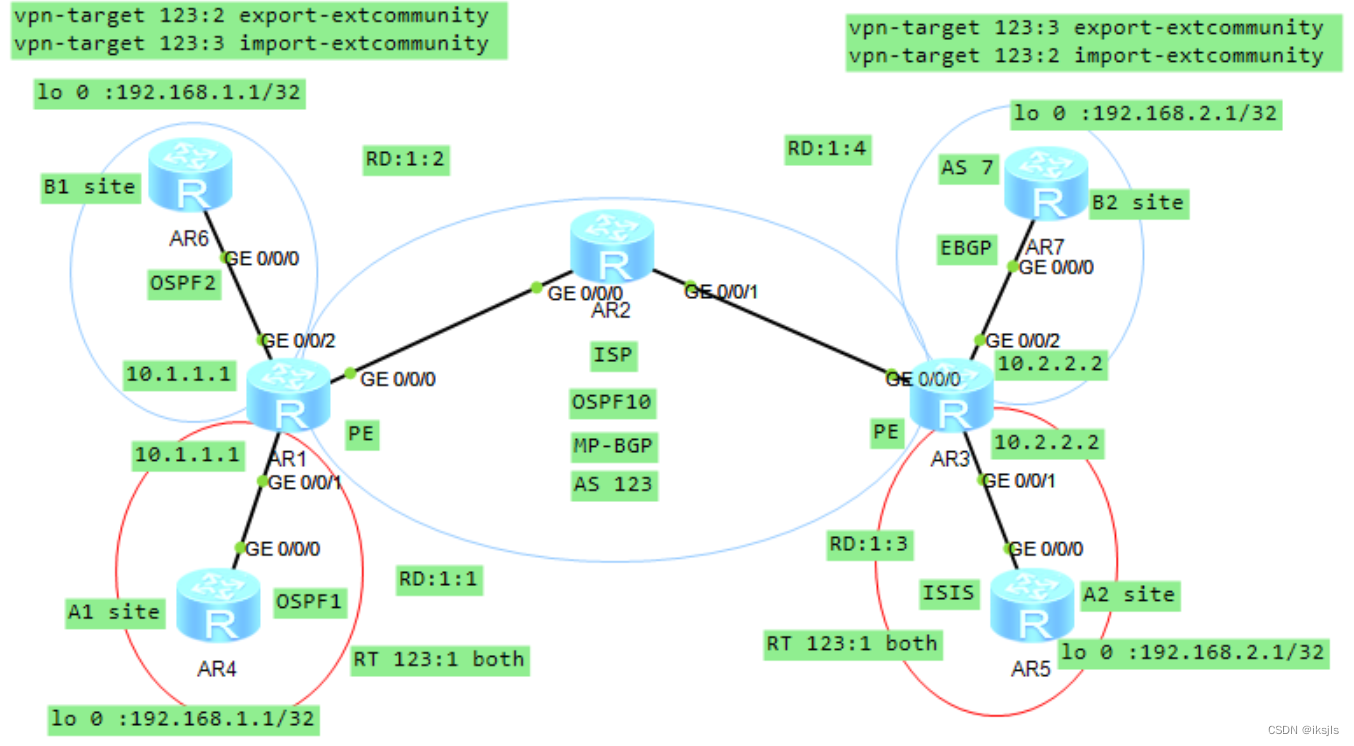
实验拓扑
实验要求
A1和A2可以看成同一个企业的总部和分部,B1和B2则是另一个企业的总部和分部,实验的目的主要就是利用公网网络传递企业内部的私网IP,使得不同的企业使用同样的私网IP在公网传播时,能实现不同企业总部与各自的分部的通信。
具体配置
R1
sys
sys R1
int g0/0/0
ip add 192.168.12.1 24
int lo 1
ip add 1.1.1.1 32

# 创建并进入VPN实例A1
ip vpn-instance A1
route-distinguisher 1:1 # 设置路由区分符为1:1

# 创建并进入VPN实例B1
ip vpn-instance B1
route-distinguisher 1:2 # 设置路由区分符为1:2

# 将接口绑定到VPN实例A1
int g0/0/1
ip binding vpn-instance A1
ip add 10.1.1.1 24

# 将接口绑定到VPN实例B1
int g0/0/2
ip binding vpn-instance B1
ip add 10.1.1.1 24

# 在VPN实例A1中启动OSPF进程1
ospf 1 router-id 1.1.1.1 vpn-instance A1
area 0
net 10.1.1.1 0.0.0.0

# 在VPN实例B1中启动OSPF进程2
ospf 2 router-id 1.1.1.1 vpn-instance B1
area 0
net 10.1.1.1 0.0.0.0

# 启用OSPF进程10
ospf 10 router-id 1.1.1.1
area 0
net 1.1.1.1 0.0.0.0
net 192.168.12.1 0.0.0.0

# 启动BGP进程123
bgp 123
peer 3.3.3.3 as 123
peer 3.3.3.3 connect-interface lo 1 # 通过Loopback1接口建立BGP连接
ipv4-family vpnv4
peer 3.3.3.3 enable # 启用vpnv4族
ipv4-family vpn-instance A1
import-route ospf 1
ipv4-family vpn-instance B1
import-route ospf 2

# 启用MPLS功能并设置LSR标识
mpls
mpls lsr-id 1.1.1.1
mpls ldp # 启用标签分发协议(LDP)

# 在接口上启用MPLS
int g0/0/0
mpls
mpls ldp

# 配置VPN实例A1的VPN目标属性
ip vpn-instance A1
vpn-target 123:1 both # 设置内部和外部扩展团体属性

# 配置VPN实例B1的VPN目标属性
ip vpn-instance B1
vpn-target 123:2 export-extcommunity # 设置出口扩展团体属性
vpn-target 123:3 import-extcommunity # 设置进口扩展团体属性

# 在OSPF进程中导入BGP路由
ospf 1
import-route bgp
R2
sys
sys R2
int g0/0/0
ip add 192.168.12.2 24
int g0/0/1
ip add 192.168.23.2 24
int lo 2
ip add 2.2.2.2 32

ospf 10 router-id 2.2.2.2
area 0
net 2.2.2.2 0.0.0.0
net 192.168.12.2 0.0.0.0
net 192.168.23.2 0.0.0.0
quit
quit

mpls
mpls lsr-id 2.2.2.2
mpls ldp
int g0/0/0
mpls
mpls ldp
int g0/0/1
mpls
mpls ldp
R3
sys
sys R3
int g0/0/0
ip add 192.168.23.3 24

int lo 3
ip add 3.3.3.3 32

# 创建并进入VPN实例A2
ip vpn-instance A2
route-distinguisher 1:3 # 设置路由区分符为1:3

# 创建并进入VPN实例B2
ip vpn-instance B2
route-distinguisher 1:4 # 设置路由区分符为1:4

# 将接口绑定到VPN实例A2
int g0/0/1
ip binding vpn-instance A2
ip add 10.2.2.2 24

# 将接口绑定到VPN实例B2
int g0/0/2
ip binding vpn-instance B2
ip add 2.2.2.2 24

# 在VPN实例A2中启用ISIS协议,设置为Level-2
isis 1 vpn-instance A2
is-level level-2
network-entity 49.0003.0000.0000.0003.00

# 启用BGP进程123,在VPN实例B2中配置IPv4族
bgp 123
ipv4-family vpn-instance B2
peer 10.2.2.2 as-number 7

ospf 10 router-id 3.3.3.3
area 0
net 3.3.3.3 0.0.0.0
net 192.168.23.3 0.0.0.0

bgp 123
peer 1.1.1.1 as 123
peer 1.1.1.1 connect-interface lo 3 # 通过Loopback3接口建立连接
ipv4-family vpnv4
peer 1.1.1.1 enable # 开启vpnv4族
ipv4-family vpn-instance A2 # 进入VPN实例A2
import-route isis 1 # 导入ISIS实例1中的路由

# 启用MPLS功能并设置LSR标识
mpls
mpls lsr-id 3.3.3.3
mpls ldp # 启用标签分发协议(LDP)

# 在接口上启用MPLS
int g0/0/0
mpls
mpls ldp

# 配置VPN实例A2的VPN目标属性
ip vpn-instance A2
vpn-target 123:1 both # 设置内部和外部扩展团体属性

# 配置VPN实例B2的VPN目标属性
ip vpn-instance B2
vpn-target 123:3 export-extcommunity # 设置出口扩展团体属性
vpn-target 123:2 import-extcommunity # 设置进口扩展团体属性

# 在ISIS实例A2中导入BGP路由
isis 1 vpn-instance A2
import-route bgp
R4
sys
sys R4
int g0/0/0
ip add 10.1.1.2 24
int lo 0
ip add 192.168.1.1 32
ospf 1 router-id 4.4.4.4
area 0
net 192.168.1.1 0.0.0.0
net 10.1.1.2 0.0.0.0

#配置telnet远程登录
user-interface vty 0 4
authentication-mode password
iksjls
user privilege level 3
R5
sys
sys R5
int g0/0/0
ip add 10.2.2.2 24
int lo 0
ip add 192.168.2.1 32
isis 1
is-level level-2
network-entity 49.0035.0000.0000.0005.00
int g0/0/0
isis en
int lo 0
isis en
R6
sys
sys R6
int g0/0/0
ip add 10.1.1.2 24
int lo 0
ip add 192.168.1.1 32
ospf 2 router-id 6.6.6.6
area 0
net 192.168.1.1 0.0.0.0
net 10.1.1.2 0.0.0.0

#配置telnet远程登录
user-interface vty 0 4
authentication-mode password
iksjls
user privilege level 3
R7
sys
sys R7
int g0/0/0
ip add 10.2.2.2 24
int lo 0
ip add 192.168.2.1 32
bgp 7
router-id 7.7.7.7
peer 10.2.2.2 as 123
net 192.168.2.1 32
测试验证
R1 BGP路由表

R3 BGP路由表

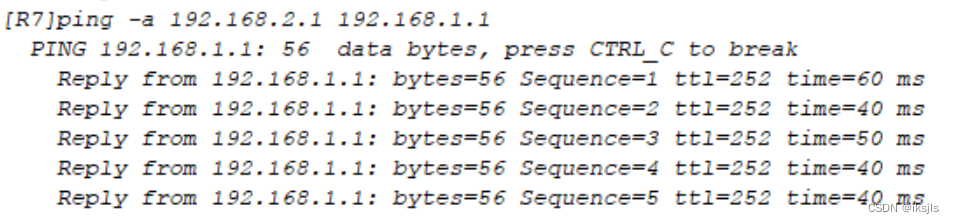
R7 上测试

R5 上测试

 至此,实验结束。


 443
443


 被折叠的 条评论
为什么被折叠?
被折叠的 条评论
为什么被折叠?
 到【灌水乐园】发言


