


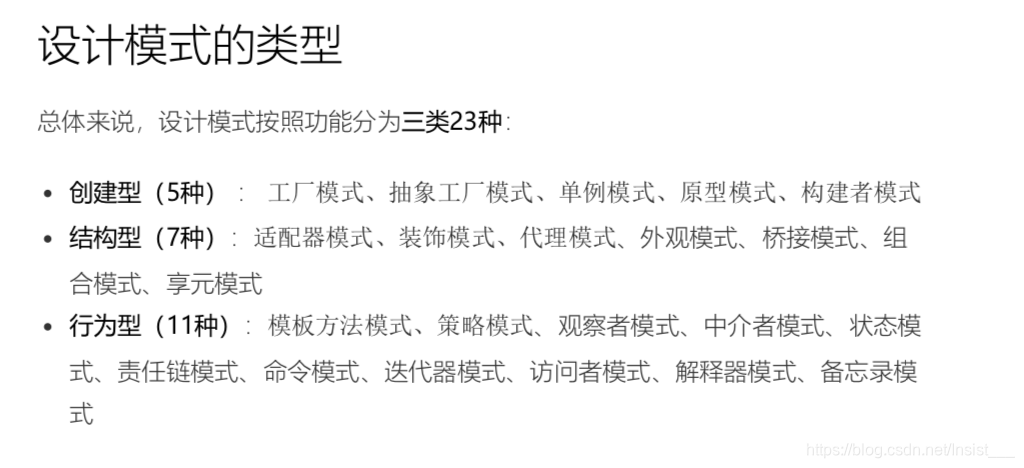
1 创建型:
为什么会使用创建型设计模式那?
1 因为我们只是想使用对象,不是为了去创建对象
2 创建对象的细节有时候复杂或者是隐蔽的,对于使用者来说,要了解对象的创建细节是比较痛苦且没有必要的
1.1原型模式(copy)
作用:
就是给我一个原型,我给你一个对象
使用原型模式复制出来的对象,和原先对象,都是在堆空间中互相独立的对象。
使用场景:
有一个数据对象student
A线程需要对改对象进行一些操作,
B线程也需要对该对象进行一些操作。
以上两个操作都各自需要自己的student对象
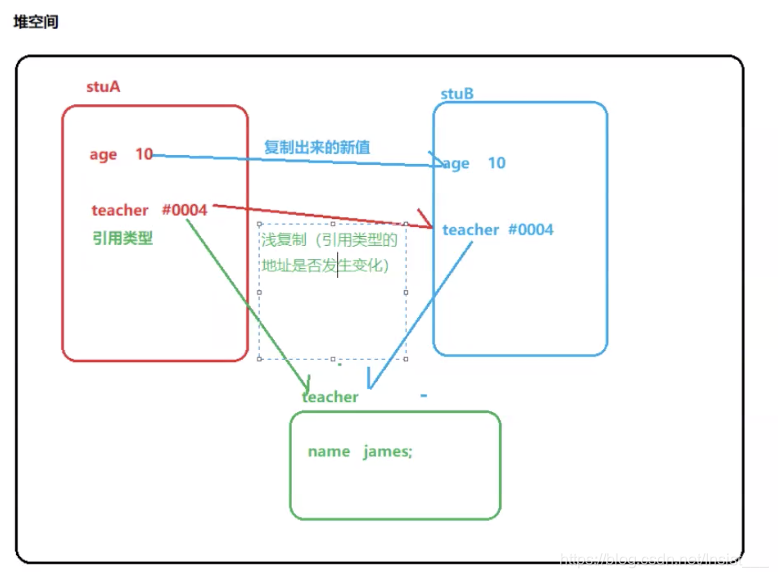
深拷贝和浅拷贝的理解
浅拷贝:原型对象和复制出来的新对象,他们的引用类型新的属性吐过地址值相同则是浅拷贝
深拷贝:原型对象和复制出来的新对象,他们的引用类型新的属性吐过地址值不相同则是深拷贝
Student{
int age;
Teacher t;
}
Student studentA =new Student();
Student studentB=new Student();
浅拷贝和深拷贝的实现分析:
浅拷贝:
1只需要给原型对象(也就是被复制的对象),实现一个cloneable接口(是一个空接口,是一个标记接口),就可以啦
2 需要调用super.clone方法产生新的对象(其实就是object对象的方法)
深拷贝:
需要使用到对象序列化流进行对象的读取和写出,经过对象序列化流的读取和写出过程所经历已经是两个不同的对象啦。
1 需要实现Serializable
package prototype;

import java.io.ByteArrayInputStream;
import java.io.ByteArrayOutputStream;
import java.io.IOException;
import java.io.ObjectInputStream;
import java.io.ObjectOutputStream;
import java.io.Serializable;

/**
 * 原型模式 理解克隆的作用:在原对象的基础上,完全复制一个新的对象(属性都是新的)
 * 浅复制:新对象的简单类型和String类型可以复制为新的,但是引用对象还是喝原对象的一样。 深复制:完全复制一个新的对象(属性都是新的)
 *
 * @author think
 *
 */
public class Prototype implements Cloneable, Serializable {

	private static final long serialVersionUID = 1L;

	// 简单类型或者String类型
	private String name;

	// 引用类型
	private SerializableObject object;

	@Override
	protected Object clone() throws CloneNotSupportedException {
		return super.clone();
	}

	/* 浅复制 */
	public Object shallowClone() throws CloneNotSupportedException {
		// super.clone()其实就是调用了Object对象的clone方法
		// Object对象的clone方法是调用了native方法去在JVM中实现对象复制。
		Prototype proto = (Prototype) super.clone();
		return proto;
	}

	/*
	 * 深复制
	 *
	 * 要实现深复制,需要采用流的形式读入当前对象的二进制输入,再写出二进制数据对应的对象。
	 */
	public Object deepClone() throws IOException, ClassNotFoundException {

		/* 将对象序列化到二进制流 */
		ByteArrayOutputStream bos = new ByteArrayOutputStream();
		ObjectOutputStream oos = new ObjectOutputStream(bos);
		oos.writeObject(this);

		/* 从二进制流中读出产生的新对象 */
		ByteArrayInputStream bis = new ByteArrayInputStream(bos.toByteArray());
		ObjectInputStream ois = new ObjectInputStream(bis);
		return ois.readObject();
	}

	public String getName() {
		return name;
	}

	public void setName(String name) {
		this.name = name;
	}

	public SerializableObject getObject() {
		return object;
	}

	public void setObject(SerializableObject object) {
		this.object = object;
	}


}

//定义一个类,为了演示深浅复制
class SerializableObject implements Serializable {
	private static final long serialVersionUID = 1L;
}
测试:
package prototype;

public class PrototypeDemo {

	public static void main(String[] args) throws Exception{
		// 创建原对象
		Prototype prototype = new Prototype();
		prototype.setName("zhangsan");
		prototype.setObject(new SerializableObject());

		System.out.println("克隆之前的对象:"+prototype.getName());
		System.out.println("克隆之前的对象:"+prototype.getObject());
		// 浅复制出来的对象
		Prototype clone = (Prototype) prototype.shallowClone();
		System.out.println("浅复制出来的对象:"+clone.getName());
		System.out.println("浅复制出来的对象:"+clone.getObject());

		// 深复制出来的对象
		Prototype deepClone = (Prototype) prototype.deepClone();
		System.out.println("深复制出来的对象:"+deepClone.getName());
		System.out.println("深复制出来的对象:"+deepClone.getObject());
	}
}

1.2构建者模式
作用:
可以根据客户需要,去帮我们创建指定的对象。
方式一:
Student stu = new Student (1, “zhangsan”) ;
第一种方式创建的对象:比较死板,只能根据构造方法的参数去设计创建对象。
比如说Student 的构造参数有10个,这10个参数都是配置到配置文件中的,而且都不是必须项,我想获取几个参数,就根据这几个参数去创建我们的对象。每次使用比较累
方式二:
Student stu = new Student();
stu.setId(1);
stu.setName(“zhangsan”);
使用第二种去创建对象,需要等待初始化完成才能正常使用。
构建者模式的玩法:
Student.id(1).name(“lisi”).age(20).build();
先私人订制,然后在创建对象。
构建者模式的角色:
导演类
构建者
产品
package build.builder;

import build.product.Father;
import build.product.Student;

// 构建器
public class StudentBuilder {

	// 需要构建的对象
	private Student student = new Student();

	public StudentBuilder id(int id) {
		student.setId(id);
		return this;
	}

	public StudentBuilder name(String name) {
		student.setName(name);
		return this;
	}

	public StudentBuilder age(int age) {
		student.setAge(age);
		return this;
	}

	public StudentBuilder father(String fatherName) {
		Father father = new Father();
		father.setName(fatherName);
		student.setFather(father);
		return this;
	}

	// 构建对象
	public Student build() {
		return student;
	}
}
package build.director;

import build.builder.StudentBuilder;
import build.product.Student;

// 导演类/测试类
public class BuildDemo {

	public static void main(String[] args) {

		StudentBuilder builder = new StudentBuilder();
		// 决定如何创建一个Student
		Student student = builder.age(1).name("zhangsan").father("zhaosi").build();

		//builder.build(xxxxxxxx).build();
		System.out.println(student);

	}
}


 1200
1200


 被折叠的 条评论
为什么被折叠?
被折叠的 条评论
为什么被折叠?
 到【灌水乐园】发言


