


一.效果图

二.代码实现
<!DOCTYPE html>
<html lang="en">
<head>
    <meta charset="UTF-8">
    <meta http-equiv="X-UA-Compatible" content="IE=edge">
    <meta name="viewport" content="width=device-width, initial-scale=1.0">
    <title>Document</title>
    <style>
        * {
            padding: 0;
            margin: 0;
        }
        form {
            background: #9BA61D;
            padding: 0 15px;
            margin: 20px auto;
            width: 350px;
            border-radius: 15px;
        }
        .step {
            font-size: 14px;
            font-weight: bold;
            margin: 10px 0;
        }
        .form_line {
            border-radius: 5px;
            border-color: #f0f5df;
            border-width: 2px;
            border-style: solid;
            padding: 3px;
            background-color: #cede95;
            font-size: 12px;
            padding-left: 10px;
        }
        .form_line span {
            display: inline-block;
            width: 110px;
        }
        .form_line input {
            background: white;
            border: none;
            height: 20px;
            border-radius: 3px;
            width: 180px;
            outline: none;
        }
        .form_line input[type=radio] {
            width: 25px;
            height: 12px;
        }
        .form_line textarea {
            width: 180px;
            height: 70px;
            vertical-align: top;
            border: none;
            border-radius: 3px;
            resize: none;
            outline: none;
        }
        input.submit-btn {
            border: none;
            background-color: #374313;
            color: white;
            display: block;
            width: 100px;
            padding: 5px 0;
            border-radius: 20px;
            margin: 10px auto 10px auto;
            cursor: pointer;
        }
    </style>
</head>
<body>
    <form action="">
        <section>
            <p class="step">第一步,详细信息</p>
            <p class="form_line">
                <span>姓名</span>
                <input type="text" placeholder="请输入姓名">
            </p>
            <p class="form_line">
                <span>电话</span>
                <input type="number" placeholder="123456789">
            </p>
            <p class="form_line">
                <span>主页</span>
                <input type="url">
            </p>
        </section>
        <section>
            <p class="step">第二步,收货地址</p>
            <p class="form_line">
                <span>详细地址</span>
                <textarea placeholder="随便"></textarea>
            </p>
            <p class="form_line">
                <span>邮编</span>
                <input type="text">
            </p>
        </section>
        <section>
            <p class="step">第三步,银行卡信息</p>
            <p class="form_line">
                <span>银行卡类型</span>
                <input type="radio" placeholder="">借记卡
                <input type="radio" placeholder="">信用卡
                <input type="radio" placeholder="">VISA卡
            </p>
            <p class="form_line">
                <span>卡号</span>
                <input type="text" placeholder="">
            </p>
            <p class="form_line">
                <span>密码</span>
                <input type="password" placeholder="">
            </p>
            <p class="form_line">
                <span>持卡人</span>
                <input type="text" placeholder="">
            </p>
        </section>
        <p>
            <input type="submit" class="submit-btn" value="提交">
        </p>
    </form>
</body>
</html>
三.标签以及属性解释
- 输入框类型
(1)单行文本输入框:<input type="text" placeholder="">是最为普通的输入框,用于输入各种文本字符串,是适用于单行文本输入。
(2)多行文本输入框:<input type="text" placeholder="">适用于多行文本输入。
(3)邮箱输入框:<input type="password" placeholder="">为密码输入框,输入的密码会自动掩盖内容为一串*号。
(4)邮箱输入框:<input type="email" id="" name="" placeholder="">为邮箱输入框,浏览器会自动辨别输入的内容是否符合邮箱格式,否则在提交的时候浏览器会提示错误。
(5)地址输入框:<input type="url" id="" name="" placeholder="">原理同上。
(6)数字输入框:<input type="number" id="" name="" placeholder="">只能填写数字,无法输入其他内容。
(7)按钮:一个是<input type="radio" placeholder="">这样的选中按钮,比如:
另一个是<input type="submit" class="submit-btn" value="提交">这样的提交按钮:

- 属性
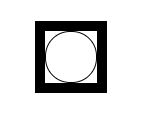
(1)border-radius:主要用来添加圆角边框,设置一个元素的圆角半径。比如:给一个元素设置border-radius: 15px的时候,就相当于在这个元素的角上,画了一个半径为15px的内切圆:

去掉直角留下圆角后,最终得到效果为:
 该智能表单中的按钮也是,通过添加圆角边框美化了样式。
(2)resize(表示重设大小): both(默认:随意调整大小) / none(不可调整) / vertical(仅垂直可调整) / horizontal(仅水平可调整)。适用于textarea可改变大小的多行文本输入框。
(3)cursor(表示光标): auto(默认:根据浏览器决定) / crosshair(十字线) / pointer(一只小手) / move(十字箭头)。适用于移动光标进入某个元素区间的效果样式。比如按钮:

(4)outline(表示轮廓): 设置为none时,就会去除选中文本框时轮廓的光圈(巨丑的那个),
去除前是这样的:

去除后:

(5)outline-offset(表示轮廓偏移原本的位置距离):
<!DOCTYPE html>
<html lang="en">
<head>
    <meta charset="UTF-8">
    <meta http-equiv="X-UA-Compatible" content="IE=edge">
    <meta name="viewport" content="width=device-width, initial-scale=1.0">
    <title>Document</title>
    <style>
        .box {
            width: 50px;
            height: 50px;
            margin: 50px;
            border: 1px solid black;
            border-radius: 25px;
            outline: 10px solid black;
            outline-offset: 0px;
        }
    </style>
</head>
<body>
    <div class="box"></div>
</body>
</html>
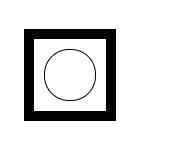
这里的outline: 10px solid black;是为元素的轮廓设置10px的实心黑色边框:
而outline-offset: 0px;则表示其偏移量,就是将这个轮廓样式以这个元素为基准,向四个方向扩展这个偏移量的距离。比如:
outline-offset: 10px;:(将轮廓样式向元素的四方扩展了10px的距离)
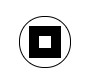
当outline-offset缩小为负数的时候,outline-offset: -20px;(将轮廓样式向元素的内部收缩)


 1096
1096


 被折叠的 条评论
为什么被折叠?
被折叠的 条评论
为什么被折叠?
 到【灌水乐园】发言


