


UI学习2之—UITextField / UIButton / 回收键盘delegate
UITextField
UITextField输⼊入框):是控制⽂本输⼊入和显⽰的控件。在App中UITextField出现频率也⽐比较⾼。
- 创建UITextField
创建UITextField与创建UILabel的步骤很相似。
1、开辟空间并初始化(如果本类有初始化方法,使用自己的;否则使用⽗类的)
2、设置⽂本显⽰、输⼊相关的属性
3、添加到⽗视图上,⽤以显⽰
4、释放
UITextField *userNameTextField = [[UITextField alloc]  initWithFrame:CGRectMake(100,100, 190, 30)];
userNameTextField.borderStyle= UITextBorderStyleRoundedRect;
userNameTextField.placeholder= @"手机号/邮箱";
[containerView  addSubview:userNameTextField];
[userNameTextField release];
文本显示
控制输入
外观控制
- 代码示例
UITextField * userNameTF = [[UITextField alloc]initWithFrame:CGRectMake(100, 100, 200, 40)];
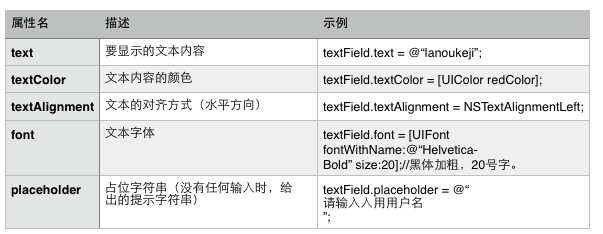
// 文本显示相关属性
userNameTF.placeholder = @"请输入用户名/邮箱"; // 文本输入提示
userNameTF.textColor = [UIColor redColor]; // 文本颜色
userNameTF.text = @"1232342335";
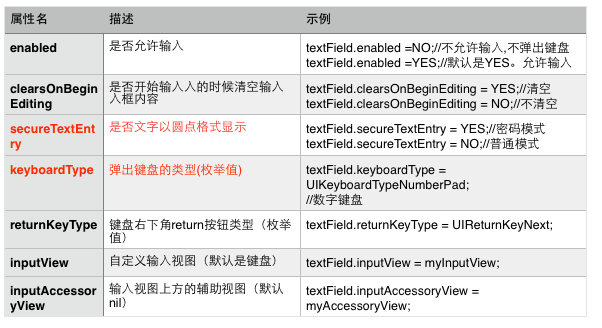
// 文本输入控制的相关属性
userNameTF.enabled = YES; // 设置是否输入文本
userNameTF.keyboardType = UIKeyboardTypeEmailAddress; //设置键盘类型
userNameTF.keyboardAppearance = UIKeyboardAppearanceDark; //设置键盘外观
//userNameTF.returnKeyType = UIReturnKeySearch; // 设置return的类型
userNameTF.clearButtonMode = UITextFieldViewModeUnlessEditing; //设置清空按钮什么时候显示
// userNameTF.secureTextEntry = YES; // 是否以密文的形式显示
// 设置自定义键盘
UIView * inputView = [[UIView alloc]initWithFrame:CGRectMake(0, 0, 40, 400)];
inputView.backgroundColor = [UIColor purpleColor];
userNameTF.inputView = inputView; // 自定义键盘
// 键盘辅助视图
UIView * accessanyView = [[UIView alloc]initWithFrame:CGRectMake(0, 0, 40, 40)];
accessanyView.backgroundColor = [UIColor redColor];
userNameTF.inputAccessoryView = accessanyView;
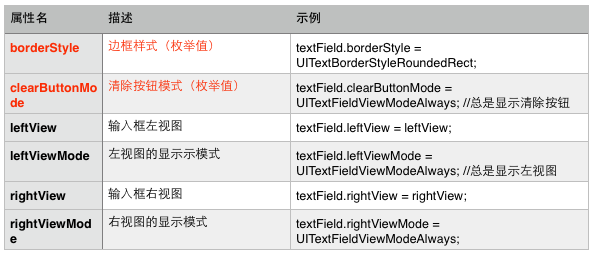
// 设置文本输入框相关样式
userNameTF.borderStyle = UITextBorderStyleRoundedRect; // 边框样式
// 设置输入框的左视图 leftView
UIView *leftView = [[UIView alloc]initWithFrame:CGRectMake(0, 0, 40 , 40)];
leftView.backgroundColor = [UIColor purpleColor];
userNameTF.leftView = leftView;
userNameTF.leftViewMode = UITextFieldViewModeAlways;
UIButton
UIButton(按钮):是响应⽤用户点击的控件。在App中UIButton是出现频率很高的控件。
- 创建UIButton
创建UIButton与创建UILabel的步骤很相似。
1、开辟空间并初始化(如果本类有初始化方法,使用自己的;否则使用⽗类的)
2、设置按钮相关的属性
3、为按钮添加点击事件
4、添加到⽗视图上,⽤以显⽰
5、按钮无需释放(因为使用类方法创建的)
- 代码示例
UIButton *loginButton = [UIButton buttonWithType:UIButtonTypeSystem];
loginButton.frame = CGRectMake(30, 200, 60, 30);
[loginButton setTitle:@"登录"forState:UIControlStateNormal];
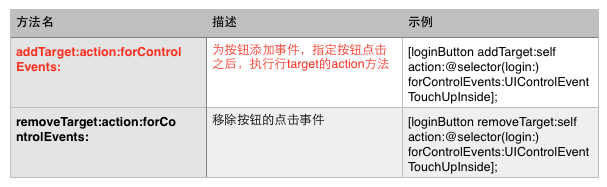
[loginButton addTarget:selfaction:@selector(login:) forControlEvents:UIControlEventTouchUpInside];
[containerView addSubview:loginButton];- UIButton监听事件
UIButton从父类UIControl那继承了控制相关的⽅方法,比如添加事件、移除事件等。
注:UIButton : UIControl : UIView
- 代码示例
 // 点击loginButton触发的方法
- (void)login:(UIButton *)button
{
    // 1. 将loginButton设为不可用
    button.enabled = NO;

    // 2. 将loginButton的标题设置为"登录中..."
    [button setTitle:@"登录中..." forState:UIControlStateNormal];
}
- 外观控制
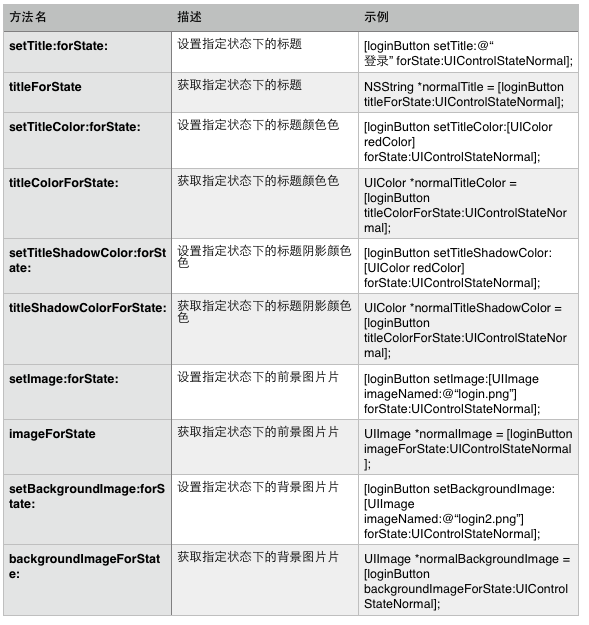
- 代码示例
 UIButton * loginButton = [UIButton  buttonWithType:UIButtonTypeCustom];
    loginButton.frame = CGRectMake(100 , 100, 32, 32);

    loginButton.backgroundColor = [UIColor whiteColor];

    // 设置按钮是否高亮
    loginButton.highlighted = YES;
    // 设置按钮是否可用
    loginButton.enabled = NO;
    // 设置按钮是否选中
    loginButton.selected = YES;

    // 给button添加标题
    [loginButton setTitle:@"" forState:UIControlStateSelected];

    // 给button添加点击事件
    [loginButton addTarget:self action:@selector(login:) forControlEvents:UIControlEventTouchUpInside];
    // 设置背景图片
[loginButton setImage:[UIImage imageNamed:@"sign.png"] forState:UIControlStateNormal];- 总结
UIView是所有可视化控件的基类。
UILabel、UITextField、UIButton是具有特定外观特定功能的视图。
UILabel侧重于⽂文本的呈现。
UITextField侧重于输入。
UIButton侧重于点击事件处理。
delegate
复习设置代理的步骤:
一.首先,要分清楚:
委托是谁?
代理是谁?
委托需要代理做哪些事情?
二.其次:
①.声明协议 ——————(委托需要代理完成的事情的声明)
②.代理对象所属的类遵守协议.
③.设置代理
④.在刚刚遵守协议的类的.m文件中实现协议中的方法
注意:实例变量_delegate是属于委托这个类的.因为委托才拥有代理
设置代理点击键盘return按钮实现键盘回收
1、将AppDelete作为UITextField的delegate
2、AppDelete.h文件接受UITextFieldDelegate协议
3、AppDelete.m文件实现textFieldShouldReturn:方法
代码:
AppDelegate.m
- (BOOL)textFieldShouldReturn:(UITextField*)textField
{
    [textField resignFirstResponder];
    return YES;
}
这是UI学习第二天的笔记,自己也是刚学,希望大家多多帮助,有错误我会及时改正!


 2720
2720


 被折叠的 条评论
为什么被折叠?
被折叠的 条评论
为什么被折叠?
 到【灌水乐园】发言


