


Android游戏开发之使用AnimationDrable实现Frame动画
雨松MOMO原创文章如转载,请注明:转载自雨松MOMO的博客原文地址:http://blog.csdn.net/xys289187120/article/details/6746455
Android开发中在制作2D帧动画中提供了使用XML配置动画文件的方式绘制,也就是说Android底层提供了动画播放的接口,那么我们分析一下如何调用它的接口来绘制动画。首先在工程res资源文件夹下创建anim动画文件夹,在这个文件夹中建立一个animation.xml文件, 这样它的路径就为re/anim/animation.xml。
看看内容应该是很好理解的,<animation-list>为动画的总标签,这里面放着帧动画 <item>标签,也就是说若干<item>标签的帧 组合在一起就是帧动画了。<animation-list > 标签中android:oneshot="false" 这是一个非常重要的属性,默认为false 表示 动画循环播放, 如果这里写true 则表示动画只播发一次。 <item>标签中记录着每一帧的信息android:drawable="@drawable/a"表示这一帧用的图片为"a",下面以此类推。 android:duration="100" 表示这一帧持续100毫秒,可以根据这个值来调节动画播放的速度。
<animation-list xmlns:android="http://schemas.android.com/apk/res/android" android:oneshot="false"> <item android:drawable="@drawable/a" android:duration="100" /> <item android:drawable="@drawable/b" android:duration="100" /> <item android:drawable="@drawable/c" android:duration="100" /> <item android:drawable="@drawable/d" android:duration="100" /> <item android:drawable="@drawable/e" android:duration="100" /> <item android:drawable="@drawable/f" android:duration="100" /> <item android:drawable="@drawable/g" android:duration="100" /> <item android:drawable="@drawable/h" android:duration="100" /> <item android:drawable="@drawable/i" android:duration="100" /> <item android:drawable="@drawable/j" android:duration="100" /> </animation-list>
下面这个例子的内容为 播放动画 与关闭动画 、设置播放类型 单次还是循环、拖动进度条修改动画的透明度,废话不多说直接进正题~~
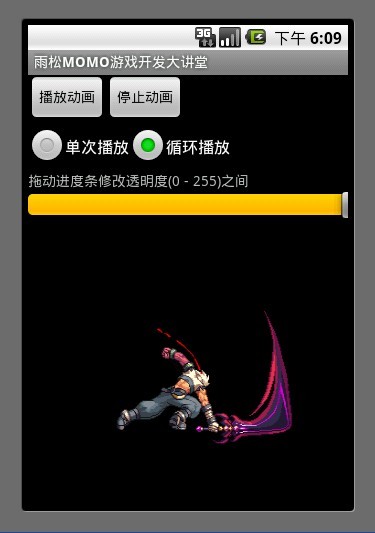
<?xml version="1.0" encoding="utf-8"?> <LinearLayout xmlns:android="http://schemas.android.com/apk/res/android" android:orientation="vertical" android:layout_width="fill_parent" android:layout_height="fill_parent" > <LinearLayout android:orientation="horizontal" android:layout_width="wrap_content" android:layout_height="wrap_content" > <Button android:id="@+id/button0" android:layout_width="wrap_content" android:layout_height="wrap_content" android:text="播放动画" /> <Button android:id="@+id/button1" android:layout_width="wrap_content" android:layout_height="wrap_content" android:text="停止动画" /> </LinearLayout> <RadioGroup android:id="@+id/radiogroup" android:layout_width="wrap_content" android:layout_height="wrap_content" android:orientation="horizontal"> <RadioButton android:id="@+id/checkbox0" android:layout_width="wrap_content" android:layout_height="wrap_content" android:checked="true" android:text="单次播放" /> <RadioButton android:id="@+id/checkbox1" android:layout_width="wrap_content" android:layout_height="wrap_content" android:text="循环播放" /> </RadioGroup> <TextView android:layout_width="wrap_content" android:layout_height="wrap_content" android:text="拖动进度条修改透明度(0 - 255)之间" /> <SeekBar android:id="@+id/seekBar" android:layout_width="fill_parent" android:layout_height="wrap_content" android:max="256" android:progress="256"/> <ImageView android:id="@+id/imageView" android:background="@anim/animation" android:layout_width="wrap_content" android:layout_height="wrap_content" /> </LinearLayout>
这是一个比较简单的布局文件,应该都能看懂吧。 我主要说一下 最后的这个 ImageView, 它就是用来显示我们的动画。 这里使用android:background="@anim/animation"设置这个ImageView现实的背景为一个动画,动画资源的路径为res/anim/animation.xml ,当然 设置background同样也可以在代码中设置。
imageView.setBackgroundResource(R.anim.animation);
通过getBackground方法就可以拿到这个animationDrawable对象。
/**拿到ImageView对象**/ imageView = (ImageView)findViewById(R.id.imageView); /**通过ImageView对象拿到背景显示的AnimationDrawable**/ animationDrawable = (AnimationDrawable) imageView.getBackground();
AnimationDrawable 就是用来控制这个帧动画,这个类中提供了很多方法。
animationDrawable.start(); 开始这个动画
animationDrawable.stop(); 结束这个动画
animationDrawable.setAlpha(100);设置动画的透明度, 取值范围(0 - 255)
animationDrawable.setOneShot(true); 设置单次播放
animationDrawable.setOneShot(false); 设置循环播放
animationDrawable.isRunning(); 判断动画是否正在播放
animationDrawable.getNumberOfFrames(); 得到动画的帧数。
将这个例子的完整代码贴上
import android.app.Activity; import android.graphics.drawable.AnimationDrawable; import android.os.Bundle; import android.util.Log; import android.view.View; import android.view.View.OnClickListener; import android.widget.Button; import android.widget.ImageView; import android.widget.RadioButton; import android.widget.RadioGroup; import android.widget.SeekBar; import android.widget.SeekBar.OnSeekBarChangeListener; public class SimpleActivity extends Activity { /**播放动画按钮**/ Button button0 = null; /**停止动画按钮**/ Button button1 = null; /**设置动画循环选择框**/ RadioButton radioButton0= null; RadioButton radioButton1= null; RadioGroup radioGroup = null; /**拖动图片修改Alpha值**/ SeekBar seekbar = null; /**绘制动画View**/ ImageView imageView = null; /**绘制动画对象**/ AnimationDrawable animationDrawable = null; @Override public void onCreate(Bundle savedInstanceState) { super.onCreate(savedInstanceState); setContentView(R.layout.simple); /**拿到ImageView对象**/ imageView = (ImageView)findViewById(R.id.imageView); /**通过ImageView对象拿到背景显示的AnimationDrawable**/ animationDrawable = (AnimationDrawable) imageView.getBackground(); /**开始播放动画**/ button0 = (Button)findViewById(R.id.button0); button0.setOnClickListener(new OnClickListener() { @Override public void onClick(View arg0) { /**播放动画**/ if(!animationDrawable.isRunning()) { animationDrawable.start(); } } }); /**停止播放动画**/ button1 = (Button)findViewById(R.id.button1); button1.setOnClickListener(new OnClickListener() { @Override public void onClick(View arg0) { /**停止动画**/ if(animationDrawable.isRunning()) { animationDrawable.stop(); } } }); /**单次播放**/ radioButton0 = (RadioButton)findViewById(R.id.checkbox0); /**循环播放**/ radioButton1 = (RadioButton)findViewById(R.id.checkbox1); /**单选列表组**/ radioGroup = (RadioGroup)findViewById(R.id.radiogroup); radioGroup.setOnCheckedChangeListener(new RadioGroup.OnCheckedChangeListener() { @Override public void onCheckedChanged(RadioGroup radioGroup, int checkID) { if(checkID == radioButton0.getId()) { //设置单次播放 animationDrawable.setOneShot(true); }else if (checkID == radioButton1.getId()) { //设置循环播放 animationDrawable.setOneShot(false); } //发生改变后让动画重新播放 animationDrawable.stop(); animationDrawable.start(); } }); /**监听的进度条修改透明度**/ seekbar = (SeekBar)findViewById(R.id.seekBar); seekbar.setOnSeekBarChangeListener(new OnSeekBarChangeListener() { @Override public void onStopTrackingTouch(SeekBar seekBar) { } @Override public void onStartTrackingTouch(SeekBar seekBar) { } @Override public void onProgressChanged(SeekBar seekBar, int progress, boolean frameTouch) { /**设置动画Alpha值**/ animationDrawable.setAlpha(progress); /**通知imageView 刷新屏幕**/ imageView.postInvalidate(); } }); } }
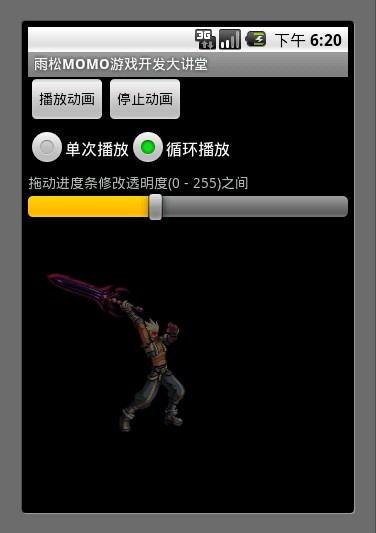
拖动进度条设置Alpha值的时候 一定要使用 imageView.postInvalidate(); 方法来通知UI线程重绘屏幕中的imageView 否则会看不到透明的效果 。这里切记切记~~
今天周末了,忙碌了一周终于可以休息休息了。最近经朋友介绍MOMO也玩起了新浪微博 哇咔咔~~,我的微薄地址在左侧的个人说明中 , 希望大家都可以来关注我喔。
总的来说这章内容还是比较简单的。老规矩每篇文章都会附带源代码,最后如果你还是觉得我写的不够详细 看的不够爽 不要紧我把源代码的下载地址贴出来 欢迎大家一起讨论学习雨松MOMO希望可以和大家一起进步。
下载地址:http://download.csdn.net/source/3573219
这是一个比较简单的布局文件,应该都能看懂吧。 我主要说一下 最后的这个 ImageView, 它就是用来显示我们的动画。 这里使用android:background="@anim/animation"设置这个ImageView现实的背景为一个动画,动画资源的路径为res/anim/animation.xml ,当然 设置background同样也可以在代码中设置。
imageView.setBackgroundResource(R.anim.animation);
通过getBackground方法就可以拿到这个animationDrawable对象。
/**拿到ImageView对象**/ imageView = (ImageView)findViewById(R.id.imageView); /**通过ImageView对象拿到背景显示的AnimationDrawable**/ animationDrawable = (AnimationDrawable) imageView.getBackground();
AnimationDrawable 就是用来控制这个帧动画,这个类中提供了很多方法。
animationDrawable.start(); 开始这个动画
animationDrawable.stop(); 结束这个动画
animationDrawable.setAlpha(100);设置动画的透明度, 取值范围(0 - 255)
animationDrawable.setOneShot(true); 设置单次播放
animationDrawable.setOneShot(false); 设置循环播放
animationDrawable.isRunning(); 判断动画是否正在播放
animationDrawable.getNumberOfFrames(); 得到动画的帧数。
将这个例子的完整代码贴上
import android.app.Activity; import android.graphics.drawable.AnimationDrawable; import android.os.Bundle; import android.util.Log; import android.view.View; import android.view.View.OnClickListener; import android.widget.Button; import android.widget.ImageView; import android.widget.RadioButton; import android.widget.RadioGroup; import android.widget.SeekBar; import android.widget.SeekBar.OnSeekBarChangeListener; public class SimpleActivity extends Activity { /**播放动画按钮**/ Button button0 = null; /**停止动画按钮**/ Button button1 = null; /**设置动画循环选择框**/ RadioButton radioButton0= null; RadioButton radioButton1= null; RadioGroup radioGroup = null; /**拖动图片修改Alpha值**/ SeekBar seekbar = null; /**绘制动画View**/ ImageView imageView = null; /**绘制动画对象**/ AnimationDrawable animationDrawable = null; @Override public void onCreate(Bundle savedInstanceState) { super.onCreate(savedInstanceState); setContentView(R.layout.simple); /**拿到ImageView对象**/ imageView = (ImageView)findViewById(R.id.imageView); /**通过ImageView对象拿到背景显示的AnimationDrawable**/ animationDrawable = (AnimationDrawable) imageView.getBackground(); /**开始播放动画**/ button0 = (Button)findViewById(R.id.button0); button0.setOnClickListener(new OnClickListener() { @Override public void onClick(View arg0) { /**播放动画**/ if(!animationDrawable.isRunning()) { animationDrawable.start(); } } }); /**停止播放动画**/ button1 = (Button)findViewById(R.id.button1); button1.setOnClickListener(new OnClickListener() { @Override public void onClick(View arg0) { /**停止动画**/ if(animationDrawable.isRunning()) { animationDrawable.stop(); } } }); /**单次播放**/ radioButton0 = (RadioButton)findViewById(R.id.checkbox0); /**循环播放**/ radioButton1 = (RadioButton)findViewById(R.id.checkbox1); /**单选列表组**/ radioGroup = (RadioGroup)findViewById(R.id.radiogroup); radioGroup.setOnCheckedChangeListener(new RadioGroup.OnCheckedChangeListener() { @Override public void onCheckedChanged(RadioGroup radioGroup, int checkID) { if(checkID == radioButton0.getId()) { //设置单次播放 animationDrawable.setOneShot(true); }else if (checkID == radioButton1.getId()) { //设置循环播放 animationDrawable.setOneShot(false); } //发生改变后让动画重新播放 animationDrawable.stop(); animationDrawable.start(); } }); /**监听的进度条修改透明度**/ seekbar = (SeekBar)findViewById(R.id.seekBar); seekbar.setOnSeekBarChangeListener(new OnSeekBarChangeListener() { @Override public void onStopTrackingTouch(SeekBar seekBar) { } @Override public void onStartTrackingTouch(SeekBar seekBar) { } @Override public void onProgressChanged(SeekBar seekBar, int progress, boolean frameTouch) { /**设置动画Alpha值**/ animationDrawable.setAlpha(progress); /**通知imageView 刷新屏幕**/ imageView.postInvalidate(); } }); } }
拖动进度条设置Alpha值的时候 一定要使用 imageView.postInvalidate(); 方法来通知UI线程重绘屏幕中的imageView 否则会看不到透明的效果 。这里切记切记~~
今天周末了,忙碌了一周终于可以休息休息了。最近经朋友介绍MOMO也玩起了新浪微博 哇咔咔~~,我的微薄地址在左侧的个人说明中 , 希望大家都可以来关注我喔。
总的来说这章内容还是比较简单的。老规矩每篇文章都会附带源代码,最后如果你还是觉得我写的不够详细 看的不够爽 不要紧我把源代码的下载地址贴出来 欢迎大家一起讨论学习雨松MOMO希望可以和大家一起进步。
下载地址:http://download.csdn.net/source/3573219


 2630
2630

 被折叠的 条评论
为什么被折叠?
被折叠的 条评论
为什么被折叠?
 到【灌水乐园】发言


