


(残梦追月原创,转载请注明)
本文地址:http://www.blogjava.net/cmzy/archive/2008/08/17/222624.html
我们一直使用ProxyFactoryBean来显式的创建AOP代理。但是在很多场合,这种方式将会使编写配置文件的工作量大大增加;由于要从 ProxyFactoryBean获得代理对象,也会使应用和Spring之间的耦合度增加。下面介绍使用Spring提供的自动代理机制来解决这类问 题。
1、使用 BeanNameAutoProxyCreator
Spring提供的BeanNameAutoProxyCreator类允许我们通过Bean的name属性来指定代理的Bean。它暴露了 java.lang.String[]类型的beanNames和 interceptorNames属性。beanNames可以指定被代理的Bean名字列表,支持“*”通配符,例如“*DAO”表示所有名字以 “DAO”结尾的Bean。interceptorNames指定通知(Advice)列表,或者通知者(Advisor)列表。
下面通过一个例程来演示如何使用BeanNameAutoProxyCreator。在例子中,有两个Bean:TestBeanA和BeanB,并在 TestMain类中的main方法中调用其MyMethod()方法。自动代理将会在方法调用前自动的执行配置的前置通知,输出提示信息。
新建一个名字为AOP_Test4.10的工程,添加Spring的IoC和AOP库后,新建一aop.test包,再分别创建两个类TestBeanA和BeanB,添加MyMethod()方法,代码如下:
- /**
- *
- */
- package aop.test;
- /**
- * @author zhangyong
- *
- */
- public class TestBeanA {
- public void MyMethod() {
- System.out.println(this .getClass().getName()
- + ".MyMethod() is run!" );
- }
- }
- /**
- *
- */
- package aop.test;
- /**
- * @author zhangyong
- *
- */
- public class BeanB {
- public void MyMethod() {
- System.out.println(this .getClass().getName()
- + ".MyMethod() is run!" );
- }
- }
再创建前置通知类BeforeAdvice:
- /**
- *
- */
- package aop.test;
- import java.lang.reflect.Method;
- import org.springframework.aop.MethodBeforeAdvice;
- /**
- * @author zhangyong
- *
- */
- public class BeforeAdvice implements MethodBeforeAdvice {
- public void before(Method method, Object[] args, Object target)
- throws Throwable {
- System.out.println(method.getName() + "(),将要运行!" );
- }
- }
最后创建含有main方法的测试类TestMain:
- /**
- *
- */
- package aop.test;
- import org.springframework.context.ApplicationContext;
- import org.springframework.context.support.ClassPathXmlApplicationContext;
- /**
- * @author zhangyong
- *
- */
- public class TestMain {
- public static void main(String[] args) {
- ApplicationContext ac = new ClassPathXmlApplicationContext(
- "applicationContext.xml" );
- TestBeanA beanA = (TestBeanA)ac.getBean("TestBeanA" );
- beanA.MyMethod();
- BeanB beanB = (BeanB)ac.getBean("BeanB" );
- beanB.MyMethod();
- }
- }
在配置文件中配置Bean和自动代理Bean,完成后代码如下:
- <? xml version = "1.0" encoding = "UTF-8" ?>
- < beans ………… >
- < bean id = "TestBeanA" class = "aop.test.TestBeanA" />
- < bean id = "BeanB" class = "aop.test.BeanB" />
- < bean id = "BeforeAdvice" class = "aop.test.BeforeAdvice" > </ bean >
- < bean class ="org.springframework.aop.framework.autoproxy.
- BeanNameAutoProxyCreator">
- < property name = "beanNames" >
- < list >
- < value > Test* </ value >
- </ list >
- </ property >
- < property name = "interceptorNames" >
- < list >
- < value > BeforeAdvice </ value >
- </ list >
- </ property >
- </ bean >
- </ beans >
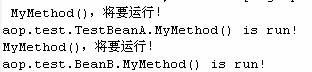
运行主类,输出结果如下:

可以看到,在主类TestMain中,我们是直接从Spring IoC容器中获取收管Bean而不是像以前那样从ProxyFactoryBean中获取代理,但是我们的前置通知BeforeAdvice仍然在 TestBeanA对象的MyMethod()方法执行前被触发,这说明我们的自动代理正在工作。
2、使用 DefaultAdvisorAutoProxyCreator
DefaultAdvisorAutoProxyCreator允许我们只需定义相应的Advisor通知者,就可以完成自动代理。配 置好DefaultAdvisorAutoProxyCreator受管Bean后,它会自动查找配置文件中定义的Advisor,并将它们作用于所有的 Bean。
修改例程4.10的配置文件,使用DefaultAdvisorAutoProxyCreator来完成自动代理。完成后配置文件代码如下(本例完整工程代码见例程4.11):
- <? xml version = "1.0" encoding = "UTF-8" ?>
- < beans …… >
- < bean id = "TestBeanA" class = "aop.test.TestBeanA" />
- < bean id = "BeanB" class = "aop.test.BeanB" />
- < bean id = "BeforeAdvice" class = "aop.test.BeforeAdvice" />
- < bean class ="org.springframework.aop.framework.autoproxy.
- DefaultAdvisorAutoProxyCreator" />
- < bean class ="org.springframework.aop.support.NameMatchMethod
- PointcutAdvisor">
- < property name = "advice" ref = "BeforeAdvice" />
- < property name = "mappedNames" >
- < list >
- < value > *Method* </ value >
- </ list >
- </ property >
- </ bean >
- </ beans >
运行主类输出结果如下:
By:残梦追月


 365
365


 被折叠的 条评论
为什么被折叠?
被折叠的 条评论
为什么被折叠?
 到【灌水乐园】发言


