


Book Description
Core Animation is the technology underlying Apple’s iOS user interface. By unleashing the full power of Core Animation, you can enhance your app with impressive 2D and 3D visual effects and create exciting and unique new interfaces.
In this in-depth guide, iOS developer Nick Lockwood takes you step-by-step through the Core Animation framework, building up your understanding through sample code and diagrams together with comprehensive explanations and helpful tips. Lockwood demystifies the Core Animation APIs, and teaches you how to make use of-
Layers and views, software drawing and hardware compositing
-
Layer geometry, hit testing and clipping
-
Layer effects, transforms and 3D interfaces
-
Video playback, text, tiled images, OpenGL, particles and reflections
-
Implicit and explicit animations
-
Property animations, keyframes and transitions
-
Easing, frame-by-frame animation and physics
-
Performance tuning and much, much more!
Approximately 356 pages.
Table of Contents
Part I: The Layer Beneath
Chapter 1. The Layer Tree
Chapter 2. The Backing Image
Chapter 3. Layer Geometry
Chapter 4. Visual Effects
Chapter 5. Transforms
Chapter 6. Specialized Layers
Part II: Setting Things in Motion
Chapter 7. Implicit Animations
Chapter 8. Explicit Animations
Chapter 9. Layer Time
Chapter 10. Easing
Chapter 11. Timer-Based Animation
Part III: The Performance of a Lifetime
Chapter 12. Tuning for Speed
Chapter 13. Efficient Drawing
Chapter 14. Image IO
Chapter 15. Layer Performance
这本书网上很多很好找,这里就不提供下载了
源码在这里下载:http://www.informit.com/title/9780133440751
正文开始
我个人看书是不看全部的,只挑一些自己感兴趣的部分看,所以不要打算从我的笔记中了解本书的全部内容。
第一章:The Layer Tree
这章只是区分一下CALayer和UIView,引用"The CALayer class is conceptually very similar to UIView. Layers, like views, are rectangular objects that can be arranged into a hierarchical tree. Like views, they can contain content (such as an image, text, or a background color) and manage the position of their children (sublayers). They have methods and properties for performing animations and transforms. The only major feature of UIView that isn’t handled by CALayer is user interaction."所以,可以简单地认为CALayer就是没有用户交互的UIView。
另外,还有一句话需要注意的,
A view has only one backing layer (created automatically) but can host an unlimited number of additional layers.
大家去体会一下
第二章:The Backing Image
@implementation ViewController

- (void)viewDidLoad
{
    [super viewDidLoad];

    //load an image
    UIImage *image = [UIImage imageNamed:@"Snowman.png"];

    //add it directly to our view's layer
    self.layerView.layer.contents = (__bridge id)image.CGImage;
}

@end
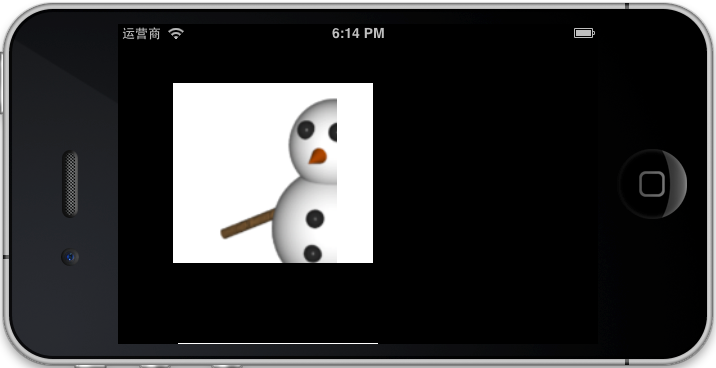
看到layer可以直接显示image,图片的显示模式对应UIView的contentMode为contentsGravity,它是个字符串对应如下:
kCAGravityCenter
kCAGravityTop
kCAGravityBottom
kCAGravityLeft
kCAGravityRight
kCAGravityTopLeft
kCAGravityTopRight
kCAGravityBottomLeft
kCAGravityBottomRight
kCAGravityResize
kCAGravityResizeAspect
kCAGravityResizeAspectFill
@implementation ViewController

- (void)viewDidLoad
{
    [super viewDidLoad];

    //load an image
    UIImage *image = [UIImage imageNamed:@"Snowman.png"];

    //add it directly to our view's layer
    self.layerView.layer.contents = (__bridge id)image.CGImage;

    //center the image
    self.layerView.layer.contentsGravity = kCAGravityCenter;
}

@end
@implementation ViewController

- (void)viewDidLoad
{
    [super viewDidLoad];

    //load an image
    UIImage *image = [UIImage imageNamed:@"Snowman.png"];

    //add it directly to our view's layer
    self.layerView.layer.contents = (__bridge id)image.CGImage;

    //center the image
    self.layerView.layer.contentsGravity = kCAGravityCenter;

    //set the contentsScale to match image
    self.layerView.layer.contentsScale = image.scale;
}

@end
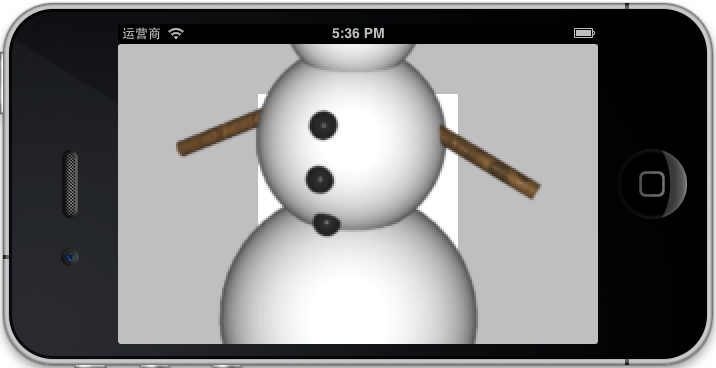
layer也有对应UIView的clipsToBounds的函数masksToBounds
代码修改如下
@implementation ViewController

- (void)viewDidLoad
{
    [super viewDidLoad];

    //load an image
    UIImage *image = [UIImage imageNamed:@"Snowman.png"];

    //add it directly to our view's layer
    self.layerView.layer.contents = (__bridge id)image.CGImage;

    //center the image
    self.layerView.layer.contentsGravity = kCAGravityCenter;

    //set the contentsScale to match screen
    self.layerView.layer.contentsScale = image.scale;

    //clip the snowman to fit his bounds
    self.layerView.layer.masksToBounds = YES;
}

@end
再看结果:

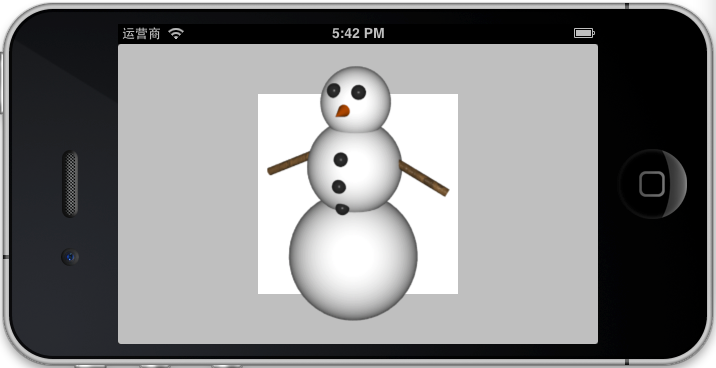
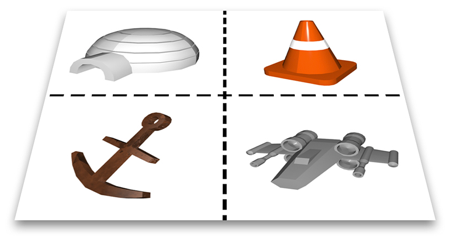
以上太基础了,后面的相对复杂和有意思些,相对于UIView拉伸效果contentStretch相同的Layer的contentsCenter,
这个函数可不是设置中心坐标的,它是个Rect。
具体效果参看:http://blog.csdn.net/iunion/article/details/25417005
我做了个简单效果,如下:
#import "ViewController.h"

@interface ViewController ()
{
    NSInteger tick;
}

@end


@implementation ViewController

- (id)initWithNibName:(NSString *)nibNameOrNil bundle:(NSBundle *)nibBundleOrNil
{
    self = [super initWithNibName:nibNameOrNil bundle:nibBundleOrNil];
    if (self) {
        // Custom initialization
    }
    return self;
}

- (void)addStretchableImage:(UIImage *)image
          withContentCenter:(CGRect)rect
                    toLayer:(CALayer *)layer
{
    //set image
    layer.contents = (__bridge id)image.CGImage;

    //set contentsCenter
    layer.contentsCenter = rect;
}

- (void)viewDidLoad
{
    [super viewDidLoad];
    // Do any additional setup after loading the view from its nib.
    //self.view.backgroundColor = [UIColor blackColor];

    UIImage *image = [UIImage imageNamed:@"Snowman"];

    self.layerView.layer.contents = (__bridge id)(image.CGImage);
    //self.layerView.layer.contentsGravity = kCAGravityResizeAspect;//kCAGravityResizeAspectFill;
    //self.layerView.layer.masksToBounds = YES;
    //self.layerView.layer.contentsScale = image.scale;
    //self.layerView.layer.contentsRect = CGRectMake(0, 0, 0.5, 0.5);
    //self.layerView.layer.contentsCenter = CGRectMake(0, 0.5, 1, 1);

    self.layerView1.layer.contents = (__bridge id)(image.CGImage);
    self.layerView1.layer.contentsGravity = kCAGravityResizeAspect;
    //self.layerView.layer.masksToBounds = YES;
    self.layerView1.layer.contentsScale = image.scale;//3;
    //self.layerView1.layer.contentsRect = CGRectMake(0, 0, 0.5, 0.5);

    tick = 0;

    [self performSelector:@selector(ChangeImage) withObject:nil afterDelay:0.25];
}

- (void)didReceiveMemoryWarning
{
    [super didReceiveMemoryWarning];
    // Dispose of any resources that can be recreated.
}

- (void)ChangeImage
{
    UIImage *image = [UIImage imageNamed:@"Snowman"];

    CGRect rect = CGRectMake(0, 0, 1, 1);

    if (tick > 5)
    {
        tick = 0;
    }

    switch (tick)
    {
        case 0:
            rect = CGRectMake(0, 0, 1, 0.75);
            break;

        case 1:
            rect = CGRectMake(0, 0, 1, 0.5);
            break;

        case 2:
            rect = CGRectMake(0, 0.25, 1, 0.5);
            break;

        case 3:
            rect = CGRectMake(0, 0.25, 1, 0.75);
            break;

        case 4:
            rect = CGRectMake(0, 0.5, 1, 1);
            break;

        case 5:
            rect = CGRectMake(0, 0.25, 1, 1);
            break;

        default:
            rect = CGRectMake(0, 0, 1, 1);
            break;
    }

    tick++;

    [self addStretchableImage:image withContentCenter:rect toLayer:self.layerView1.layer];

    [self performSelector:@selector(ChangeImage) withObject:nil afterDelay:0.1];
}

@end
顺带提一下IOS7的contentStretch更换为
-[UIImage resizableImageWithCapInsets:]
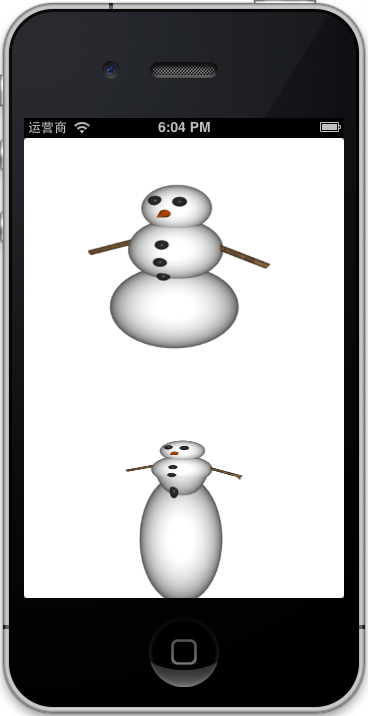
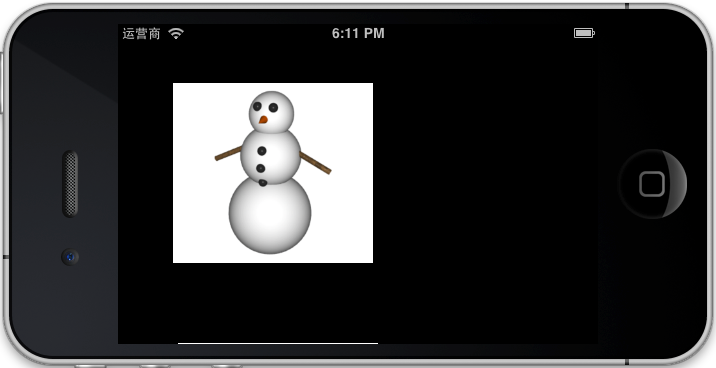
contentsRect这也是layer的一个重要属性,默认值是{0, 0, 1, 1}
- (void)viewDidLoad
{
    [super viewDidLoad];
    // Do any additional setup after loading the view from its nib.
    self.view.backgroundColor = [UIColor blackColor];

    UIImage *image = [UIImage imageNamed:@"Snowman"];

    self.layerView.layer.contents = (__bridge id)(image.CGImage);
    self.layerView.layer.contentsGravity = kCAGravityResizeAspect;//kCAGravityResizeAspectFill;
    //self.layerView.layer.masksToBounds = YES;
    self.layerView.layer.contentsScale = image.scale;
}
稍微修改一下:
- (void)viewDidLoad
{
    [super viewDidLoad];
    // Do any additional setup after loading the view from its nib.
    self.view.backgroundColor = [UIColor blackColor];

    UIImage *image = [UIImage imageNamed:@"Snowman"];

    self.layerView.layer.contents = (__bridge id)(image.CGImage);
    self.layerView.layer.contentsGravity = kCAGravityResizeAspect;//kCAGravityResizeAspectFill;
    //self.layerView.layer.masksToBounds = YES;
    self.layerView.layer.contentsScale = image.scale;
    self.layerView.layer.contentsRect = CGRectMake(0, 0, 0.5, 0.5);
}
大家可以看到增加了self.layerView.layer.contentsRect =CGRectMake(0,0,0.5,0.5);图片只剩下左上角了
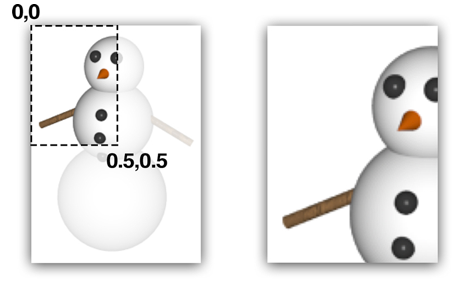
还有一个发现self.layerView.layer.contentsScale = image.scale;不起作用了还原为原图大小,这个问题以后是需要注意的
以上是不是想到了什么类似东西
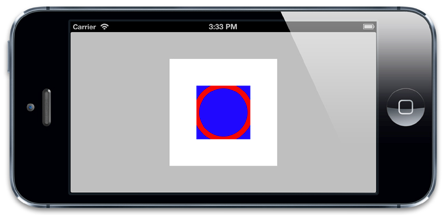
Custom Drawing 初涉基本Layer编程
代码我就不贴了,只是我简单的使用了一个CALayerDelegate
- (void)drawLayer:(CALayer *)layer inContext:(CGContextRef)ctx;
这个不需要在这里说了吧
- (void)drawLayer:(CALayer *)layer inContext:(CGContextRef)ctx
{
    //draw a thick red circle
    CGContextSetLineWidth(ctx, 10.0f);
    CGContextSetStrokeColorWithColor(ctx, [UIColor redColor].CGColor);
    CGContextStrokeEllipseInRect(ctx, layer.bounds);
}
以上所有例子(除了我自己YY的)均可在 http://www.informit.com/title/9780133440751 下载


 2万+
2万+


 被折叠的 条评论
为什么被折叠?
被折叠的 条评论
为什么被折叠?
 到【灌水乐园】发言


