


 本文是关于iOS Core Animation高级技术的学习笔记,重点探讨了Specialized Layers,包括kCAFillRuleEvenOdd规则、最大斜接长度控制、边角处理以及线型图案设置。还提到了CATextLayer相对于UILabel的性能优势和CAGradientLayer及CAReplicatorLayer的应用示例。
第六章:Specialized Layers
| 类别 |
用途 |
| CAEmitterLayer |
用于实现基于Core Animation粒子发射系统。发射器层对象控制粒子的生成和起源 |
| CAGradientLayer |
用于绘制一个颜色渐变填充图层的形状(所有圆角矩形边界内的部分) |
| CAEAGLLayer/CAOpenGLLayer |
用于设置需要使用OpenGL ES(iOS)或OpenGL(OS X)绘制的内容与内容储备。 |
| CAReplicatorLayer |
当你想自动生成一个或多个子层的拷贝。复制器为你生成拷贝并使用你指定的属性值以修改复制品的外观和属性。 |
| CAScrollLayer |
用于管理由多个子区域组成的大的可滚动区域 |
| CAShaperLayer |
用于绘制三次贝塞尔曲线。CAShaperLayer对绘制基于路径的形状非常有帮助。因为CAShaperLayer总是生成一个最新的路径。而如果将路径画在图层储备中,一旦图层被缩放,形状就变形了。 |
| CATextLayer |
用于渲染一个无格式或属性文本字符 |
| CATransformLayer |
用于渲染一个真3D的图层层级。而不是由其他图层类实现的2D图层层级。 |
| QCCompositionLayer |
用于渲染一个Quartz组件元素(仅在OS X中有效) |
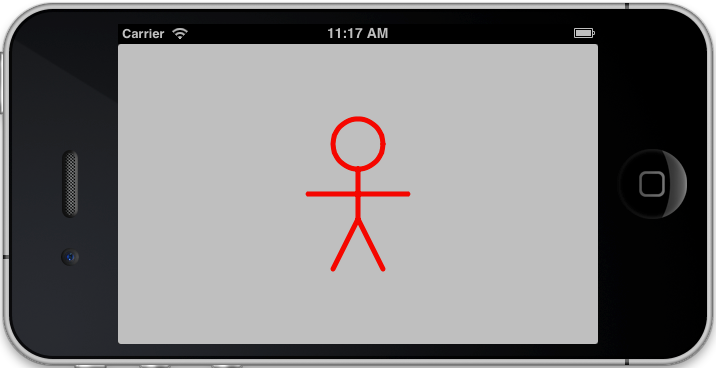
CAShapeLayer
使用CGPath绘制矢量图,UIBezierPath类可以创建基于矢量的路径,此类是Core Graphics框架关于path的一个封装。它可以定义简单的形状,如椭圆或者矩形,或者有多个直线和曲线段组成的形状。
源码在这里下载:http://www.informit.com/title/9780133440751
@interface ViewController ()

@property (nonatomic, weak) IBOutlet UIView *containerView;

@end

@implementation ViewController

- (void)viewDidLoad
{
    [super viewDidLoad];

    //create path
    UIBezierPath *path = [[UIBezierPath alloc] init];
    [path moveToPoint:CGPointMake(175, 100)];
    [path addArcWithCenter:CGPointMake(150, 100) radius:25 startAngle:0 endAngle:2*M_PI clockwise:YES];
    [path moveToPoint:CGPointMake(150, 125)];
    [path addLineToPoint:CGPointMake(150, 175)];
    [path addLineToPoint:CGPointMake(125, 225)];
    [path moveToPoint:CGPointMake(150, 175)];
    [path addLineToPoint:CGPointMake(175, 225)];
    [path moveToPoint:CGPointMake(100, 150)];
    [path addLineToPoint:CGPointMake(200, 150)];

    //create shape layer
    CAShapeLayer *shapeLayer = [CAShapeLayer layer];
    shapeLayer.strokeColor = [UIColor redColor].CGColor;
    shapeLayer.fillColor = [UIColor clearColor].CGColor;
    shapeLayer.lineWidth = 5;
    shapeLayer.lineJoin = kCALineJoinRound;
    shapeLayer.lineCap = kCALineCapRound;
    shapeLayer.path = path.CGPath;

    //add it to our view
    [self.containerView.layer addSublayer:shapeLayer];
}

@end
先说说CAShapeLayer的属性设置
1. 线颜色
@property CGColorRef strokeColor
2. 填充色
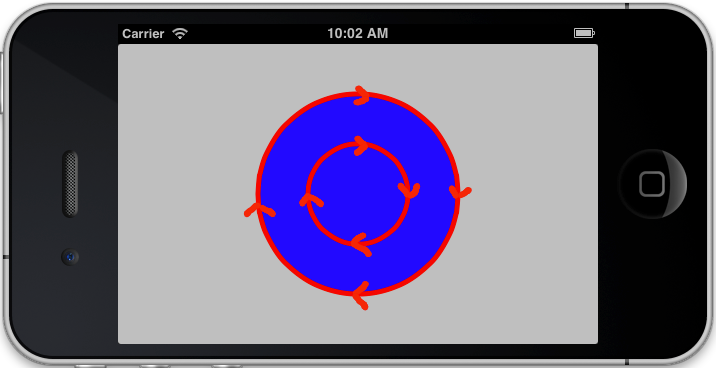
@property CGColorRef fillColor3. 填充规则
@property(copy) NSString *fillRule
默认值kCAFillRuleNonZero的情况
- (void)viewDidLoad
{
    [super viewDidLoad];

    //create path
    UIBezierPath *path = [[UIBezierPath alloc] init];
    [path moveToPoint:CGPointMake(200, 150)];
    [path addArcWithCenter:CGPointMake(150, 150) radius:50 startAngle:0 endAngle:2*M_PI clockwise:YES];
    [path moveToPoint:CGPointMake(250, 150)];
    [path addArcWithCenter:CGPointMake(150, 150) radius:100 startAngle:0 endAngle:2*M_PI clockwise:YES];

    //create shape layer
    CAShapeLayer *shapeLayer = [CAShapeLayer layer];
    shapeLayer.strokeColor = [UIColor redColor].CGColor;
    shapeLayer.fillColor = [UIColor blueColor].CGColor;
    shapeLayer.fillRule = kCAFillRuleNonZero;
    //shapeLayer.fillRule = kCAFillRuleEvenOdd;

    shapeLayer.lineWidth = 5;
    shapeLayer.lineJoin = kCALineJoinBevel;
    shapeLayer.lineCap = kCALineCapRound;
    shapeLayer.path = path.CGPath;

    //add it to our view
    [self.containerView.layer addSublayer:shapeLayer];
}
再修改
- (void)viewDidLoad
{
    [super viewDidLoad];

    //create path
    UIBezierPath *path = [[UIBezierPath alloc] init];
    [path moveToPoint:CGPointMake(200, 150)];
    [path addArcWithCenter:CGPointMake(150, 150) radius:50 startAngle:0 endAngle:2*M_PI clockwise:YES];
    [path moveToPoint:CGPointMake(250, 150)];
    [path addArcWithCenter:CGPointMake(150, 150) radius:100 startAngle:0 endAngle:-2*M_PI clockwise:NO];

    //create shape layer
    CAShapeLayer *shapeLayer = [CAShapeLayer layer];
    shapeLayer.strokeColor = [UIColor redColor].CGColor;
    shapeLayer.fillColor = [UIColor blueColor].CGColor;
    shapeLayer.fillRule = kCAFillRuleNonZero;
    //shapeLayer.fillRule = kCAFillRuleEvenOdd;

    shapeLaye
最低0.47元/天 解锁文章


 3952
3952

 被折叠的 条评论
为什么被折叠?
被折叠的 条评论
为什么被折叠?
 到【灌水乐园】发言


