


一、前置(npm 设置)
具体安装node和vue脚手架可参考:【Vue脚手架安装教程】_安装vue脚手架_zjyJul的博客-CSDN博客
全局设置淘宝镜像
npm config set registry http://registry.npm.taobao.org
安装Vue脚手架
npm install -g @vue/cli
创建项目 vue_test
查看脚手架版本,有版本表示安装成功
vue -V
创建项目(有可能卡住,按enter。或者进到vue_test,直接启动 npm run serve )
vue create vue_test
二、main.js 入口文件 以及 render() 函数
关于不同版本的Vue:
1.vue.js与vue.runtime.xxx.js的区别:
(1).vue.js是完整版的Vue,包含:核心功能+模板解析器。
(2).vue.runtime.xxx.js是运行版的Vue,只包含:核心功能;没有模板解析器。
2.因为vue.runtime.xxx.js没有模板解析器,所以不能使用template配置项,需要使用 render函数接收到的 ceateElement函数去指定具体内容。
/*
main.js是整个项目的入口文件
*/

//引入 Vue
import Vue from 'vue'
//引入App组件,他是所有文件的父组件
import App from './App.vue'

Vue.config.productionTip = false
//创建Vue实例,vm
new Vue({
  render: h => h(App),
}).$mount('#app')
三、脚手架结构
3-1 、文件结构目录
├── node_modules
├── public
│ ├── favicon.ico: 页签图标
│ └── index.html: 主页面
├── src
│ ├── assets: 存放静态资源
│ │ └── logo.png
│ │── component: 存放组件
│ │ └── HelloWorld.vue
│ │── App.vue: 汇总所有组件
│ │── main.js: 入口文件
├── .gitignore: git版本管制忽略的配置
├── babel.config.js: babel的配置文件
├── package.json: 应用包配置文件
├── README.md: 应用描述文件
├── package-lock.json:包版本控制文件
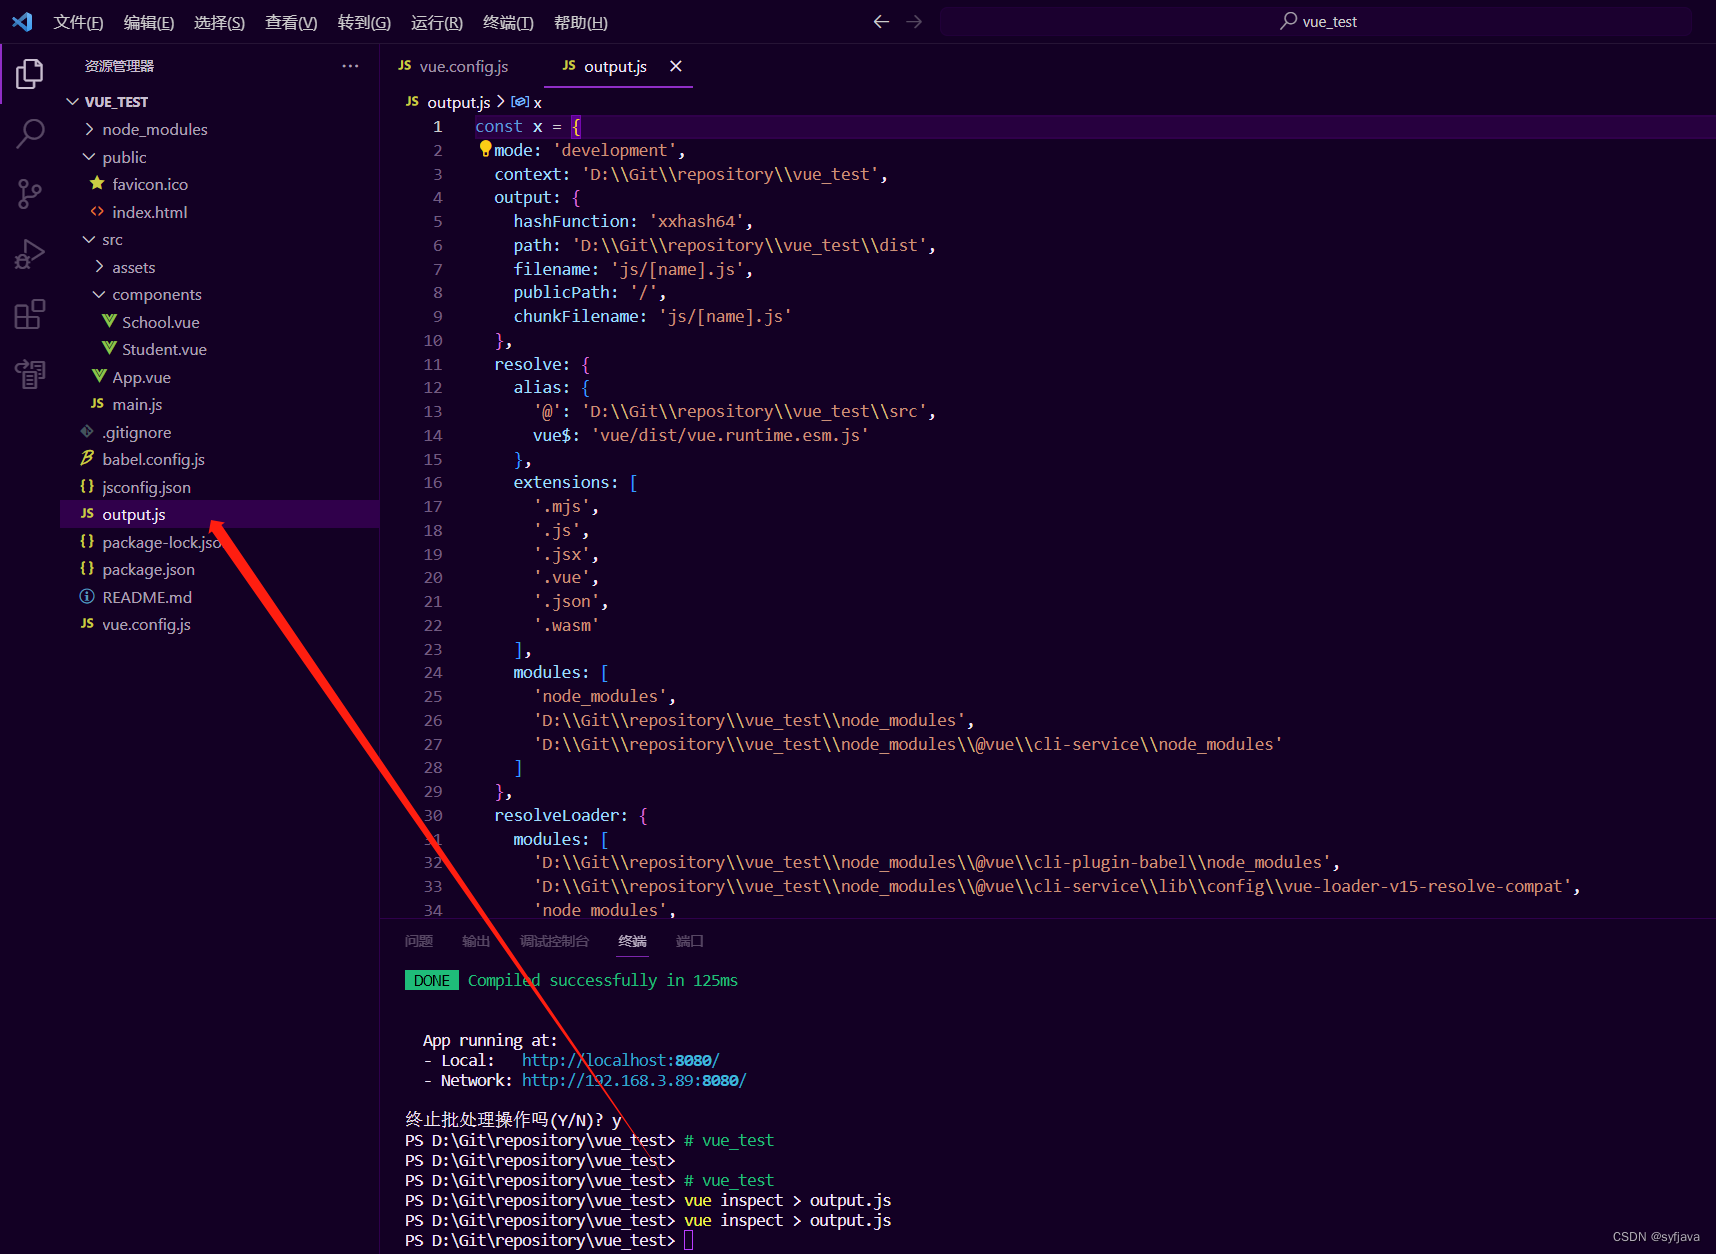
3-2 、 vue.config.js配置文件
1-使用vue.config.js可以对脚手架进行个性化定制,详情见:https://cli.vuejs.org/zh
2-使用vue inspect > output.js可以查看到Vue脚手架的默认配置。
3-3 ref的使用
被用来给元素或子组件注册引用信息(id的替代者)
应用在html标签上获取的是真实DOM元素,应用在组件标签上是组件实例对象(vc)
使用方式:
打标识:<h1 ref="xxx">.....</h1>或 <School ref="xxx"></School>
获取:this.$refs.xxx
DEMO
<template>
  <div id="app">
    <School ref="Sch"></School>
    <hr />
    <h1 v-text="msg" ref="title"></h1>
    <button @click="showName()" ref="but">点我显示学校名称</button>
  </div>
</template>

<script>
import School from "./components/School.vue";

export default {
  name: "App",
  data() {
    return {
      msg:'节点文本'
    }
  },
  components: {
    School,
  },
  methods: {
    showName() {
      console.log("当前节点", this.$refs.title); //真实DOM
      console.log("按钮", this.$refs.but); //真实DOM
      console.log("组件对象", this.$refs.Sch); //组件对象
    },
  },
};
</script>

<style>
#app {
  font-family: Avenir, Helvetica, Arial, sans-serif;
  -webkit-font-smoothing: antialiased;
  -moz-osx-font-smoothing: grayscale;
  text-align: center;
  color: #2c3e50;
  margin-top: 60px;
}
</style>
结果
4-props 配置 (功能:让组件接收外部传过来的数据)
之前,我们在配置组件的时候,数据总是跟随组件的,也就是说数据和组件没有做到完全分离,
如果我们想要每次使用组件的时候,组件固定,但是数据自定义,就需要用到 props 配置项,如下:
接收数据:
第一种方式(只接收):
props:['name']第二种方式(限制类型):
props:{name:String}第三种方式(限制类型、限制必要性、指定默认值)
备注:props是只读的,Vue底层会监测你对props的修改,如果进行了修改,就会发出警告,若业务需求确实需要修改,那么请复制props的内容到data中一份,然后去修改data中的数据。
传递数据
<template>
  <div id="app">
    <Student name="1111" :age="18" sex = "男"></Student>
    <hr />
    <Student name="222" :age="19" sex = "男"></Student>
    <hr />
    <Student name="3333" :age="20" sex = "男"></Student>

    <hr />

  </div>
</template>

<script>
import Student from "./components/Student.vue";

export default {
  name: "App",
  components: {
    Student,
  },
};
</script>

<style>
#app {
  font-family: Avenir, Helvetica, Arial, sans-serif;
  -webkit-font-smoothing: antialiased;
  -moz-osx-font-smoothing: grayscale;
  text-align: center;
  color: #2c3e50;
  margin-top: 60px;
}
</style>
接受数据
<template>
  <!--组件主体-->
  <div class="demo1">
    <h1>{{ msg }}</h1>
    <h2>姓名:{{ name }}</h2>
    <h2>年龄:{{ myAge }}</h2>
    <h2>性别:{{ sex }}</h2>
    <button @click="changeAge">
      修改age传入值,Vue不推荐,可以通过值中转下,不展示
    </button>
  </div>
</template>

<script>
export default {
  name: "Student",
  data() {
    return {
      msg:'正在学习Vue',
      myAge: this.age,
      // age: 18,
      // sex:'男',

    };
  },
  methods: {
    changeAge(){
        this.myAge++;
    }
  },
  // 1- 简单]接受
  // props:['name','age','sex']

  // 2- (限制类型)
  // 方式3
  // props:{
  //   name: String,
  //   age: Number,
  //   sex: String
  // }

  //3- 完整写法 (限制类型、限制必要性、指定默认值)
  //通常情况下,required 是不会和 default 一起出现的,因为一般都是可选参数才可以省略,才需要拥有 default 默认值
  props: {
    name: {
      type: String, // 限制类型
      required: true, // 必要性
      default: "xxxx", // 默认值,如果不加引号代表的是一个数值类型,加了引号代表的是一个字符串类型
    },
    age: {
      type: Number, // 限制类型
      required: true, // 必要性
      default: 99, // 默认值,如果不加引号代表的是一个数值类型,加了引号代表的是一个字符串类型
    },
    sex: {
      type: String, // 限制类型
      required: true, // 必要性
      default: "xxxx", // 默认值,如果不加引号代表的是一个数值类型,加了引号代表的是一个字符串类型
    }
  },

};
</script>


<style>
/* 组件样式 */
.demo1 {
  background-color: greenyellow;
}
</style>
5-mixin 混入
把多个组件共用的配置提取成一个混入对象
注意
当混入的 data 或 methods 与 原数据data 或 methods 配置项中的数据发生冲突时,以原数据为主;而如果是钩子函数,则都会执行
定义混合js,并暴露
export const common = {
    methods: {
        showMsg(){
            alert(this.name);
          }
    },
    mounted() {
        console.log('挂载完毕')
    },
}

export const common1 = {
   data() {
    return {
        x:100,
        y:99
    }
   },
}
5-1局部混入
<template>
  <!--组件主体-->
  <div class="demo11">
    <h2 @click="showMsg()">学校:{{ name }}</h2>
    <h2 @click="showMsg()">学校地址:{{ addr }}</h2>
  </div>
</template>

<script>
//混入
//import {common, common1} from '../mixin'

export default {
  name: "School",
  data() {
    return {
      name:'Vue学院',
      addr:'海棠大道168号'
    };
  },
  mixins:[common, common1]
};
</script>
<style>
/* 组件样式 */
.demo11 {
  background-color: red;
}
</style>
5-2 在main..js 中,全局混入
import {common, common1} from './mixin'

//全局引入
Vue.mixin(common)
Vue.mixin(common1)
6-插件
1- Vue 里面的插件其实就是一个对象,在这个对象中必须要有 install 方法
2- 插件的作用是:用来增强 Vue,其本质是包含 install 方法的一个对象,install 方法的第一个参数 Vue,第二个及后面的参数是插件使用者传递的数据
首先定义个plugin.js 的插件,可以引入以下内容
const obj = {
    install(Vue, param1, param2) {
        console.log('Vue 构造器', Vue);
        console.log('打印参数', param1, param2);

        // 1-定义全局过滤器
        Vue.filter('mySliceOf4', function (val) {
            return val.slice(0, 4)
        });

        // 2-全局写法
        Vue.directive('fbind2', {
            //指令成功与元素绑定时候(初始化)
            bind(element, binding) {
                console.log("bind");
                element.value = binding.value;
            },
            //指令所在元素被插入页面时候
            inserted(element, binding) {
                console.log("inserted");
                element.focus();

            },
            update(element, binding) {
                console.log("update");

                element.value = binding.value;
                element.focus();

            }
        })

        //3- // 3. 配置全局混入
        Vue.mixin(
            {
                methods: {
                    showMsg() {
                        alert(this.name);
                    }
                },
                mounted() {
                    console.log('挂载完毕')
                }
            }
        )
        //4- 给vue 原型上面添加方法
        Vue.prototype.hello = function () {
            alert('在Vue原型上面调用方法')
        }

        Vue.prototype.hello1 = ()=> {
            alert('在Vue原型上面调用方法1')
        }

    }
}

export default obj;
在main.js中使用插件
//引入并且使用插件
import  plugins from './plugins'
Vue.use(plugins, '传递参数1', '传递参数2',);
全局都可以使用例如:
<template>
  <!--组件主体-->
  <div class="demo1">
    <h2  @click="showMsg">姓名:{{ name  | mySliceOf4}}</h2>
    <h2>性别:{{ sex }}</h2>
    <input type="text"  v-fbind2:value="msg">
    <br/>
    <button @click="hello">点我显示弹窗</button>
  </div>
</template>

<script>
export default {
  name: "Student",
  data() {
    return {
      name: "正在学习Vue学生",
      sex: "男",
      msg:"自动获取焦点指令测试"
    };
  },
};
</script>
<style>
/* 组件样式 */
.demo1 {
  background-color: greenyellow;
}
</style>
7-scoped 样式
scoped 的作用:让样式在局部生效,防止冲突
我们可以在 style 中添加 scoped 属性,这样一来,该组件的样式只能为该组件内部使用,其他组件无法使用
如下,我们在 Student 中书写了一个样式 .demo;再在 School 中书写一个相同命名的样式 .demo,让背景色为红色,如下:
Student .vue 组件
<template>
  <!--组件主体-->
  <div class="demo">
    <h2  class="fontless">姓名:{{ name}}</h2>
    <h2>性别:{{ sex }}</h2>
  </div>
</template>

<script>
export default {
  name: "Student",
  data() {
    return {
      name: "正在学习Vue学生",
      sex: "男",
    };
  },
};
</script>
<style lang="less" scoped>
/* 组件样式 */
.demo {
  background-color: greenyellow;
  .fontless{
    font-size: 40px;
  }
}
</style>
School.vue 组件
<template>
  <!--组件主体-->
  <div class="demo">
    <h2 >学校:{{ name }}</h2>
    <h2>学校地址:{{ addr }}</h2>
  </div>
</template>

<script>
export default {
  name: "School",
  data() {
    return {
      name: "Vue学院",
      addr: "海棠大道168号",
    };
  },
};
</script>
<style scoped>
/* 组件样式 */
.demo  {
  background-color: red;
}
</style>


 3192
3192


 被折叠的 条评论
为什么被折叠?
被折叠的 条评论
为什么被折叠?
 到【灌水乐园】发言


