


Dlib+OpenCV深度学习人脸识别
-
前言
人脸识别在LWF(Labeled Faces in the Wild)数据集上人脸识别率现在已经99.7%以上,这个识别率确实非常高了,但是真实的环境中的准确率有多少呢?我没有这方面的数据,但是可以确信的是真实环境中的识别率并没有那么乐观。现在虽然有一些商业应用如员工人脸识别管理系统、海关身份验证系统、甚至是银行人脸识别功能,但是我们可以仔细想想员工人脸识别管理,海关身份证系统的应用场景对身份的验证功能其实并没有商家吹嘘的那么重要,打个比方说员工上班的时候刷脸如果失败了会怎样,是不是重新识别一下,如果还是误识别,或是识别不出,是不是就干脆刷卡或是其他方式登记上班,然后骂一句他娘的,本人那么帅居然没识别出来!那银行柜员机上人脸识别系统呢,你看它敢不敢让你连密码也不输直接刷脸转账,是不是关掉了人脸识别、指纹识别机器还可以正常运作。所以说真实环境中在各种光照因素、年龄因素、网红因素(化妆)、甚至是作弊因素等各种因素条件下的识别率有多少只有产品厂家自己知道,我相信每个厂家针对这些情况都有做优化,比如外围硬件的辅助,针对特定场景的各种约束等等,通过各个厂家自己在各个方面对系统的优化,是可以提升自身产品的综合体验的。
前面扯远了,本文的目的是实现一个人脸识别的最简单实际应用,即用摄像头捕捉动态人脸,然后和已经存储在数据库中的128D人脸特征进行比较识别出相应的人脸信息(名字等)。工程是基于VS2015+简单的MFC对话框实现的,代码存放在:http://git.oschina.net/wjiang/face_recognition
在这个系统中我预先存储了下面几位明星的正面头像的128D人脸特征,当然你可以存储和导入更多的人脸。

然后经过人脸检测、人脸图像处理,和人脸识别等步骤识别出相应的人脸信息,识别效果如下(怕大家被丑到所以用了明星的图片,没有用真实的人脸 – 没有做活体检测):
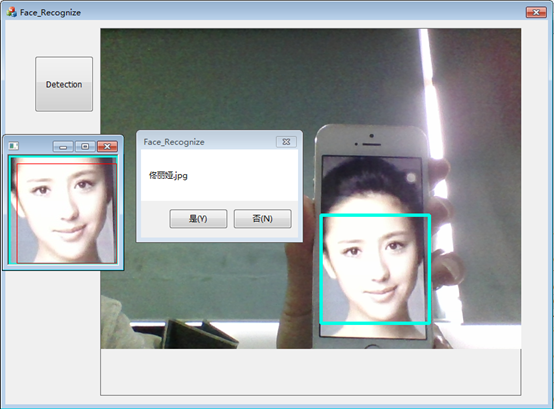

当然这只是一个简单的应用,真正用到生产的系统,还需运用活体检测等技术,防止运用照片或是手机视频等方式欺骗过人脸识别系统,安全级别要求更高的应用领域例如支付、转账等系统活体检测可能仍不够安全,这时还可以通过人脸识别+验证密码等方式加强安全性能。
-
人脸数据库导入
人脸数据导入,也就是说我在系统启动之初,需要导入我的人脸数据库,也就是前面的那些明星的正面照。装载的开始阶段,因为要检测静态人脸图片的人脸部位,首先需要用dlib的人脸检测器,用get_frontal_face_detector()获得。然后需要将68点人脸标记模型导入shape_predictor sp,目的就是要对其人脸到一个标准的姿势,接着就是装载DNN模型。然后取每张人脸照片的特征,并将特征和姓名等相关的信息放入FACE_DESC结构中,最后将每张人脸信息结构放入face_desc_vec容器中,这里我只装载了9个明星的人脸信息。
int FACE_RECOGNITION::load_db_faces(void)
{
    intrc = -1;
    longhFile = 0;
    struct_finddata_tfileinfo;

    frontal_face_detectordetector =get_frontal_face_detector();
    // We will also use a face landmarking model to align faces to a standard pose: (see face_landmark_detection_ex.cpp for an introduction)
    deserialize("shape_predictor_68_face_landmarks.dat") >>sp;

    // And finally we load the DNN responsible for face recognition.
    deserialize("dlib_face_recognition_resnet_model_v1.dat") >>net;

    if ((hFile =_findfirst(".\\faces\\*.jpg", &fileinfo)) != -1)
    {
        do
        {
            if ((fileinfo.attrib &_A_ARCH))
            {
                if (strcmp(fileinfo.name,".") != 0 && strcmp(fileinfo.name,"..") != 0)
                {
                    if (!strcmp(strstr(fileinfo.name,".") + 1 , "jpg"))
                    {
                        cout <<"This file is an image file!" <<fileinfo.name <<endl;
                        matrix<rgb_pixel>img;
                        charpath[260];
                        sprintf_s(path,".\\faces\\%s",fileinfo.name);
                        load_image(img,path);
                        image_windowwin(img);

                        for (autoface :detector(img))
                        {
                            autoshape =sp(img,face);
                            matrix<rgb_pixel>face_chip;
                            extract_image_chip(img,get_face_chip_details(shape, 150, 0.25),face_chip);
                            //Record the all this face's information
                            FACE_DESCsigle_face;
                            sigle_face.face_chip =face_chip;
                            sigle_face.name =fileinfo.name;

                            std::vector<matrix<rgb_pixel>>face_chip_vec;
                            std::vector<matrix<float, 0, 1>>face_all;

                            face_chip_vec.push_back(move(face_chip));
                            //Asks the DNN to convert each face image in faces into a 128D vector
                            face_all =net(face_chip_vec);

                            //Get the feature of this person
                            std::vector<matrix<float, 0, 1>>::iteratoriter_begin = face_all.begin(),
                                iter_end =face_all.end();
                            if (face_all.size() > 1)break;
                            sigle_face.face_feature = *iter_begin;

                            //all the person description into vector
                            face_desc_vec.push_back(sigle_face);

                            win.add_overlay(face);
                        }
                    }
                    else
                    {
                        cout <<"This file is not image file!" <<fileinfo.name <<endl;
                    }
                }
            }
            else
            {
                //files.push_back(p.assign(path).append("\\").append(fileinfo.name));
            }
        } while (_findnext(hFile, &fileinfo) == 0);
        _findclose(hFile);
    }
    returnrc;
}-
人脸检测
人脸检测在人脸识别的应用系统中我认为是至关重要的一环,因为人脸检测的好坏直接影响最终的识别率,如果在人脸检测阶段能做到尽量好的话,系统的识别率会有一个比较大的提升。下面的是人脸检测的具体代码实现(很简陋莫怪),尝试了用Dlib人脸检测,OpenCV人脸检测,还有于仕琪的libfacedetection,比较发现于仕琪的libfacedetection是做人脸检测最好的一个,速度快,并且检测图像效果也很好。
intcapture_face(Matframe,Mat&out)
{
    Matgray;
    Matface;
    intrc = -1;

    if (frame.empty() || !frame.data)return -1;

    cvtColor(frame,gray,CV_BGR2GRAY);
    int *pResults =NULL;

    unsignedchar *pBuffer = (unsignedchar *)malloc(DETECT_BUFFER_SIZE);
    if (!pBuffer)
    {
        fprintf(stderr,"Can not alloc buffer.\n");
        return -1;
    }
    //pResults = facedetect_frontal_tmp((unsigned char*)(gray.ptr(0)), gray.cols, gray.rows, gray.step,
    //    1.2f, 5, 24);
    pResults =facedetect_multiview_reinforce(pBuffer, (unsignedchar*)(gray.ptr(0)),gray.cols,gray.rows, (int)gray.step,
        1.2f, 2, 48, 0, 1);

    //printf("%d faces detected.\n", (pResults ? *pResults : 0));//重复运行
                                                            //print the detection results
    if (pResults !=NULL)
    {
        for (inti = 0;i < (pResults ? *pResults : 0);i++)
        {
            short *p = ((short*)(pResults + 1)) + 6 *i;
            intx =p[0];
            inty =p[1];
            intw =p[2];
            inth =p[3];
            intneighbors =p[4];

            Rect_<float>face_rect =Rect_<float>(x,y,w, h);
            face =frame(face_rect);

            printf("face_rect=[%d, %d, %d, %d], neighbors=%d\n",x,y, w,h,neighbors);
            Pointleft(x,y);
            Pointright(x +w,y + h);
            cv::rectangle(frame,left,right, Scalar(230, 255, 0), 4);
        }
        //imshow("frame", frame);
        if (face.empty() || !face.data)
        {
            face_detect_count = 0;
            return -1;
        }
        if (face_detect_count++ > 30)
        {
            imshow("face",face);
            out =face.clone();
            return 0;
        }
    }
    else
    {
        //face is moving, and reset the detect count
        face_detect_count = 0;
    }

    returnrc;
}-
人脸识别
通过人脸检测函数capture_face()经过处理之后临时保存在工程目录下的cap.jpg,用get_face_chip_details()函数将检测到的目标图片标准化为150*150像素大小,并对人脸进行旋转居中,用extract_image_chip()取得图像的一个拷贝,然后将其存储到自己的图片face_chip中,把的到face_chip放入vect_faces容器中,传送给深度神经网络net,得到捕捉到人脸图片的128D向量特征。最后在事先导入的人脸数据库中遍历与此特征最相近的人脸即可识别出相应的人脸信息。
这种模式的应用,也就是我们所说的1:N应用,1对N是比较考验系统运算能力的,举个例子,现在支付宝账户应该已经是上亿级别的用户,如果你在就餐的时候选择使用支付宝人脸支付,也许在半个小时内服务器也没有找你的脸,这下就悲催,当然在真实应用场景可能是还需要你输入你的名字,这下可能就快多了,毕竟全国可能和你重名的也就了不的几千上万个吧,一搜索,人脸识别再一验证即可。
前面的这些还没有考虑安全的因素,比如说双胞胎啊,化妆啊(网红的年代啊),还有年龄的因素,环境的因素还包括光照、角度等导致的误识别或是识别不出,识别不出的情况还好,如果是误识别对于支付等对于安全性要求极其严苛的应用来说简直就是灾难。所以人脸识别还有很大的局限性 – 额,好像扯远了。
	matrix<rgb_pixel> face_cap;
	//save the capture in the project directory
	load_image(face_cap, ".\\cap.jpg");

	//Display the raw image on the screen
	image_window win1(face_cap);

	frontal_face_detector detector = get_frontal_face_detector();
	std::vector<matrix<rgb_pixel>> vect_faces;

	for (auto face : detector(face_cap))
	{
		auto shape = face_recognize.sp(face_cap, face);
		matrix<rgb_pixel> face_chip;
		extract_image_chip(face_cap, get_face_chip_details(shape, 150, 0.25), face_chip);
		vect_faces.push_back(move(face_chip));
		win1.add_overlay(face);
	}

	if (vect_faces.size() != 1)
	{
		cout <<"Capture face error! face number "<< vect_faces.size()  << endl;
		cap.release();
		goto CAPTURE;
	}

	//Use DNN and get the capture face's feature with 128D vector
	std::vector<matrix<float, 0, 1>> face_cap_desc = face_recognize.net(vect_faces);
	//Browse the face feature from the database, and find the match one
	std::pair<double,std::string> candidate_face;
	std::vector<double> len_vec;

	std::vector<std::pair<double, std::string>> candi_face_vec;
	candi_face_vec.reserve(256);

	for (size_t i = 0; i < face_recognize.face_desc_vec.size(); ++i)
	{
		auto len = length(face_cap_desc[0] - face_recognize.face_desc_vec[i].face_feature);
	    if (len < 0.45)
		{
			len_vec.push_back(len);
			candidate_face.first = len;
			candidate_face.second = face_recognize.face_desc_vec[i].name.c_str();
			candi_face_vec.push_back(candidate_face);

#ifdef _FACE_RECOGNIZE_DEBUG
			char buffer[256] = {0};
			sprintf_s(buffer, "Candidate face %s Euclid length %f",
				face_recognize.face_desc_vec[i].name.c_str(),
				len);
			MessageBox(CString(buffer), NULL, MB_YESNO);
#endif
		}
		else
		{
			cout << "This face from database is not match the capture face, continue!" << endl;
		}
	}

	//Find the most similar face
	if (len_vec.size() != 0)
	{
		shellSort(len_vec);

		int i(0);
		for (i = 0; i != len_vec.size(); i++)
		{
			if (len_vec[0] == candi_face_vec[i].first)
				break;
		}

		char buffer[256] = { 0 };
		sprintf_s(buffer, "The face is %s -- Euclid length %f",
			candi_face_vec[i].second.c_str(), candi_face_vec[i].first);
		if (MessageBox(CString(buffer), NULL, MB_YESNO) == IDNO)
		{
			face_record();
		}
	}
	else
	{
		if (MessageBox(CString("Not the similar face been found"), NULL, MB_YESNO) == IDYES)
		{
			face_record();
		}
	}

	face_detect_count = 0;
	frame.release();
face.release(); -
异常处理
当人脸或是物体快速的在摄像头前活动时,会导致系统异常抛出,异常提示如下:

对于这个问题,我们可以先用C++捕获异常的工具,try和catch工具来捕获异常:
	Mat frame;
	Mat face;
	VideoCapture cap(0);
	if (!cap.isOpened()) {
		AfxMessageBox(_T("Please check your USB camera's interface num."));
	}

	try
	{
		while (1)
		{
			check_close(cap);
			cap >> frame;
			if (!frame.empty())
			{
				if (capture_face(frame, face) == 0)
				{
					//convert to IplImage format and then save with .jpg format
					IplImage face_Img;
					face_Img = IplImage(face);
					//save the capture face to the project directory
					cvSaveImage("./cap.jpg", &face_Img);
					break;
				}
				imshow("view", frame);
			}

			int c = waitKey(10);
			if ((char)c == 'c') { break; }
		}
	}
	catch (exception& e)
	{
		cout << "\nexception thrown!" << endl;
		cout << e.what() << endl;
#ifdef _CAPTURE_DEBUG
		MessageBox(CString(e.what()), NULL, MB_YESNO);
#endif
		goto CAPTURE;
	}
在catch中将捕获到的异常信息打印出来:
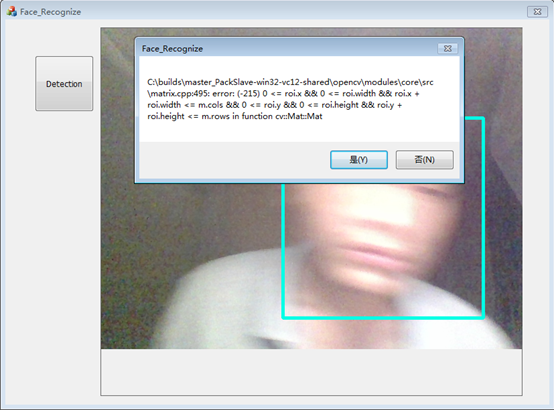
可以看到,可能是由于摄像头捕获响应速率跟不上的原因,在cap >>frame;的时候得到的frame出现了格式错误,如上图的对话框所示error(-215) 0 < roi.x,也就是说OpenCV感兴趣区域的x坐标出现了一个负数,而这显然必须是要非负数的地方出现了一个负数的输入,导致OpenCV异常抛出。
没关系我们我们不理会这个异常的frame输入就可以,在异常抛出的catch屏蔽掉对话框的显示,我们即可流畅的采集图像。不理会这个错误的帧输入也就是说直接丢弃这一帧。


 1581
1581

 被折叠的 条评论
为什么被折叠?
被折叠的 条评论
为什么被折叠?
 到【灌水乐园】发言


