


一、相关理论
本篇博文主要讲解2015年一篇paper《Age and Gender Classification using Convolutional Neural Networks》paper的创新点在哪里。难道是因为利用CNN做年龄和性别分类的paper很少吗?网上搜索了一下,性别预测,以前很多都是用SVM算法,用CNN搞性别分类就只搜索到这一篇文章。
性别分类自然而然是二分类问题,然而对于年龄怎么搞?年龄预测是回归问题吗?paper采用的方法是把年龄划分为多个年龄段,每个年龄段相当于一个类别,这样性别也就多分类问题了。
言归正传,下面开始讲解2015年paper《Age and Gender Classification using Convolutional Neural Networks》的网络结构,这篇文章没有什么新算法,只有调参,改变网络层数、卷积核大小等……所以如果已经对Alexnet比较熟悉的,可能会觉得看起来没啥意思,这篇papar的相关源码和训练数据,文献作者有给我们提供,可以到Caffe zoo model:https://github.com/BVLC/caffe/wiki/Model-Zoo 或者文献的主页:http://www.openu.ac.il/home/hassner/projects/cnn_agegender/。下载相关训练好的模型,paper性别、年龄预测的应用场景比较复杂,都是一些非常糟糕的图片,比较模糊的图片等,所以如果我们想要直接利用paper训练好的模型,用到我们自己的项目上,可能精度会比较低,后面我将会具体讲一下利用paper的模型进行fine-tuning,以适应我们的应用,提高我们自己项目的识别精度。
二、算法实现
因为paper的主页,有提供网络结构的源码,我将结合网络结构文件进行讲解。
1、 网络结构
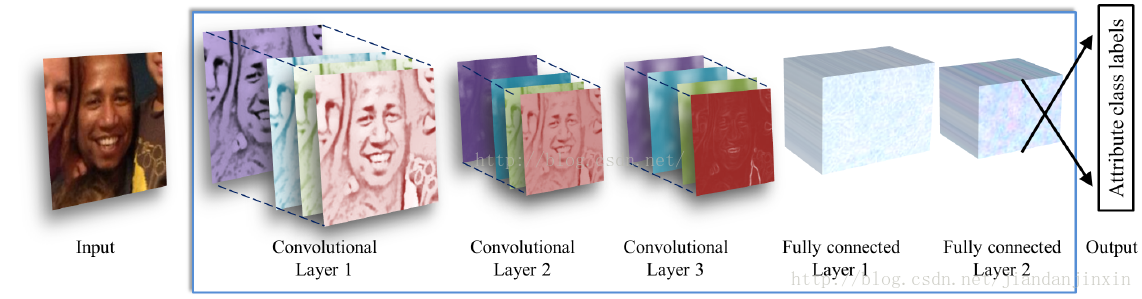
Paper所用的网络包含:3个卷积层,还有2个全连接层。这个算是层数比较少的CNN网络模型了,这样可以避免过拟合。对于年龄的识别,paper仅仅有8个年龄段,相当于8分类模型;然后对于性别识别自然而然是二分类问题了。
然后图像处理直接采用3通道彩色图像进行处理,图片6都统一缩放到256*256,然后再进行裁剪,为227*227(训练过程随机裁剪,验证测试过程通过矩形的四个角+中心裁剪),也就是说网络的输入时227*227的3通道彩色图像,总之基本上跟Alexnet一样。
网络模型:
1、 网络结构
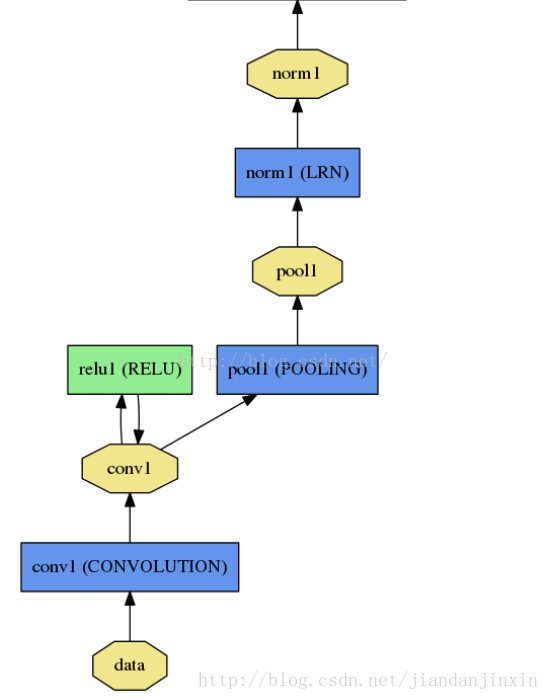
(1)第一层:采用96个卷积核,每个卷积核参数个数为3*7*7,这个就相当于3个7*7大小的卷积核在每个通道进行卷积。激活函数采用ReLU,池化采用最大重叠池化,池化的size选择3*3,strides选择2。然后接着再来一个局部响应归一化层。什么叫局部响应归一化,自己可以查看一下文献:《ImageNet Classification with Deep Convolutional Neural Networks》,局部响应归一化可以提高网络的泛化能力。
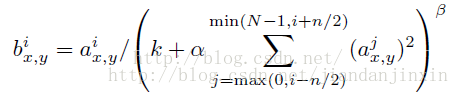
局部响应归一化,这个分成两种情况,一种是3D的归一化,也就是特征图之间对应像素点的一个归一化。还有一种是2D归一化,就是对特征图的每个像素的局部做归一化。局部响应归一化其实这个可有可无,精度提高不了多少,如果你还不懂上面那个公式也没有关系。我们可以利用最新的算法:Batch Normalize ,这个才牛逼呢,2015年,我觉得最牛逼的算法之一,不仅提高了训练速度,连精度也提高了。过程:通过7*7大小的卷积核,对227*227图片卷积,然后特征图的个数为96个,每个特征图都是三通道的,这个作者没有讲到卷积层的stride大小,不过我们大体可以推测出来,因为paper的网络结构是模仿:ImageNet Classification with Deep Convolutional Neural Networks的网络结构的,连输入图片的大小也是一样的,这篇文献的第一层如下所示:
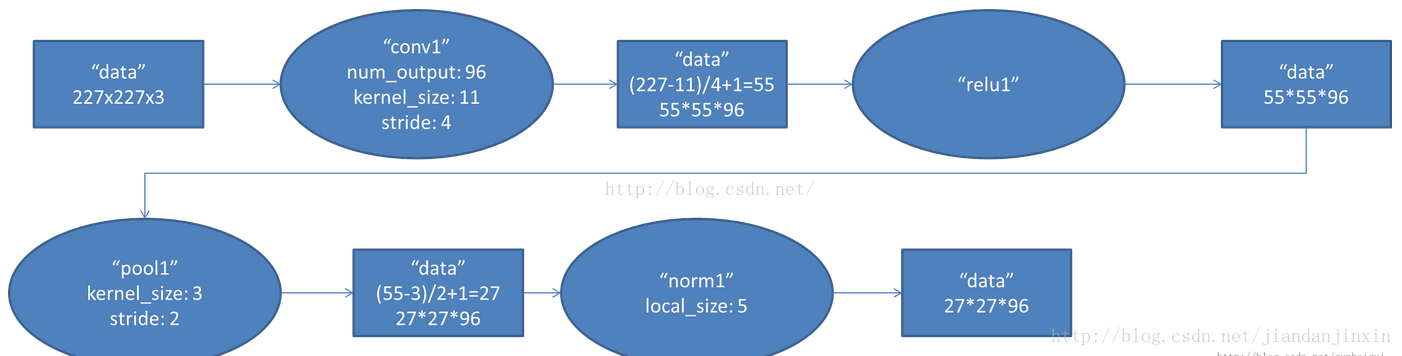
我们可以推测出,paper选择的卷积步长为4,这样经过卷积后,然后pad为2,这样经过卷积后图片的大小为:(227-7)/4+1=56。然后经过3*3,且步长为2的大小,进行重叠池化,可以得到:56/2=28*28大小的图片,具体边界需要补齐。下面是原文的第一层结构示意图:
layers {
  name: "conv1"
  type: CONVOLUTION
  bottom: "data"
  top: "conv1"
  blobs_lr: 1
  blobs_lr: 2
  weight_decay: 1
  weight_decay: 0
  convolution_param {
    num_output: 96
    kernel_size: 7
    stride: 4
    weight_filler {
      type: "gaussian"
      std: 0.01
    }
    bias_filler {
      type: "constant"
      value: 0
    }
  }
}
layers {
  name: "relu1"
  type: RELU
  bottom: "conv1"
  top: "conv1"
}
layers {
  name: "pool1"
  type: POOLING
  bottom: "conv1"
  top: "pool1"
  pooling_param {
    pool: MAX
    kernel_size: 3
    stride: 2
  }
}
layers {
  name: "norm1"
  type: LRN
  bottom: "pool1"
  top: "norm1"
  lrn_param {
    local_size: 5
    alpha: 0.0001
    beta: 0.75
  }
}
(2)第二层:
第二层的输入也就是96*28*28的单通道图片,因为我们上一步已经把三通道合在一起进行卷积了。第二层结构,选择256个滤波器,滤波器大小为5*5,卷积步长为1,这个也可以参考AlexNet的结构。池化也是选择跟上面的一样的参数。
layers {
  name: "conv2"
  type: CONVOLUTION
  bottom: "norm1"
  top: "conv2"
  blobs_lr: 1
  blobs_lr: 2
  weight_decay: 1
  weight_decay: 0
  convolution_param {
    num_output: 256
    pad: 2
    kernel_size: 5
    weight_filler {
      type: "gaussian"
      std: 0.01
    }
    bias_filler {
      type: "constant"
      value: 1
    }
  }
}
layers {
  name: "relu2"
  type: RELU
  bottom: "conv2"
  top: "conv2"
}
layers {
  name: "pool2"
  type: POOLING
  bottom: "conv2"
  top: "pool2"
  pooling_param {
    pool: MAX
    kernel_size: 3
    stride: 2
  }
}
layers {
  name: "norm2"
  type: LRN
  bottom: "pool2"
  top: "norm2"
  lrn_param {
    local_size: 5
    alpha: 0.0001
    beta: 0.75
  }
}
(3)第三层:滤波器个数选择384,卷积核大小为3*3
layers {
  name: "conv3"
  type: CONVOLUTION
  bottom: "norm2"
  top: "conv3"
  blobs_lr: 1
  blobs_lr: 2
  weight_decay: 1
  weight_decay: 0
  convolution_param {
    num_output: 384
    pad: 1
    kernel_size: 3
    weight_filler {
      type: "gaussian"
      std: 0.01
    }
    bias_filler {
      type: "constant"
      value: 0
    }
  }
}
layers {
  name: "relu3"
  type: RELU
  bottom: "conv3"
  top: "conv3"
}
layers {
  name: "pool5"
  type: POOLING
  bottom: "conv3"
  top: "pool5"
  pooling_param {
    pool: MAX
    kernel_size: 3
    stride: 2
  }
}
(4)第四层:第一个全连接层,神经元个数选择512
layers {
  name: "fc6"
  type: INNER_PRODUCT
  bottom: "pool5"
  top: "fc6"
  blobs_lr: 1
  blobs_lr: 2
  weight_decay: 1
  weight_decay: 0
  inner_product_param {
    num_output: 512
    weight_filler {
      type: "gaussian"
      std: 0.005
    }
    bias_filler {
      type: "constant"
      value: 1
    }
  }
}
layers {
  name: "relu6"
  type: RELU
  bottom: "fc6"
  top: "fc6"
}
layers {
  name: "drop6"
  type: DROPOUT
  bottom: "fc6"
  top: "fc6"
  dropout_param {
    dropout_ratio: 0.5
  }
}
(5)第五层:第二个全连接层,神经元个数也是选择512
layers {
  name: "fc7"
  type: INNER_PRODUCT
  bottom: "fc6"
  top: "fc7"
  blobs_lr: 1
  blobs_lr: 2
  weight_decay: 1
  weight_decay: 0
  inner_product_param {
    num_output: 512
    weight_filler {
      type: "gaussian"
      std: 0.005
    }
    bias_filler {
      type: "constant"
      value: 1
    }
  }
}
layers {
  name: "relu7"
  type: RELU
  bottom: "fc7"
  top: "fc7"
}
layers {
  name: "drop7"
  type: DROPOUT
  bottom: "fc7"
  top: "fc7"
  dropout_param {
    dropout_ratio: 0.5
  }
}
(6)第六层:输出层,对于性别来说是二分类,输入神经元个数为2
layers {
  name: "fc8"
  type: INNER_PRODUCT
  bottom: "fc7"
  top: "fc8"
  blobs_lr: 10
  blobs_lr: 20
  weight_decay: 1
  weight_decay: 0
  inner_product_param {
    num_output: 2
    weight_filler {
      type: "gaussian"
      std: 0.01
    }
    bias_filler {
      type: "constant"
      value: 0
    }
  }
}
layers {
  name: "accuracy"
  type: ACCURACY
  bottom: "fc8"
  bottom: "label"
  top: "accuracy"
  include: { phase: TEST }
}
layers {
  name: "loss"
  type: SOFTMAX_LOSS
  bottom: "fc8"
  bottom: "label"
  top: "loss"
}
网络方面,paper没有什么创新点,模仿AlexNet结构。
2、网络训练
(1)初始化参数:权重初始化方法采用标准差为0.01,均值为0的高斯正太分布。

(2)网络训练:采用dropout,来限制过拟合。Drop out比例采用0.5,还有就是数据扩充,数据扩充石通过输入256*256的图片,然后进行随机裁剪,裁剪为227*227的图片,当然裁剪要以face中心为基础,进行裁剪。

(3)训练方法采用,随机梯度下降法,min-batch 大小选择50,学习率大小0.001,然后当迭代到10000次以后,把学习率调为0.0001。

(4)结果预测:预测方法采用输入一张256*256的图片,然后进行裁剪5张图片为227*227大小,其中四张图片的裁剪方法分别采用以256*256的图片的4个角为基点点,进行裁剪。然后最后一张,以人脸的中心为基点进行裁剪。然后对这5张图片进行预测,最后对预测结果进行平均。三、Age and Gender Classification Using Convolutional Neural Networks - Demo
下载 cnn_age_gender_models_and_data.0.0.2.zip
cd caffe-master/python/cnn_age_gender_models_and_data.0.0.2
ipython notebook
接着修改一下 caffe所在的位置
caffe_root = '../../../caffe-master/' #为caffe所在目录出现的问题1
#Loading the age network
age_net_pretrained='./age_net.caffemodel'
age_net_model_file='./deploy_age.prototxt'
age_net = caffe.Classifier(age_net_model_file, age_net_pretrained,
                       mean=mean,
                       channel_swap=(2,1,0),
                       raw_scale=255,
                       image_dims=(256, 256))
报错
File "/home/XXX/caffe-master/python/caffe/io.py", line 255, in set_mean
raise ValueError('Mean shape incompatible with input shape.')
ValueError: Mean shape incompatible with input shape.
解决方案
gedit ./caffe-master/python/caffe/io.py用
if ms != self.inputs[in_][1:]:
    print(self.inputs[in_])
    in_shape = self.inputs[in_][1:]
    m_min, m_max = mean.min(), mean.max()
    normal_mean = (mean - m_min) / (m_max - m_min)
    mean = resize_image(normal_mean.transpose((1,2,0)),in_shape[1:]).transpose((2,0,1)) * (m_max - m_min) + m_min
    #raise ValueError('Mean shape incompatible with input shape.')
替代
if ms != self.inputs[in_][1:]:
    raise ValueError('Mean shape incompatible with input shape.')
出现的问题2
feat = age_net.blobs['conv1'].data[4, :49]
vis_square(feat, padval=1)
报错
IndexError: index 4 is out of bounds for axis 0 with size 1解决方案
feat = age_net.blobs['conv1'].data[0, :49]
vis_square(feat, padval=1)
代码示例
# coding=utf-8
import os
import numpy as np
import matplotlib.pyplot as plt
%matplotlib inline
import cv2
import shutil
import time

#设置caffe源码所在的路径set the path where the Caffe source code
caffe_root = '../../../caffe-master/'
import sys
sys.path.insert(0, caffe_root + 'python')
import caffe

plt.rcParams['figure.figsize'] = (10, 10)
plt.rcParams['image.interpolation'] = 'nearest'
plt.rcParams['image.cmap'] = 'gray'


#加载均值文件mean file loading
mean_filename='./imagenet_mean.binaryproto'
proto_data = open(mean_filename, "rb").read()
a = caffe.io.caffe_pb2.BlobProto.FromString(proto_data)
mean  = caffe.io.blobproto_to_array(a)[0]

#创建网络,并加载已经训练好的模型文件 create a network, and have good training model file loading
gender_net_pretrained='./mytask_train_iter_8000.caffemodel'
gender_net_model_file='./deploy.prototxt'
gender_net = caffe.Classifier(gender_net_model_file, gender_net_pretrained,
                       mean=mean,
                       channel_swap=(2,1,0),#RGB通道与BGR
                       raw_scale=255,#把图片归一化到0~1之间
                       image_dims=(256, 256))#设置输入图片的大小

#载入年龄网络,并加载已经训练好的模型文件
age_net_pretrained='./age_net.caffemodel'
age_net_model_file='./deploy_age.prototxt'
age_net = caffe.Classifier(age_net_model_file, age_net_pretrained,
                       mean=mean,
                       channel_swap=(2,1,0),
                       raw_scale=255,
                       image_dims=(256, 256))

#Label类别
age_list=['(0, 2)','(4, 6)','(8, 12)','(15, 20)','(25, 32)','(38, 43)','(48, 53)','(60, 100)']
gender_list=['Male','Female']  #类别


#Reading and plotting the input image
example_image = './example_image.jpg'
input_image = caffe.io.load_image(example_image) # read pictures 读取图片
_ = plt.imshow(input_image)    #显示原图片


#预测结果
prediction = age_net.predict([input_image])
print 'predicted age:', age_list[prediction[0].argmax()]

prediction = gender_net.predict([input_image])
print 'predicted gender:', gender_list[prediction[0].argmax()]


for k, v in gender_net.params.items:
    print 'weight'
# in blob parameters of each layer, using vector to store two blob variable Caffe, v[0] weight
    print (k, v[0].data.shape)
    print b
    print (k, v[1].data.shape) v[1] # bias


#预测分类及其特征可视化

#Filters visualizations 滤波可视化
def showimage(im):
    if im.ndim == 3:
        im = im[:, :, ::-1]
    plt.set_cmap('jet')
    plt.imshow(im)

#Display # feature visualization, padval is used to adjust the brightness
def vis_square(data, padsize=1, padval=0):
    data -= data.min()
    data /= data.max()

    # force the number of filters to be square
    n = int(np.ceil(np.sqrt(data.shape[0])))
    padding = ((0, n ** 2 - data.shape[0]), (0, padsize), (0, padsize)) + ((0, 0),) * (data.ndim - 3)
    data = np.pad(data, padding, mode='constant', constant_values=(padval, padval))

    # tile the filters into an image
    data = data.reshape((n, n) + data.shape[1:]).transpose((0, 2, 1, 3) + tuple(range(4, data.ndim + 1)))
    data = data.reshape((n * data.shape[1], n * data.shape[3]) + data.shape[4:])
    showimage(data)


#Loading the gender network without the mean image - just for better visualizations
age_net = caffe.Classifier(age_net_model_file, age_net_pretrained,
                       channel_swap=(2,1,0),
                       raw_scale=255,
                       image_dims=(256, 256))

prediction = age_net.predict([input_image])

#Input image
_ = plt.imshow(input_image)


#The first conv layer filters, conv1
filters = gender_net.params['conv1'][0].data[:49] #conv1滤波器可视化  conv1 filter visualization
vis_square(filters.transpose(0, 2, 3, 1))

#conv2 filter visualization
filters = gender_net.params['conv2'][0].data[:49] #conv2滤波器可视化  conv2 filter visualization
vis_square(filters.transpose(0, 2, 3, 1))


#feat map
feat = gender_net.blobs['conv1'].data[4, :49]  #The first Conv layer output, conv1 (rectified responses of the filters above)
vis_square(feat, padval=1)

for k, v in gender_net.blobs.items:
    print (k, v.data.shape);
Feat = gender_net.blobs[k].data[0,0:4]# shows the name of the K network layer, the first picture generated by the 4 maps feature
Vis_square (feat, padval=1)


# shows the original image, and the classification results
Str_gender=gender_list[prediction_gender[0].argmax ()]
print Str_gender

plt.imshow (input_image)
plt.title (str_gender)
plt.show ()
参考文献
1、《Age and Gender Classification using Convolutional Neural Networks》
2、《ImageNet Classification with Deep Convolutional Neural Networks》
3、caffe finetune predict and classify the lung nodule( 肺结节的分类)
4、https://github.com/BVLC/caffe/wiki/Model-Zoo
6、 http://stackoverflow.com/questions/30808735/error-when-using-classify-in-caffe
7、Age and Gender Classification Using Convolutional Neural Networks - Demo-ipynb
9、Deep learning (nine) Caffe prediction, feature visualization Python interface call


 751
751

 被折叠的 条评论
为什么被折叠?
被折叠的 条评论
为什么被折叠?
 到【灌水乐园】发言


