


前言
Qt框架式一个可以用c++语言来开发的框架,对于嵌入式开发来说,Qt框架可以用来开发上位机,用来对设备进行操纵,也可以用来开发图形界面,当做Linux系统的gui。所以说,基于Qt框架来开发软件,是嵌入式工程师必备的一项技能。
这里写的是一款所有嵌入式工程师都要用到的软件,串口调试工具。这里我是用c++写的,我写的功能比较简陋,也就只有串口收发之类的简单功能。对比一些成熟的串口调试工具肯定是不如的,但是不妨当作练手的小项目。
一、功能设计
项目要实现什么功能,最好在一开始就能定下来,写起来也方便,bug也少。
在实际开发中,很多时候都会在写完后加需求,或者在项目进行中加需求,这很麻烦,因为会打乱事先设计好的软件框架。
1串口接收数据
2串口发送数据
3带有时间戳
4不论是收发都能在窗口看到
5能设置波特率、数据网、验证位、停止位等功能
6能把接收数据转化为十六进制或者ascii字符格式
二、UI布局
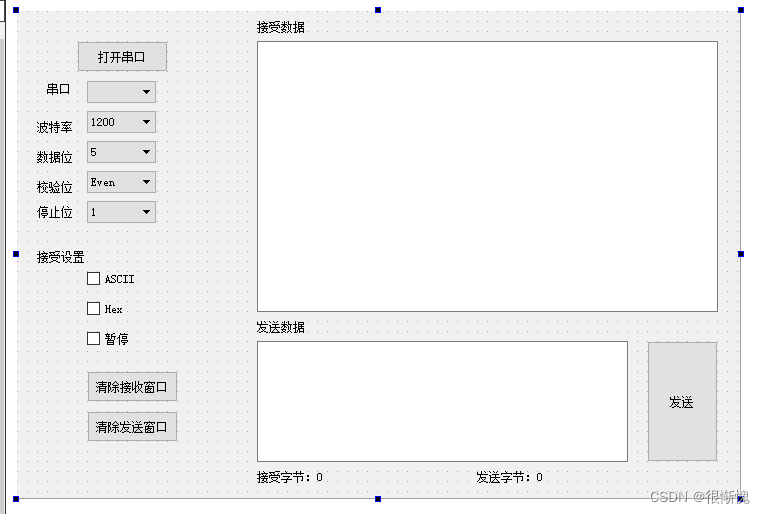 创建widget任务,先把UI界面弄好,Qt提供了方便快速的界面设计方式,很多东西用代码来实现是很复杂的,既麻烦,效果还不好。
直接在widget里,用拖动控件的方法,很容易就把这个UI搞好了。
也就用到了几个很基础的控件,pushbutton、textedit、tatel、checkbox。
三、写代码
widget.cpp中的代码,注释都差不多写了。
就是有个奇怪的问题,本来想改个背景图片,变得好看点的,但加入图片之后,运行就会变得很卡,也不知道为什么。
#include "widget.h"
#include "ui_widget.h"
#include <QDebug>
#include <QMessageBox>

Widget::Widget(QWidget *parent) :
    QWidget(parent),
    ui(new Ui::Widget)
{
    ui->setupUi(this);

    resize(750,500);//窗口大小

    QPixmap pixmap(":/image/image/yp.jpg"); // 加载图片
    QPalette palette;
    palette.setBrush(this->backgroundRole(), QBrush(pixmap.scaled(this->size(), Qt::IgnoreAspectRatio, Qt::SmoothTransformation))); // 调整图片大小以适应窗口大小
    this->setPalette(palette); // 设置调色板
    this->setAutoFillBackground(true); // 自动填充背景
    ui->textEdit->setStyleSheet("QTextEdit { background-color: rgba(255, 255, 255, 128); }");
    ui->textEdit_2->setStyleSheet("QTextEdit { background-color: rgba(255, 255, 255, 128); }");

    setWindowTitle("串口调试助手(●′ω`●)");//窗口标题
    time1= new QTimer(this);
    serial=new QSerialPort(this);
    time1->start(500);//开启一个200ms的定时器
    connect(time1,&QTimer::timeout,this,&Widget::timerEvent);//时间到后,发出timeout信号,触发槽函数timerevent
    ui->comboBox_2->setCurrentIndex(4);
    ui->comboBox_3->setCurrentIndex(3);
    ui->comboBox_4->setCurrentIndex(2);
    ui->comboBox_5->setCurrentIndex(0);
    rx_len=0;
    tx_len=0;
    connect(serial,QSerialPort::readyRead,this,&Widget::serial_port);//当串口有数据时,转到槽
    ui->checkBox->setCheckState(Qt::Checked);//默认选中ascii

}

Widget::~Widget()
{
    delete ui;
}


void Widget::timerEvent()
{

    QStringList newPortStringList;//创建容器
    newPortStringList.clear();
    foreach(const QSerialPortInfo &info,QSerialPortInfo::availablePorts())//foreach关键字,遍历列表,放到info中
    {
        newPortStringList+=info.portName();//将可用串口的名字放到字符串容器中

        //qDebug()<<newPortStringList;
    }

    if(newPortStringList.size()!=PortStringList.size())
    {
        PortStringList=newPortStringList;//PortStringList是私有成员,是全局的,保存上一次的串口名字
        ui->comboBox->clear();//将下拉栏清空
        ui->comboBox->addItems(PortStringList);//上次串口名字加入
    }


}

void Widget::on_pushButton_clicked()
{
    if(ui->pushButton->text()==QString("打开串口"))
    {
        rx_len=0;
        serial->setPortName(ui->comboBox->currentText());//设置串口名字
        serial->setBaudRate(ui->comboBox_2->currentText().toInt());//设置波特率,注意将text转化为int类型
        switch (ui->comboBox_3->currentText().toInt()) {
        case 5:
            serial->setDataBits(QSerialPort::Data5);
            break;
        case 6:
            serial->setDataBits(QSerialPort::Data6);
            break;
        case 7:
            serial->setDataBits(QSerialPort::Data7);
            break;
        case 8:
            serial->setDataBits(QSerialPort::Data8);
        break;
        default:
            serial->setDataBits(QSerialPort::UnknownDataBits);
            break;
        }

        switch(ui->comboBox_4->currentIndex())//校验位
        {
            case 0:serial->setParity(QSerialPort::EvenParity);break;
            case 1:serial->setParity(QSerialPort::OddParity);break;
            case 2:serial->setParity(QSerialPort::NoParity);break;//没有检验
            default:
                serial->setParity(QSerialPort::UnknownParity);break;//位置校验
        }

        switch (ui->comboBox_5->currentIndex()) {
        case 0:serial->setStopBits(QSerialPort::OneStop);break;
        case 1:serial->setStopBits(QSerialPort::OneAndHalfStop);break;
        case 2:serial->setStopBits(QSerialPort::TwoStop);break;

        default:
            serial->setStopBits(QSerialPort::UnknownStopBits);
            break;
        }

        serial->setFlowControl(QSerialPort::NoFlowControl);
        if(!serial->open(QIODevice::ReadWrite))
        {
            QMessageBox::information(this,"错误提示","无法打开串口",QMessageBox::Ok);
            return;
        }

        //打开串口状态,不可调整串口参数
        ui->comboBox->setEnabled(false);
        ui->comboBox_2->setEnabled(false);
        ui->comboBox_3->setEnabled(false);
        ui->comboBox_4->setEnabled(false);
        ui->comboBox_5->setEnabled(false);

        ui->pushButton->setText("关闭串口");
    }
    else
    {
        serial->close();
        ui->comboBox->setEnabled(true);
        ui->comboBox_2->setEnabled(true);
        ui->comboBox_3->setEnabled(true);
        ui->comboBox_4->setEnabled(true);
        ui->comboBox_5->setEnabled(true);
        ui->pushButton->setText("打开串口");
    }
}

void Widget::serial_port()
{
    qDebug()<<"hello world";
    QString last_rx;
    int length;
    // 获取当前日期和时间
    QDateTime currentDateTime = QDateTime::currentDateTime();

    // 将日期和时间格式化为字符串
    //QString timestamp = currentDateTime.toString("hh:mm:ss");
    int my_hour=currentDateTime.time().hour();
    int my_min=currentDateTime.time().minute();
    int my_sec=currentDateTime.time().second();
    int my_ms = currentDateTime.time().msec();

    QString time_temp=QString("%1:%2:%3:%4").arg(my_hour,2,10,QLatin1Char('0')).arg(my_min,2,10,QLatin1Char('0')).arg(my_sec,2,10,QLatin1Char('0')).arg(my_ms,3,10,QLatin1Char('0'));

    // 将时间戳添加到QTextEdit
    //ui->textEdit->append(timestamp + " - Your text here");


    if(ui->checkBox_3->checkState()!=Qt::Checked)//不处于暂停
    {
        last_rx=ui->textEdit->toPlainText();//获取当前数据的方法
        rx_data=serial->readAll();//从串口接收数据


        //rx_data = QString::fromUtf8(rx_data);//转为UTF-8编码的QString


        rx_len+=rx_data.length();//调用qstring中的方法
        ui->label_10->setText(QString::number(rx_len));//将长度转化为整形
        if(ui->checkBox_2->checkState()==Qt::Checked)//hex
        {
            rx_data=rx_data.toLatin1().toHex();//qstring先转字符串,后转为hex格式
            length=rx_data.length();
            for(int i=0;i<length/2;i++)
            {
                rx_data.insert(2+3*i,' ');
            }
        }
        else//ascii
        {
            rx_data=rx_data.toLatin1();//转为ascii字符串的方法
        }
        last_rx=last_rx.append(time_temp+"[收]>>:");//
        last_rx=last_rx.append(rx_data);//最新接受到的追加到后面
        last_rx=last_rx.append("\n");//每次都要换行

        ui->textEdit->setText(last_rx);//填入字符串,输出
        //ui->textEdit->setWordWrapMode(QTextOption::WordWrap);

    }
}

//三者互斥
void Widget::on_checkBox_clicked()//ASCII
{
    ui->checkBox->setCheckState(Qt::Checked);
    ui->checkBox_2->setCheckState(Qt::Unchecked);
    ui->checkBox_3->setCheckState(Qt::Unchecked);
}

void Widget::on_checkBox_2_clicked()//hex
{
    ui->checkBox->setCheckState(Qt::Unchecked);
    ui->checkBox_2->setCheckState(Qt::Checked);
    ui->checkBox_3->setCheckState(Qt::Unchecked);
}

void Widget::on_checkBox_3_clicked()//暂停
{
    ui->checkBox->setCheckState(Qt::Unchecked);
    ui->checkBox_2->setCheckState(Qt::Unchecked);
    ui->checkBox_3->setCheckState(Qt::Checked);
}

void Widget::on_pushButton_2_clicked()
{
    //将text_edit2中数据发送出去
//    QByteArray byte_array;
//    tx_data=ui->textEdit_2->toPlainText();//获取当前数据
//    byte_array=tx_data.toLatin1();//将当前数据转换为QByteArray类型
//    serial->write(byte_array);//串口发送
//    rx_len+=tx_data.length();//获得长度
//    ui->label_12->setText(QString::number(rx_len));//显示长度
    // 获取当前日期和时间
    QDateTime currentDateTime = QDateTime::currentDateTime();

    // 将日期和时间格式化为字符串
    //QString timestamp = currentDateTime.toString("hh:mm:ss");
    int my_hour=currentDateTime.time().hour();
    int my_min=currentDateTime.time().minute();
    int my_sec=currentDateTime.time().second();
    int my_ms = currentDateTime.time().msec();

    QString time_temp=QString("%1:%2:%3:%4").arg(my_hour,2,10,QLatin1Char('0')).arg(my_min,2,10,QLatin1Char('0')).arg(my_sec,2,10,QLatin1Char('0')).arg(my_ms,3,10,QLatin1Char('0'));


    tx_data=ui->textEdit_2->toPlainText();
    QByteArray temp=tx_data.toLatin1();
    serial->write(temp);
    rx_len+=tx_data.length();
    ui->label_12->setText(QString::number(rx_len));

    QString last_tx;
    last_tx=ui->textEdit->toPlainText();//获取当前数据的方法
    last_tx=last_tx.append(time_temp+"[发]>>:");//
    last_tx=last_tx.append(tx_data);//最新接受到的追加到后面
    last_tx=last_tx.append("\n");//每次都要换行

    ui->textEdit->setText(last_tx);//填入字符串,输出
}

void Widget::on_pushButton_3_clicked()
{
    ui->textEdit->clear();
}

void Widget::on_pushButton_4_clicked()
{
    ui->textEdit_2->clear();
}
widget.h中的代码,就创建了几个私有变量和槽函数。
#ifndef WIDGET_H
#define WIDGET_H

#include <QWidget>
#include <QtSerialPort/QtSerialPort>
#include <QTimer>
#include <QTimerEvent>
namespace Ui {
class Widget;
}

class Widget : public QWidget
{
    Q_OBJECT

public:
    explicit Widget(QWidget *parent = 0);
    ~Widget();

private:
    Ui::Widget *ui;
    QTimer *time1;
    QStringList PortStringList;
    QSerialPort *serial;//私有成员,对象指针
    QString rx_data,tx_data;
    long rx_len,tx_len;
private slots:
   void timerEvent();

   void on_pushButton_clicked();

   void serial_port();
   void on_checkBox_clicked();
   void on_checkBox_2_clicked();
   void on_checkBox_3_clicked();
   void on_pushButton_2_clicked();
   void on_pushButton_3_clicked();
   void on_pushButton_4_clicked();
};

#endif // WIDGET_H
这是工程文件,这里主要是加了一个软件的图标。把这个图片放在工程文件夹里,写上RC_ICONS = 1.ico就OK了,这个1.ico是文件的名字
需要注意的是,这个ico文件的大小好像是又限制的,我用别的bmp文件直接改格式成ico,结果编译就报错了。然后用转换工具转换,改变了像素大小,编译就通过了。
#-------------------------------------------------
#
# Project created by QtCreator 2023-02-28T22:11:46
#
#-------------------------------------------------

QT       += core gui
QT += serialport

greaterThan(QT_MAJOR_VERSION, 4): QT += widgets

TARGET = untitled1
TEMPLATE = app

# The following define makes your compiler emit warnings if you use
# any feature of Qt which as been marked as deprecated (the exact warnings
# depend on your compiler). Please consult the documentation of the
# deprecated API in order to know how to port your code away from it.
DEFINES += QT_DEPRECATED_WARNINGS

# You can also make your code fail to compile if you use deprecated APIs.
# In order to do so, uncomment the following line.
# You can also select to disable deprecated APIs only up to a certain version of Qt.
#DEFINES += QT_DISABLE_DEPRECATED_BEFORE=0x060000    # disables all the APIs deprecated before Qt 6.0.0


SOURCES += \
        main.cpp \
        widget.cpp

HEADERS += \
        widget.h

FORMS += \
        widget.ui

RESOURCES += \
    image.qrc

RC_ICONS = 1.ico
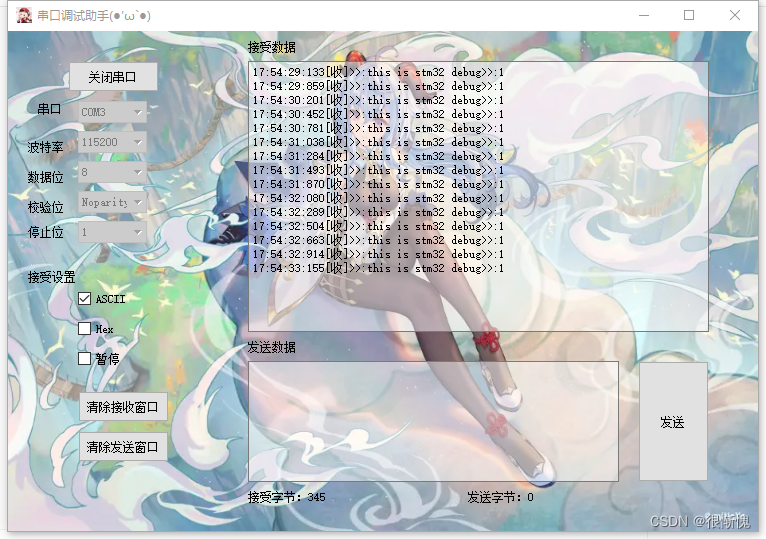
四、运行效果
接收
发送
打包软件
软件写好之后,还是debug的版本,不是发行版本,体积大,别人也能直接看你源码。所以要打包成发行版本
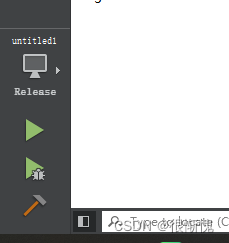
在软件界面左下角选择release后运行,在工程文件夹下会生成一个对于的release文件。
 这里还不时要最终要发布的,选这里的exe可执行文件,创建一个新的文件夹把它丢进去。然后在qt软件的文件夹里找到这个cmd终端

输入windeployqt exe的目录,例如windeployqt F:\qt_exp\1_hello_world\first_project 回车之后,库就会自动添加到这个文件夹
然后这个文件夹,就包含了所有的依赖库,就能打包发给别人用了。
https://gitee.com/wangyongwei111/qt.git
项目放在这个git仓库中
总结
以上,基本上完成了串口调试工具的基本功能,就是还有几个遗憾的地方没搞好。
一个是背景图片的问题,不知道为什么加入背景图片后,运行起来就变得很卡,动一下卡一下。
第二是还是不支持中文,用stm32f103发个中文过去,显示是会乱码的。
这两个问题还不知道怎么解决。


 5519
5519


 被折叠的 条评论
为什么被折叠?
被折叠的 条评论
为什么被折叠?
 到【灌水乐园】发言


