


LFWG2024.09
2024.9.2.4:48清早下个新笔记
json里的框框各是什么?
数组:[元素,元素,元素]或者多维数组[数组1,数组2][数组3,数组4][数组5,数组6]这种内和外都是数组Array**有序的元素(Element)**数据集合.
对象:{键名1:值1,键名2:值2,键名3:值3}或者{键名1:{键名2:值2},{键名3:值3}}这种嵌套的对象(Object),“键名1”:值1这样的一对叫成员(Member)对象.
()方法没有这种数据结构
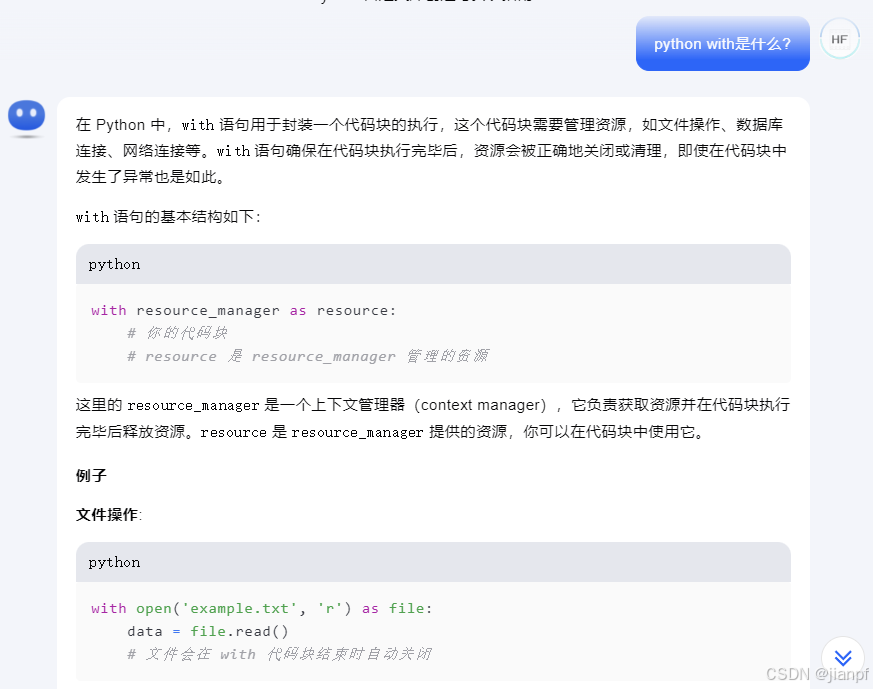
在 Python 中,with 语句用于封装一个代码块的执行,这个代码块需要管理资源,如文件操作、数据库连接、网络连接等。with 语句确保在代码块执行完毕后,资源会被正确地关闭或清理,即使在代码块中发生了异常也是如此。
import json

# 数组类型
number=[1,2,3]
filename="./data/temp_json.txt"

# 块处理打开一个文件
with open(filename,"w") as f:
    #dump数据保存文件名中[1, 2, 3]
    json.dump(number,f)

# 括号是数组
number=(1,2,23)
# 块处理打开一个文件
with open(filename,"w") as f:
    #dump数据保存文件名中[1, 2, 23]
    json.dump(number,f)

# 对象
number={'a':100,"b":(1,2),"c":[4,5,6],"d":{"w":"windows","L":"linux"}}
# 块处理打开一个文件
with open(filename,"w") as f:
    #dump数据保存文件名中
    # {"a": 100, "b": [1, 2], "c": [4, 5, 6], "d": {"w": "windows", "L": "linux"}}
    json.dump(number,f)

# 逗号隔开的都是数组[]
number={'a':100,"b":(1,2),"c":[4,5,6],"d":{"w":"windows","L":"linux"}},{"jpf":"jianPF","flag":"ok"}
# 块处理打开一个文件
with open(filename,"w") as f:
    #dump数据保存文件名中
    # [{"a": 100, "b": [1, 2], "c": [4, 5, 6], "d": {"w": "windows", "L": "linux"}}, {"jpf": "jianPF", "flag": "ok"}]
    json.dump(number,f)

with open(filename,"r") as rf:
    data=rf.read()
print('读取到的json:',data)

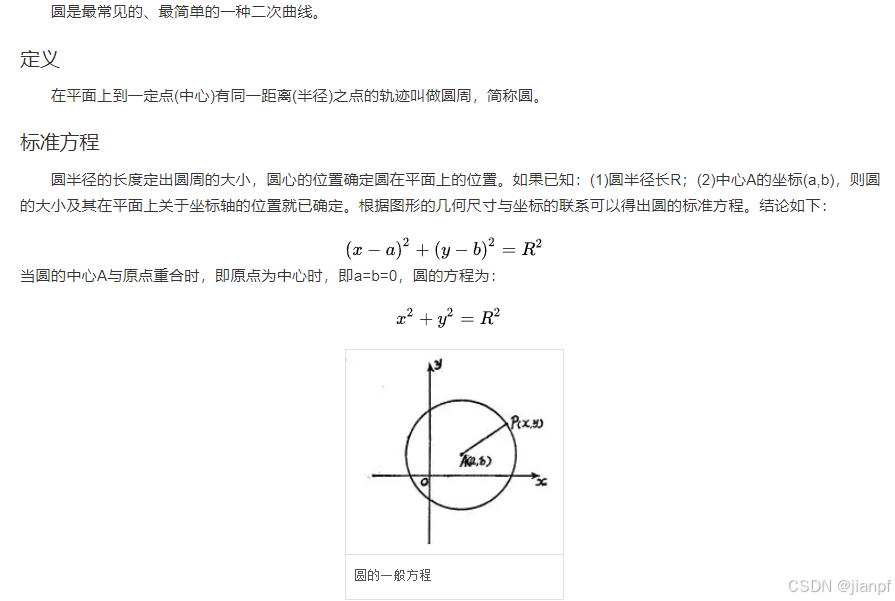
居中公式2:取整(绝对值(总长-单长))/2
https://blog.csdn.net/qq_64919823/article/details/139023335
# LFZL给到地图左上点,计算1920*1080窗口的上下左右
scr_point=(2166, 690, 256, 256)
up_click_point=((scr_point[0]+scr_point[2]-1920)+scr_point[0]+scr_point[2])//2,scr_point[1]+100
down_click_point=((scr_point[0]+scr_point[2]-1920)+scr_point[0]+scr_point[2])//2,scr_point[1]+900
left_click_point=(scr_point[0]+scr_point[2]-1920)+100,scr_point[1]+(1080/2)
rigtht_click_point=scr_point[0],scr_point[1]+(1080/2)
https://blog.csdn.net/c80486/article/details/52504607
https://www.cnblogs.com/GhostRiderQin/p/11949354.html
https://blog.51cto.com/u_16099265/7412689
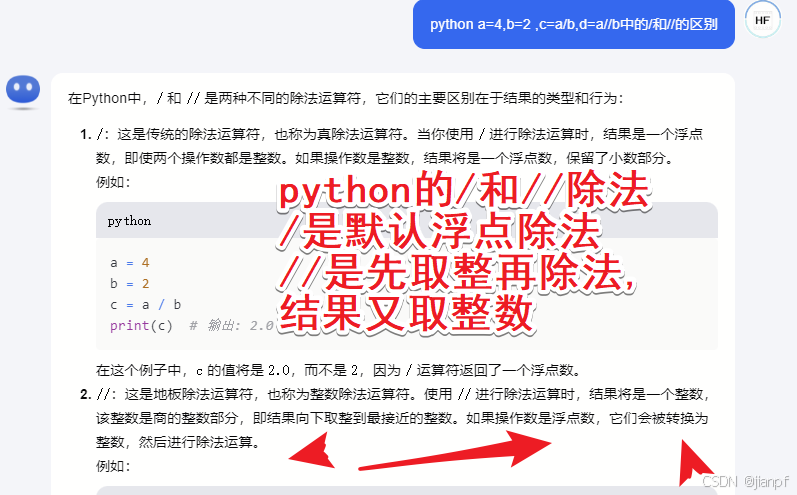
python中//是取整再除法再取整数
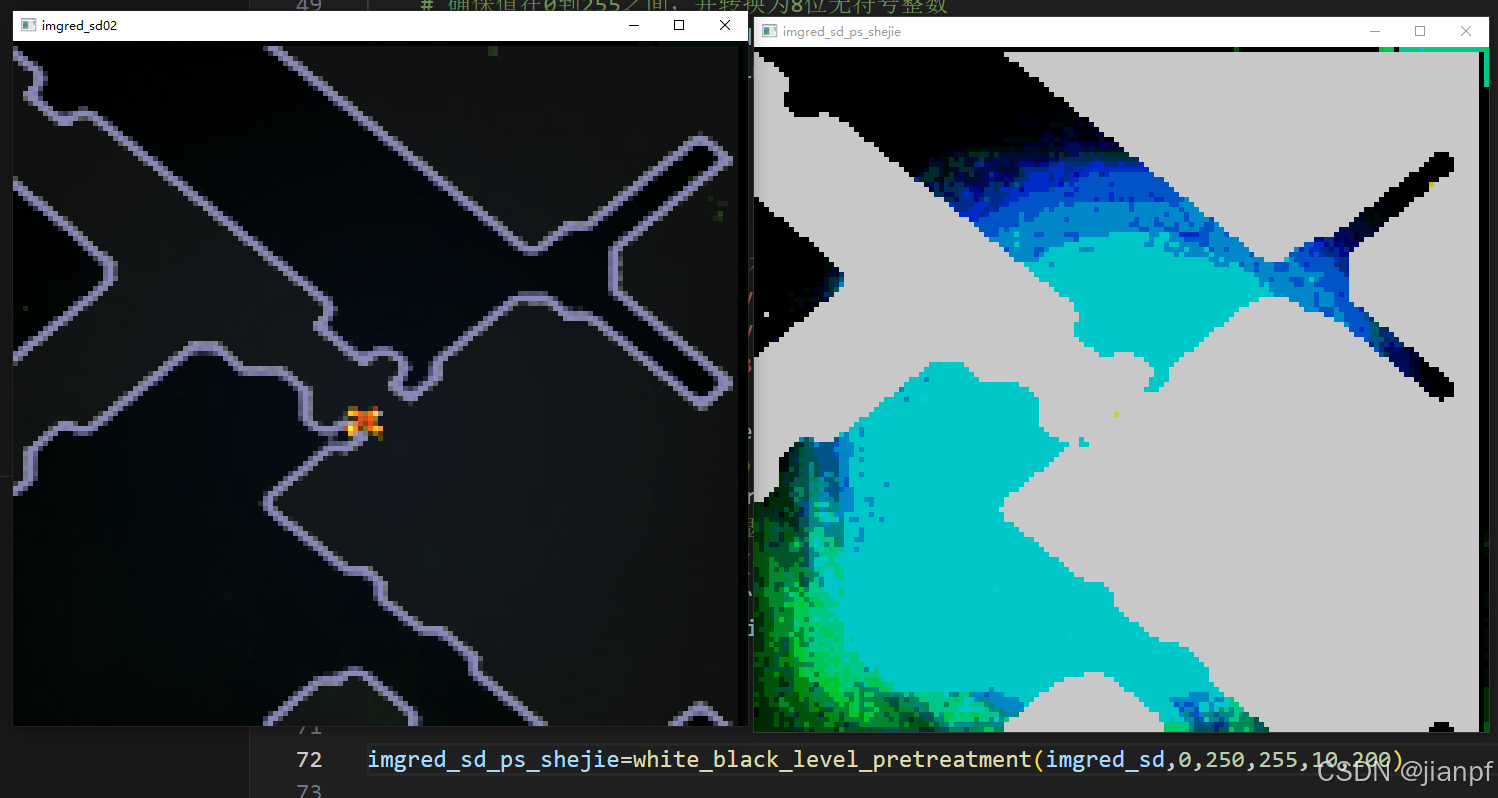
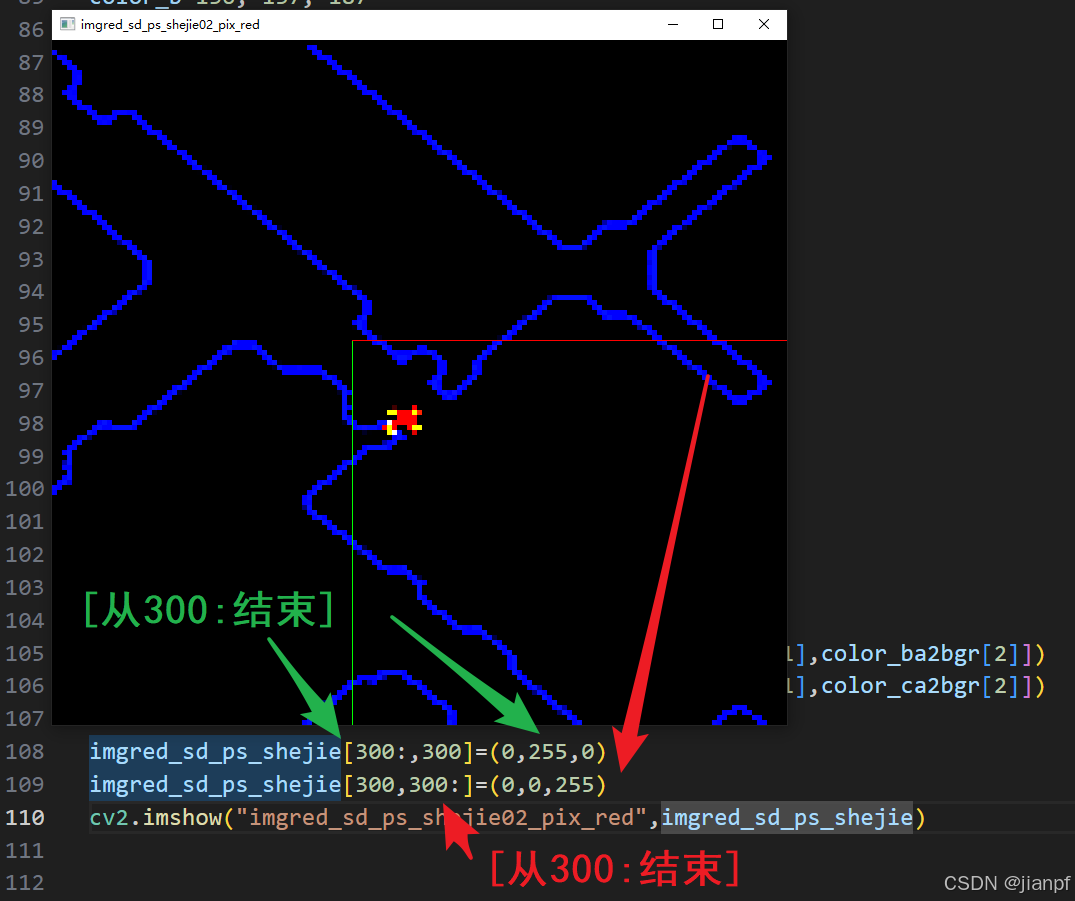
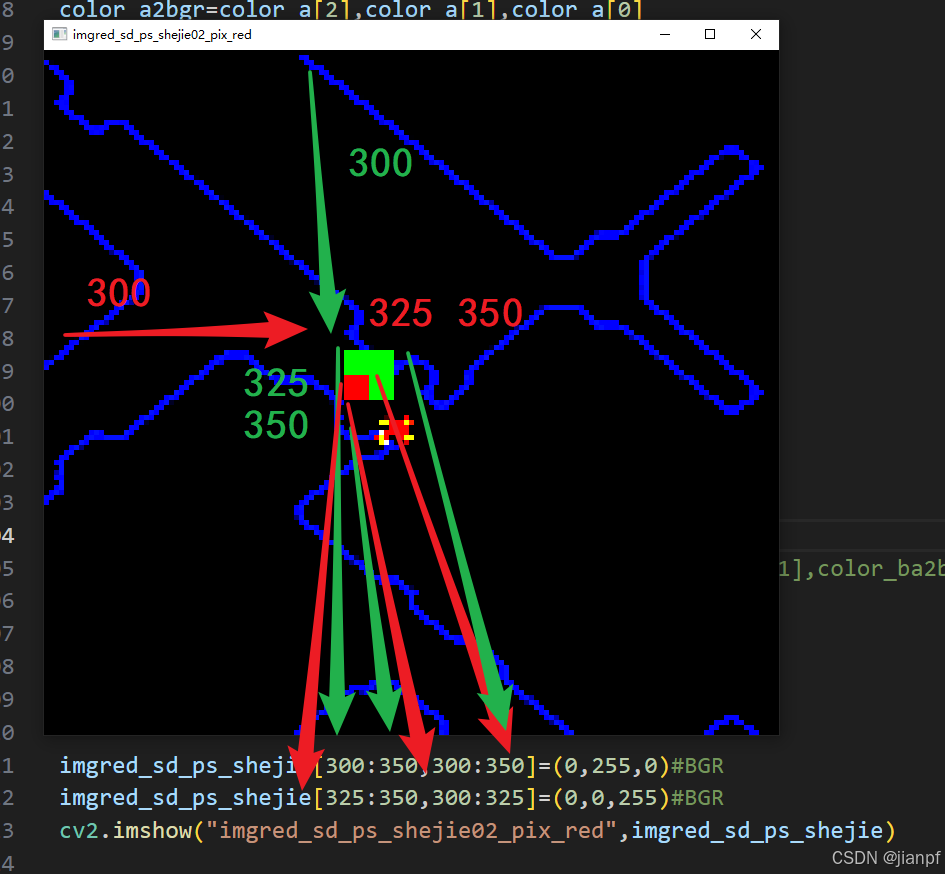
imgred_sd_ps_shejie=white_black_level_pretreatment(imgred_sd,0,250,255,10,200)
中间调250控制曝光
阴影输出10控制分层
高光输出200控制分层
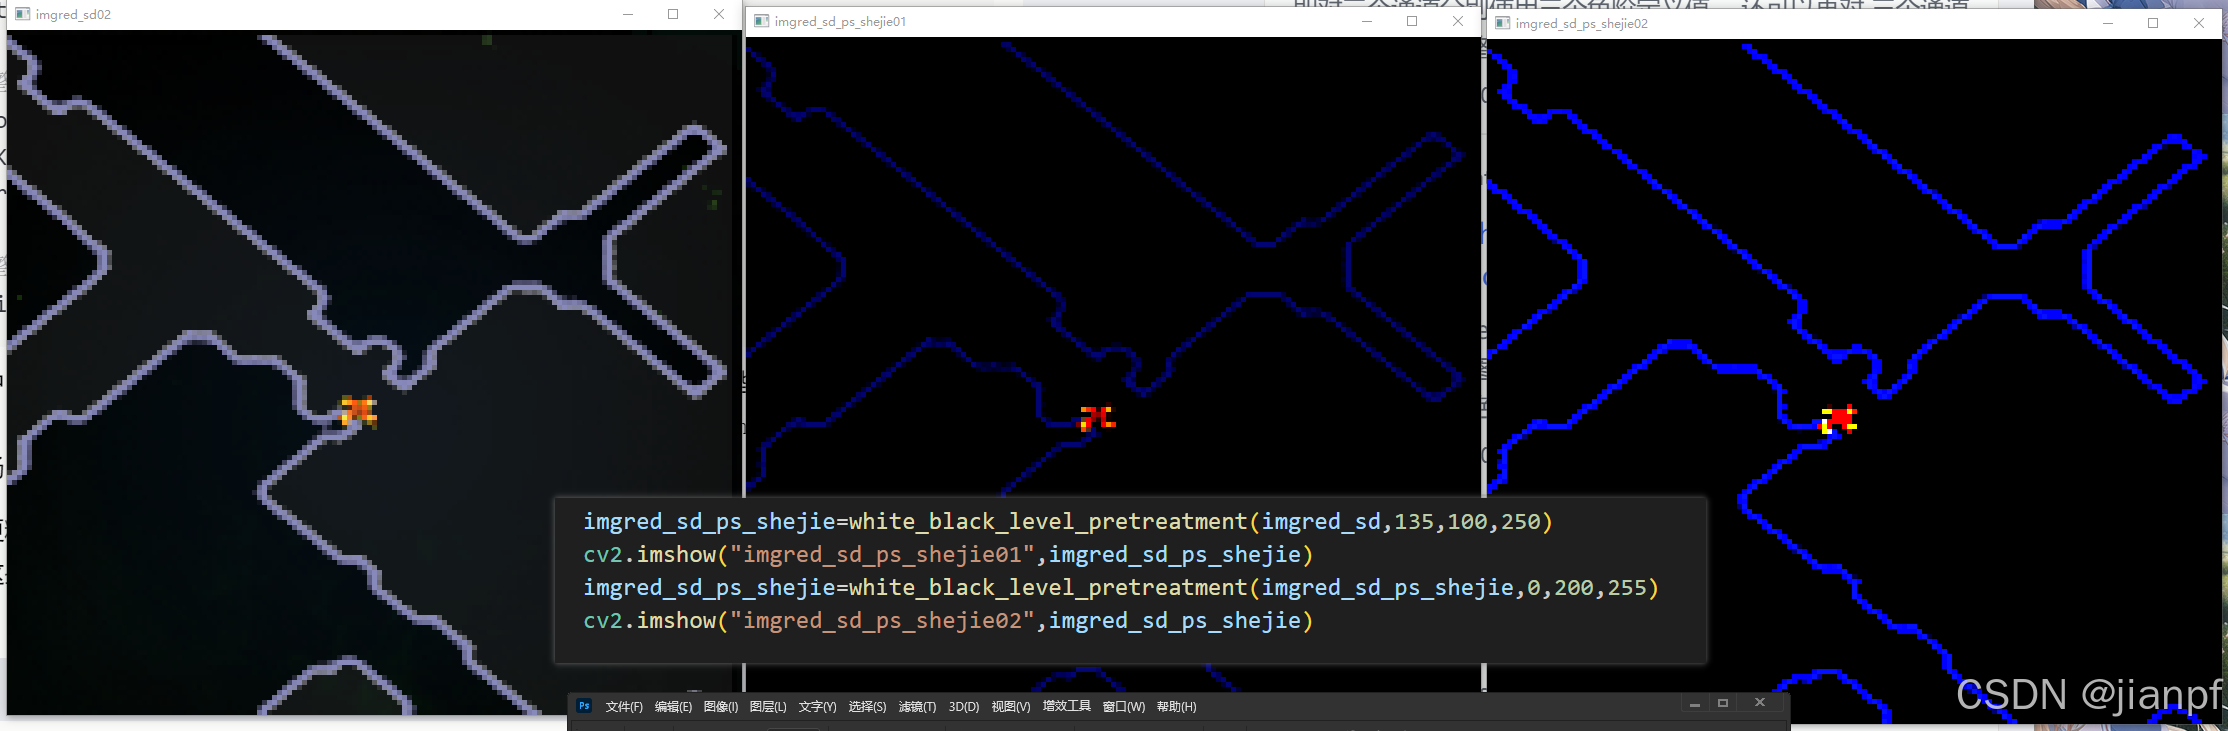
imgred_sd_ps_shejie=white_black_level_pretreatment(imgred_sd,135,100,250)
cv2.imshow("imgred_sd_ps_shejie01",imgred_sd_ps_shejie)
imgred_sd_ps_shejie=white_black_level_pretreatment(imgred_sd_ps_shejie,0,200,255)
cv2.imshow("imgred_sd_ps_shejie02",imgred_sd_ps_shejie)
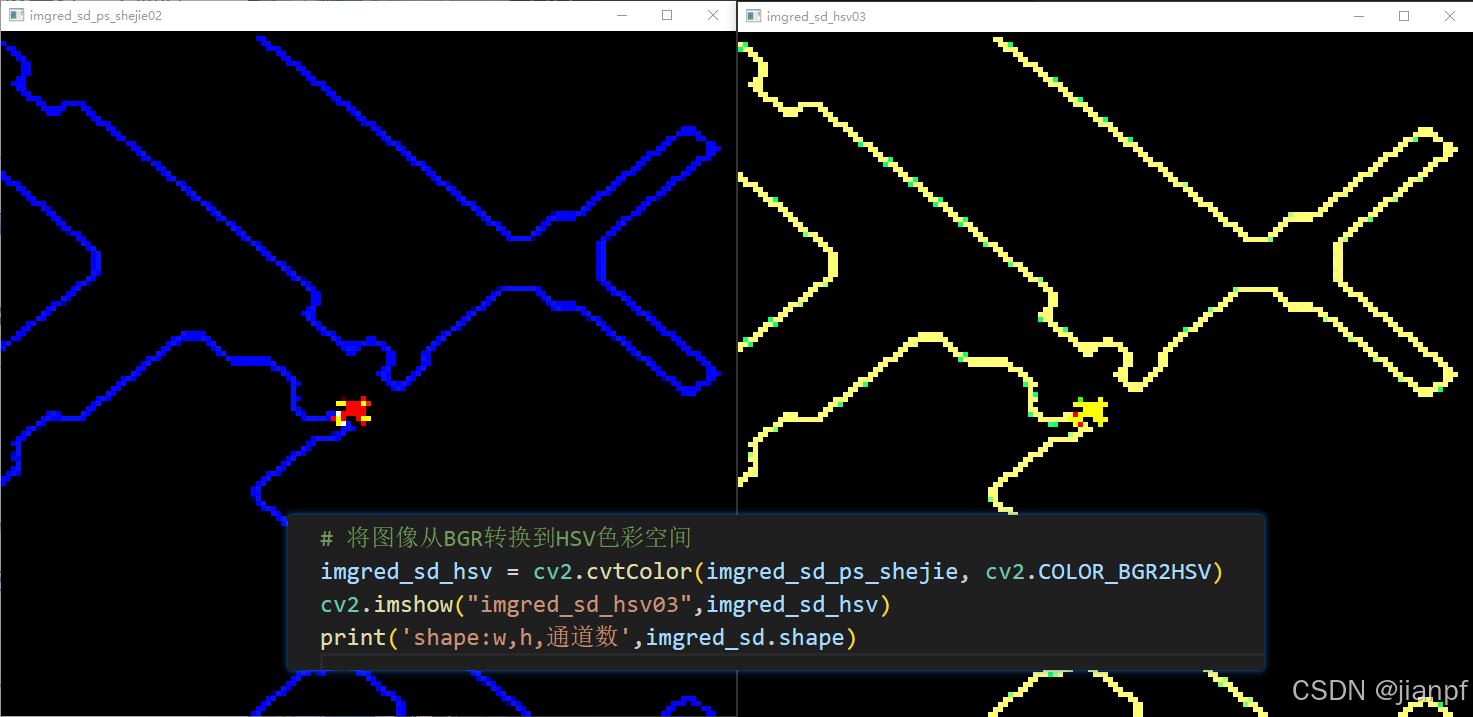
# 将图像从BGR转换到HSV色彩空间
imgred_sd_hsv = cv2.cvtColor(imgred_sd_ps_shejie, cv2.COLOR_BGR2HSV)
cv2.imshow("imgred_sd_hsv03",imgred_sd_hsv)
print('shape:w,h,通道数',imgred_sd.shape)
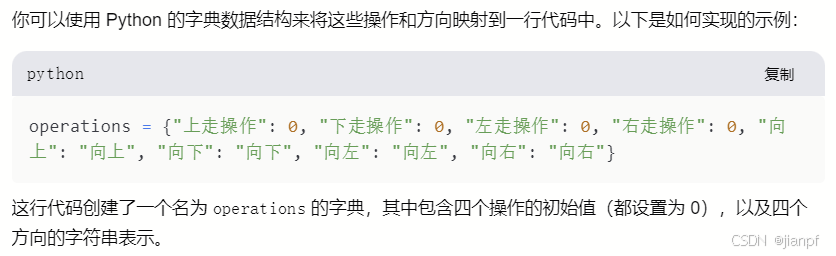
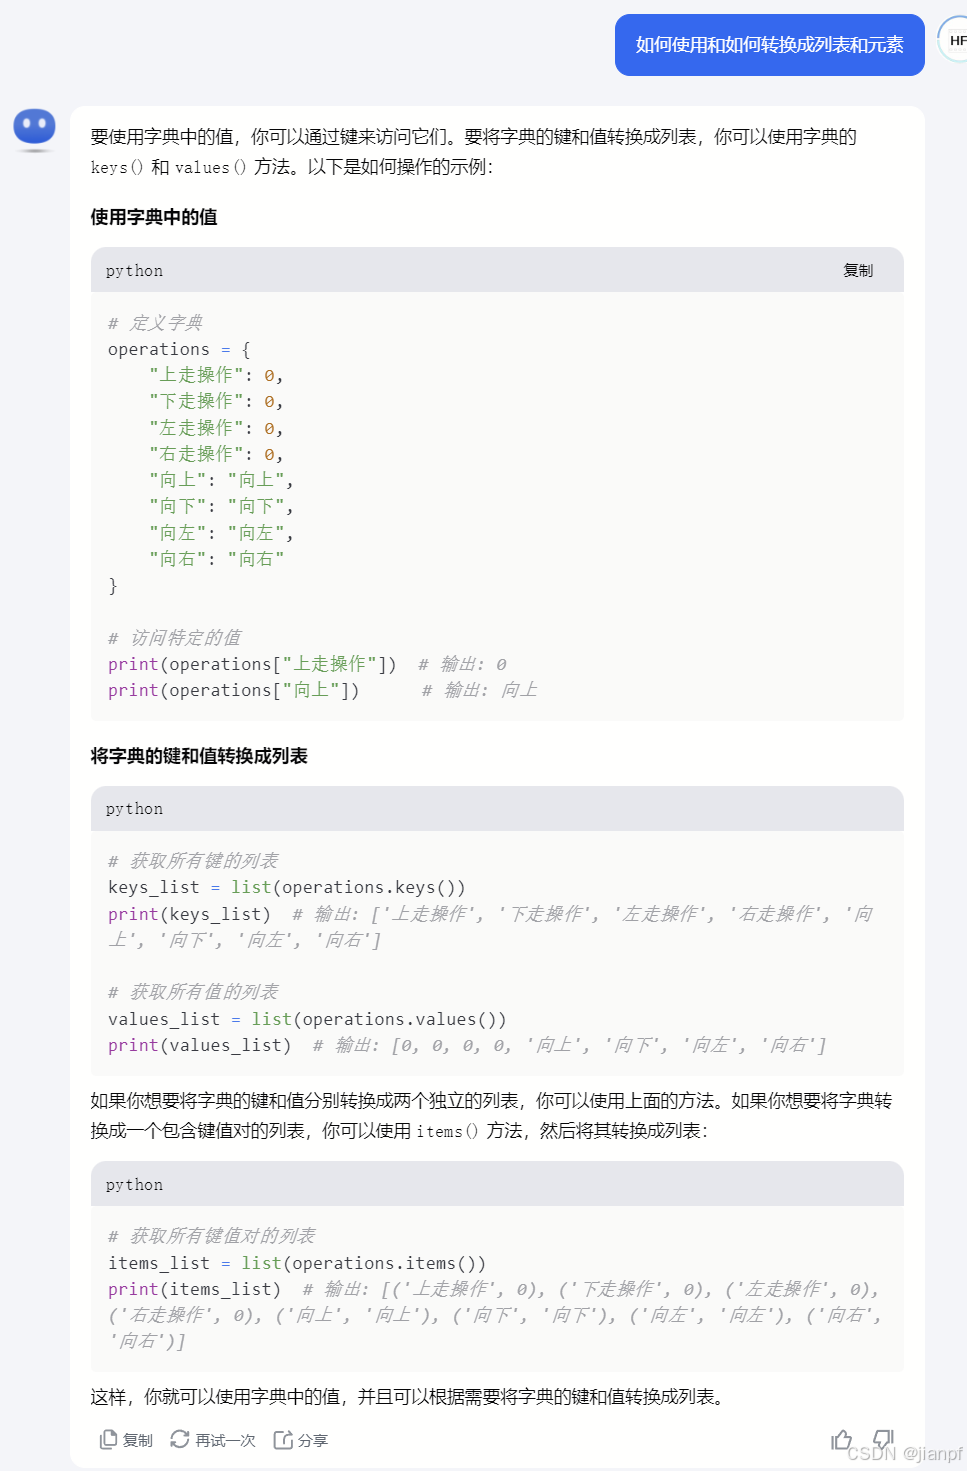
还有一种数据类型,字典对象
# 元素和列表的转换JPF2024.9.2
a=(1,2,3)
b=[3,4,5]
c=[a]
d=[b]
e=([1,2,3],4)
print('(元素不可修改)\t\t',a)
print('[列表可修改]\t\t',b)
print('[列表(元素)]\t\t',c)
print('[列表[列表]]\t\t',d)
print('([数组]元素)\t\t',e)
print('[列表化a元素]\t\t',list(a))
print('(元素化b列表)\t\t',tuple(b))
"""
输出结果:
(元素不可修改) (1, 2, 3)
[列表可修改] [3, 4, 5]
[列表(元素)] [(1, 2, 3)]
[列表[列表]] [[3, 4, 5]]
([数组]元素) ([1, 2, 3], 4)
[列表化a元素] [1, 2, 3]
(元素化b列表) (3, 4, 5)
"""
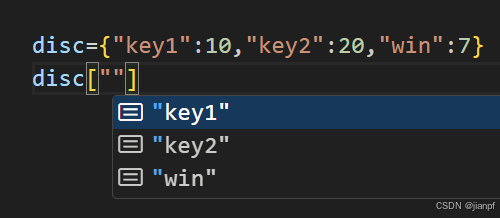
operations={"key1":value,"key2",value}
a=operations.key1
屏幕右上方为原点,颜色覆盖顺序
原来是excel表x代表行(含),y代表列(不含)
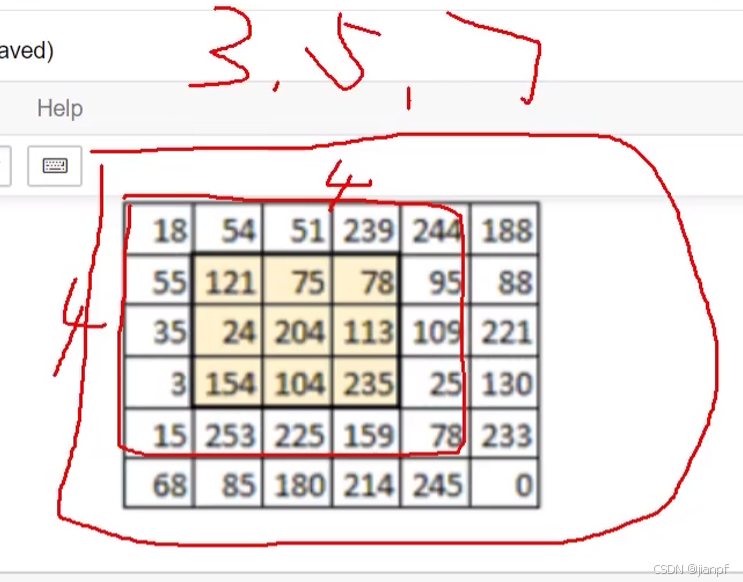
img[第10行开始:到第20行,第10列;到第30列]的区域中(结束索引大于开始索引)(结束行>开始行)
#numpy处理图像分割原理,索引每一行
import cv2
import numpy as np
matrix =  np.array([
    [91, 92, 93, 94, 95],
    [96, 97, 98, 99, 10],
    [11, 12, 13, 14, 15],
    [16, 17, 18, 19, 20],
    [21, 22, 23, 24, 25]
])

sliced_matrix = matrix[1:4, 1:4]
print(sliced_matrix)

"""
输出结果:(每行每行的输出)
[[97 98 99]
 [12 13 14]
 [17 18 19]]
 """
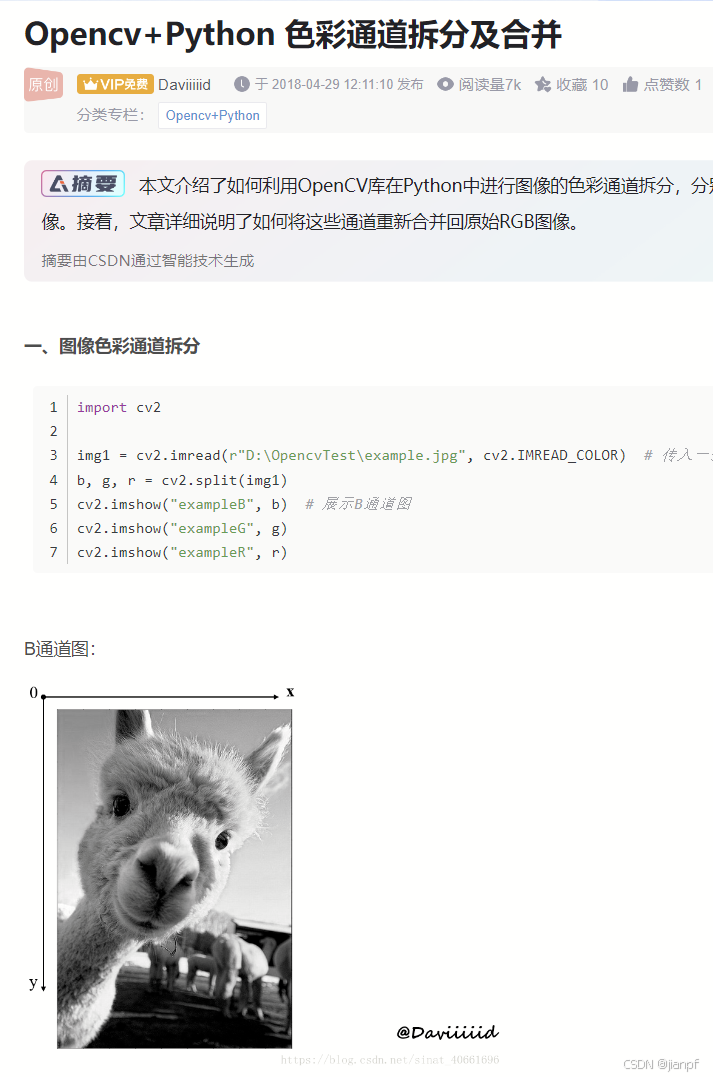
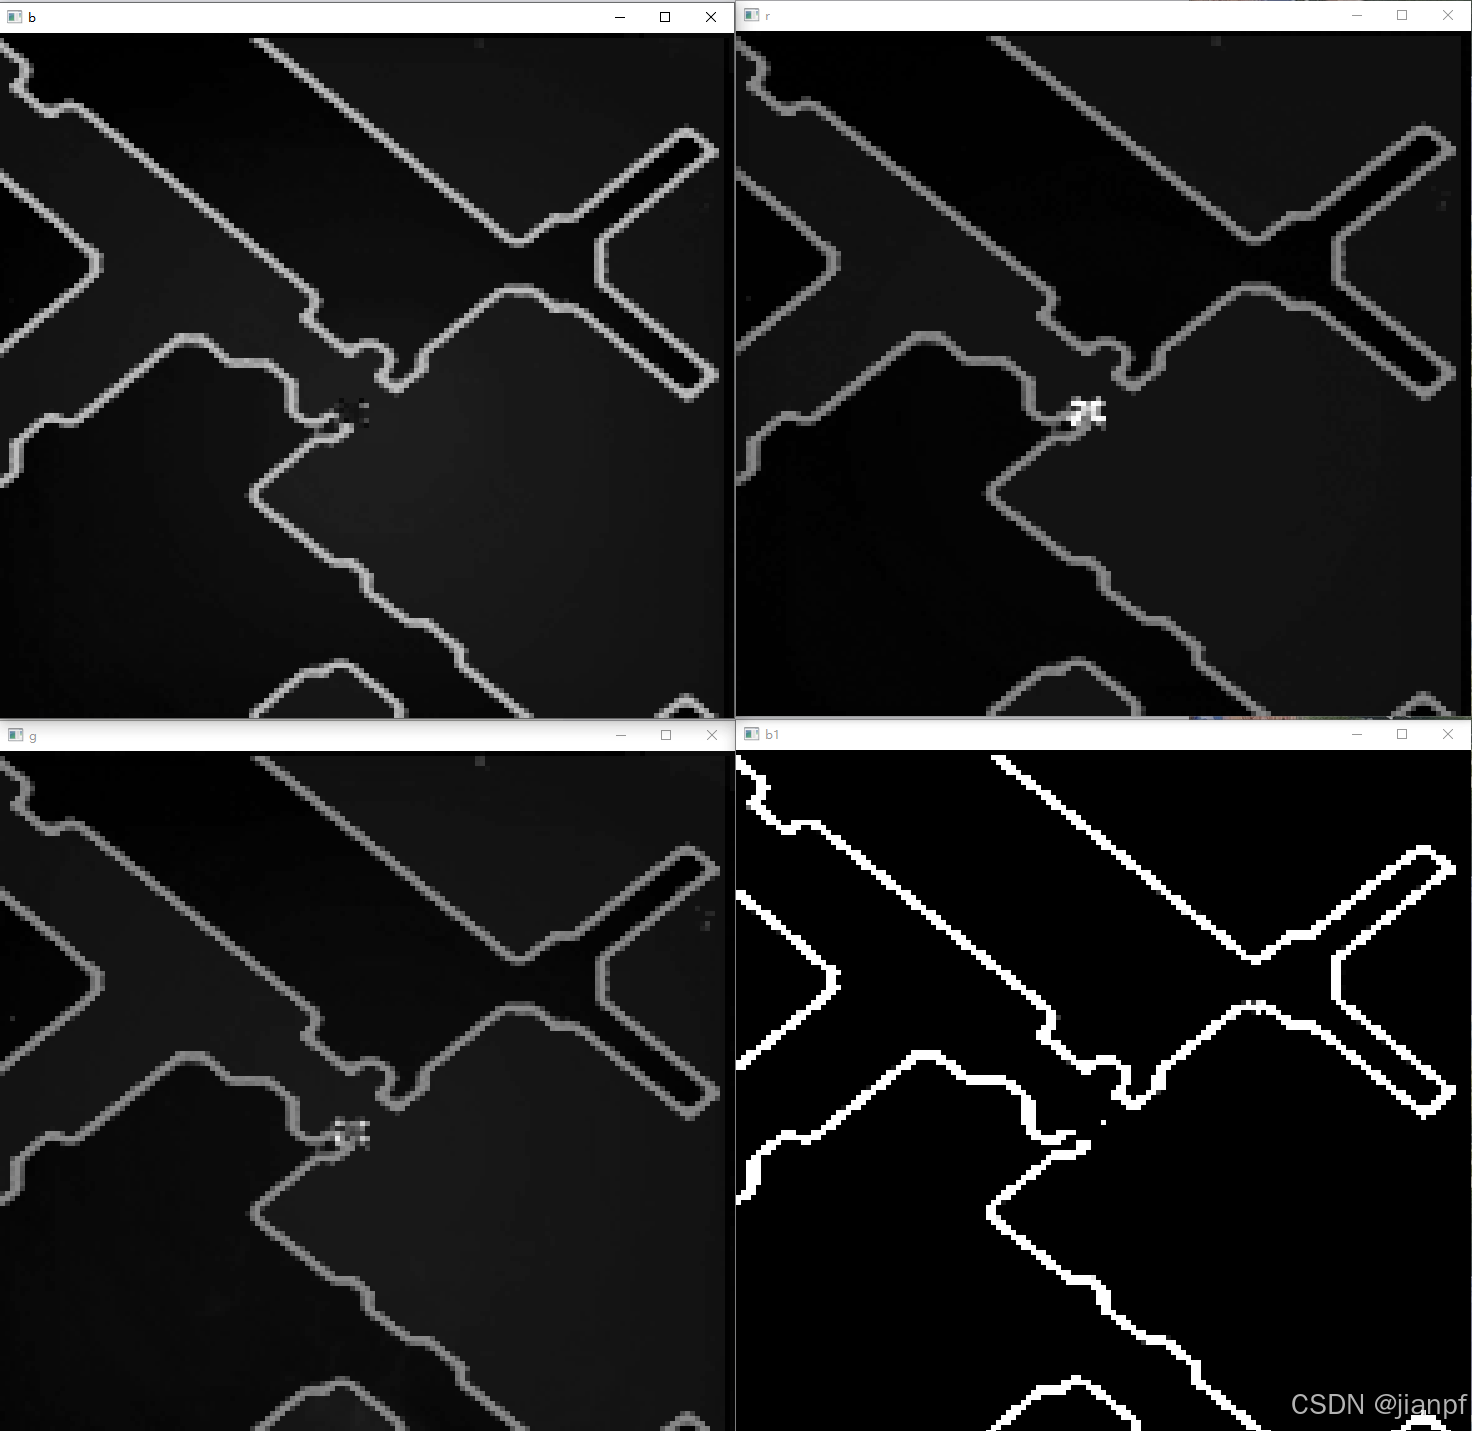
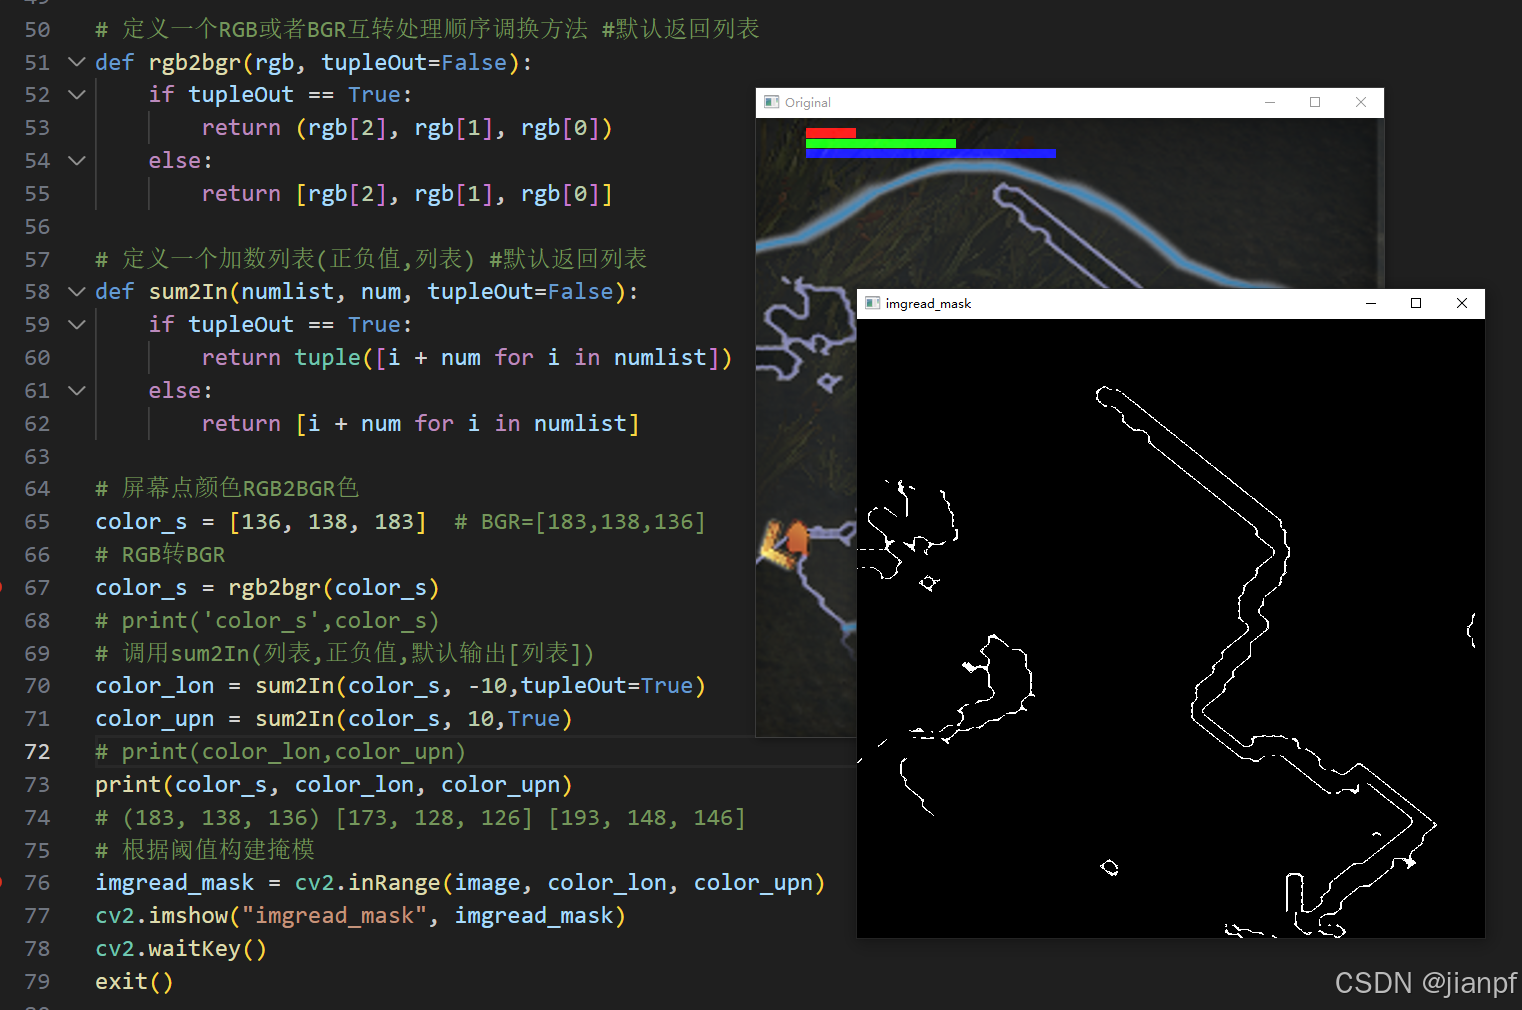
# 切割蓝色通道+色阶处理
imgred_b=cv2.split(imgred)[0]
https://blog.csdn.net/sinat_40661696/article/details/80142217
# ps修图-色阶(传入cv2图,阴影,中间调,高光)
# 中间调取 0 -50- 100(代表不改变)
# 阴影高光值取0-255
def white_black_level_pretreatment(img, shadow,midtone, highlight ,output_shadow=None, output_highlight=None):
    if highlight > 255:
        highlight = 255
    if shadow < 0:
        shadow = 0
    if shadow >= highlight:
        shadow = highlight - 2

    img = np.array(img, dtype=float)  # 确保使用浮点数进行计算

    diff = highlight - shadow
    coe = 255.0 / diff

    # 计算调整后的图像
    rgb_diff = img - shadow
    rgb_diff = np.maximum(rgb_diff, 0)
    adjusted_img = rgb_diff * coe

    # 应用伽马校正来调整中间调
    gamma = midtone / 100.0
    adjusted_img = np.power(adjusted_img, gamma)

    # 调整阴影和高光输出
    if output_shadow is not None:
        adjusted_img = np.clip(adjusted_img + (output_shadow - shadow), 0, 255)
    if output_highlight is not None:
        adjusted_img = np.clip(adjusted_img - (highlight - output_highlight), 0, 255)

    # 确保值在0到255之间,并转换为8位无符号整数
    adjusted_img = np.clip(adjusted_img, 0, 255)
    adjusted_img = adjusted_img.astype(np.uint8)

    return adjusted_img
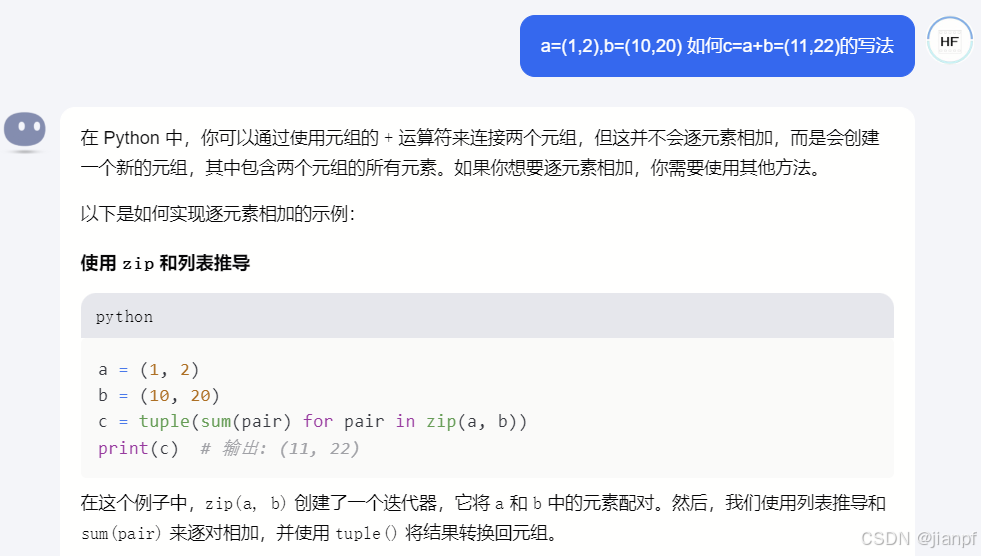
在这个例子中,zip(a, b) 创建了一个迭代器,它将 a 和 b 中的元素配对。然后,我们使用列表推导和 sum(pair) 来逐对相加,并使用 tuple() 将结果转换回元组。
通过列表块和sum和zip迭代器配对的到数组(优雅的代码块)
imgPianYiPoing = [sum(pair) for pair in zip(pianyiPoint, imgMidPoint)]
设置一个偏移值(记得用列表可修改)
pianyiPoint = [2, 2]
imgMidPoint = [int(i / 2) for i in imgWidthHight]
#rgb视野原图,误差±20
color_aa = 75, 136, 180
color_ba = [i-20 for i in color_aa ]# [160 116 55]
color_ca = [i+20 for i in color_aa ]# [200 156 95]
列表的方式来实现元组 a 和 b 的逐元素相加

格式化Python代码的快捷键是Shift + Alt + F
不知道安装哪个了?

r=np.ones((100,200),np.uint8)#黑1,无符号8位

你可以使用列表推导式或者 np.fromfunction()
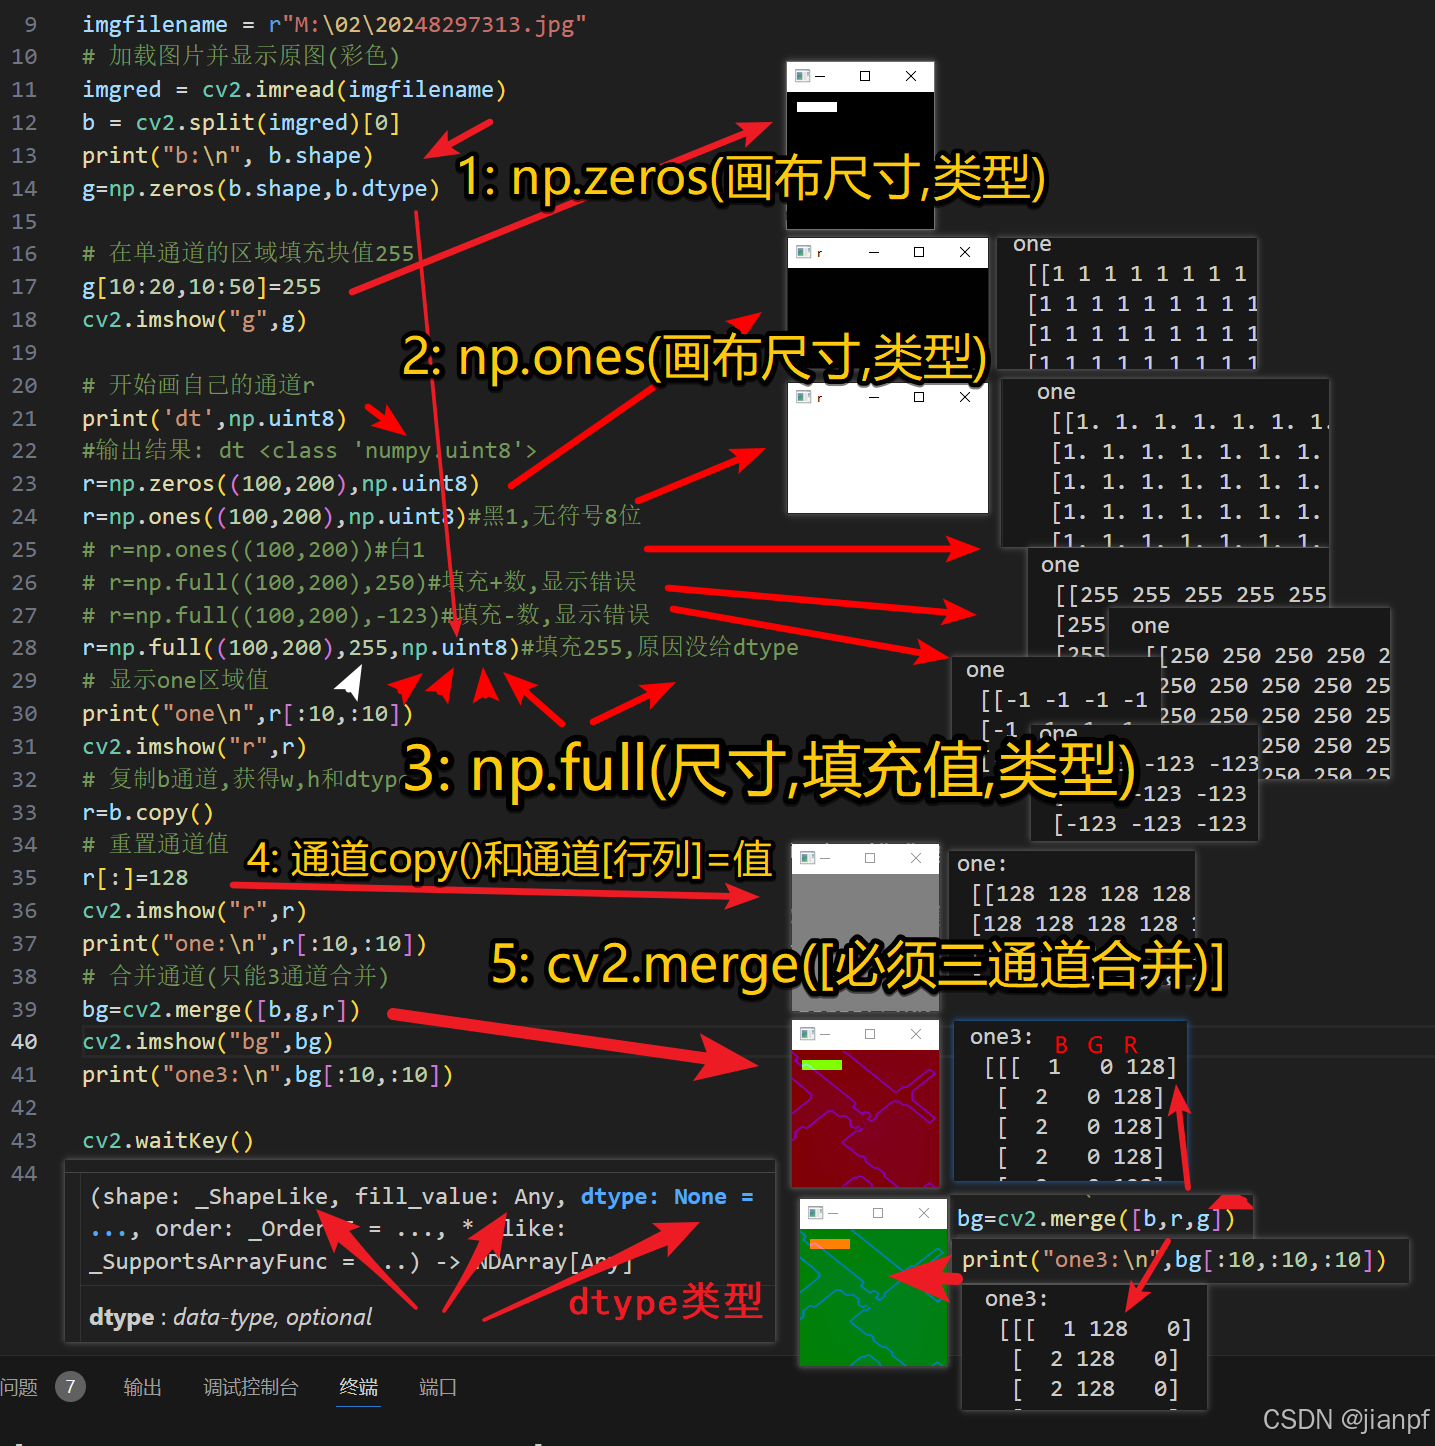
3: np.full(尺寸,填充值,类型)
5: cv2.merge([必须三通道合并])
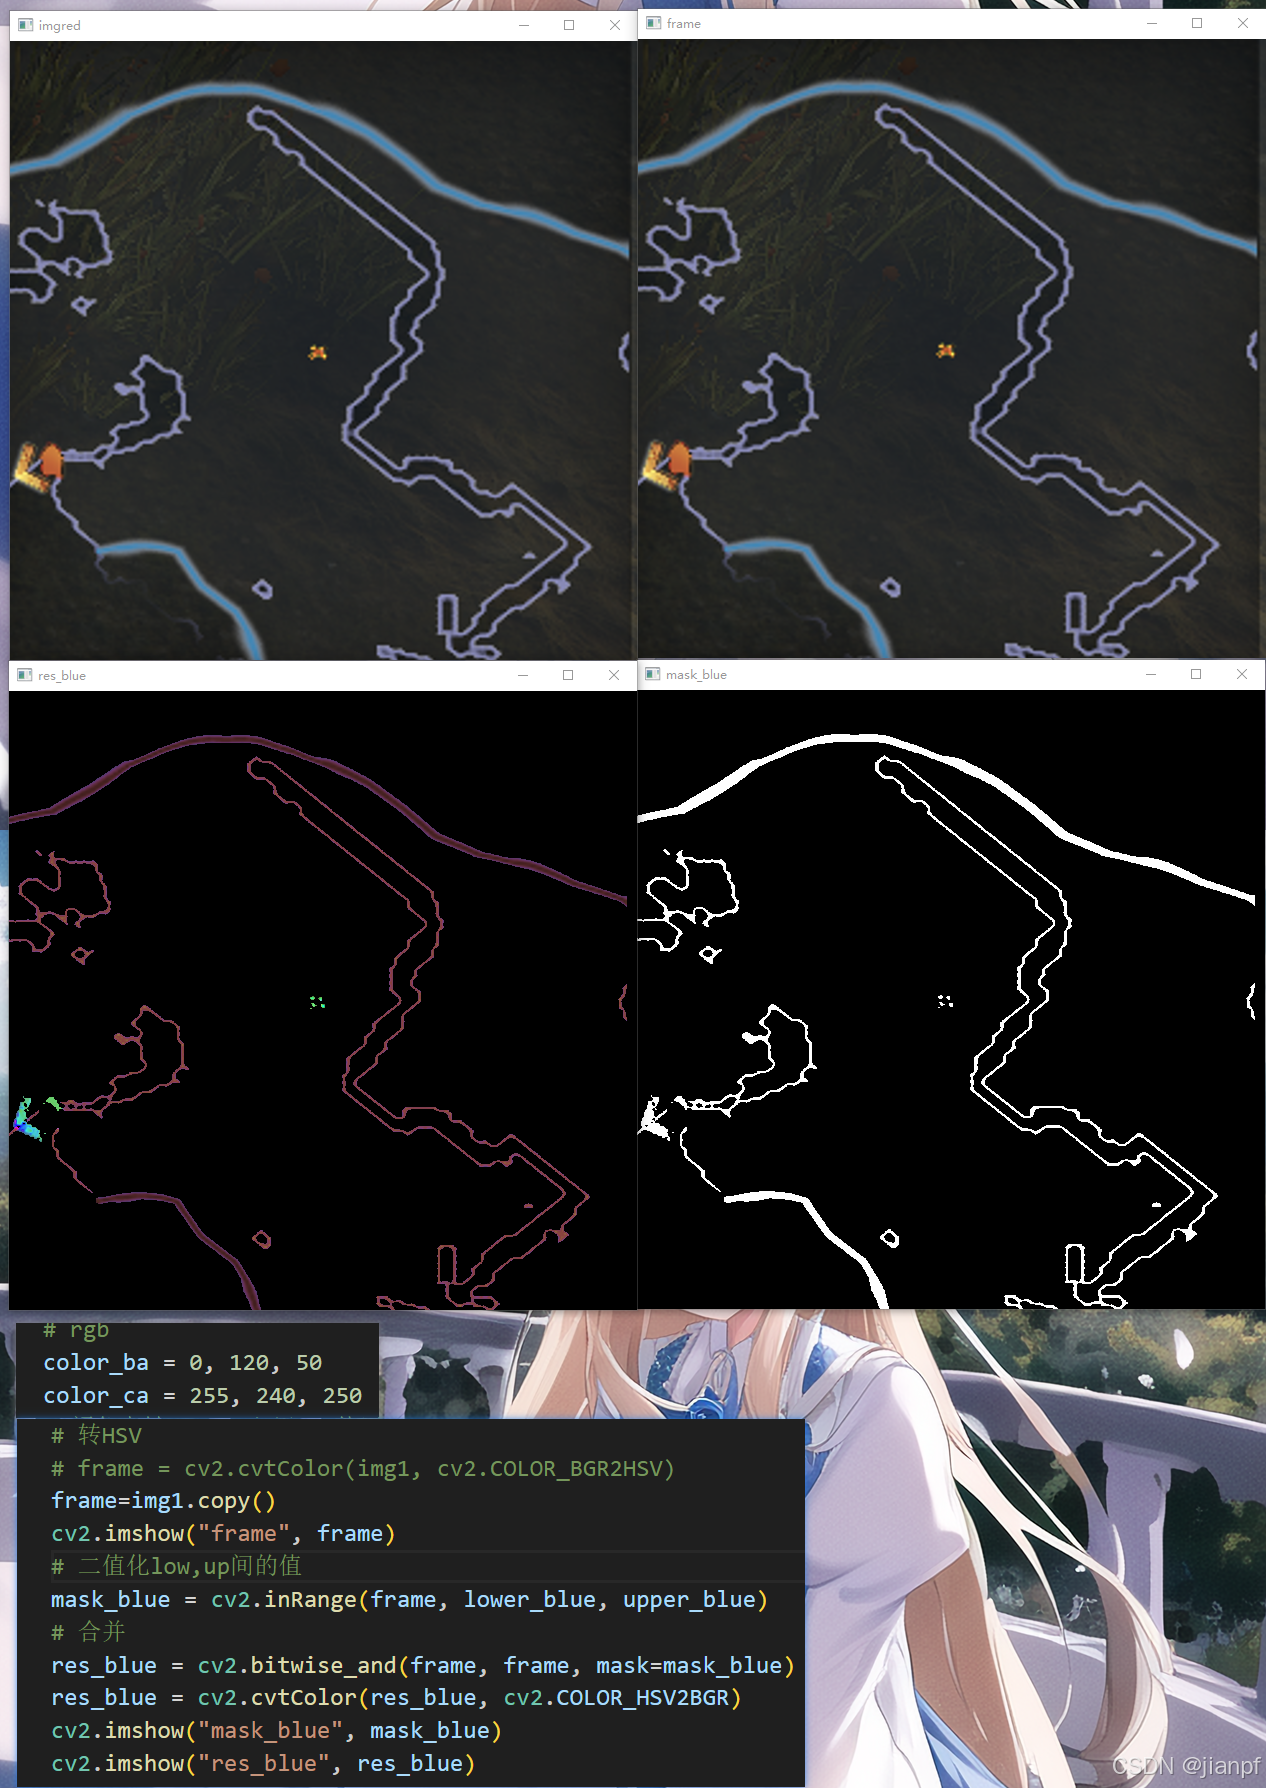
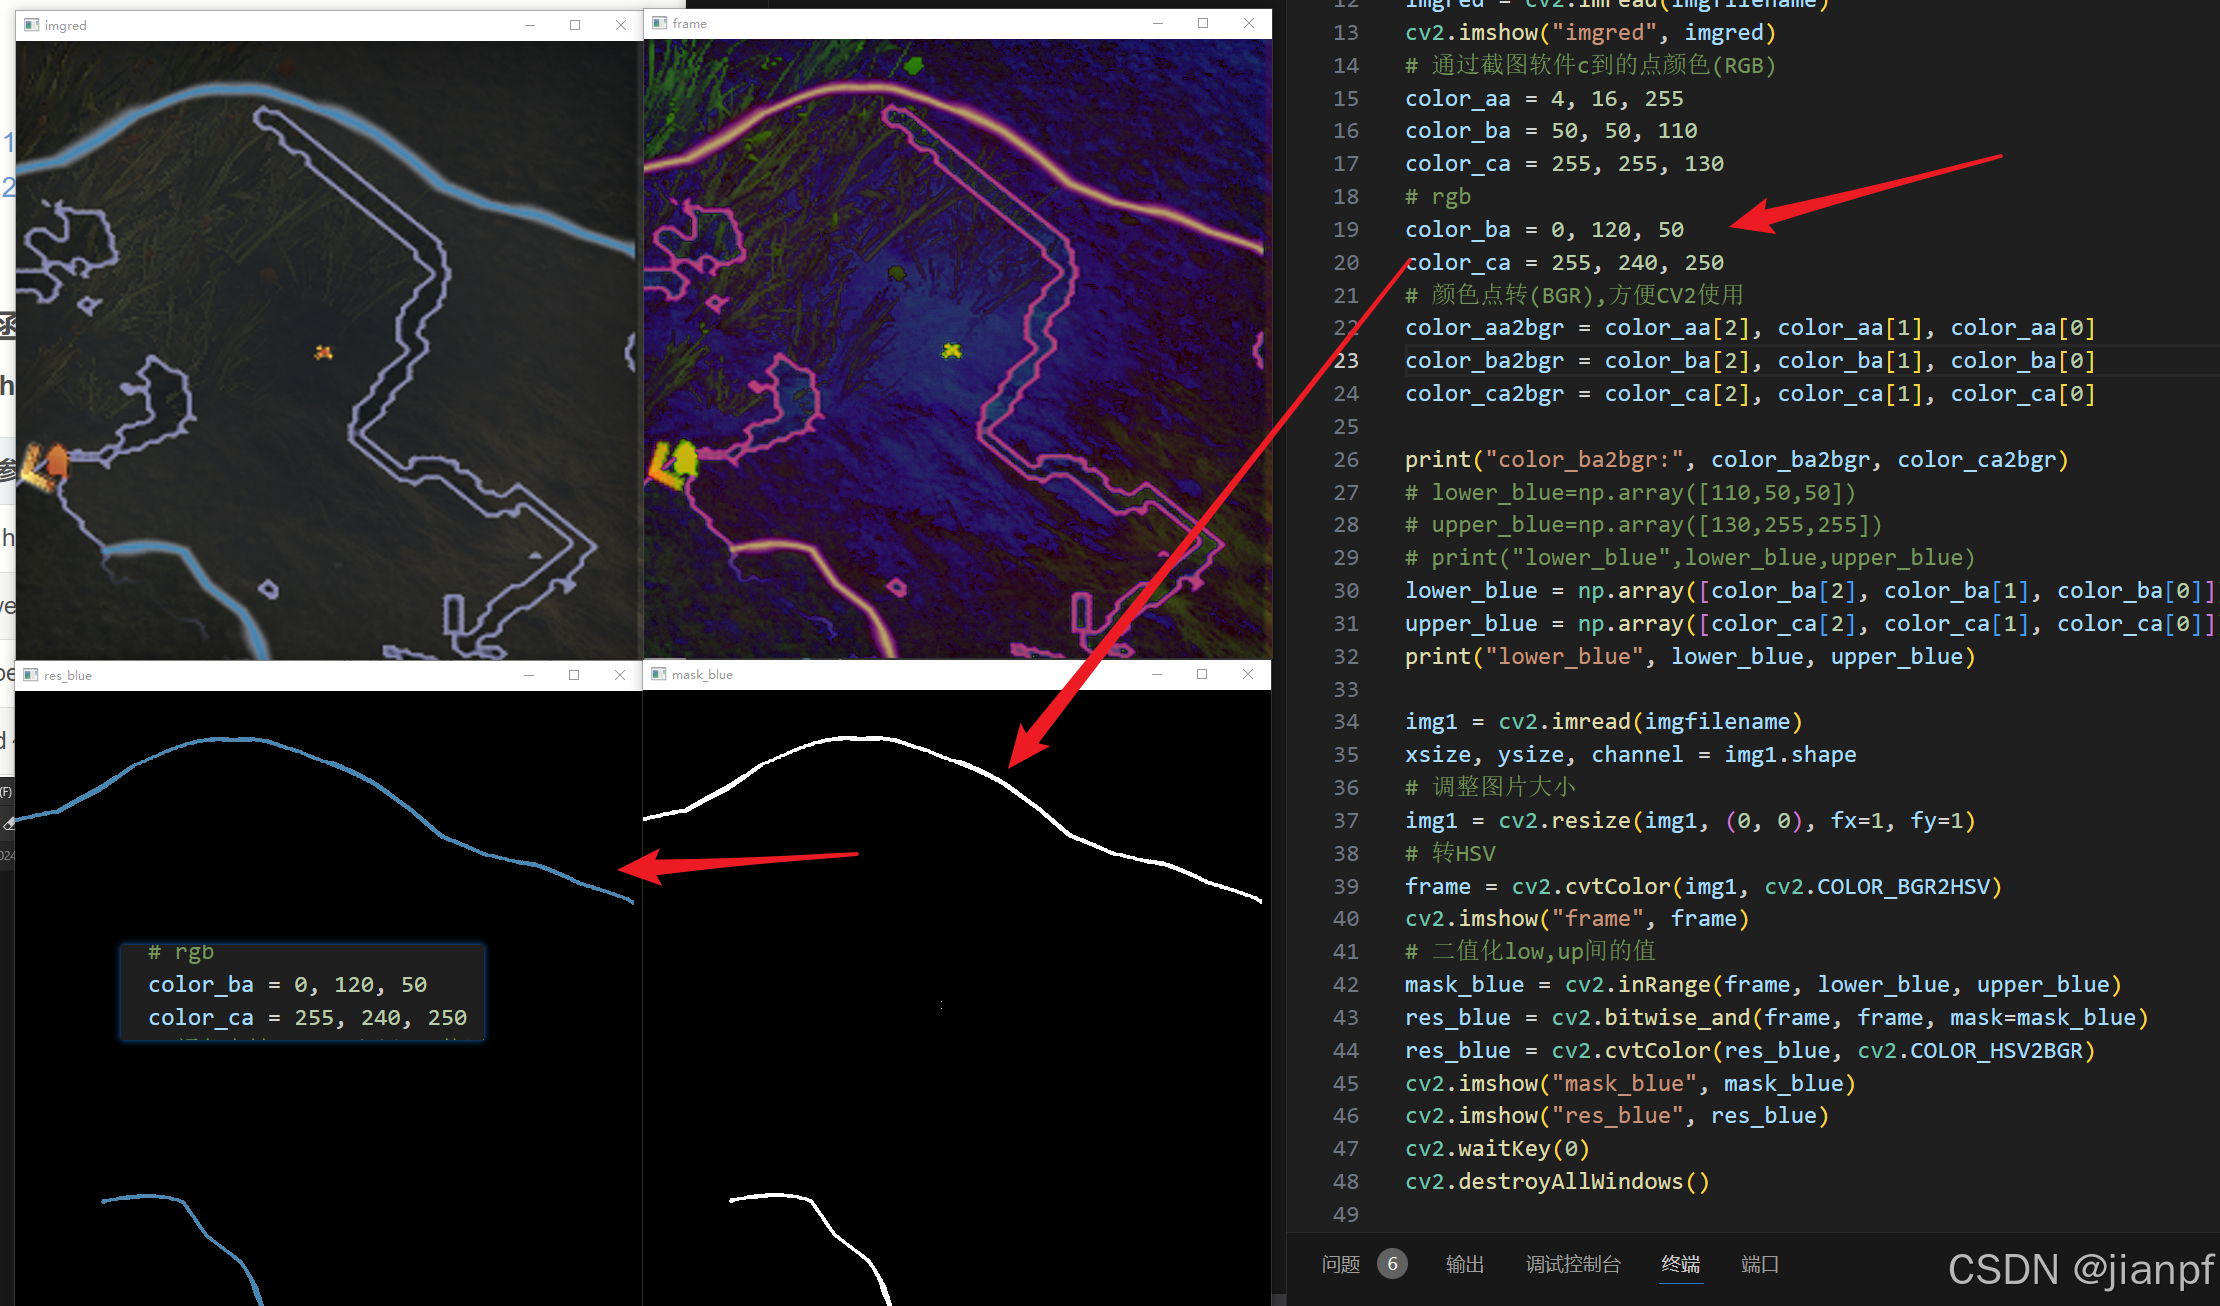
# rgb
color_ba = 0, 120, 50
color_ca = 255, 240, 250
# 颜色点转(BGR),方便CV2使用
color_ba2bgr = color_ba[2], color_ba[1], color_ba[0]
color_ca2bgr = color_ca[2], color_ca[1], color_ca[0]
lower_blue = np.array([color_ba[2], color_ba[1], color_ba[0]])
upper_blue = np.array([color_ca[2], color_ca[1], color_ca[0]])
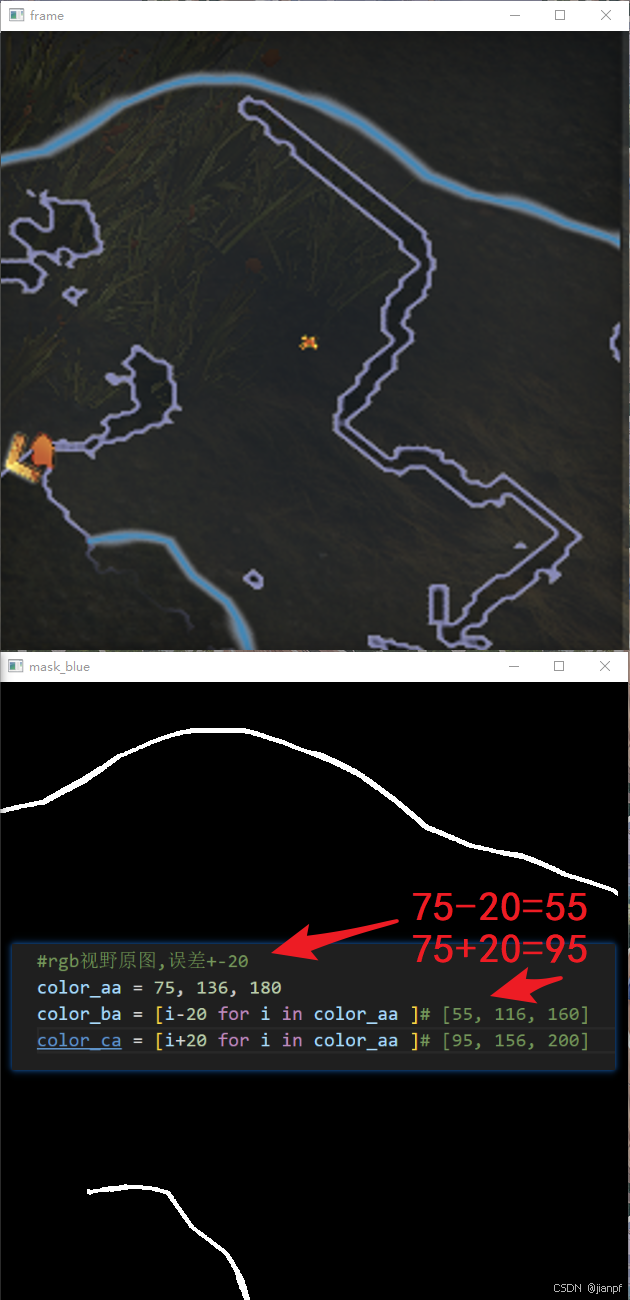
#rgb视野原图,误差+-20
color_aa = 75, 136, 180
color_ba = [i-20 for i in color_aa ]# [55, 116, 160]
color_ca = [i+20 for i in color_aa ]# [95, 156, 200]
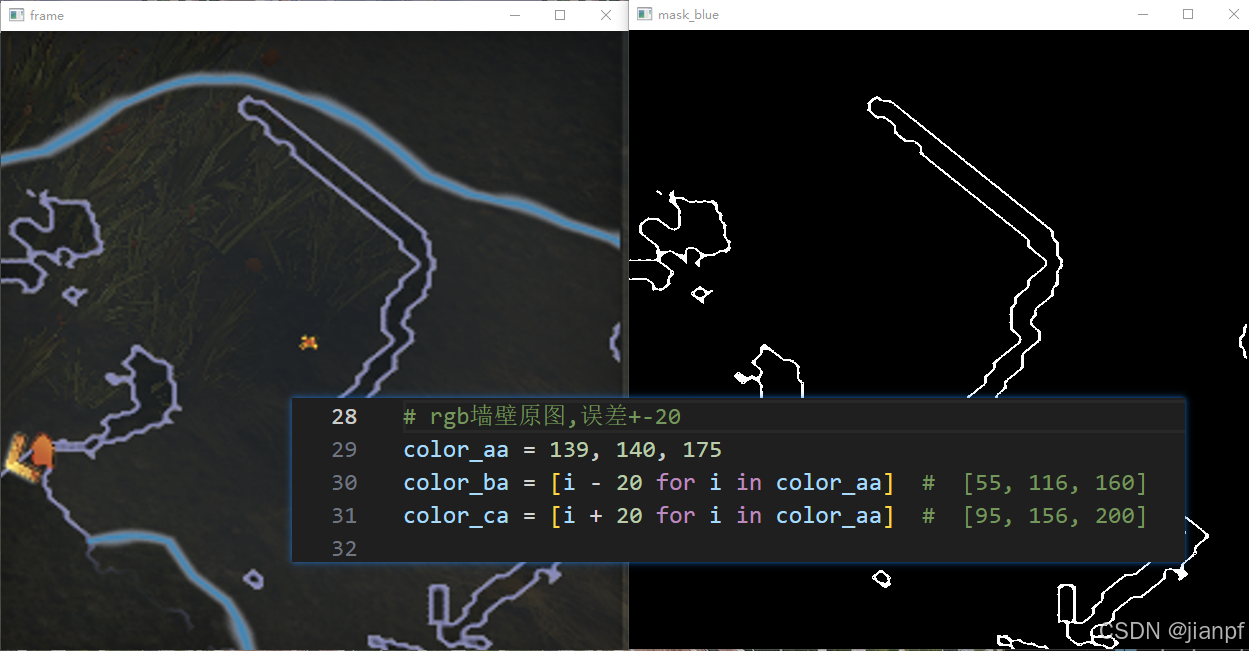
# rgb墙壁原图,误差+-20
color_aa = 139, 140, 175
color_ba = [i - 20 for i in color_aa] # [55, 116, 160]
color_ca = [i + 20 for i in color_aa] # [95, 156, 200]
# 颜色点转(BGR),方便CV2使用
color_ba2bgr = color_ba[2], color_ba[1], color_ba[0]
color_ca2bgr = color_ca[2], color_ca[1], color_ca[0]
#定义小于通道和大于通道值归0区间
lower_blue = np.array([color_ba[2], color_ba[1], color_ba[0]])
upper_blue = np.array([color_ca[2], color_ca[1], color_ca[0]])
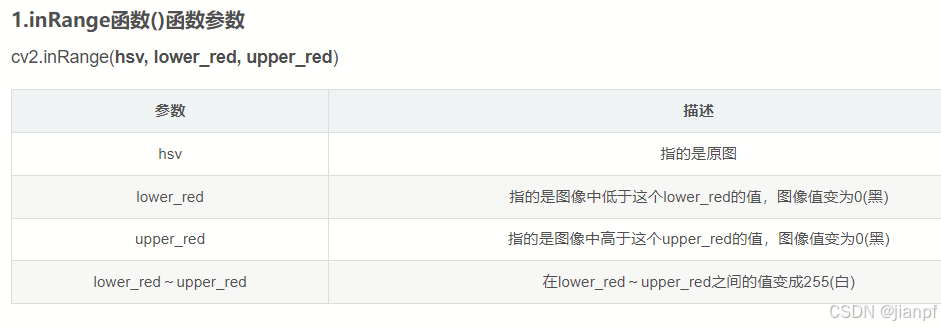
mask_blue = cv2.inRange(imgread, lower_blue, upper_blue)
#合并图层,按位与运算图片的掩模ROI(蒙版)
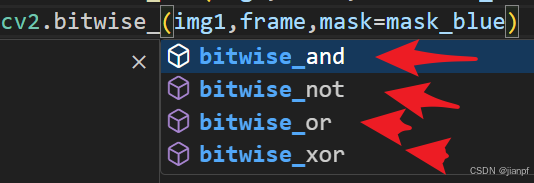
res_blue = cv2.bitwise_and(imgread, frame, mask=mask_blue)
cv2.bitwise_and():按位与运算
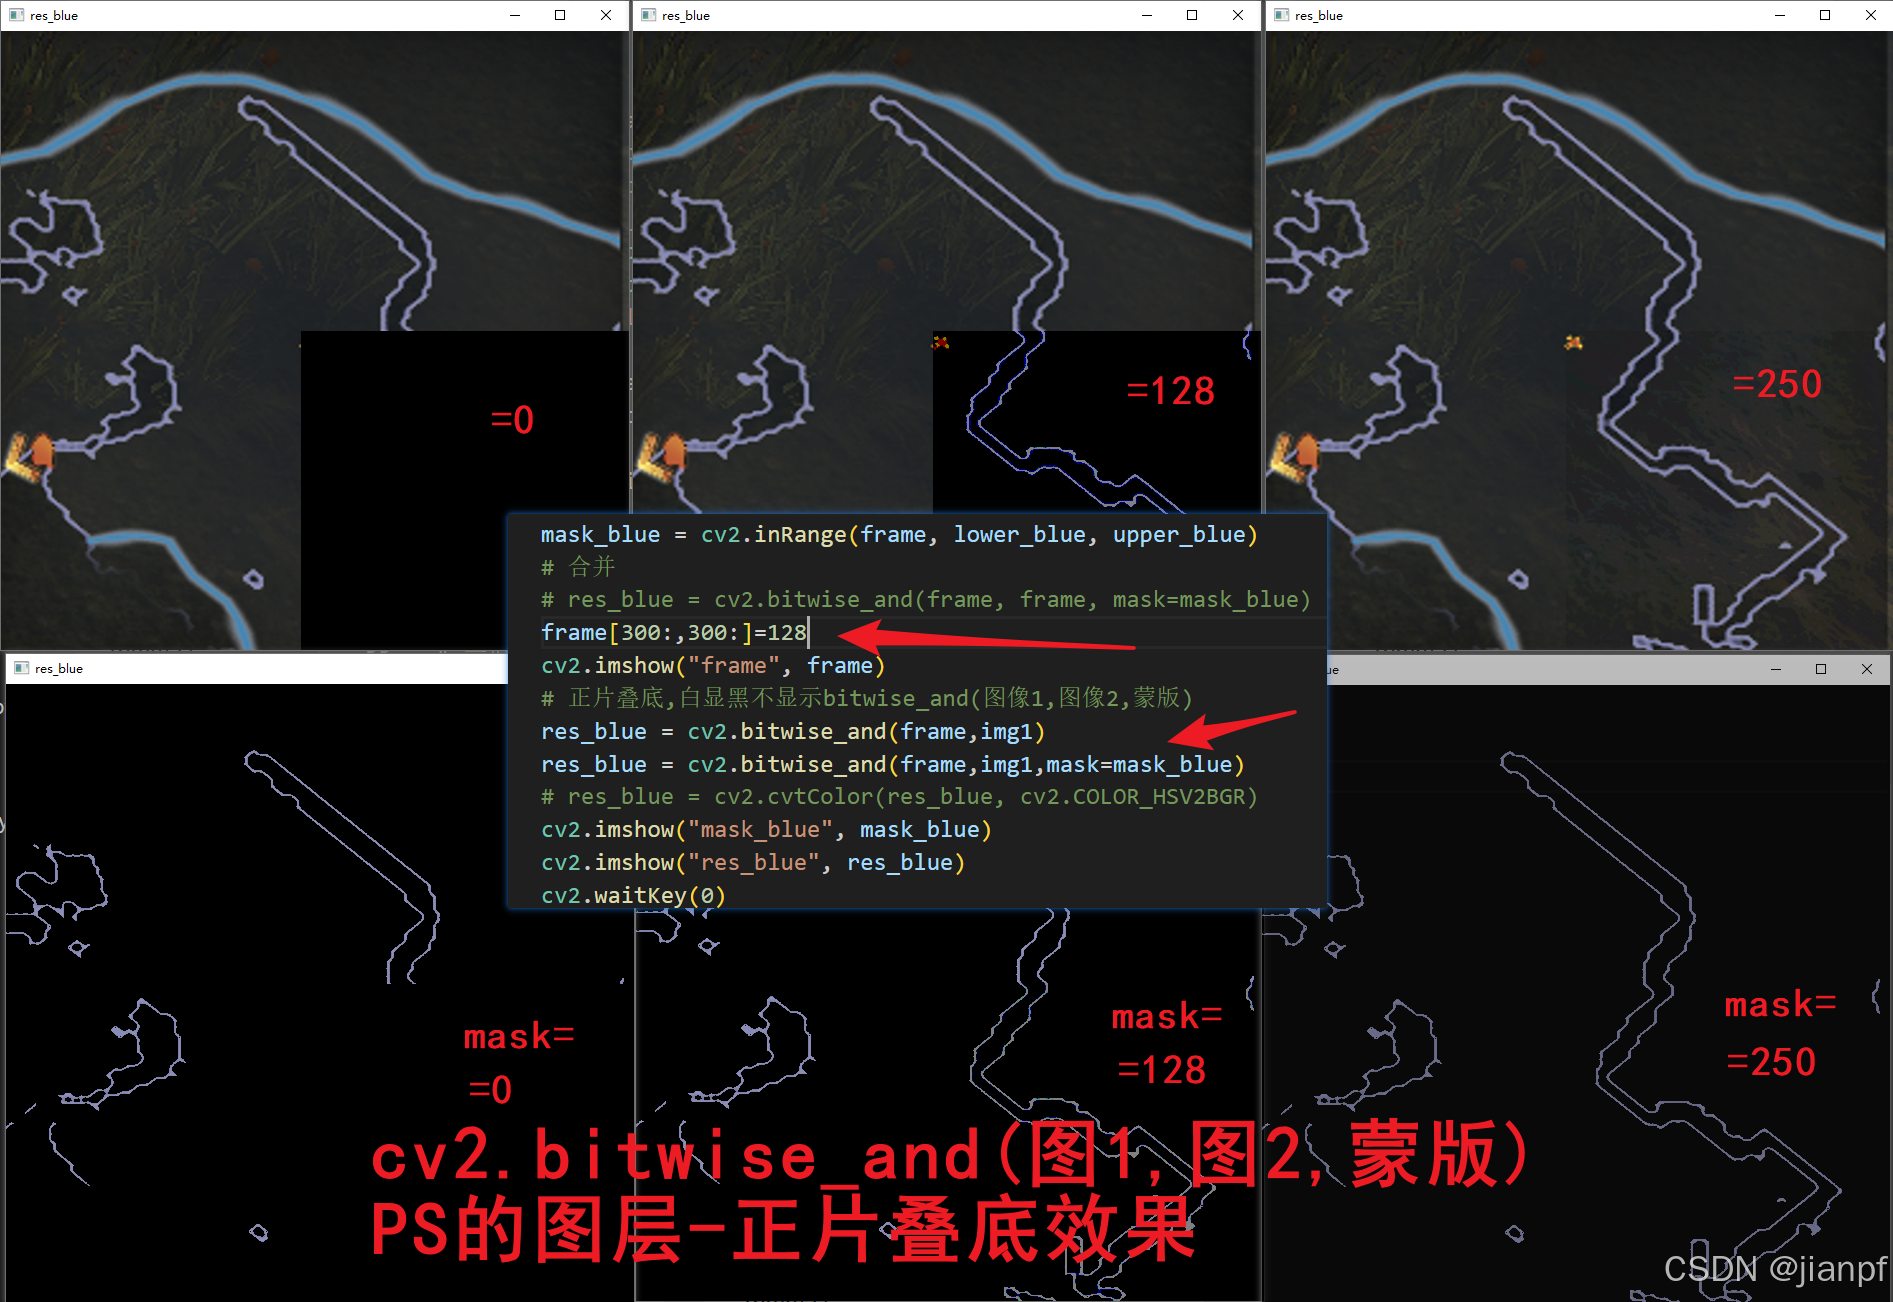
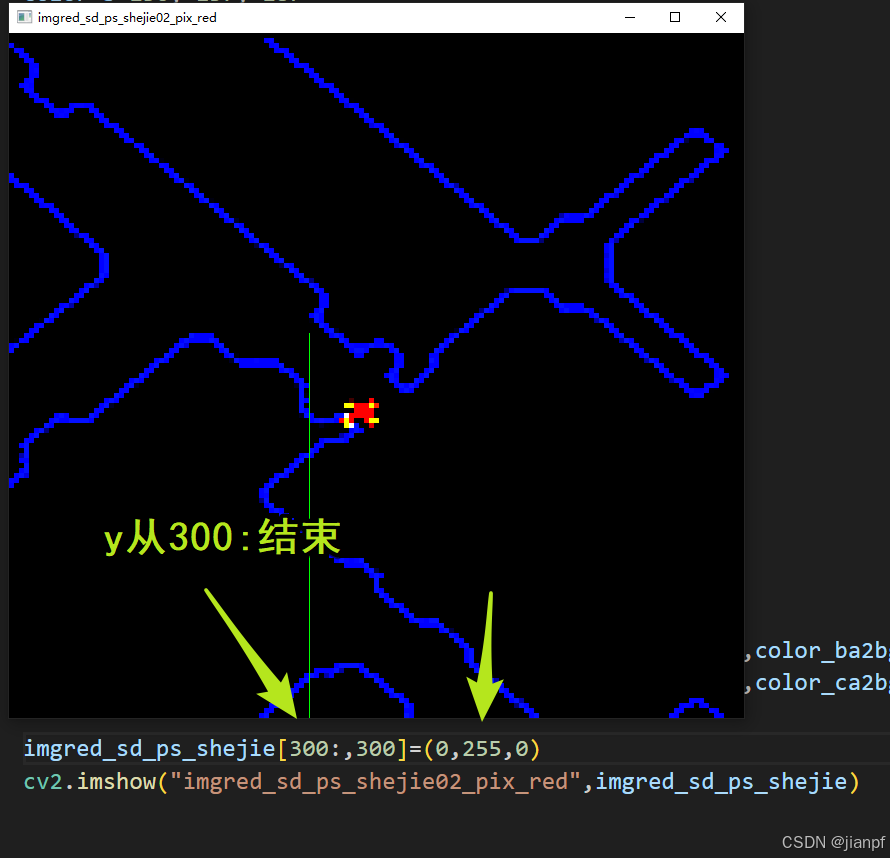
frame[300:,300:]=128
cv2.imshow("frame", frame)
# 正片叠底,白显黑不显示bitwise_and(图像1,图像2,蒙版)
res_blue = cv2.bitwise_and(frame,img1)
res_blue = cv2.bitwise_and(frame,img1,mask=mask_blue)
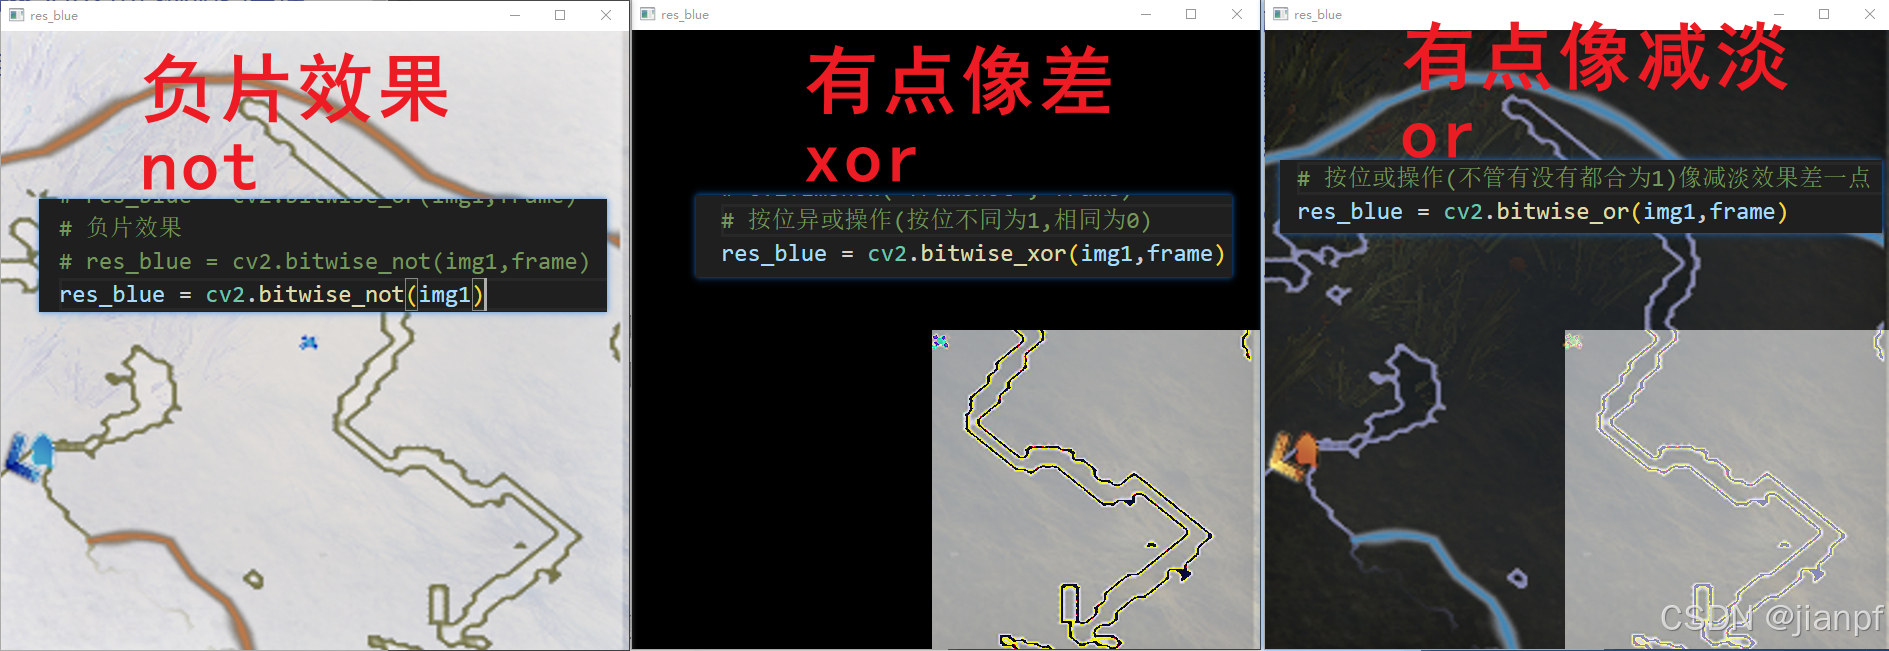
# 负片效果(一张图片自取反)
# res_blue = cv2.bitwise_not(img1,frame)
res_blue = cv2.bitwise_not(img1)
# 按位异或操作(按位不同为1,相同为0)
res_blue = cv2.bitwise_xor(img1,frame)
# 按位或操作(不管有没有都合为1)像减淡效果差一点
res_blue = cv2.bitwise_or(img1,frame,)
https://blog.csdn.net/weixin_57194935/article/details/124600235
https://baijiahao.baidu.com/s?id=1796034869119891396&wfr=spider&for=pc
2024.9.3.05:15晴30度
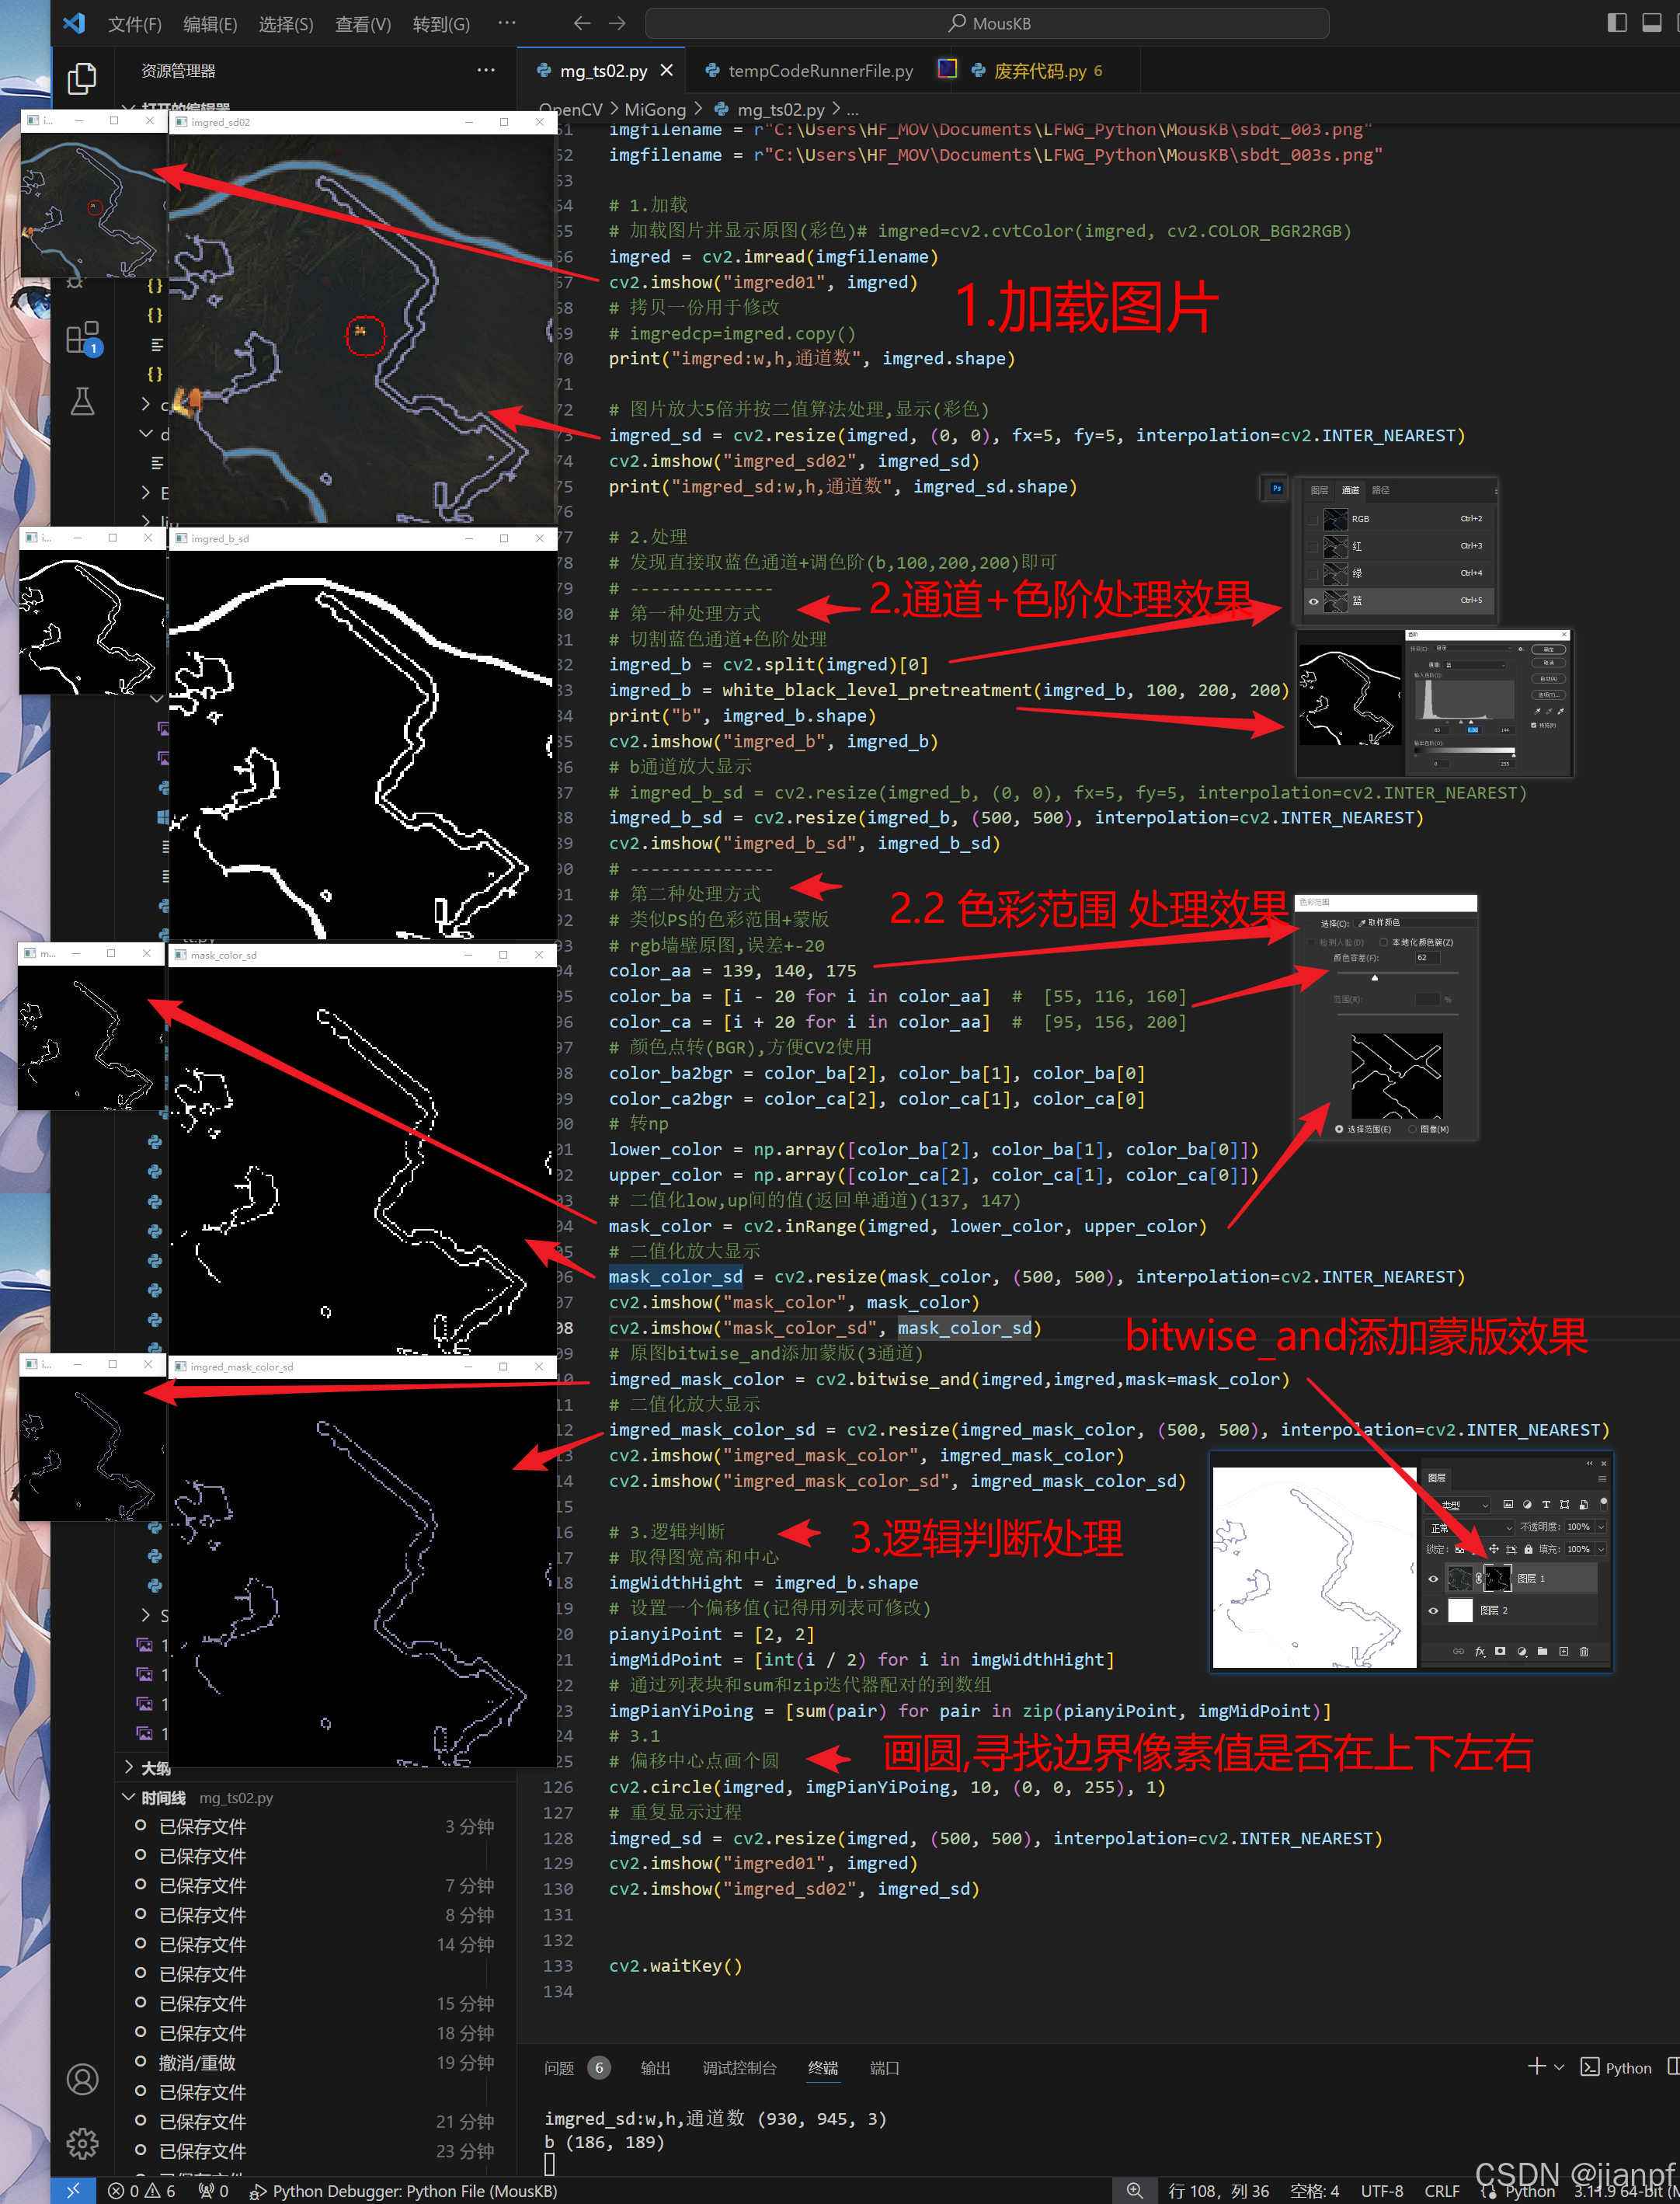
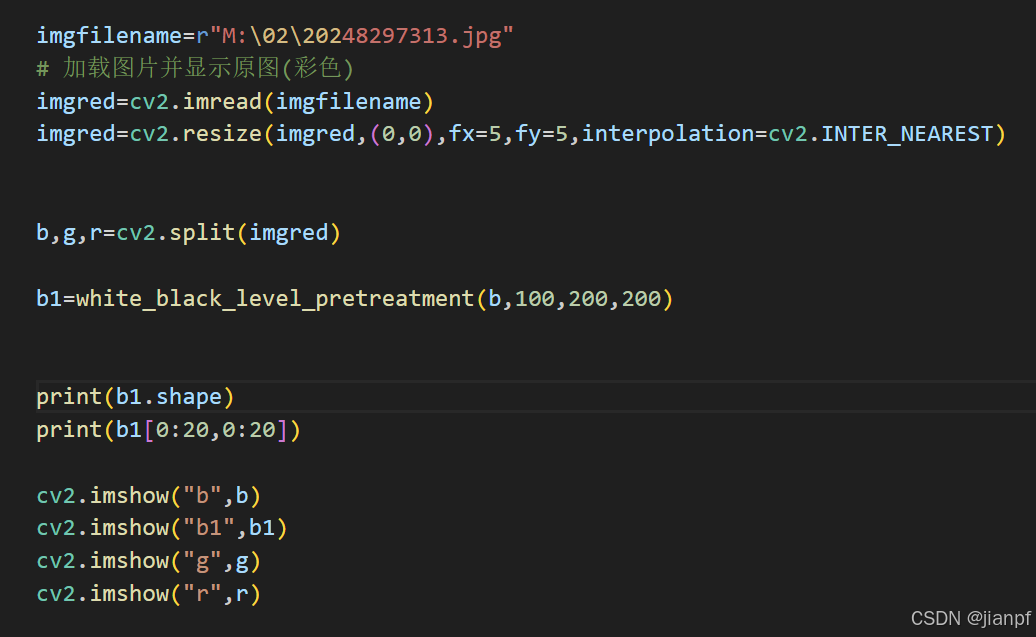
imgfilename = r"C:\Users\HF_MOV\Documents\LFWG_Python\MousKB\sbdt_003s.png"

# 1.加载
# 加载图片并显示原图(彩色)# imgred=cv2.cvtColor(imgred, cv2.COLOR_BGR2RGB)
imgred = cv2.imread(imgfilename)
cv2.imshow("imgred01", imgred)
# 拷贝一份用于修改
# imgredcp=imgred.copy()
print("imgred:w,h,通道数", imgred.shape)

# 图片放大5倍并按二值算法处理,显示(彩色)
imgred_sd = cv2.resize(imgred, (0, 0), fx=5, fy=5, interpolation=cv2.INTER_NEAREST)
cv2.imshow("imgred_sd02", imgred_sd)
print("imgred_sd:w,h,通道数", imgred_sd.shape)

# 2.处理
# 发现直接取蓝色通道+调色阶(b,100,200,200)即可
# --------------
# 第一种处理方式
# 切割蓝色通道+色阶处理
imgred_b = cv2.split(imgred)[0]
imgred_b = white_black_level_pretreatment(imgred_b, 100, 200, 200)
print("b", imgred_b.shape)
cv2.imshow("imgred_b", imgred_b)
# b通道放大显示
# imgred_b_sd = cv2.resize(imgred_b, (0, 0), fx=5, fy=5, interpolation=cv2.INTER_NEAREST)
imgred_b_sd = cv2.resize(imgred_b, (500, 500), interpolation=cv2.INTER_NEAREST)
cv2.imshow("imgred_b_sd", imgred_b_sd)
# --------------
# 第二种处理方式
# 类似PS的色彩范围+蒙版
# rgb墙壁原图,误差+-20
color_sel=30
color_aa = 139, 140, 175
color_ba = [i - color_sel for i in color_aa]  #  [55, 116, 160]
color_ca = [i + color_sel for i in color_aa]  #  [95, 156, 200]
# 颜色点转(BGR),方便CV2使用
color_ba2bgr = color_ba[2], color_ba[1], color_ba[0]
color_ca2bgr = color_ca[2], color_ca[1], color_ca[0]
# 转np
lower_color = np.array([color_ba[2], color_ba[1], color_ba[0]])
upper_color = np.array([color_ca[2], color_ca[1], color_ca[0]])
# 二值化low,up间的值(返回单通道)(137, 147)
mask_color = cv2.inRange(imgred, lower_color, upper_color)
# 二值化放大显示
mask_color_sd = cv2.resize(mask_color, (500, 500), interpolation=cv2.INTER_NEAREST)
cv2.imshow("mask_color", mask_color)
cv2.imshow("mask_color_sd", mask_color_sd)
# 原图bitwise_and添加蒙版(3通道)
imgred_mask_color = cv2.bitwise_and(imgred,imgred,mask=mask_color)
# 二值化放大显示
imgred_mask_color_sd = cv2.resize(imgred_mask_color, (500, 500), interpolation=cv2.INTER_NEAREST)
cv2.imshow("imgred_mask_color", imgred_mask_color)
cv2.imshow("imgred_mask_color_sd", imgred_mask_color_sd)

# 3.逻辑判断
# 取得图宽高和中心
imgWidthHight = imgred_b.shape
# 设置一个偏移值(记得用列表可修改)
pianyiPoint = [2, 2]
imgMidPoint = [int(i / 2) for i in imgWidthHight]
# 通过列表块和sum和zip迭代器配对的到数组
imgPianYiPoing = [sum(pair) for pair in zip(pianyiPoint, imgMidPoint)]
# 3.1
# 偏移中心点画个圆
cv2.circle(imgred, imgPianYiPoing, 10, (0, 0, 255), 1)
# 重复显示过程
imgred_sd = cv2.resize(imgred, (500, 500), interpolation=cv2.INTER_NEAREST)
cv2.imshow("imgred01", imgred)
cv2.imshow("imgred_sd02", imgred_sd)
那种方式会快点呢?()
用系统的选取颜色范围应该通用点.因为内置的cv2.inRange()方法,换场景在说.(问题总比困难多,方法又总比困难多,总结:[时间>合作>]方法>困难>问题)(说说前面的时间合作是什么意思?你别哲学了啊!)(没有哲学啊!客观简单描述了一下)(怎么又哲学起来了)(哲学>客观)(这AI没完没了)
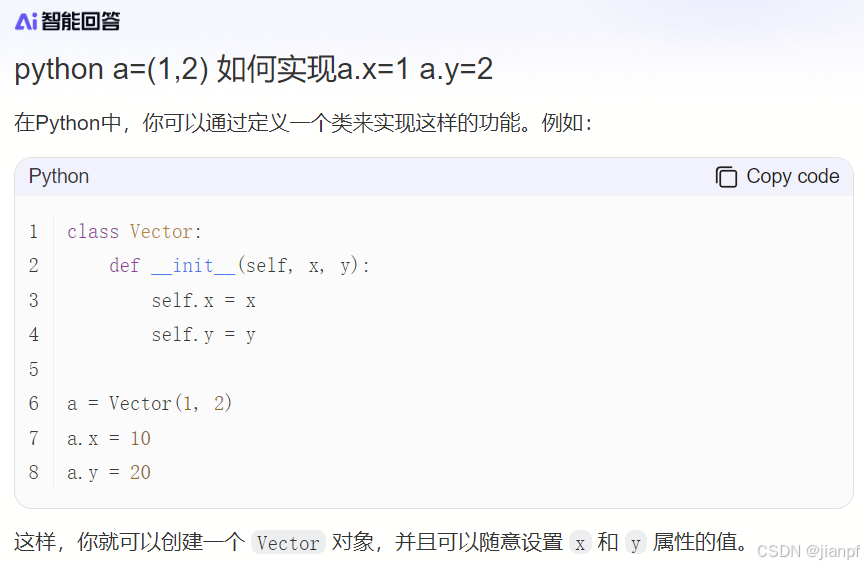
python a=(1,2) 如何实现a.x=1 a.y=2 ,创建类实现点属性方法
#python  a=(1,2) 如何实现a.x=1 a.y=2
class Vector:
    def __init__(self, x, y):
        self.x = x
        self.y = y

a = Vector(1, 2)
a.x = 10
a.y = 20


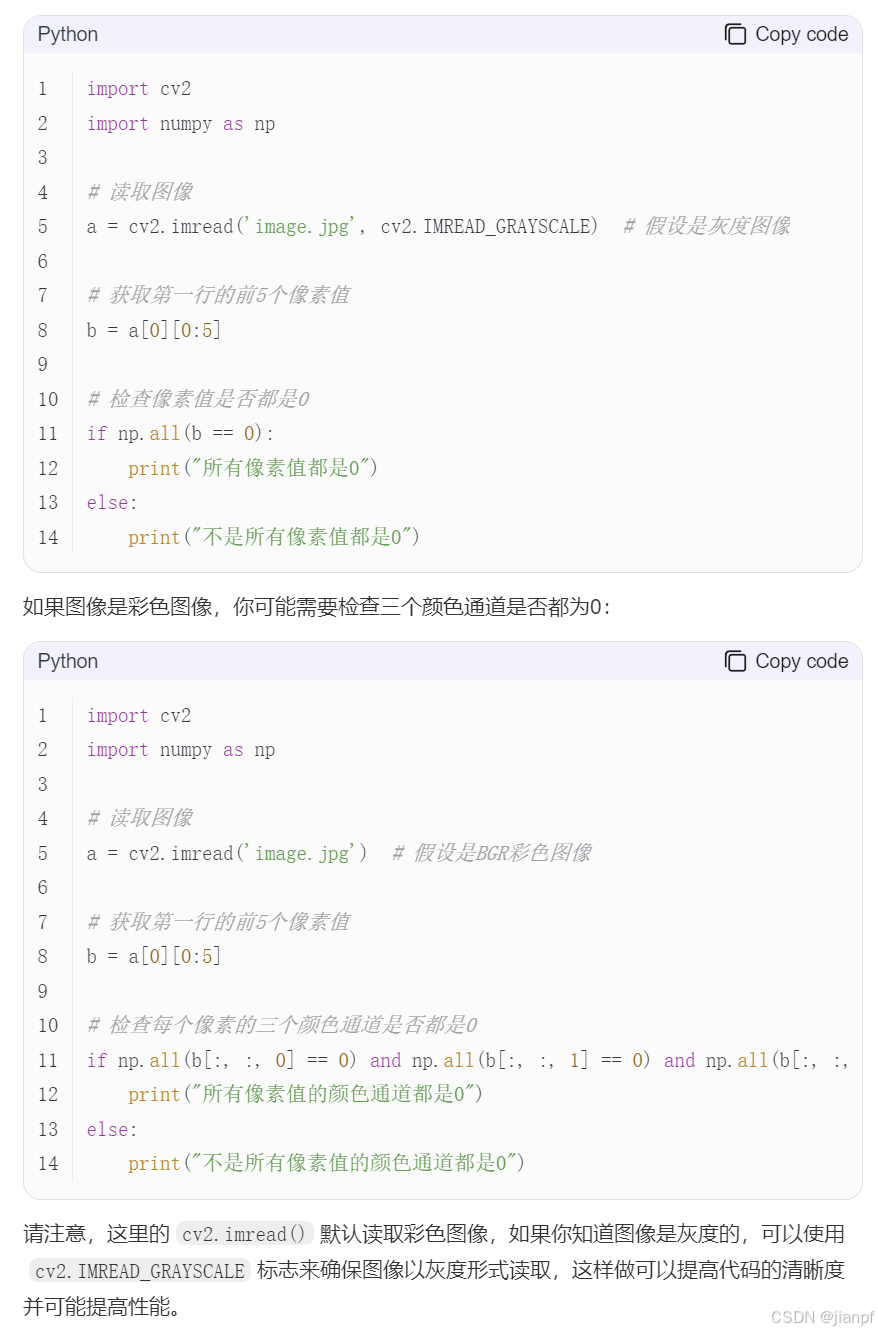
#python a=cv2.imread()后b=a[0][0:5]的值判断是都是0
import cv2
import numpy as np

# 读取图像
a = cv2.imread('image.jpg')  # 假设是BGR彩色图像

# 获取第一行的前5个像素值
b = a[0][0:5]

# 检查每个像素的三个颜色通道是否都是0
if np.all(b[:, :, 0] == 0) and np.all(b[:, :, 1] == 0) and np.all(b[:, :, 2] == 0):
    print("所有像素值的颜色通道都是0")
else:
    print("不是所有像素值的颜色通道都是0")
python a=cv2.imread()后b=a[0][0:5]的值判断是都是0用np.all()
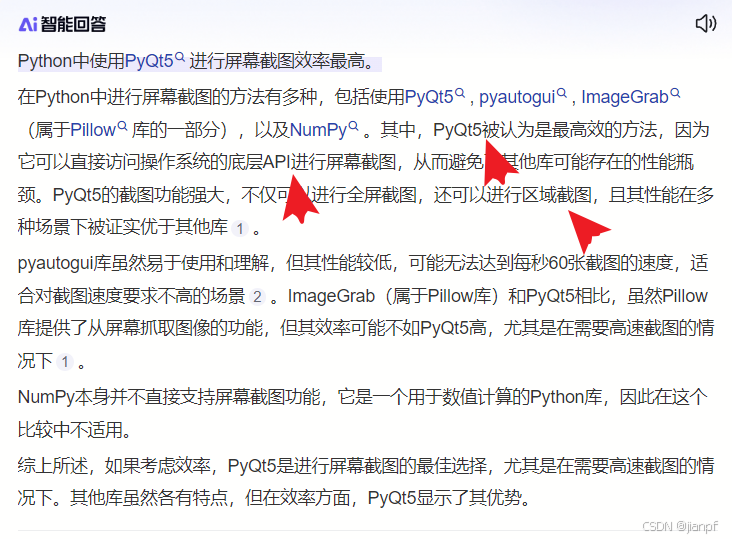
python numpy和pyautogui和ImageGrab和PyQt5截图 哪个效率高?PyQt5高
https://www.jb51.net/article/248103.htm

https://www.cnblogs.com/yangjisen/p/16727466.html
Python Capture:未开源的库,用不了
https://blog.csdn.net/gitblog_00025/article/details/138023869
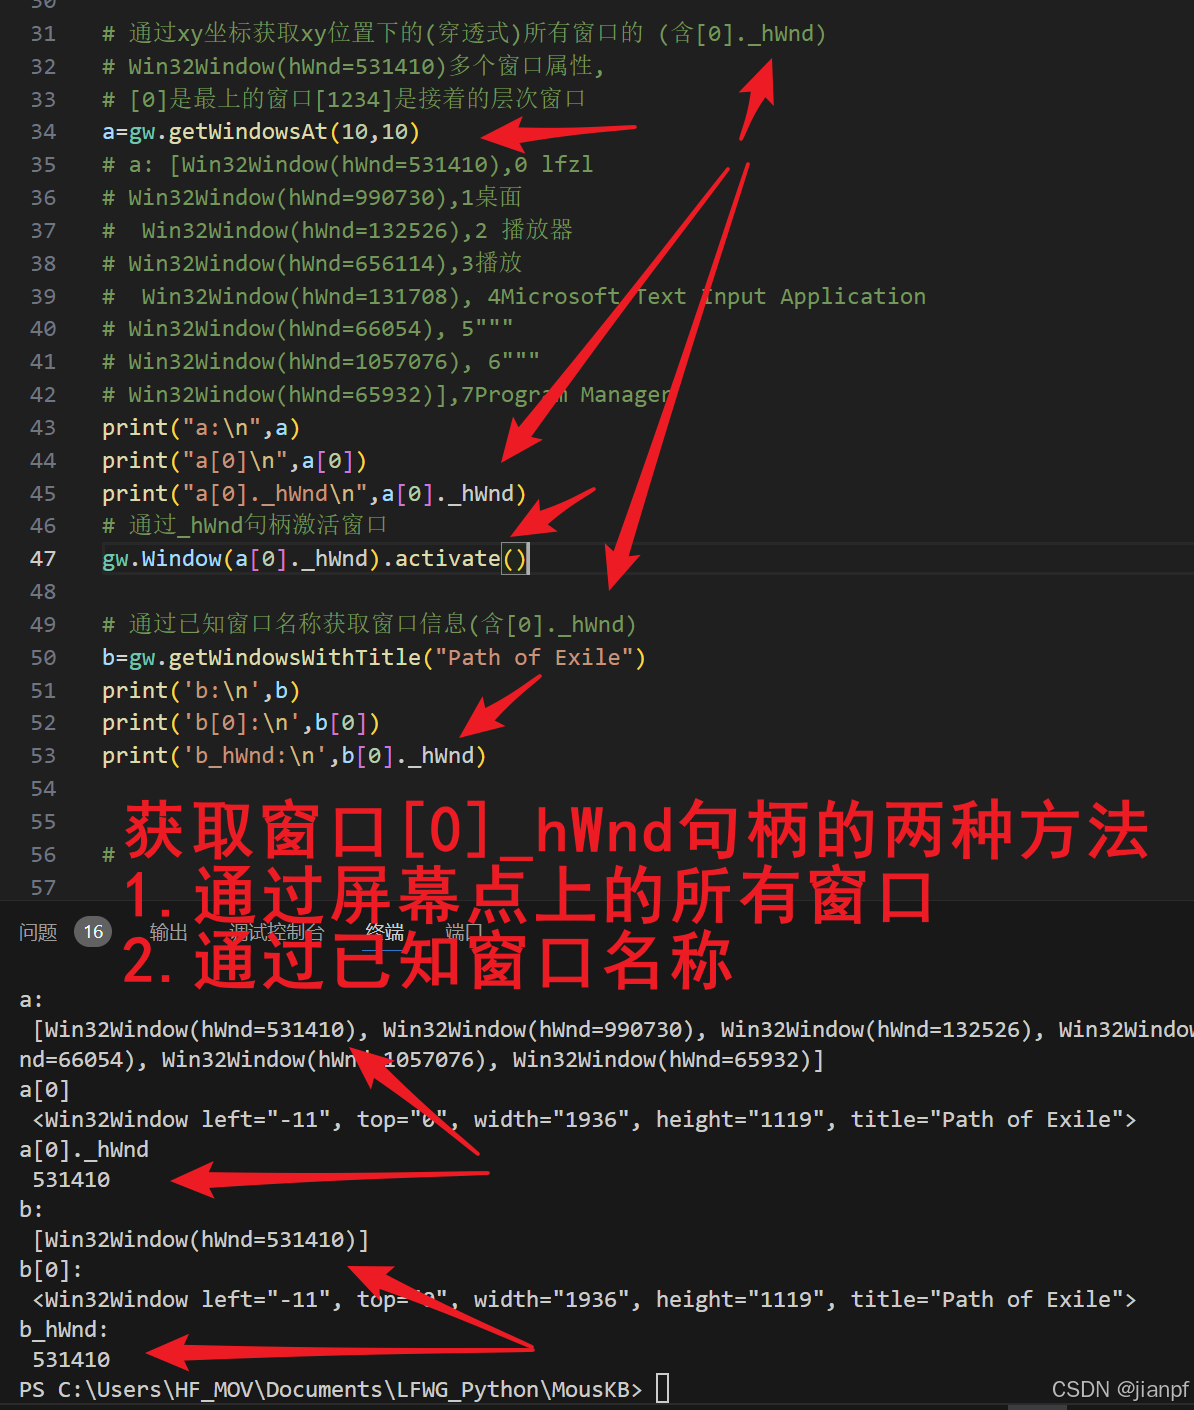
# 通过xy坐标获取xy位置下的(穿透式)所有窗口的 (含[0]._hWnd)
# Win32Window(hWnd=531410)多个窗口属性,
# [0]是最上的窗口[1234]是接着的层次窗口
a=gw.getWindowsAt(10,10)
# a: [Win32Window(hWnd=531410),0 lfzl
# Win32Window(hWnd=990730),1桌面
#  Win32Window(hWnd=132526),2 播放器
# Win32Window(hWnd=656114),3播放
#  Win32Window(hWnd=131708), 4Microsoft Text Input Application
# Win32Window(hWnd=66054), 5"""
# Win32Window(hWnd=1057076), 6"""
# Win32Window(hWnd=65932)],7Program Manager
print("a:\n",a)
print("a[0]\n",a[0])
print("a[0]._hWnd\n",a[0]._hWnd)
# 通过_hWnd句柄激活窗口
gw.Window(a[0]._hWnd).activate()

# 通过已知窗口名称获取窗口信息(含[0]._hWnd)
b=gw.getWindowsWithTitle("Path of Exile")
print('b:\n',b)
print('b[0]:\n',b[0])
print('b_hWnd:\n',b[0]._hWnd)
获取窗口句柄[0]._hWnd的两中方法
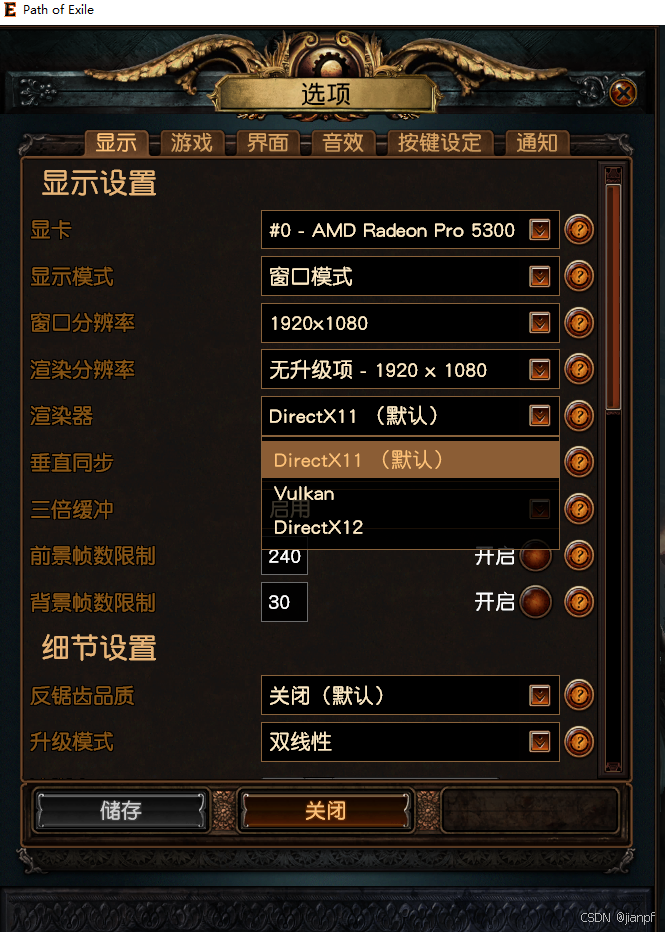
qt5代码directx11可以正常截图,dx12截图黑屏,
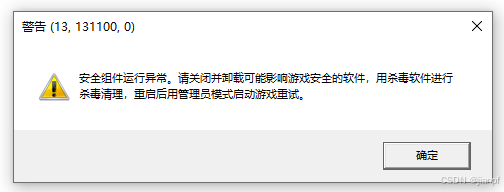
流放管理员模式
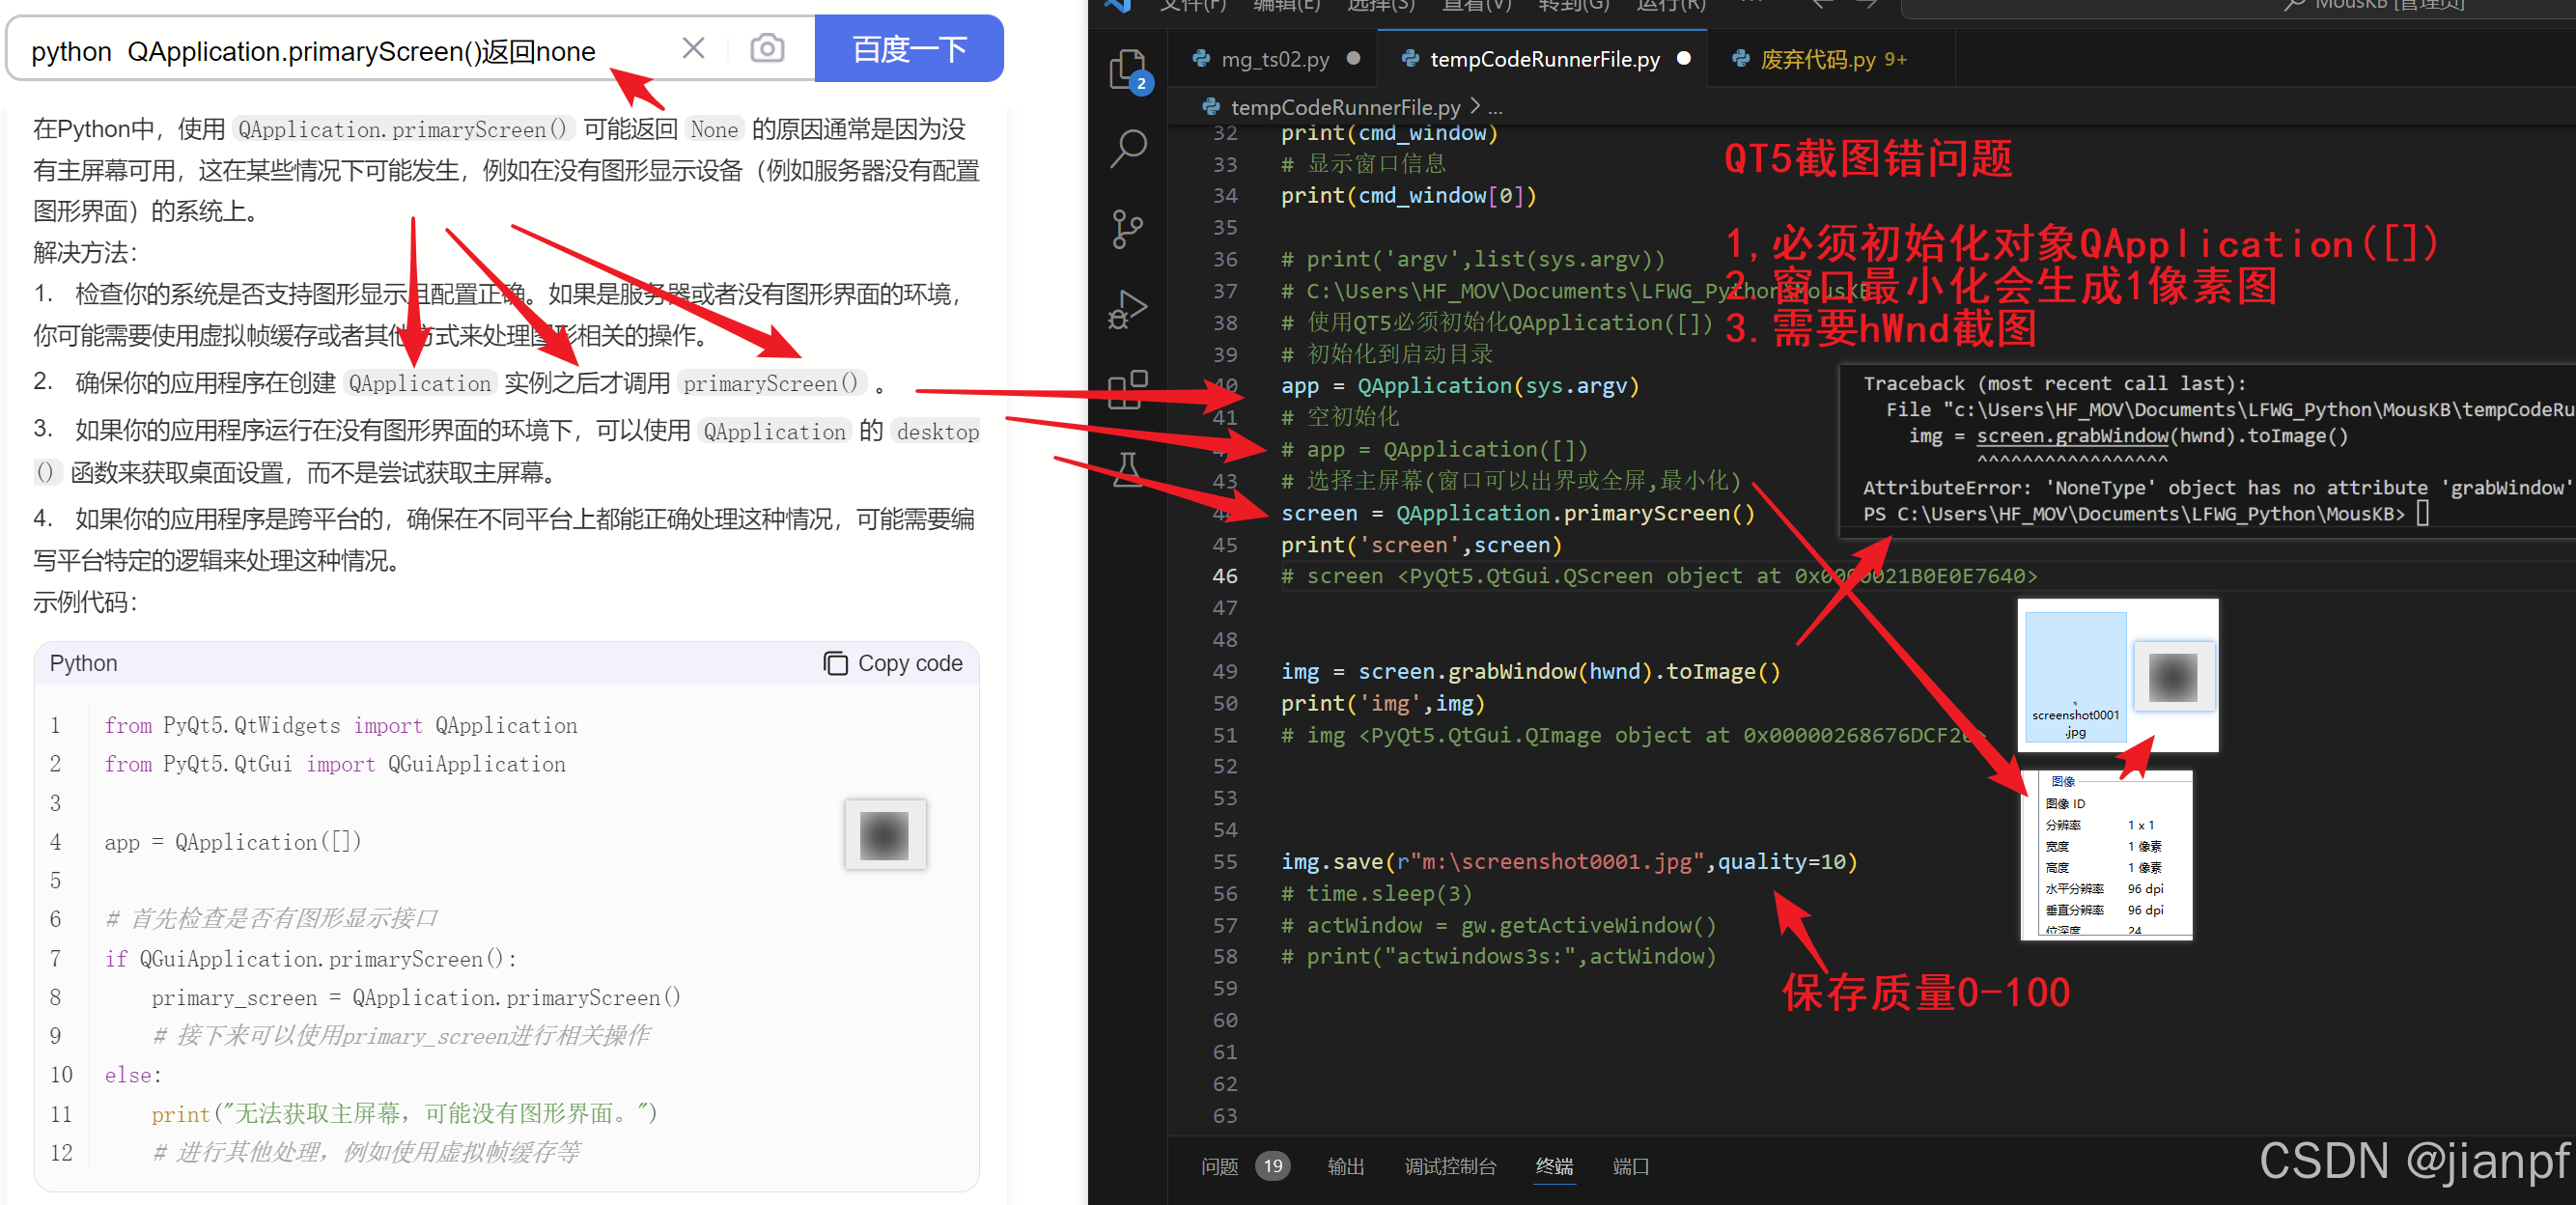
QT5截图出错问题,必须初始化1像素
#这个是截取窗口的
# hwnd = gw.FindWindow(None, 'C:/Windows/system32/cmd.exe')
cmd_window=gw.getWindowsWithTitle("无标题 - 记事本")
cmd_window=gw.getWindowsWithTitle("Path of Exile")
hwnd=cmd_window[0]._hWnd
# 显示窗口句柄
print(cmd_window)
# 显示窗口信息
print(cmd_window[0])
# print('argv',list(sys.argv))
# C:\Users\HF_MOV\Documents\LFWG_Python\MousKB
# 使用QT5必须初始化QApplication([])
# 初始化到启动目录
app = QApplication(sys.argv)
# 空初始化
# app = QApplication([])
# 选择主屏幕(窗口可以出界或全屏,最小化)
screen = QApplication.primaryScreen()
print('screen',screen)
# screen <PyQt5.QtGui.QScreen object at 0x0000021B0E0E7640>
# 根据窗口句柄获取图像
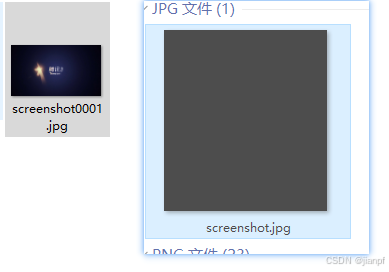
img = screen.grabWindow(hwnd).toImage()
print('img',img)
# img <PyQt5.QtGui.QImage object at 0x00000268676DCF20>
# 保存图片
img.save(r"m:\screenshot0001.jpg",quality=10)
# time.sleep(3)
# actWindow = gw.getActiveWindow()
# print("actwindows3s:",actWindow)
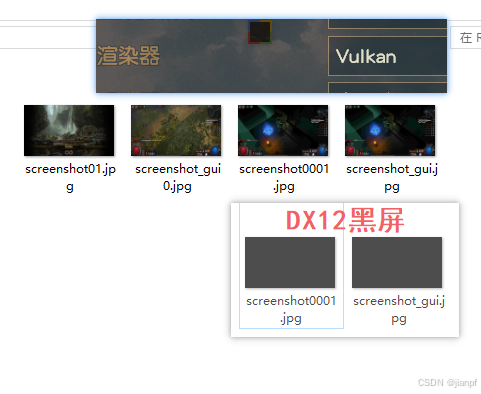
DX12黑屏QT5截图失败

# 根据窗口标题[0]获取到长宽高句柄信息
gwinh=gw.getWindowsWithTitle("Path of Exile")[0]
# 获取窗口句柄值
hwnd=gwinh._hWnd
# 激活窗口最上显示
gw.Window(hwnd).activate()
# 移动窗口和修改窗口尺寸
gwinh.moveTo(500, 1000)
gwinh.resizeTo(1936, 1119)
# print(gwinh[0].left)
# print(gwinh)
# <Win32Window left="229", top="165", width="1936", height="1119", title="Path of Exile">

# 使用QT5必须初始化QApplication([])
# 初始化到启动目录
app = QApplication(sys.argv)
# 选择主屏幕(窗口可以出界或全屏,最小化)
qt5_screen = QApplication.primaryScreen()
# 根据窗口句柄获取图像
qt5_img = qt5_screen.grabWindow(hwnd).toImage()

# 地图点
# 计算屏幕中点
img_mid_point=(int(gwinh.width/2)+gwinh.left,int(gwinh.height/2)+gwinh.top-(gwinh.height-qt5_img.height()))
# 地图大小255*255
img_map_point=(1920-255-10,10)
print('img_mid_point:\t',img_mid_point)
print('img_map_point:\t',img_map_point)
pyautogui.moveTo(img_mid_point)
exit()
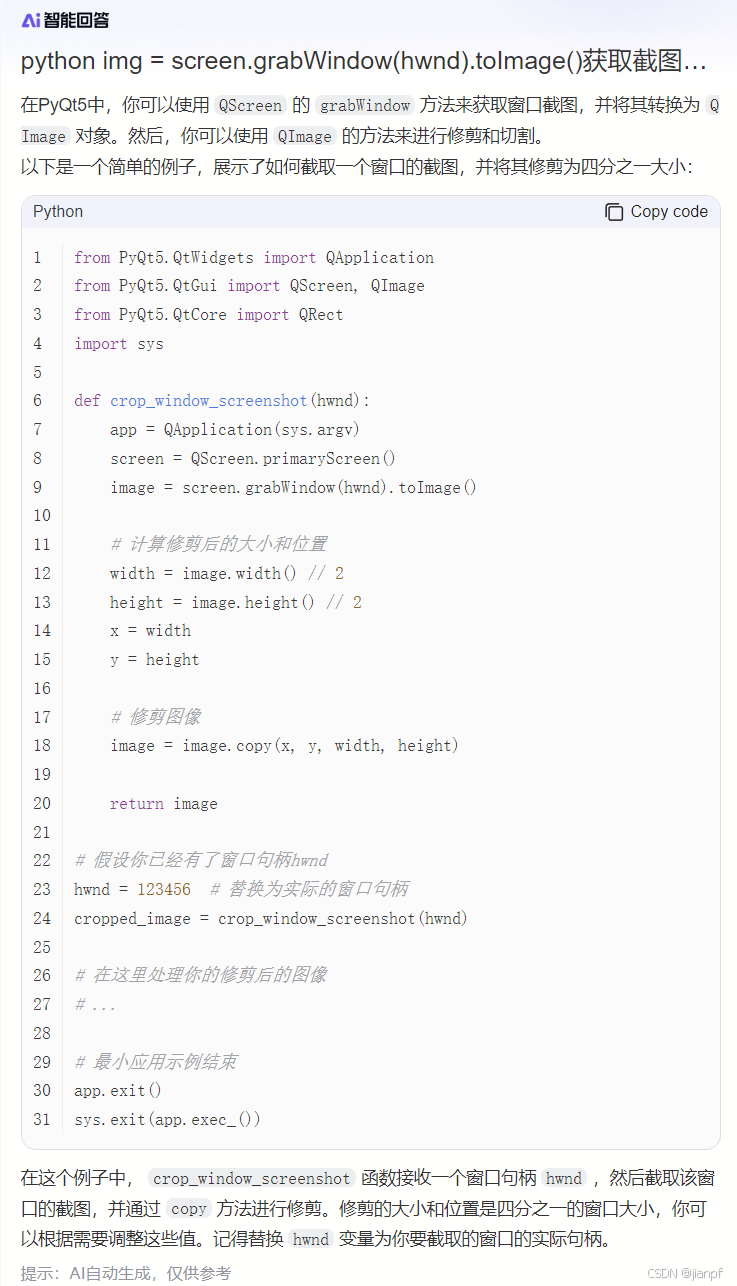
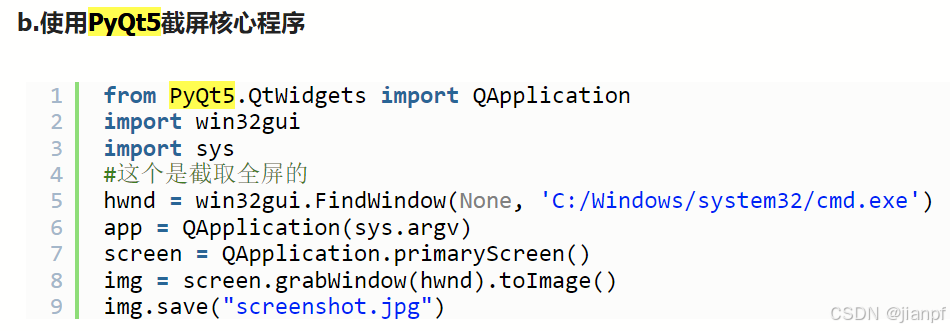
from PyQt5.QtWidgets import QApplication
from PyQt5.QtGui import QScreen, QImage
from PyQt5.QtCore import QRect
import sys

def crop_window_screenshot(hwnd):
    app = QApplication(sys.argv)
    screen = QScreen.primaryScreen()
    image = screen.grabWindow(hwnd).toImage()

    # 计算修剪后的大小和位置
    width = image.width() // 2
    height = image.height() // 2
    x = width
    y = height

    # 修剪图像
    image = image.copy(x, y, width, height)

    return image

# 假设你已经有了窗口句柄hwnd
hwnd = 123456  # 替换为实际的窗口句柄
cropped_image = crop_window_screenshot(hwnd)

# 在这里处理你的修剪后的图像
# ...

# 最小应用示例结束
app.exit()
sys.exit(app.exec_())
QT5截图裁剪分割是用.copy()方法的
image = screen.grabWindow(hwnd).toImage().copy(x, y, width, height)
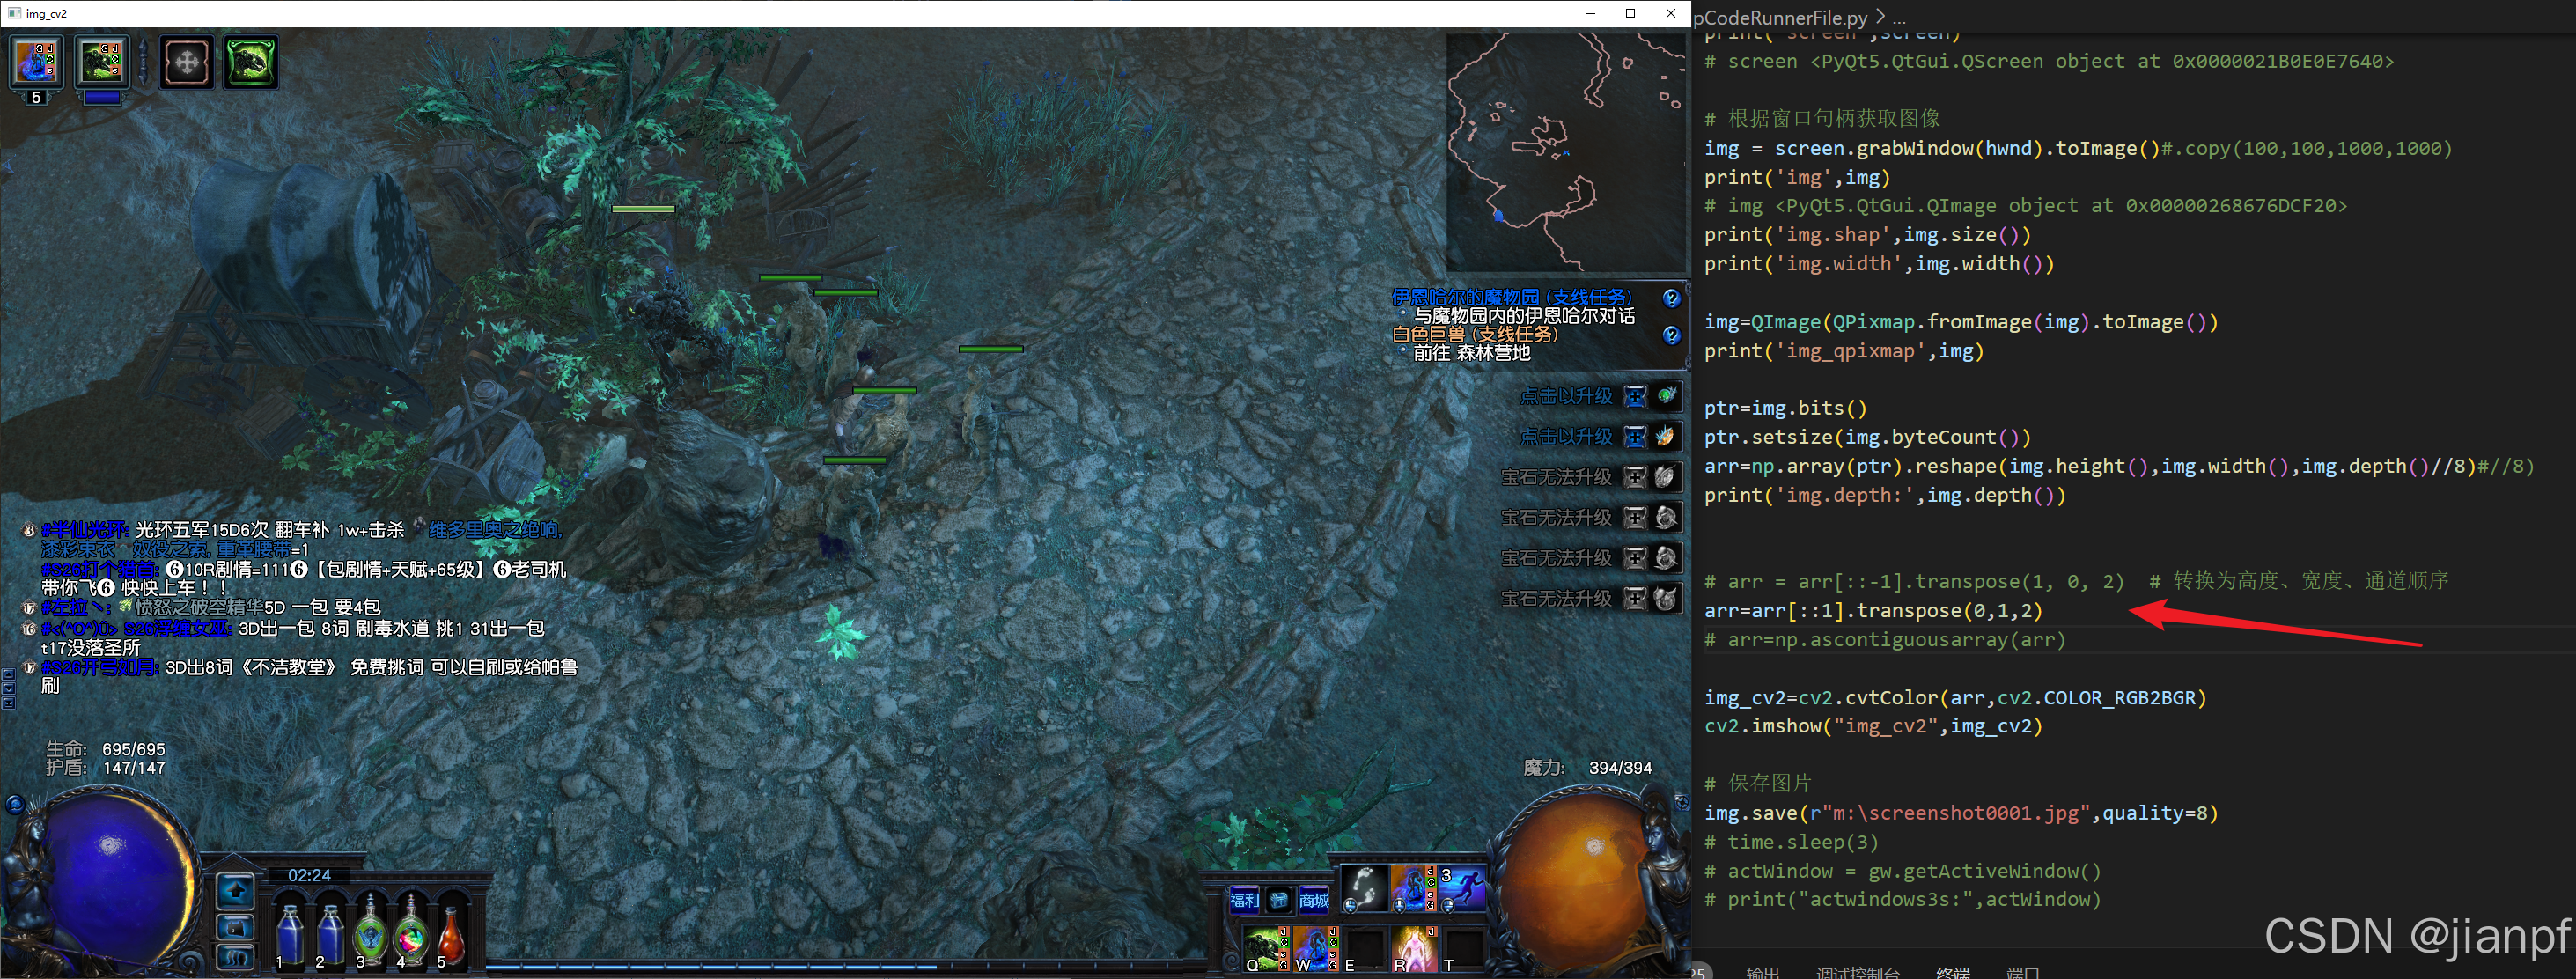
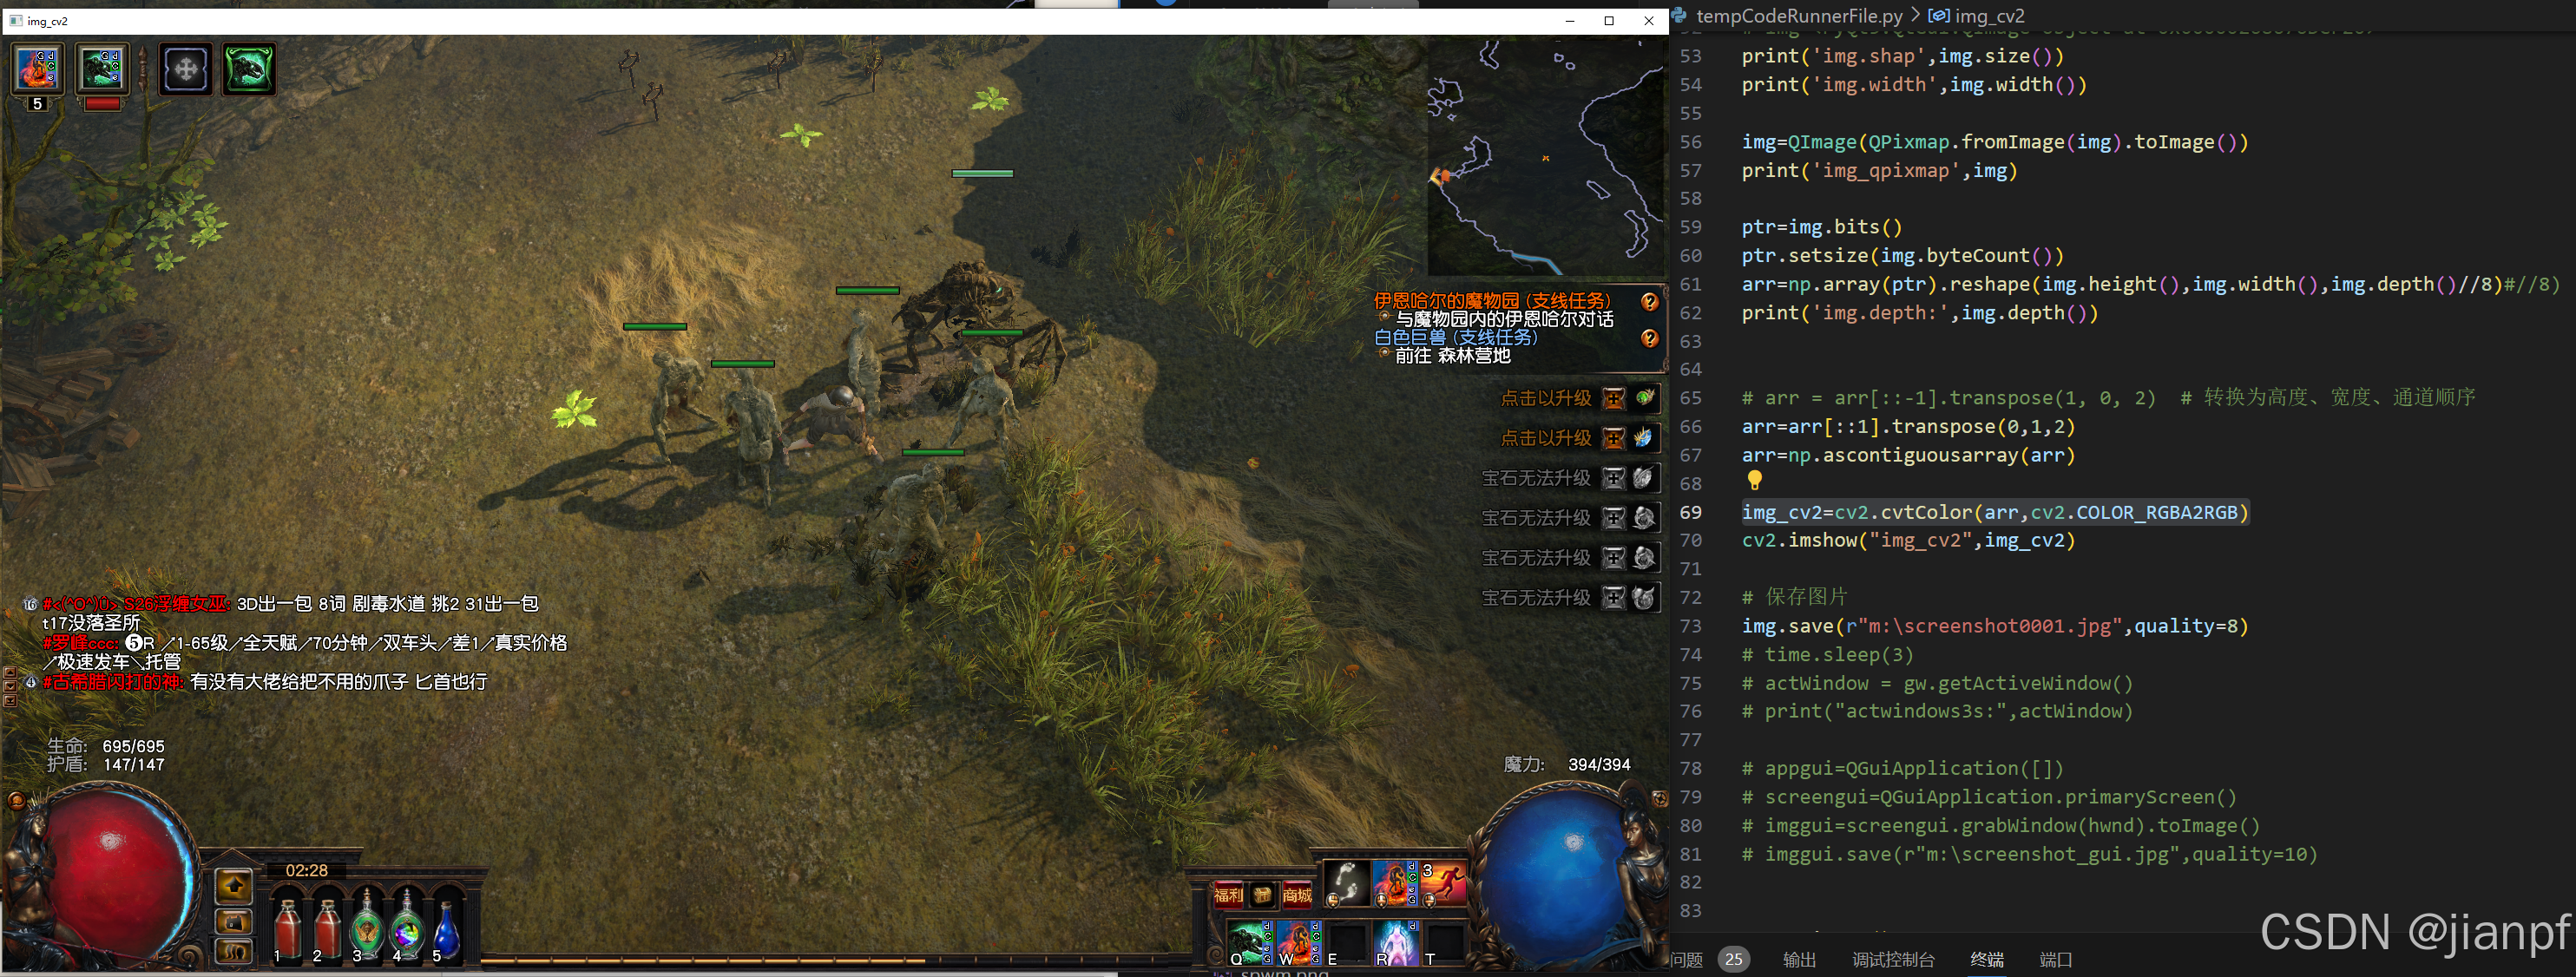
QT5截图转np是带有A通道,需要cv2.COLOR_RGBA2RGB把A通道去除,常正常显示
a=set() set 是一个内置的数据类型,它是一个无序的、不包含重复元素的集合。
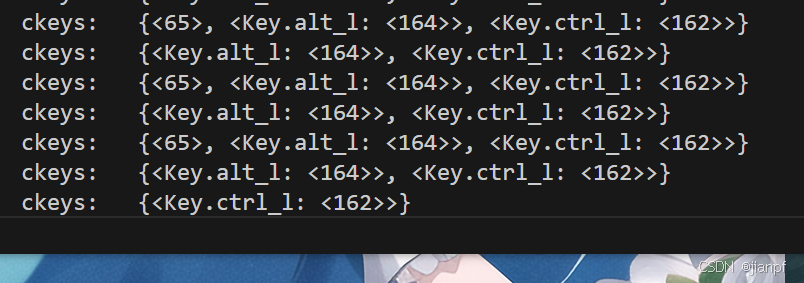
from pynput.keyboard import Listener, Key, KeyCode
# 定义一个全局变量来存储组合键的状态
current_keys = set()
# 定义一个函数来处理按键按下事件
def on_press(key):
global current_keys
try:
# 将按下的键添加到集合中
current_keys.add(key)
# 检查是否按下了 Ctrl+.
if any(k.char == 'ctrl' or k.char == 'ctrl_l' for k in current_keys) and key.char == '.':
print('a')
# 检查是否按下了 Alt+.
elif any(k.char == 'alt' or k.char == 'alt_l' for k in current_keys) and key.char == '.':
print('b')
except AttributeError:
pass # 忽略没有 char 属性的按键(如功能键)
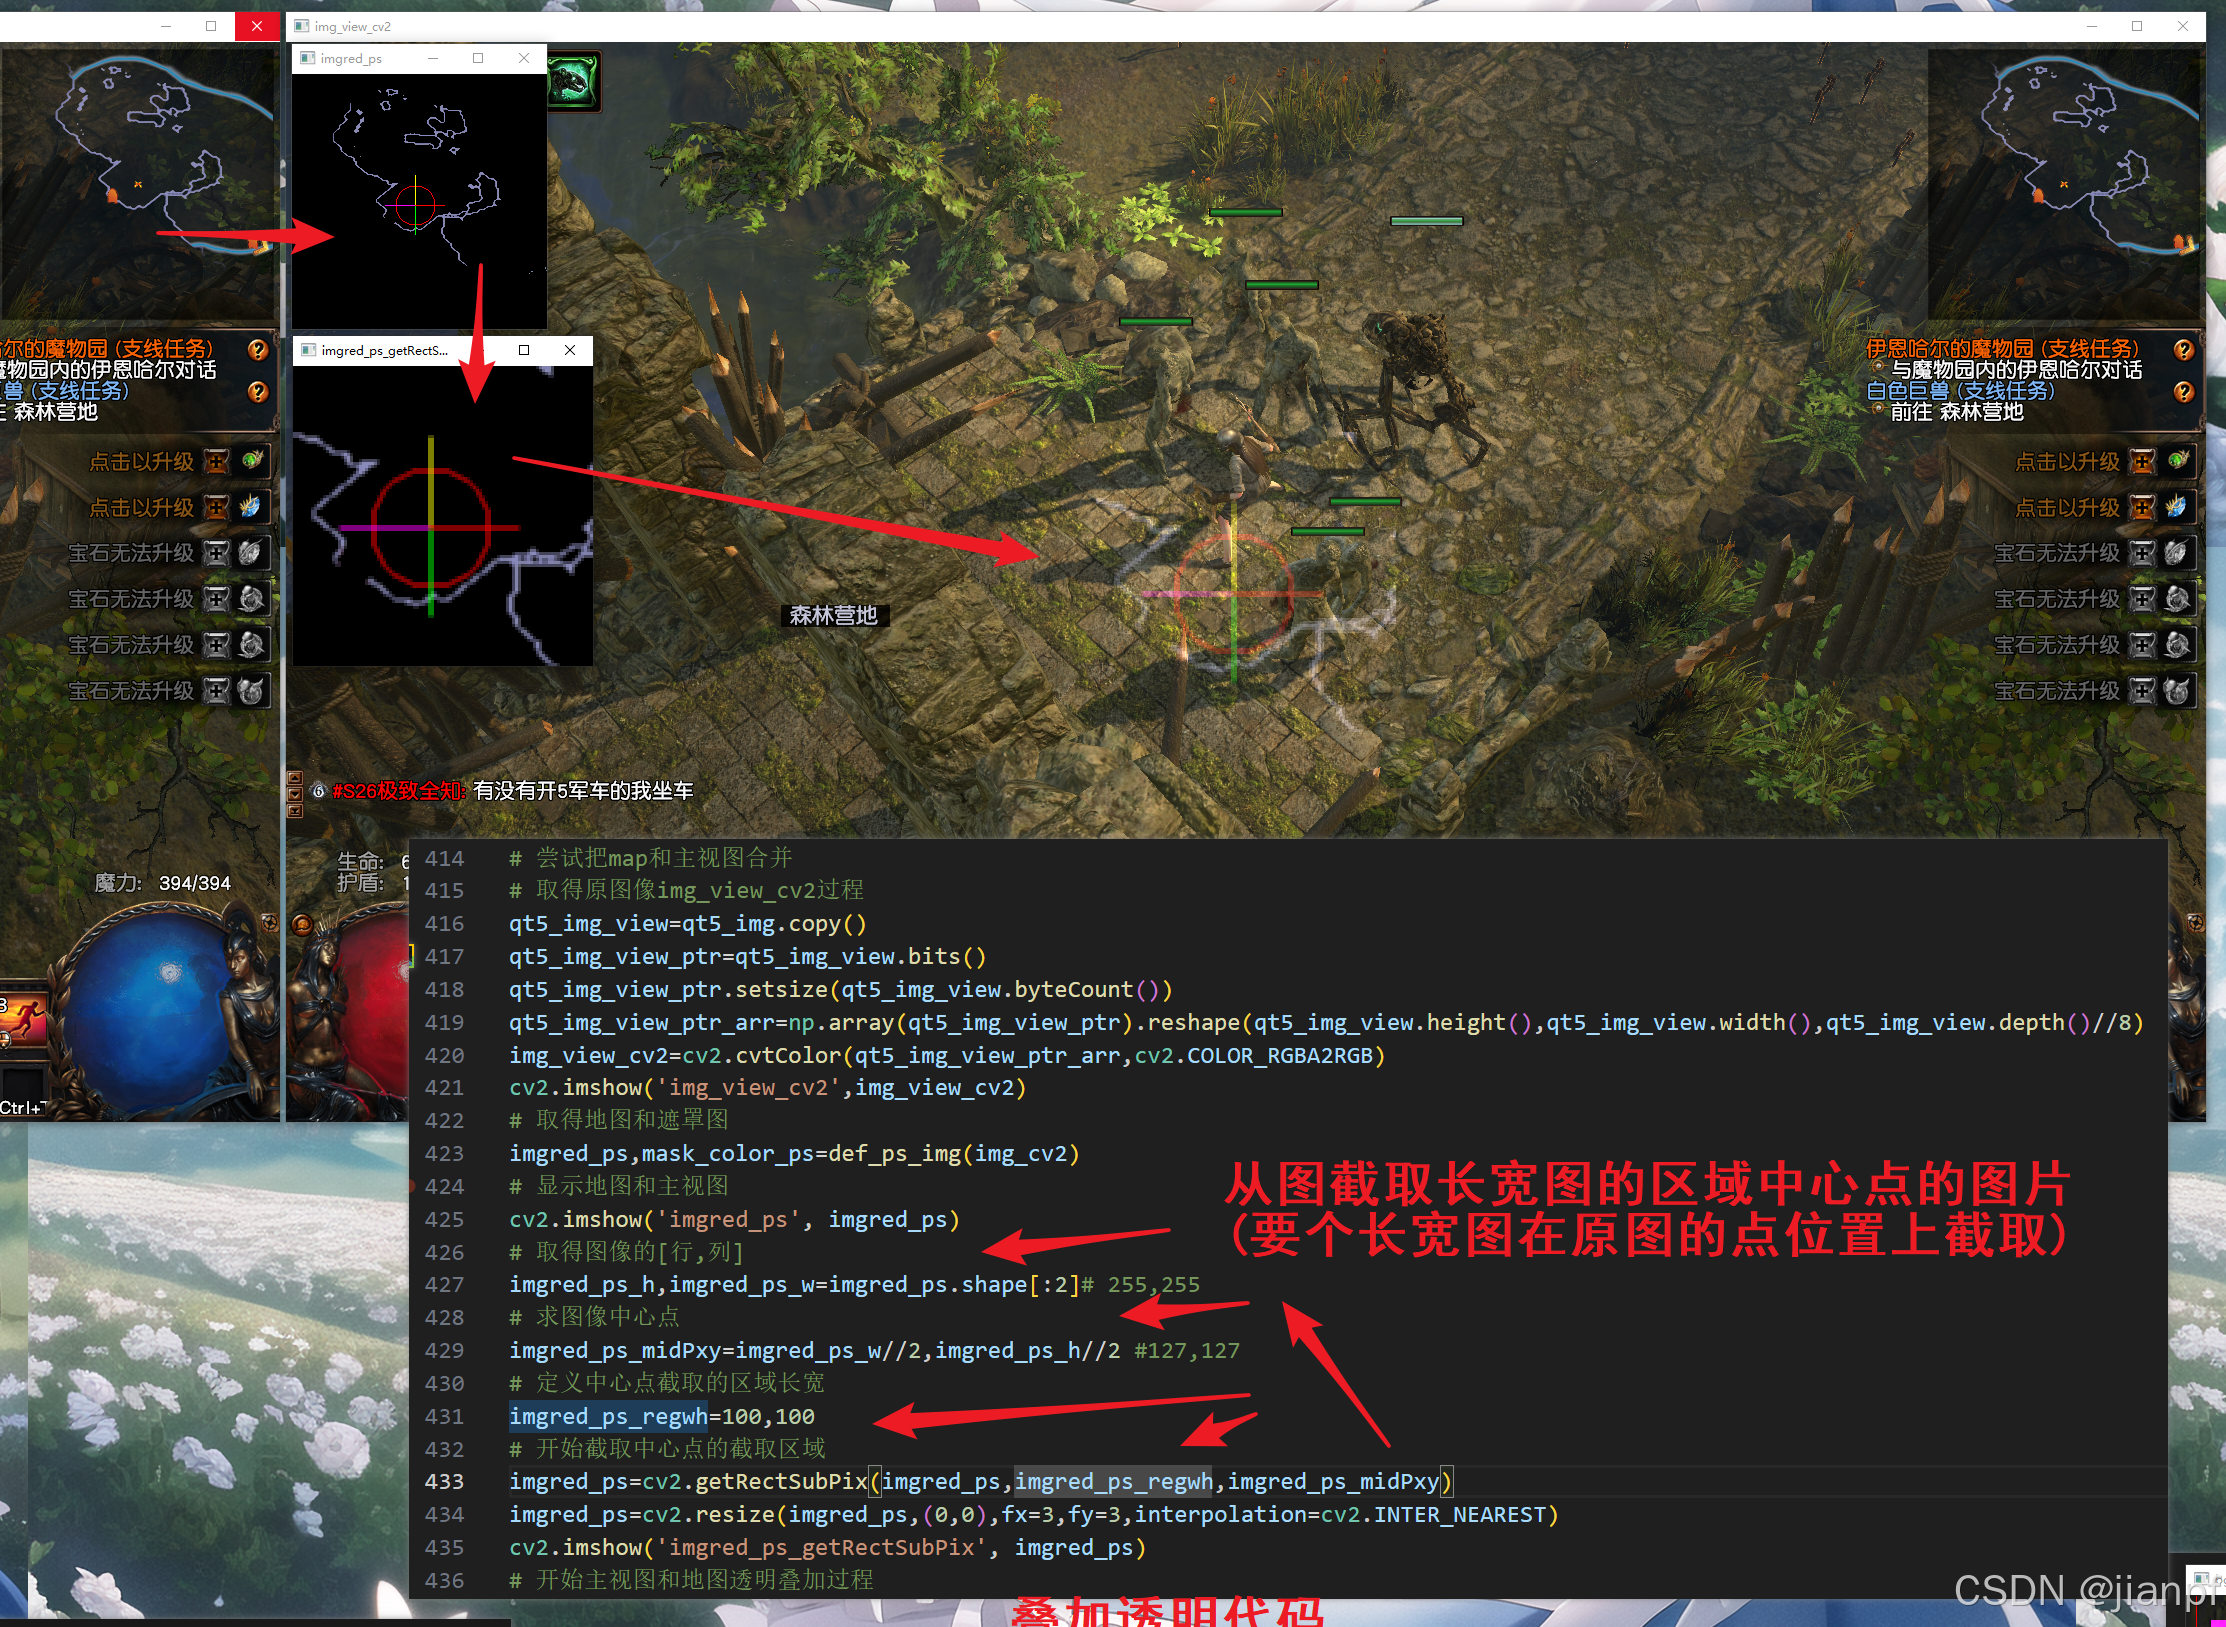
# 定义一个函数来处理按键释放事件
def on_release(key):
global current_keys
try:
# 将释放的键从集合中移除
current_keys.remove(key)
except KeyError:
pass # 如果键不在集合中,则忽略
# 创建并启动监听器
with Listener(on_press=on_press, on_release=on_release) as listener:
listener.join()

更新后还是pynput 1.7.7版本
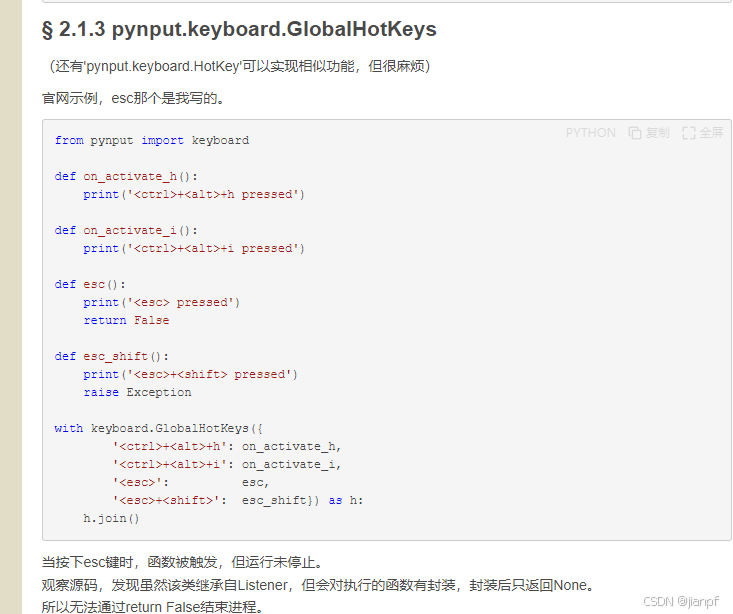
from pynput import keyboard

def on_activate_h():
    print('<ctrl>+<alt>+h pressed')

def on_activate_i():
    print('<ctrl>+<alt>+i pressed')

def esc():
    print('<esc> pressed')
    return False

def esc_shift():
    print('<esc>+<shift> pressed')
    # 无法退出,抛出错误退出或exit()全退
    raise Exception

with keyboard.GlobalHotKeys({
        '<ctrl>+<alt>+h': on_activate_h,
        '<ctrl>+<alt>+i': on_activate_i,
        '<esc>':          esc,
        '<esc>+<shift>':  esc_shift}) as h:
    h.join()
组合快捷键字符串方式’+‘要用尖括号
修改’++.': on_activate_h,后.也是可以的
https://www.cnblogs.com/tobe-goodlearner/p/tutorial-pynput.html
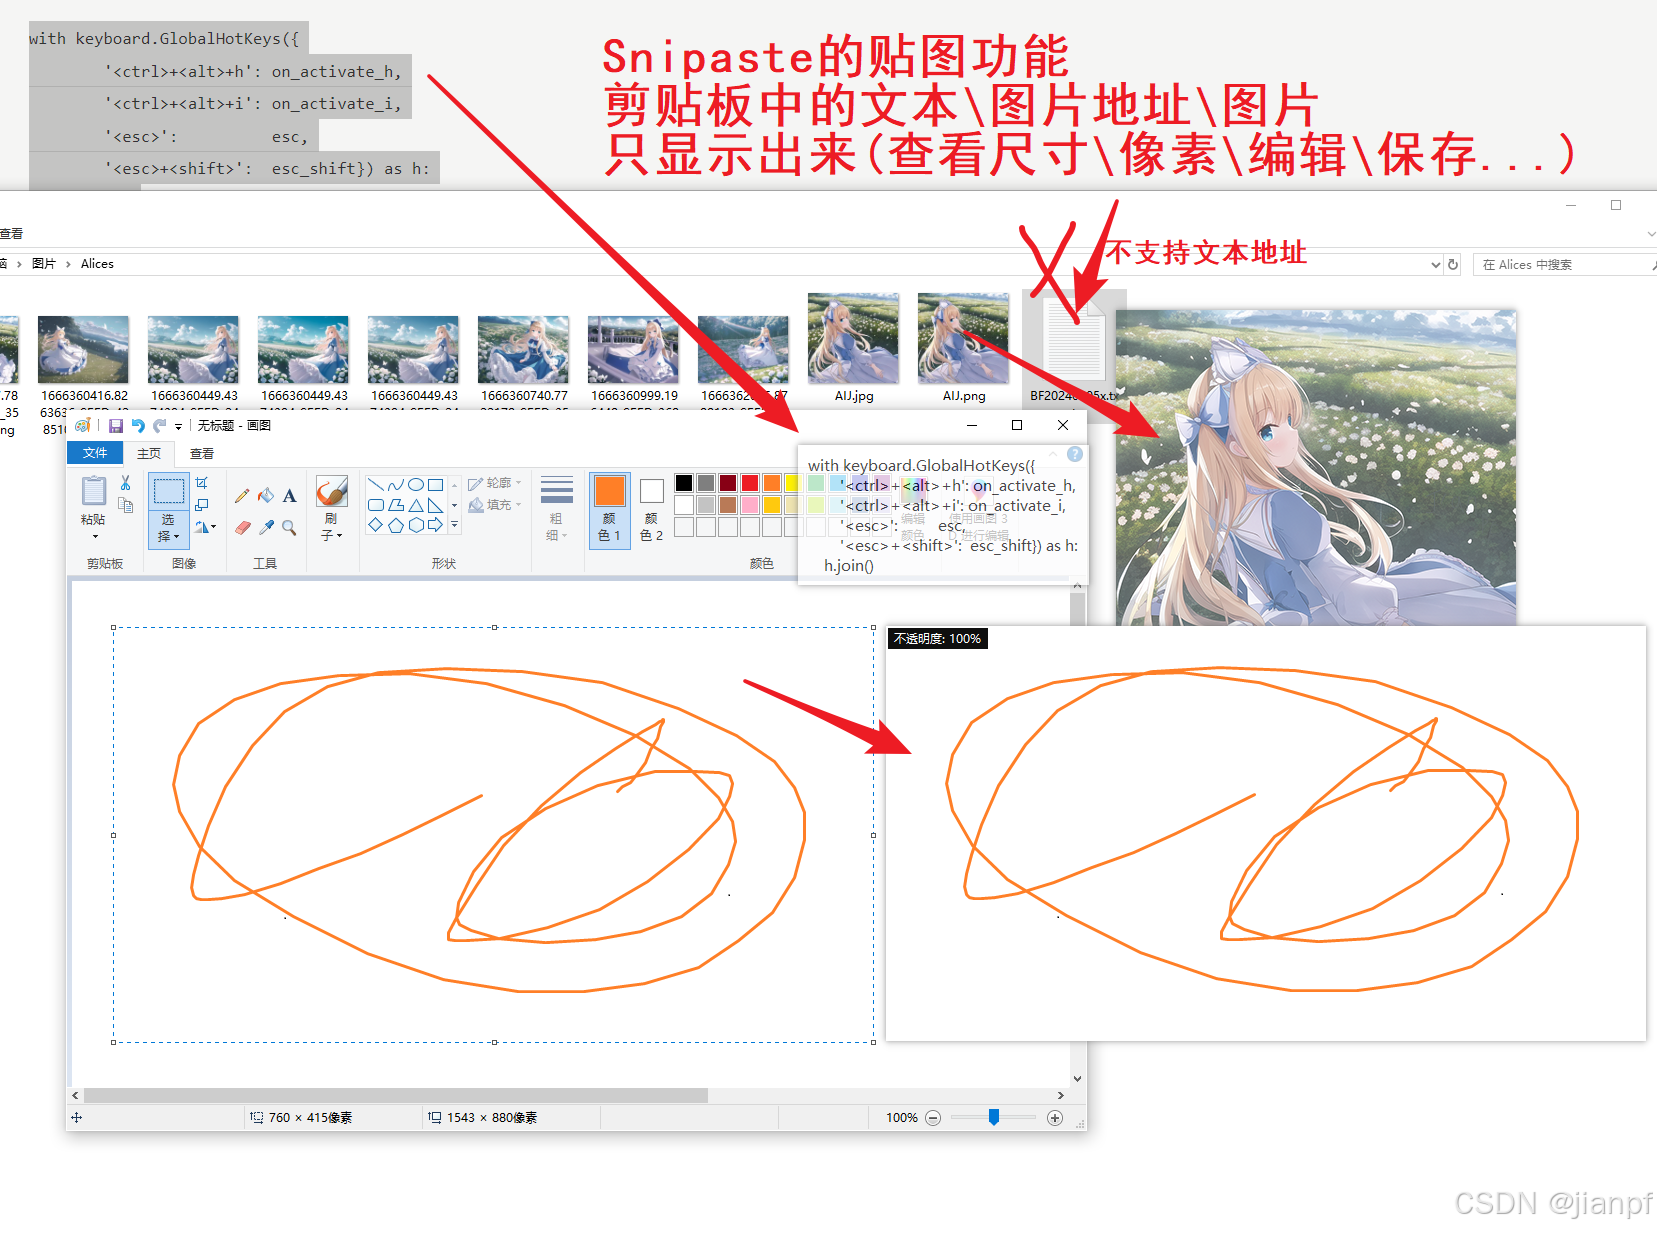
Snipaste的贴图功能就是剪贴板+路径图片+文字=只显示出来,只保存在历史记录中(保存还是要保存)
吸取颜色shift切换提示255模式,#ffffff十六进制模式
ctrl键显示中点十字线(2024.9.7.5:04)
hkey="ok"
# 简单的设置退出快捷键shift+esc的标注模板
def shift_esc():
    global hkey
    print("运行结束...")
    hkey="exit"
    exit()
# 设置暂停10
def shift_F5():
    global hkey
    print("暂停运行10秒")
    hkey="stop"
    time.sleep(10)
    print("暂停运行10结束...")
# 热键的进程函数
def thread_hkey_listener():
    with GlobalHotKeys({'<shift>+<esc>':shift_esc,'<shift>+<F5>':shift_F5}) as hkey:
        hkey.join()
thread_hkey=threading.Thread(target=thread_hkey_listener)
thread_hkey.start()
#注意hkey标记的顺序值优先赋值,进来就改值或清值
进程简单的设置退出快捷键shift+esc的标注模板
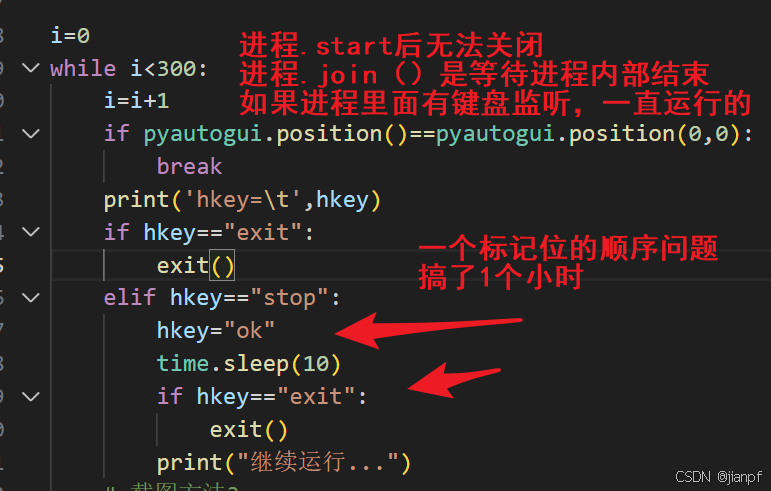
进程.start和.join等待
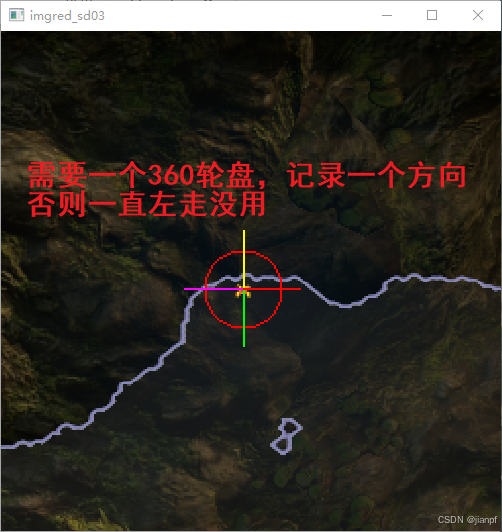
def_fangXiang=“left”
方向盘=左
前一步进入循环
while(1)
if 方向盘=左:
if 判断左是否通:
方向盘=左
走左
退出循环
if 方向盘=上:
if 判断上是否通:
方向盘=上
走上
退出循环
if 方向盘=右:
if 判断右是否通:
方向盘=右
走右
退出循环
if 方向盘=下:
if 判断下是否通:
方向盘=下
下上
退出循环
后一步进入循环
while(2):
if 方向盘=左:
if 左不通:
方向盘=上
if 上不通:
方向盘=右
if 右不通:
方向盘下
if 下不通:
方向盘左
if 方向盘=上:
if 上不通
2024.9.4.20:01晴32-38度
不行要把坐标动起来
2024.9.5.2:55
https://www.bilibili.com/video/BV1ts4y1G7A1/?p=7&spm_id_from=pageDriver&vd_source=606d359e368cfd6b2c0e0b03ff16fa67
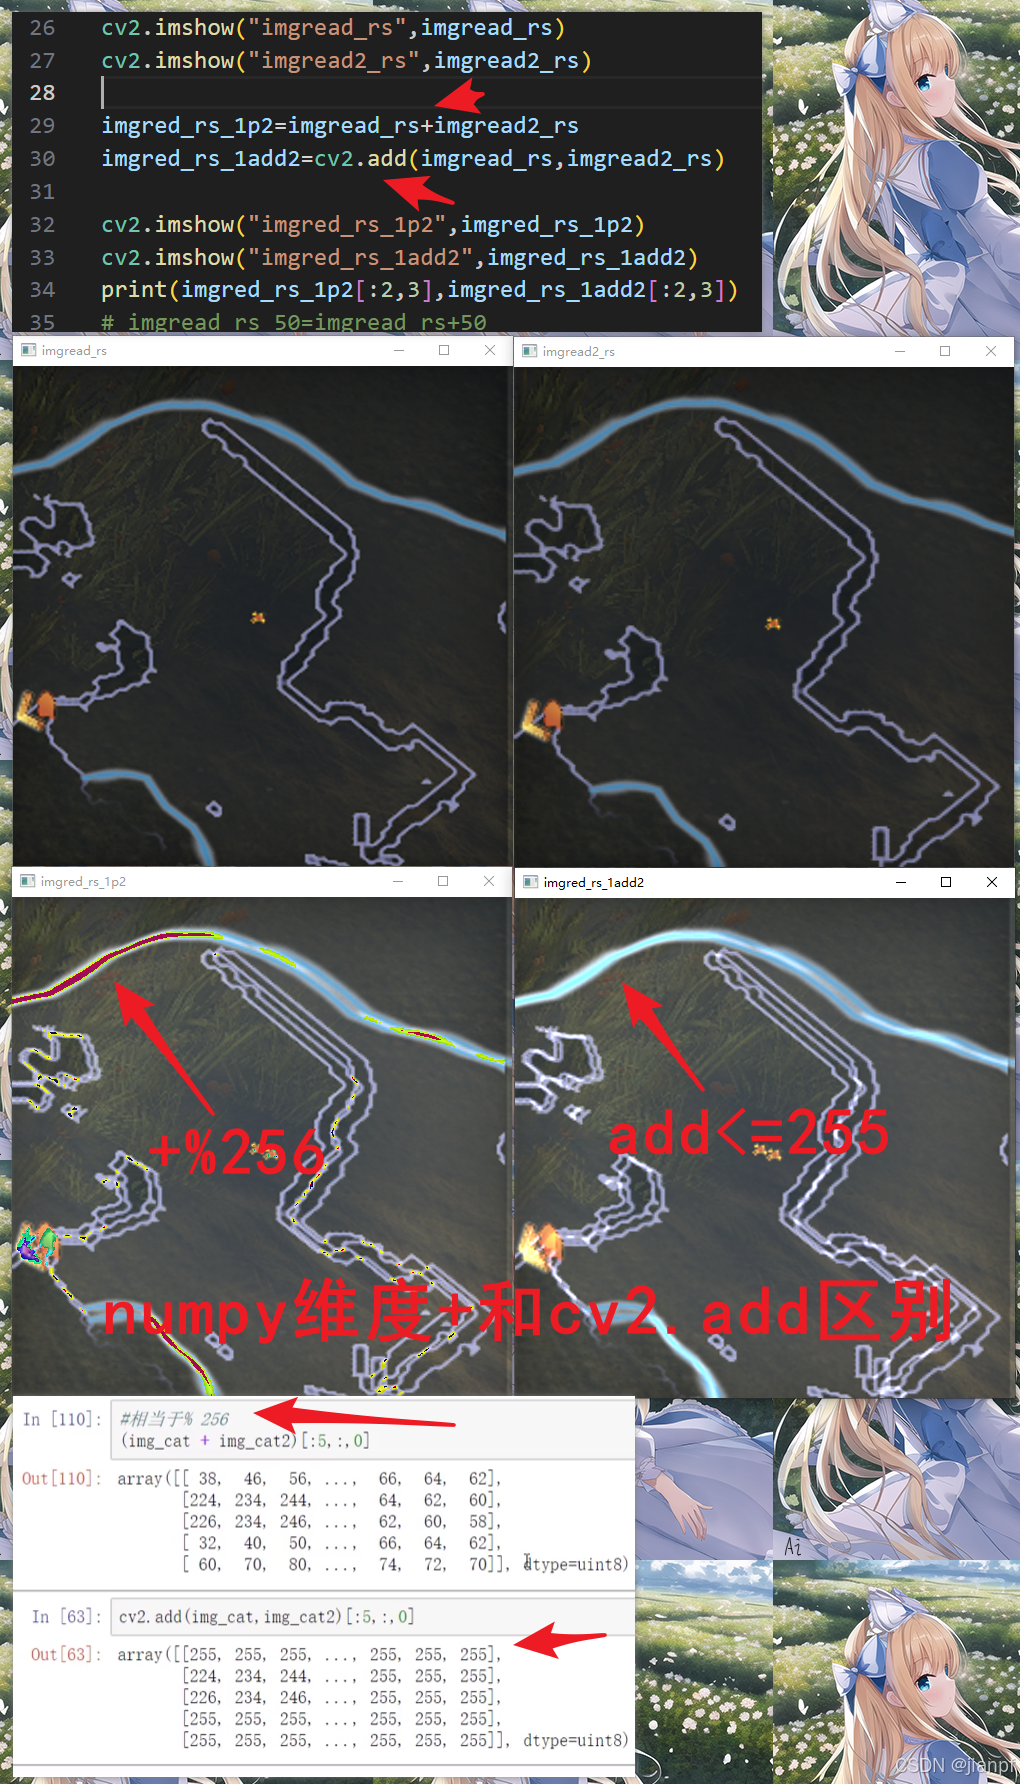
变化过程:蓝色加到头就加绿色再加红色再加就黑屏了,add只能到255.
数值计算
图像每通道值+50,叠加效果
img_cat=img_cat+50
维度计算默认取余数,叠加效果
img_cat=img_cat+img_dog
CV2.add方法,变亮效果
img_cat=cv2
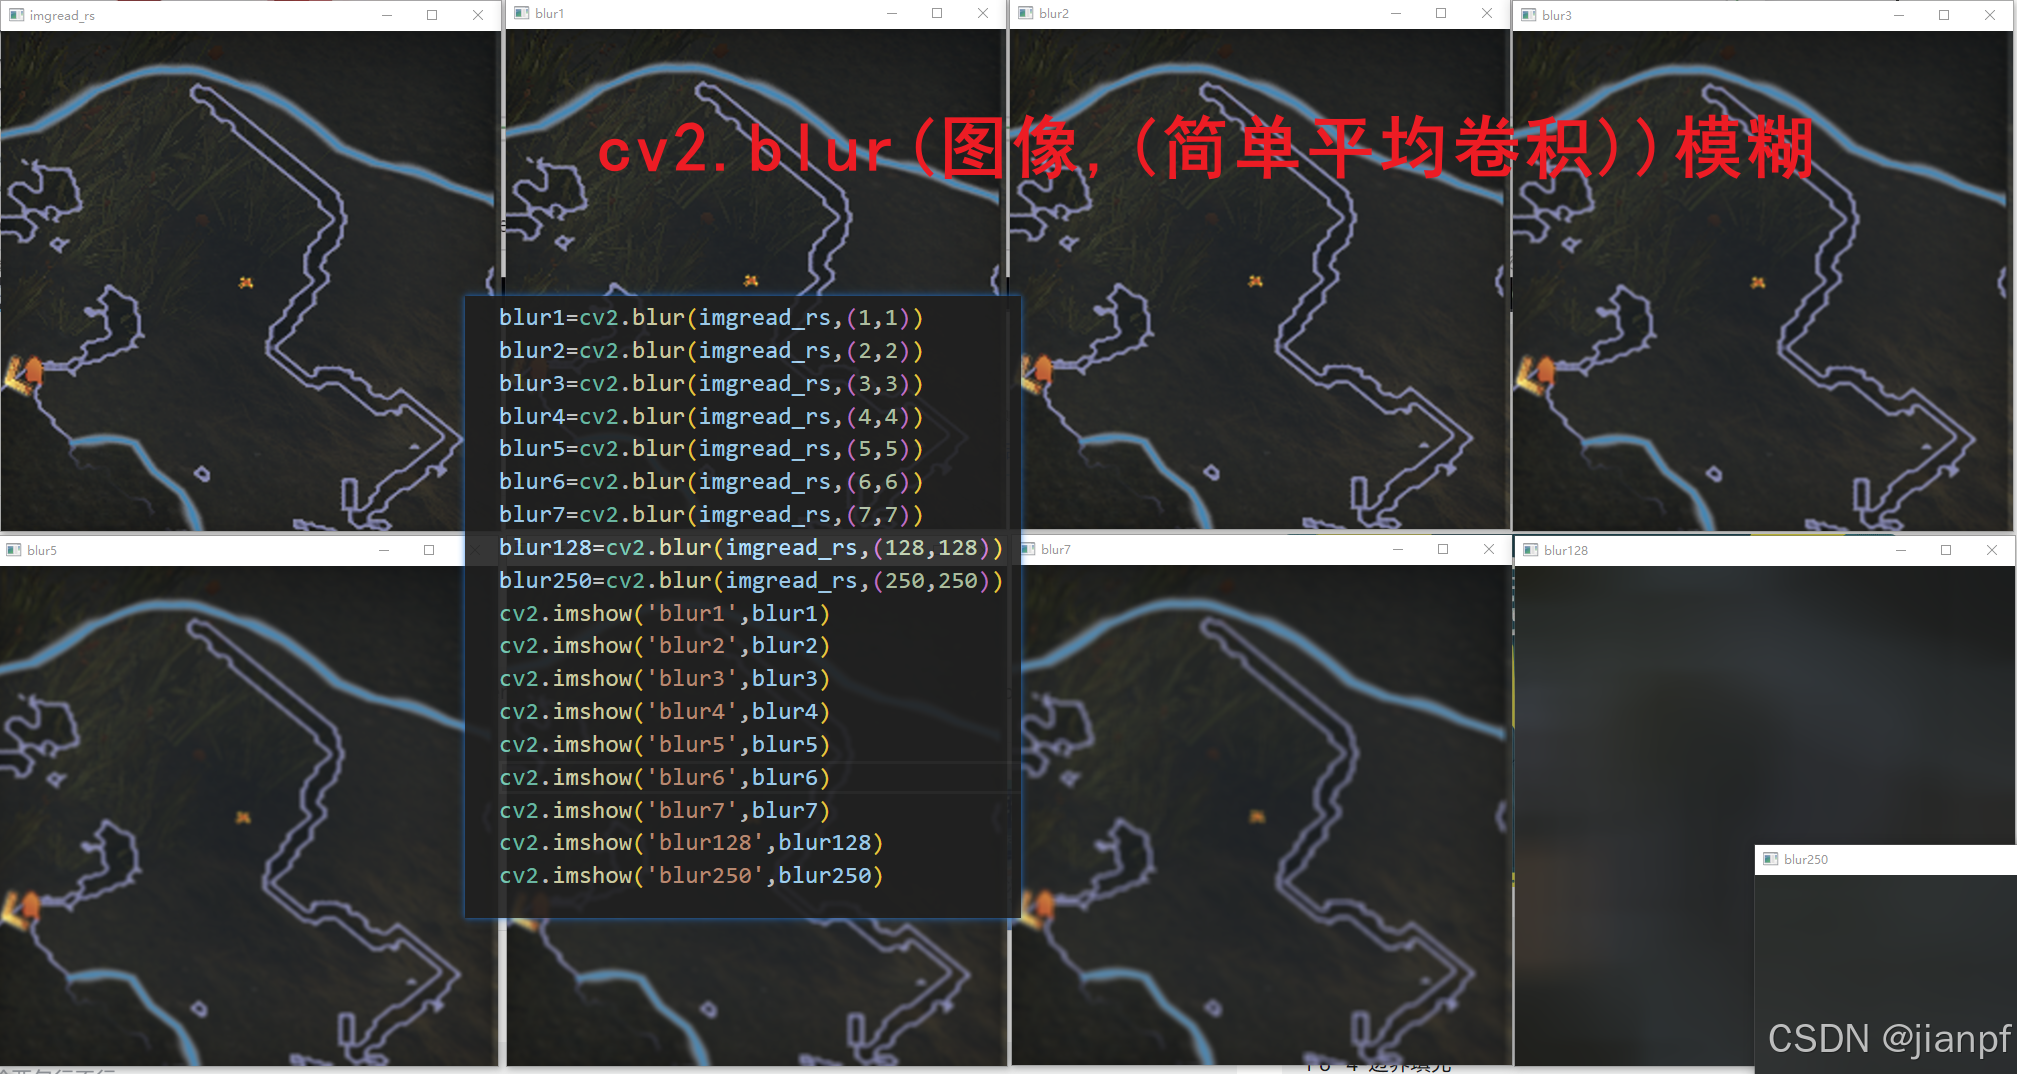
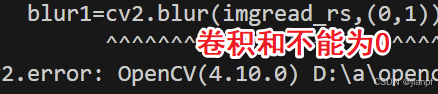
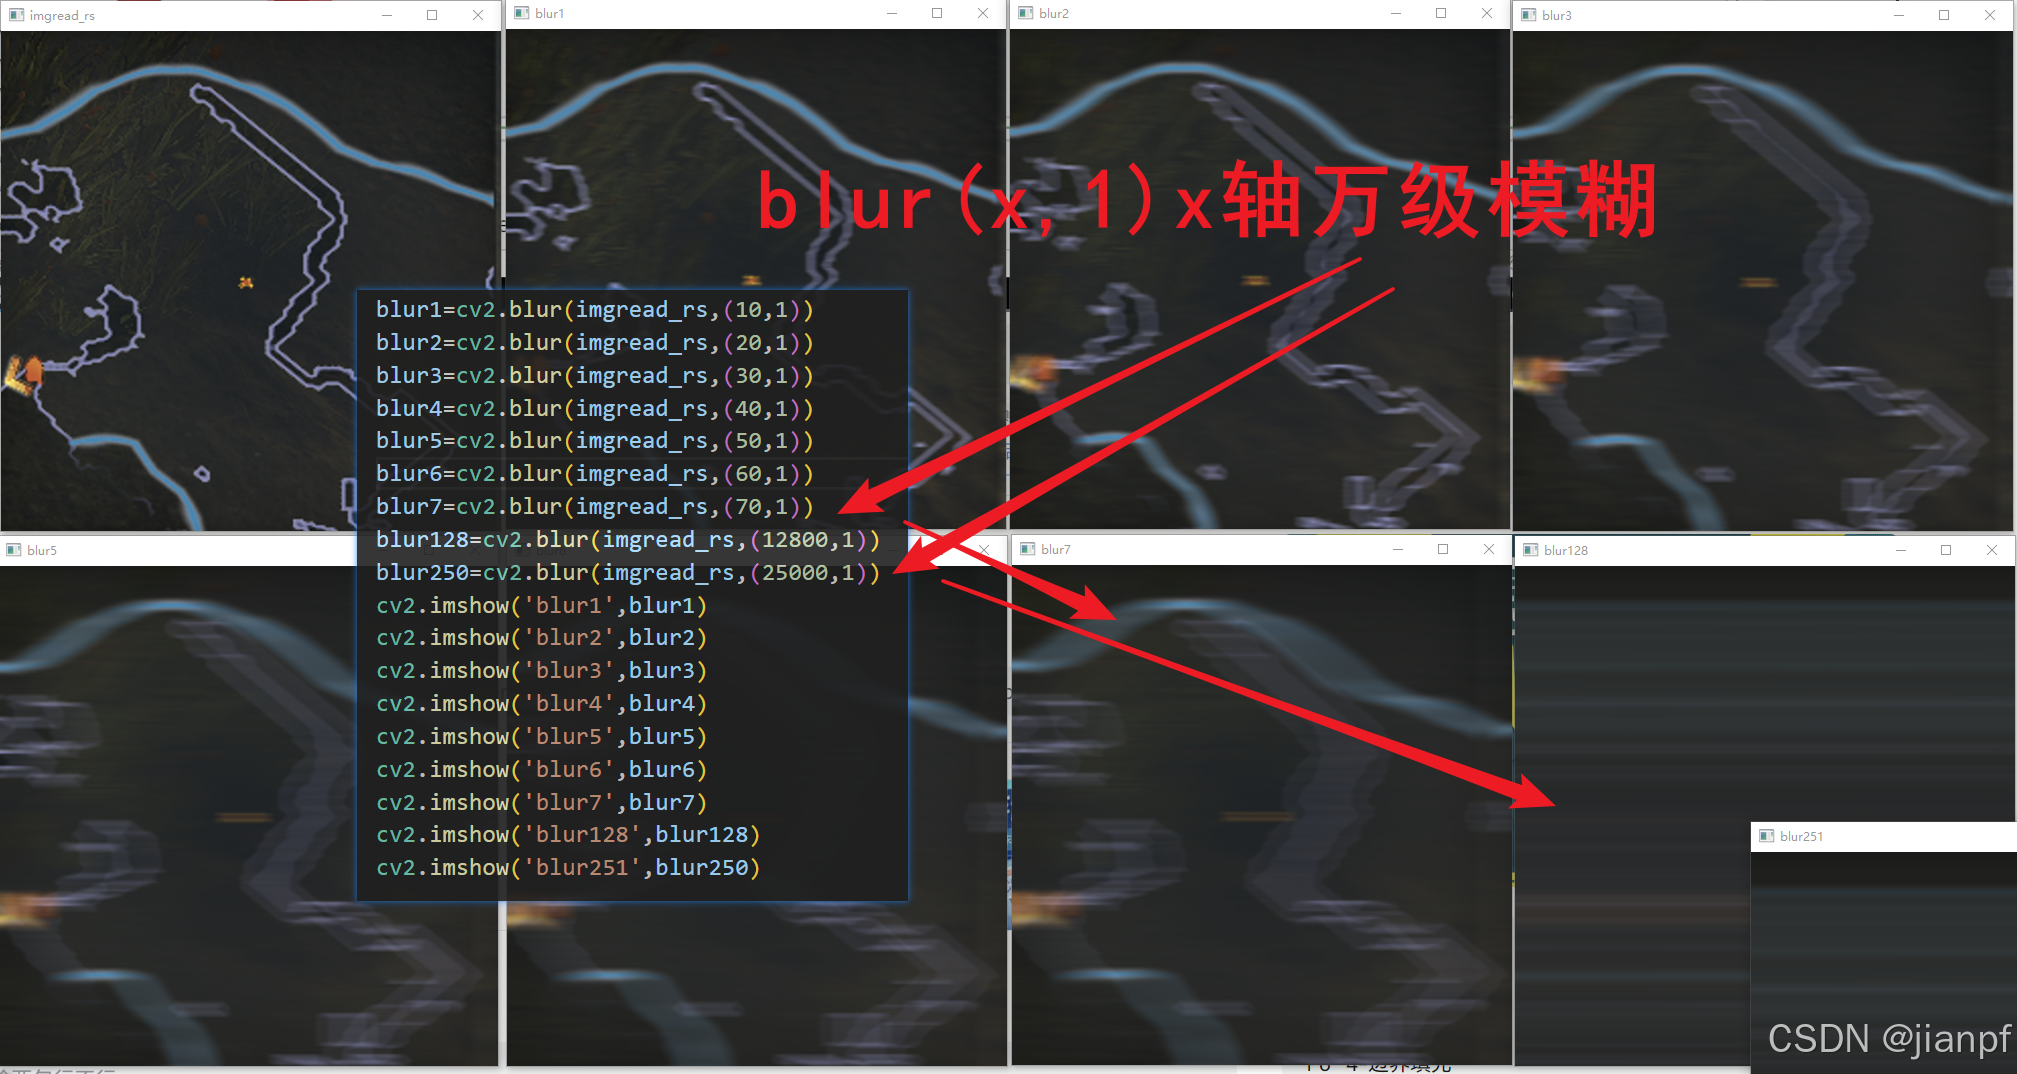
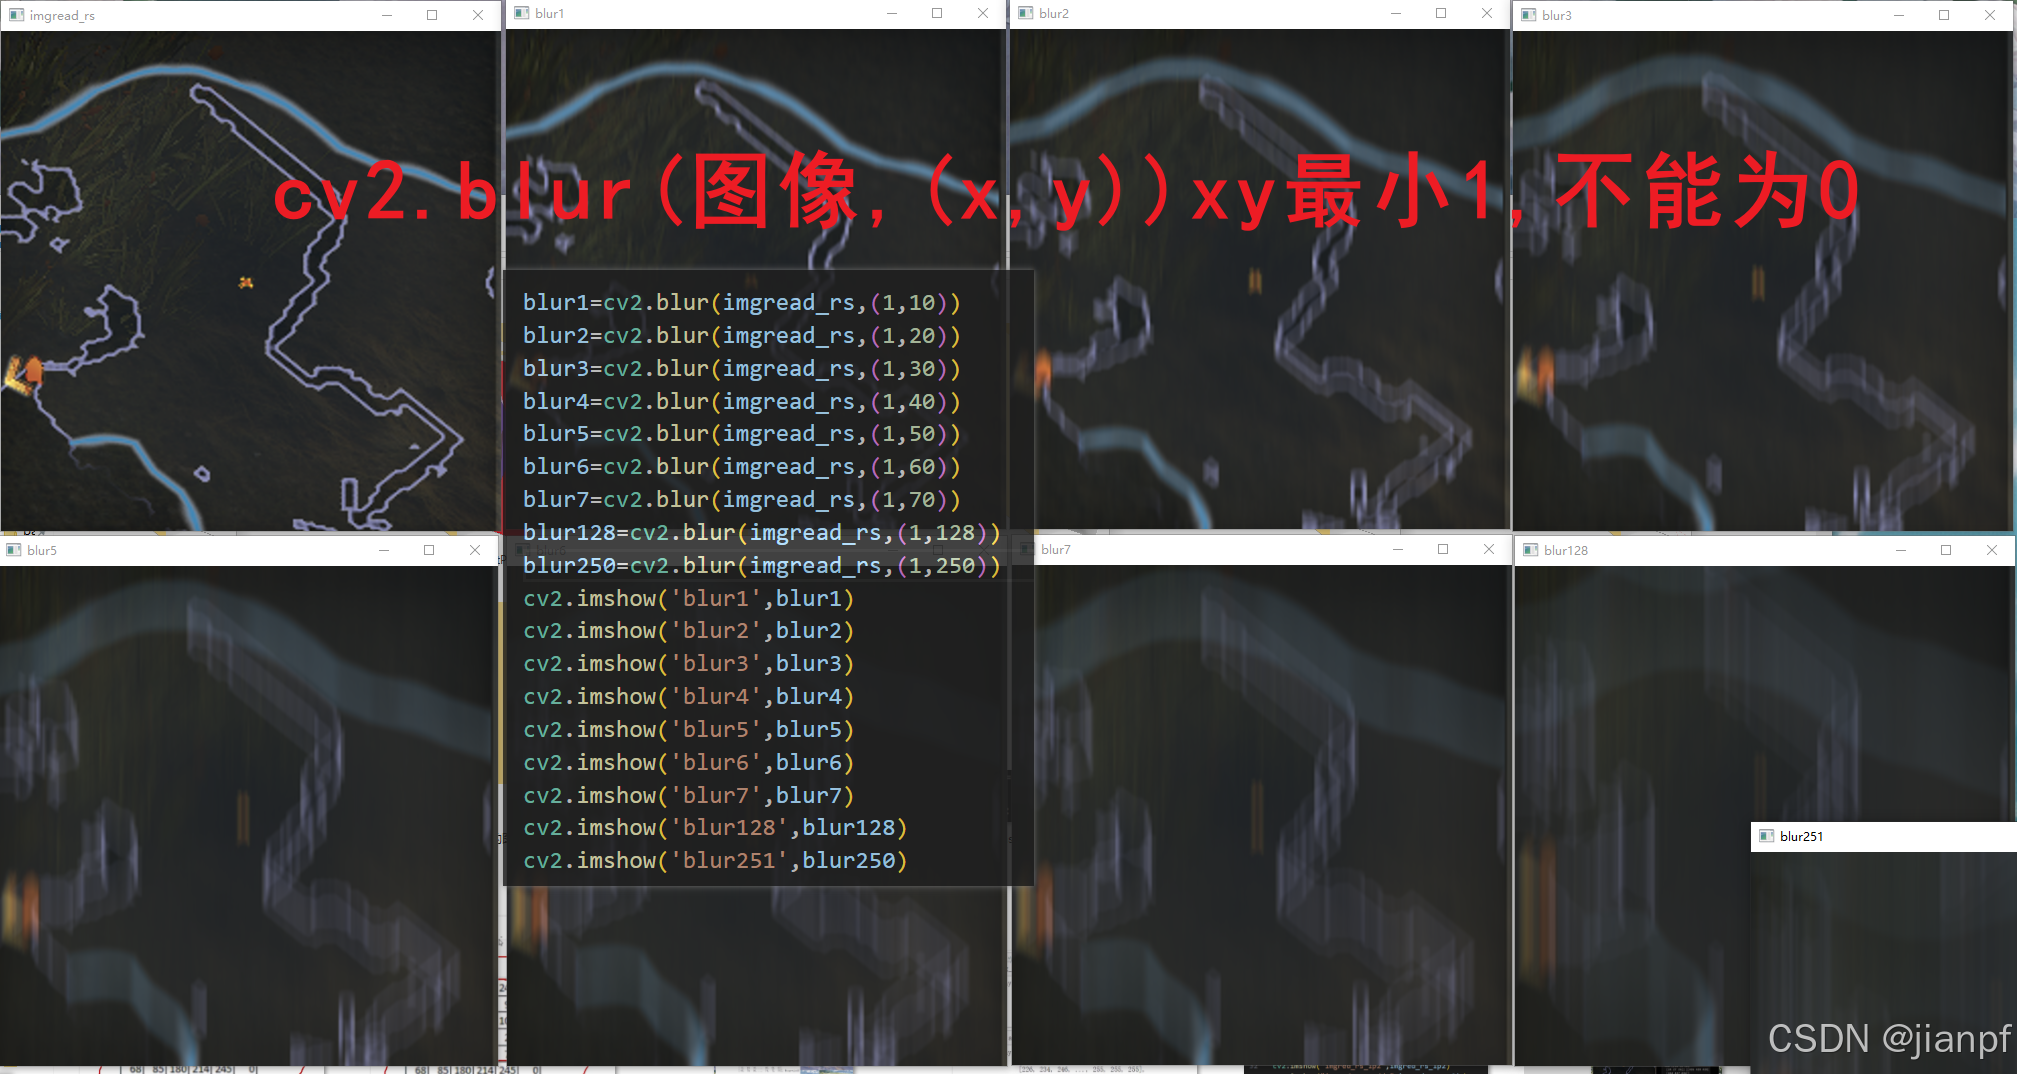
均值滤波,简单的平均卷积操作.cv2.blur(img,(核区域,扫雷区域,最少3,3,因为2是中间位))
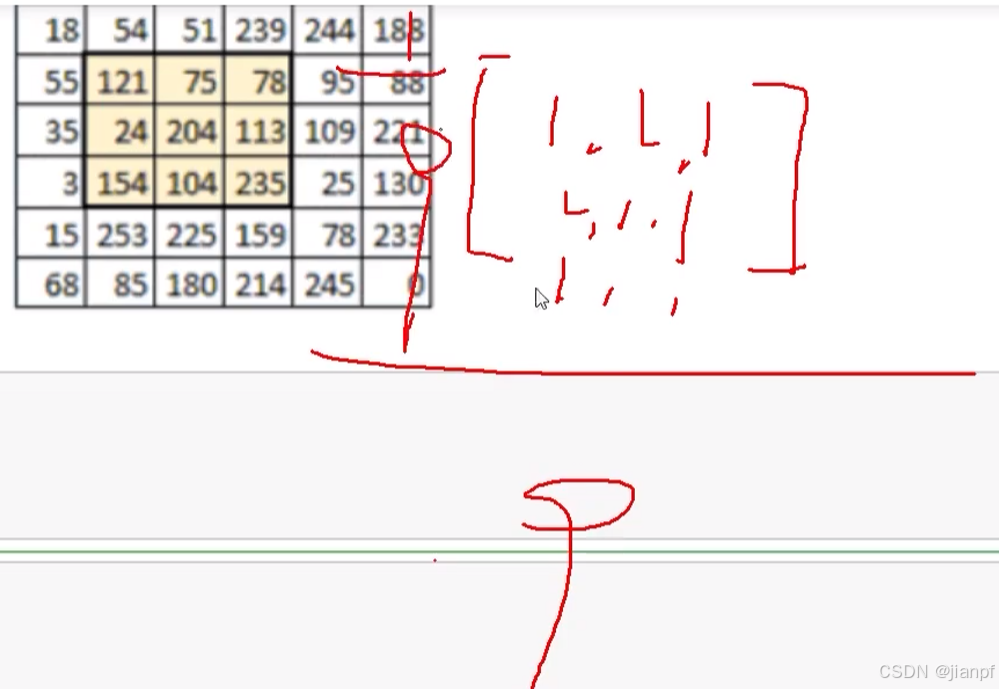
体积维度和/总和=每一格是总和的9分之1=???
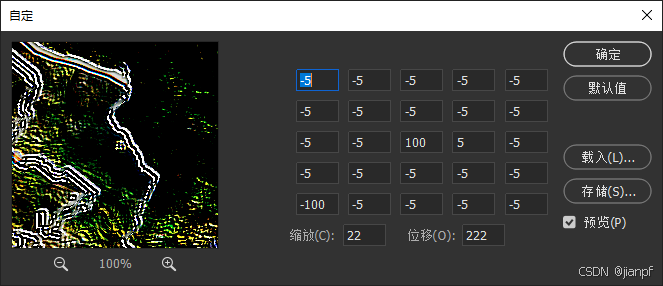
PS的自定义滤镜卷积
在这里插入图片描述
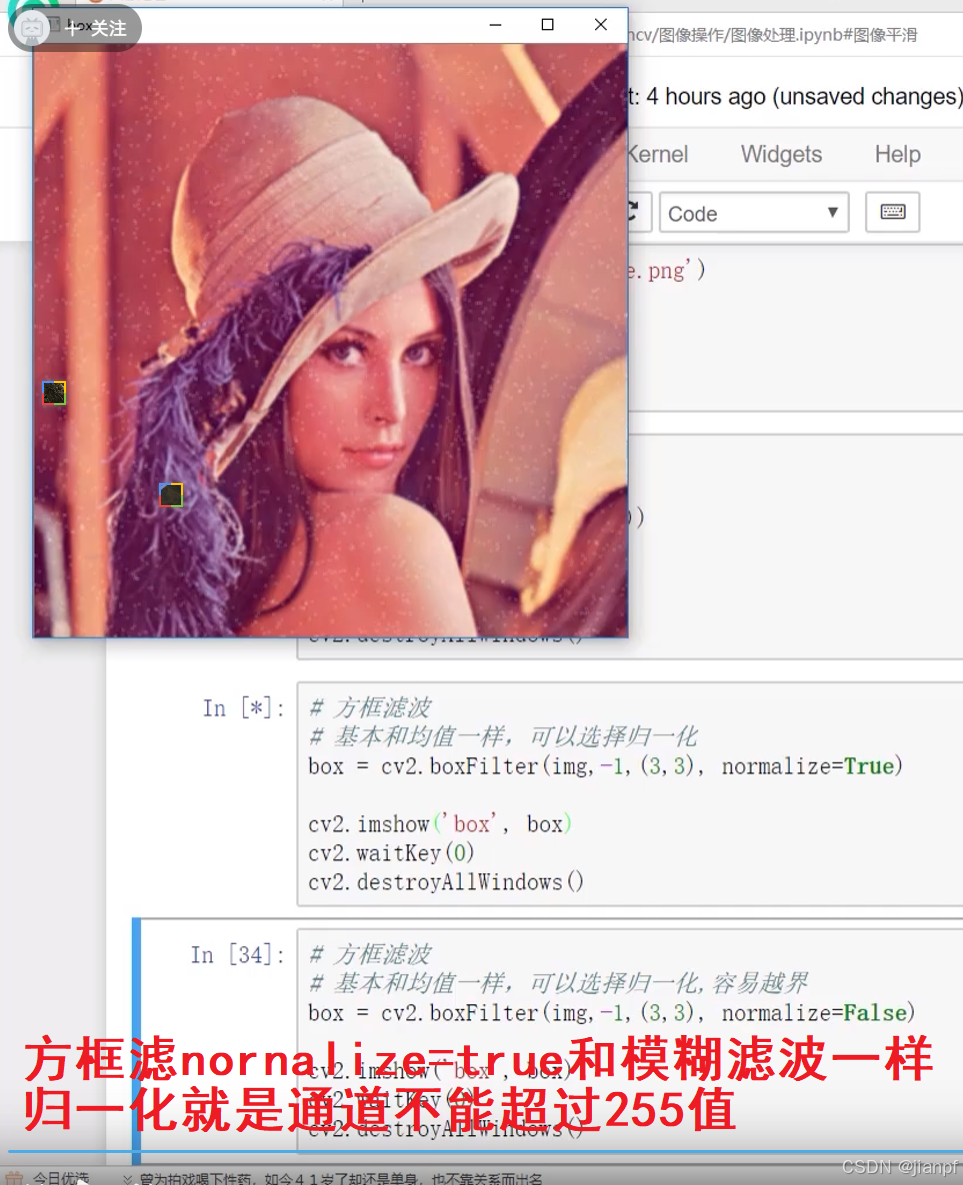
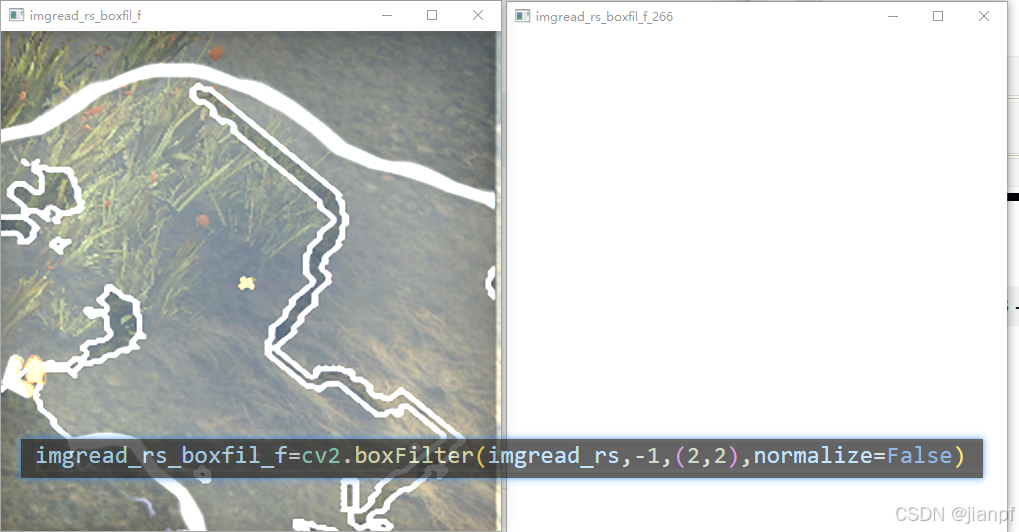
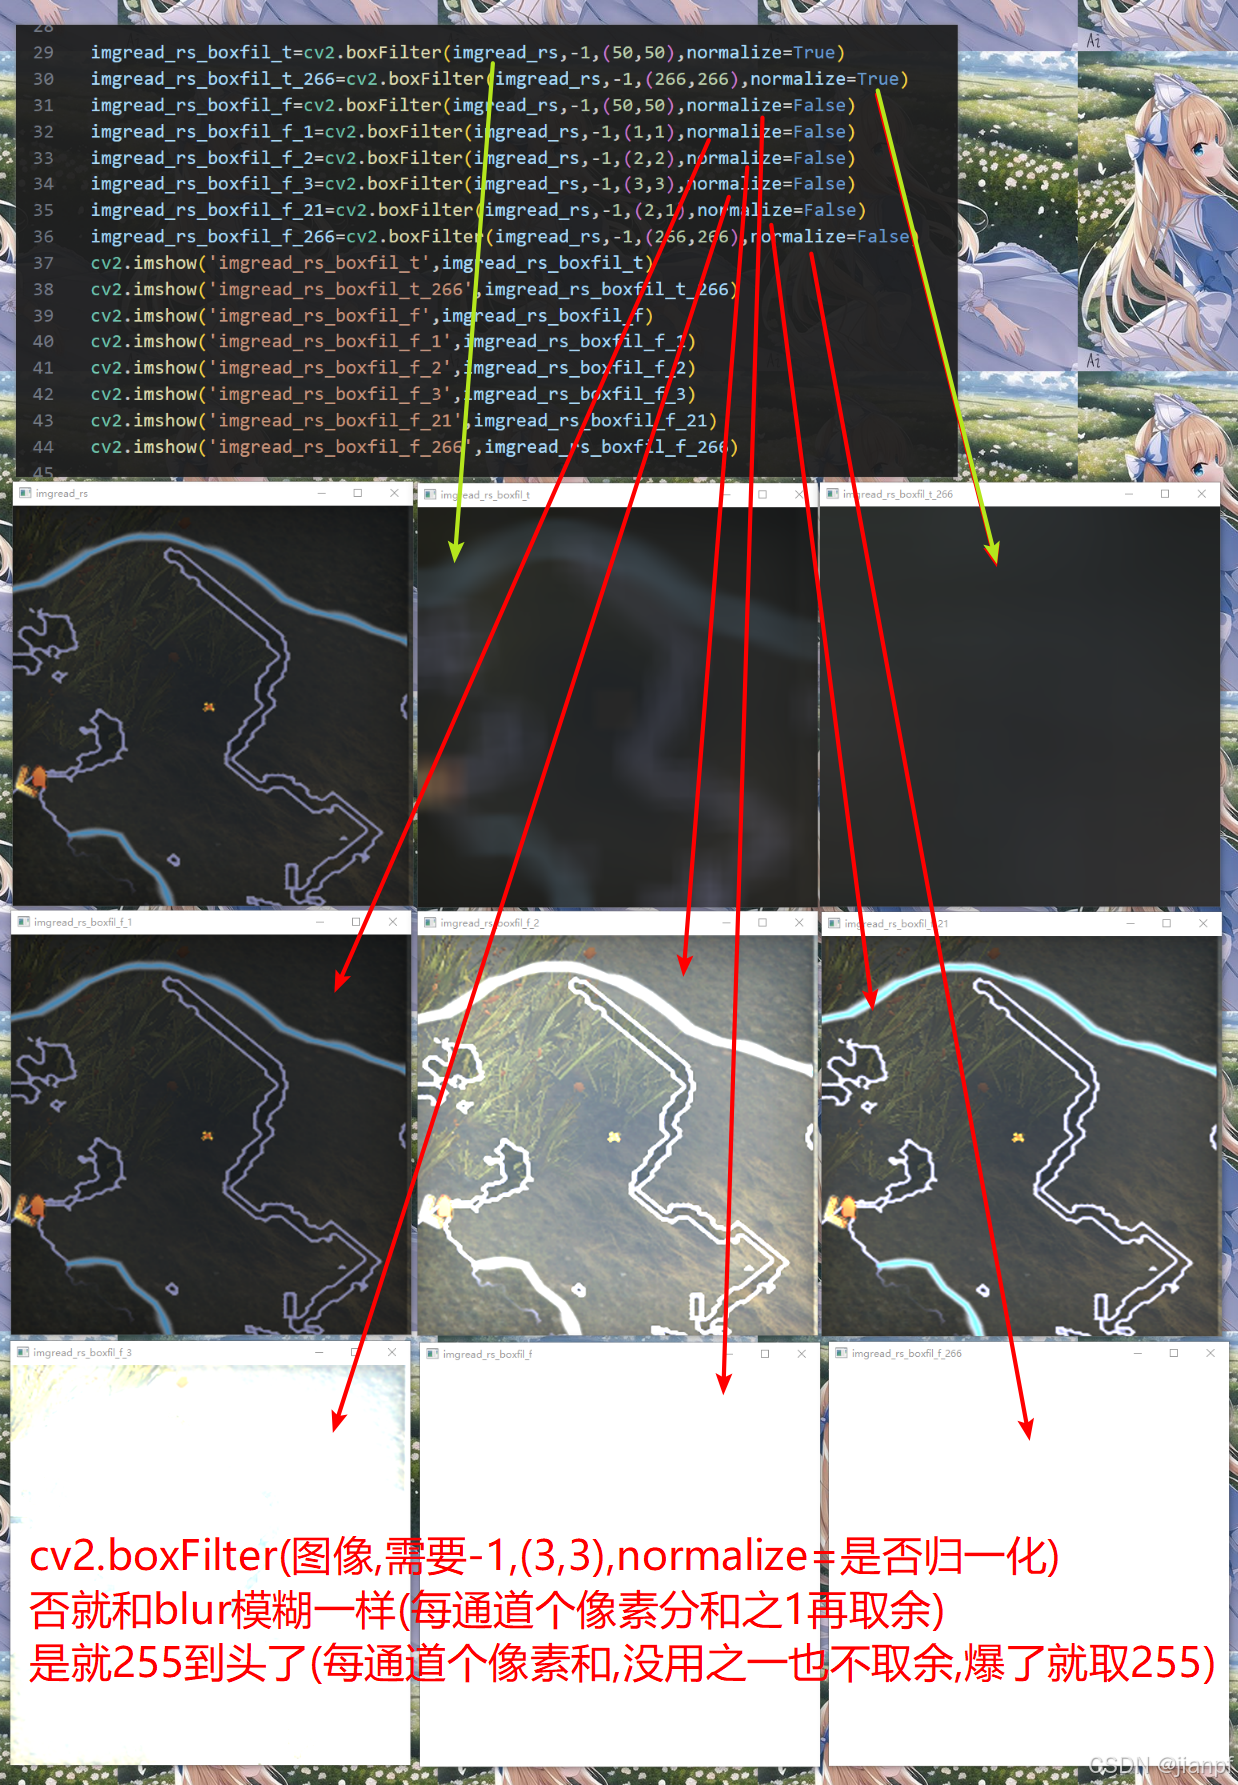
normalize=标准化(不标准化就越界,爆了255了)
归一化就是通道255到头了
图和文字哪个是对的?
看代码吧,normalize=True是和blur一样效果,所以红字是否对调一下就可以了(图不对就别贴图啊)
#imshow代码块
		"cv2.imshow": {
		"prefix": "imshow",
		"body": [
			"cv2.imshow(${2:$1},$1)$0",
		],
		"description": "cv2.imshow('a',a)"
		}
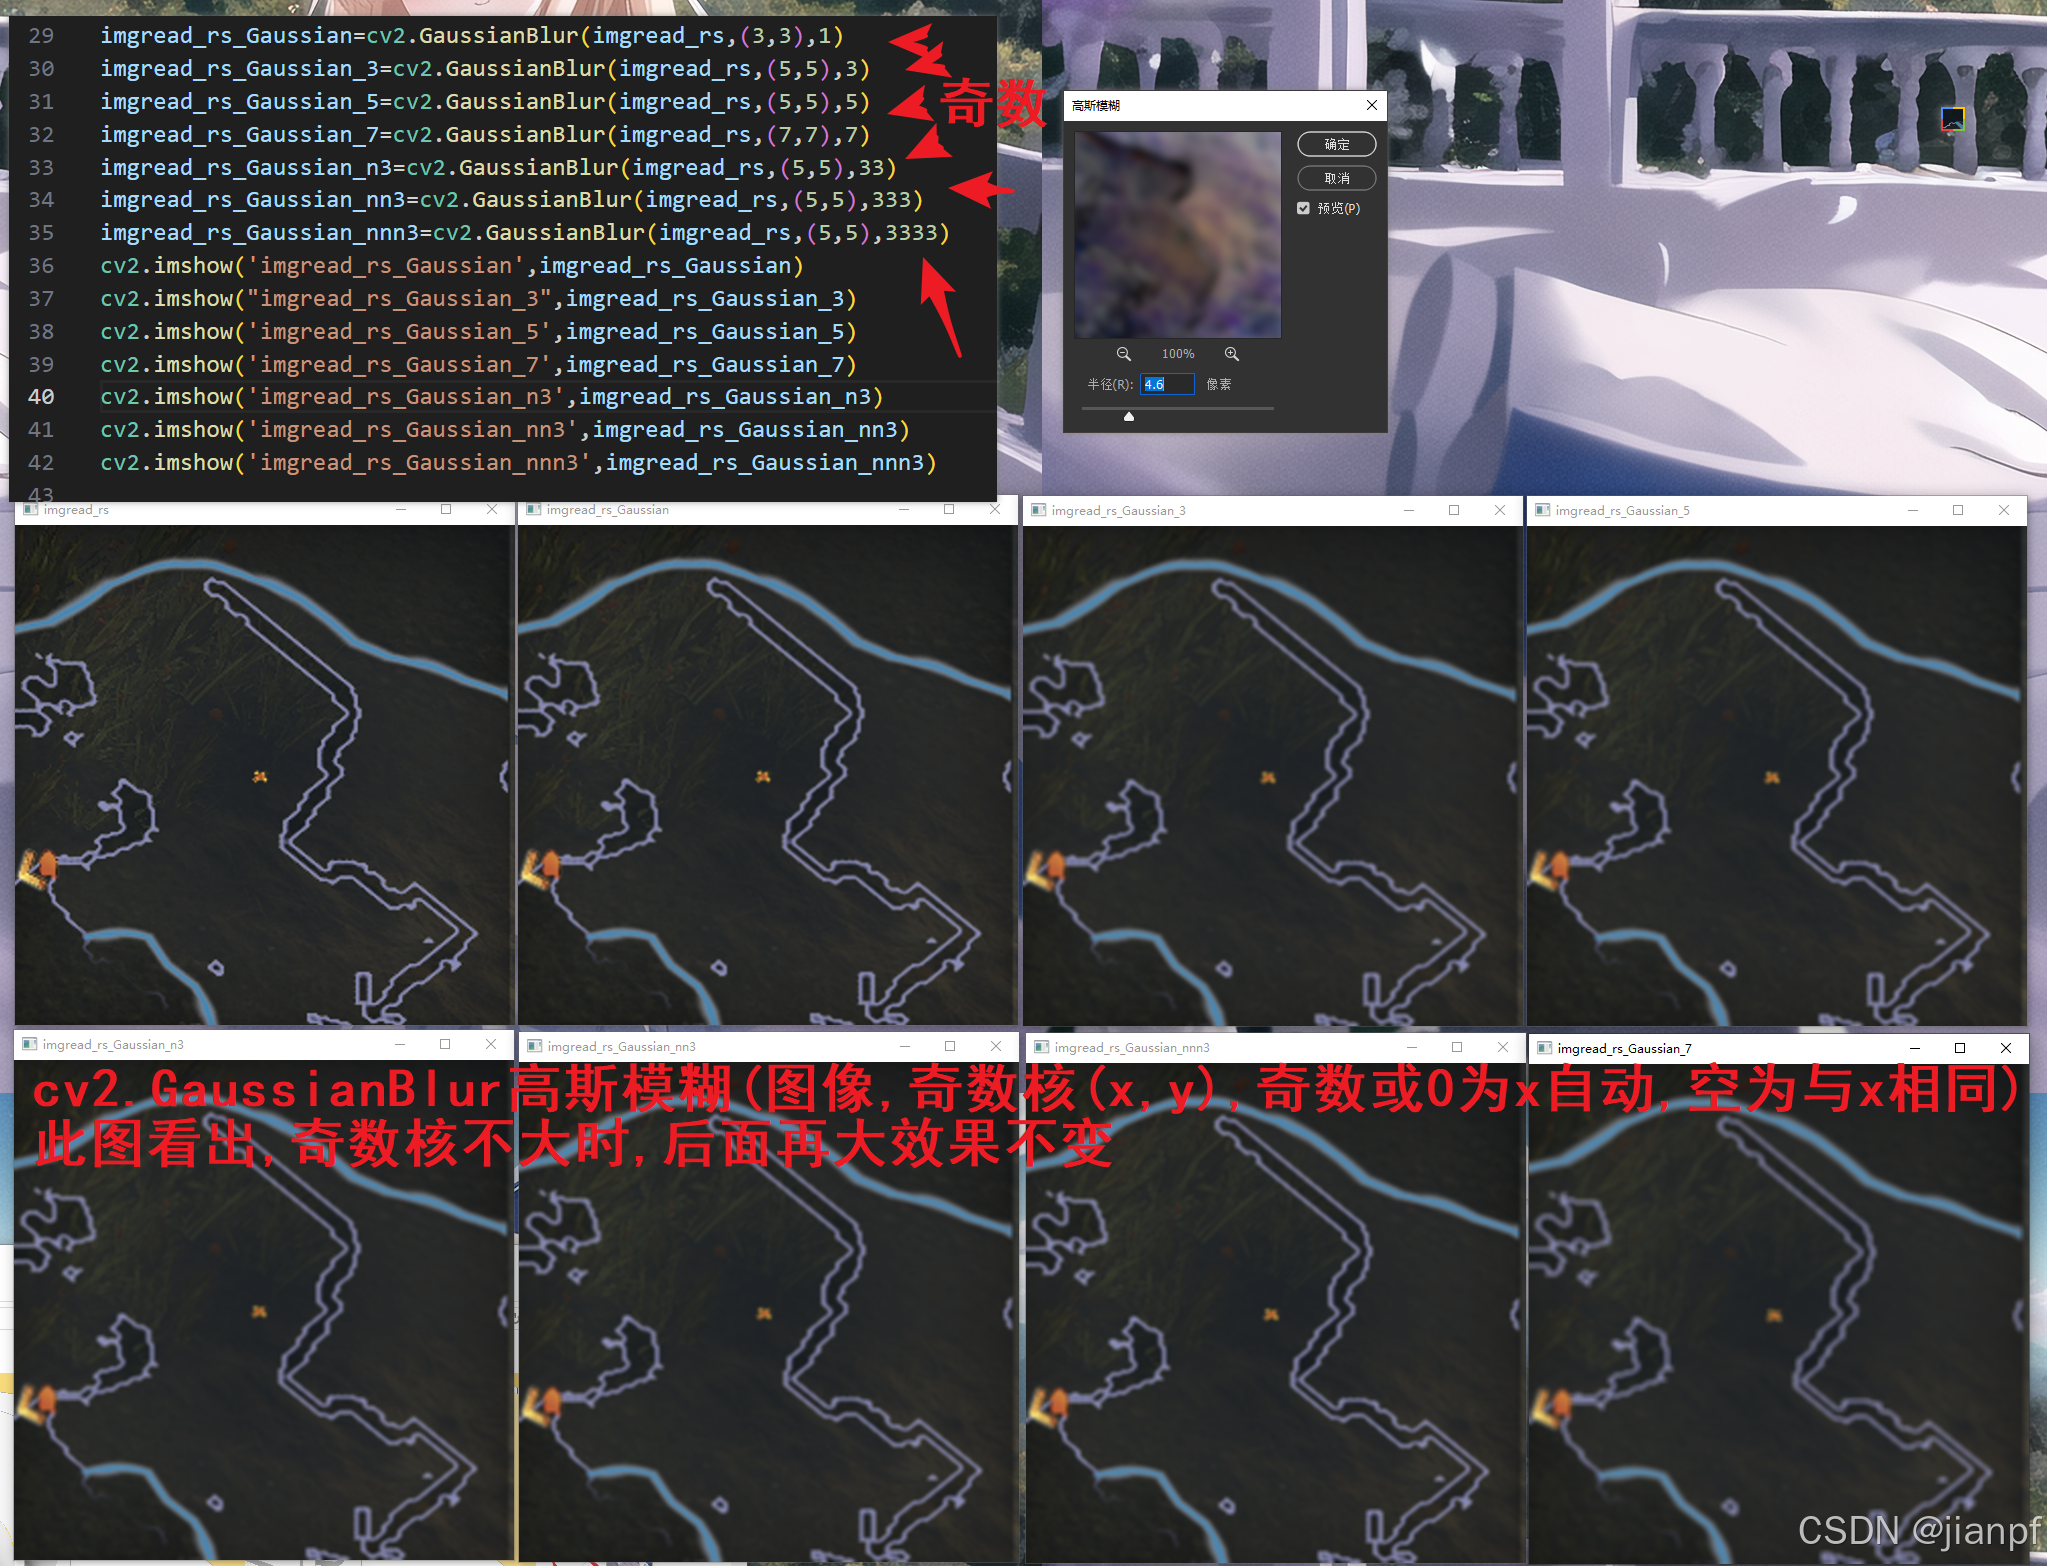
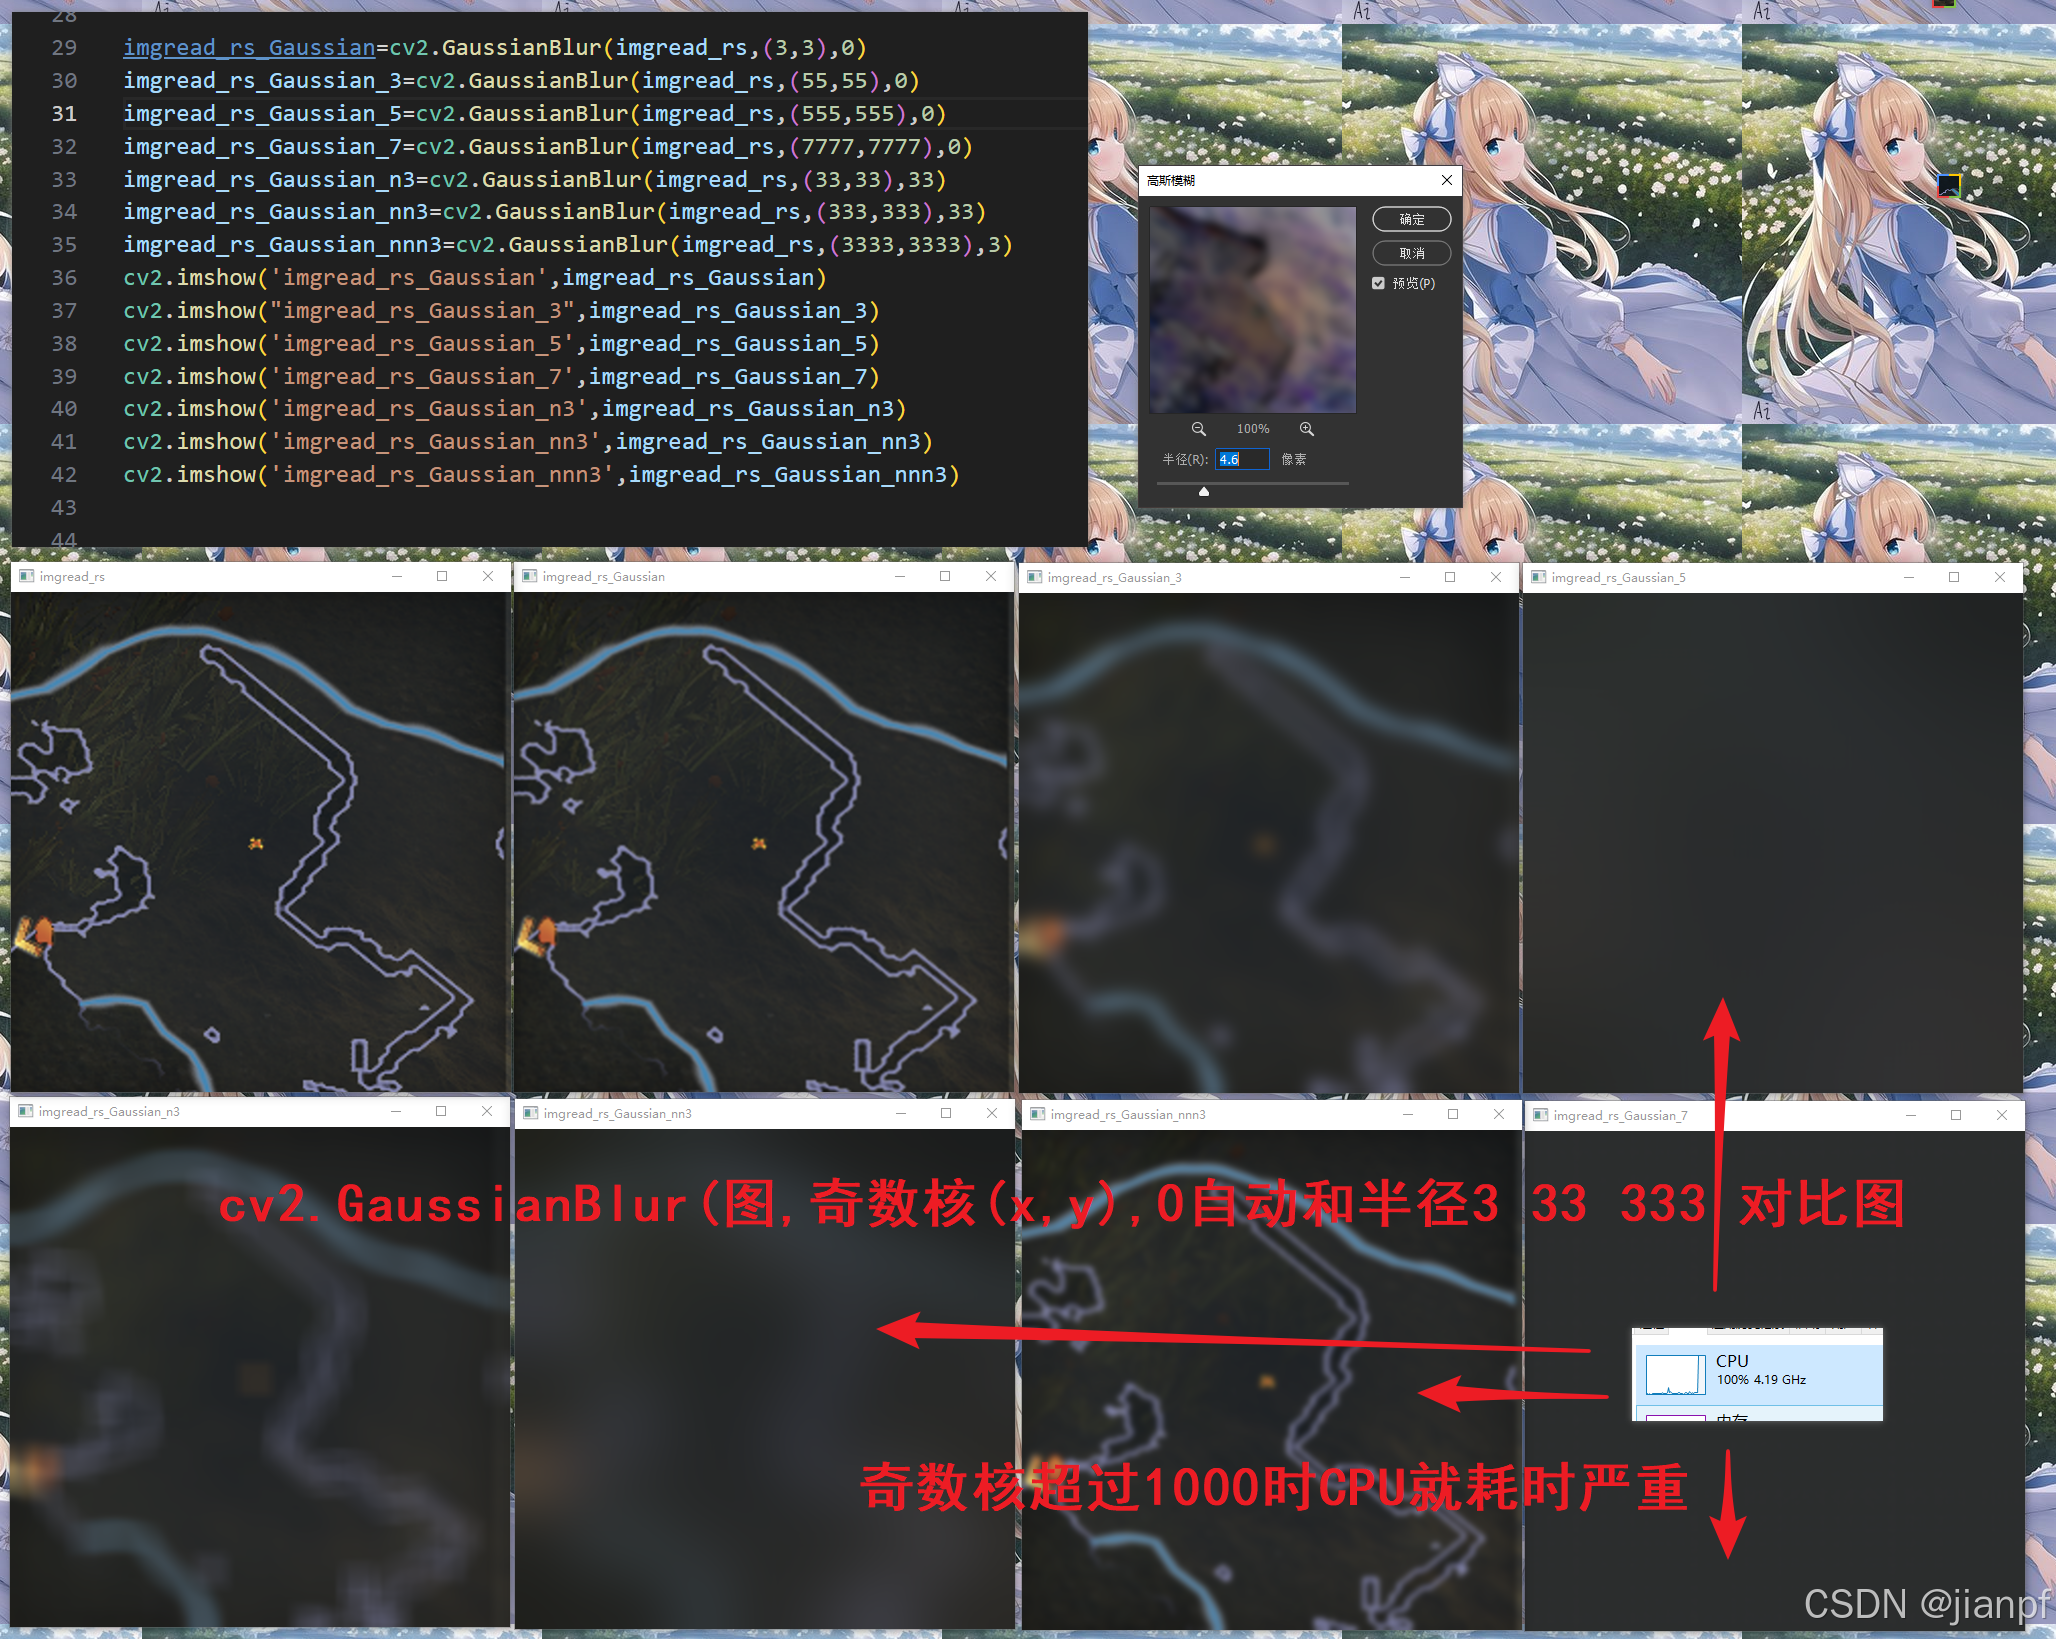
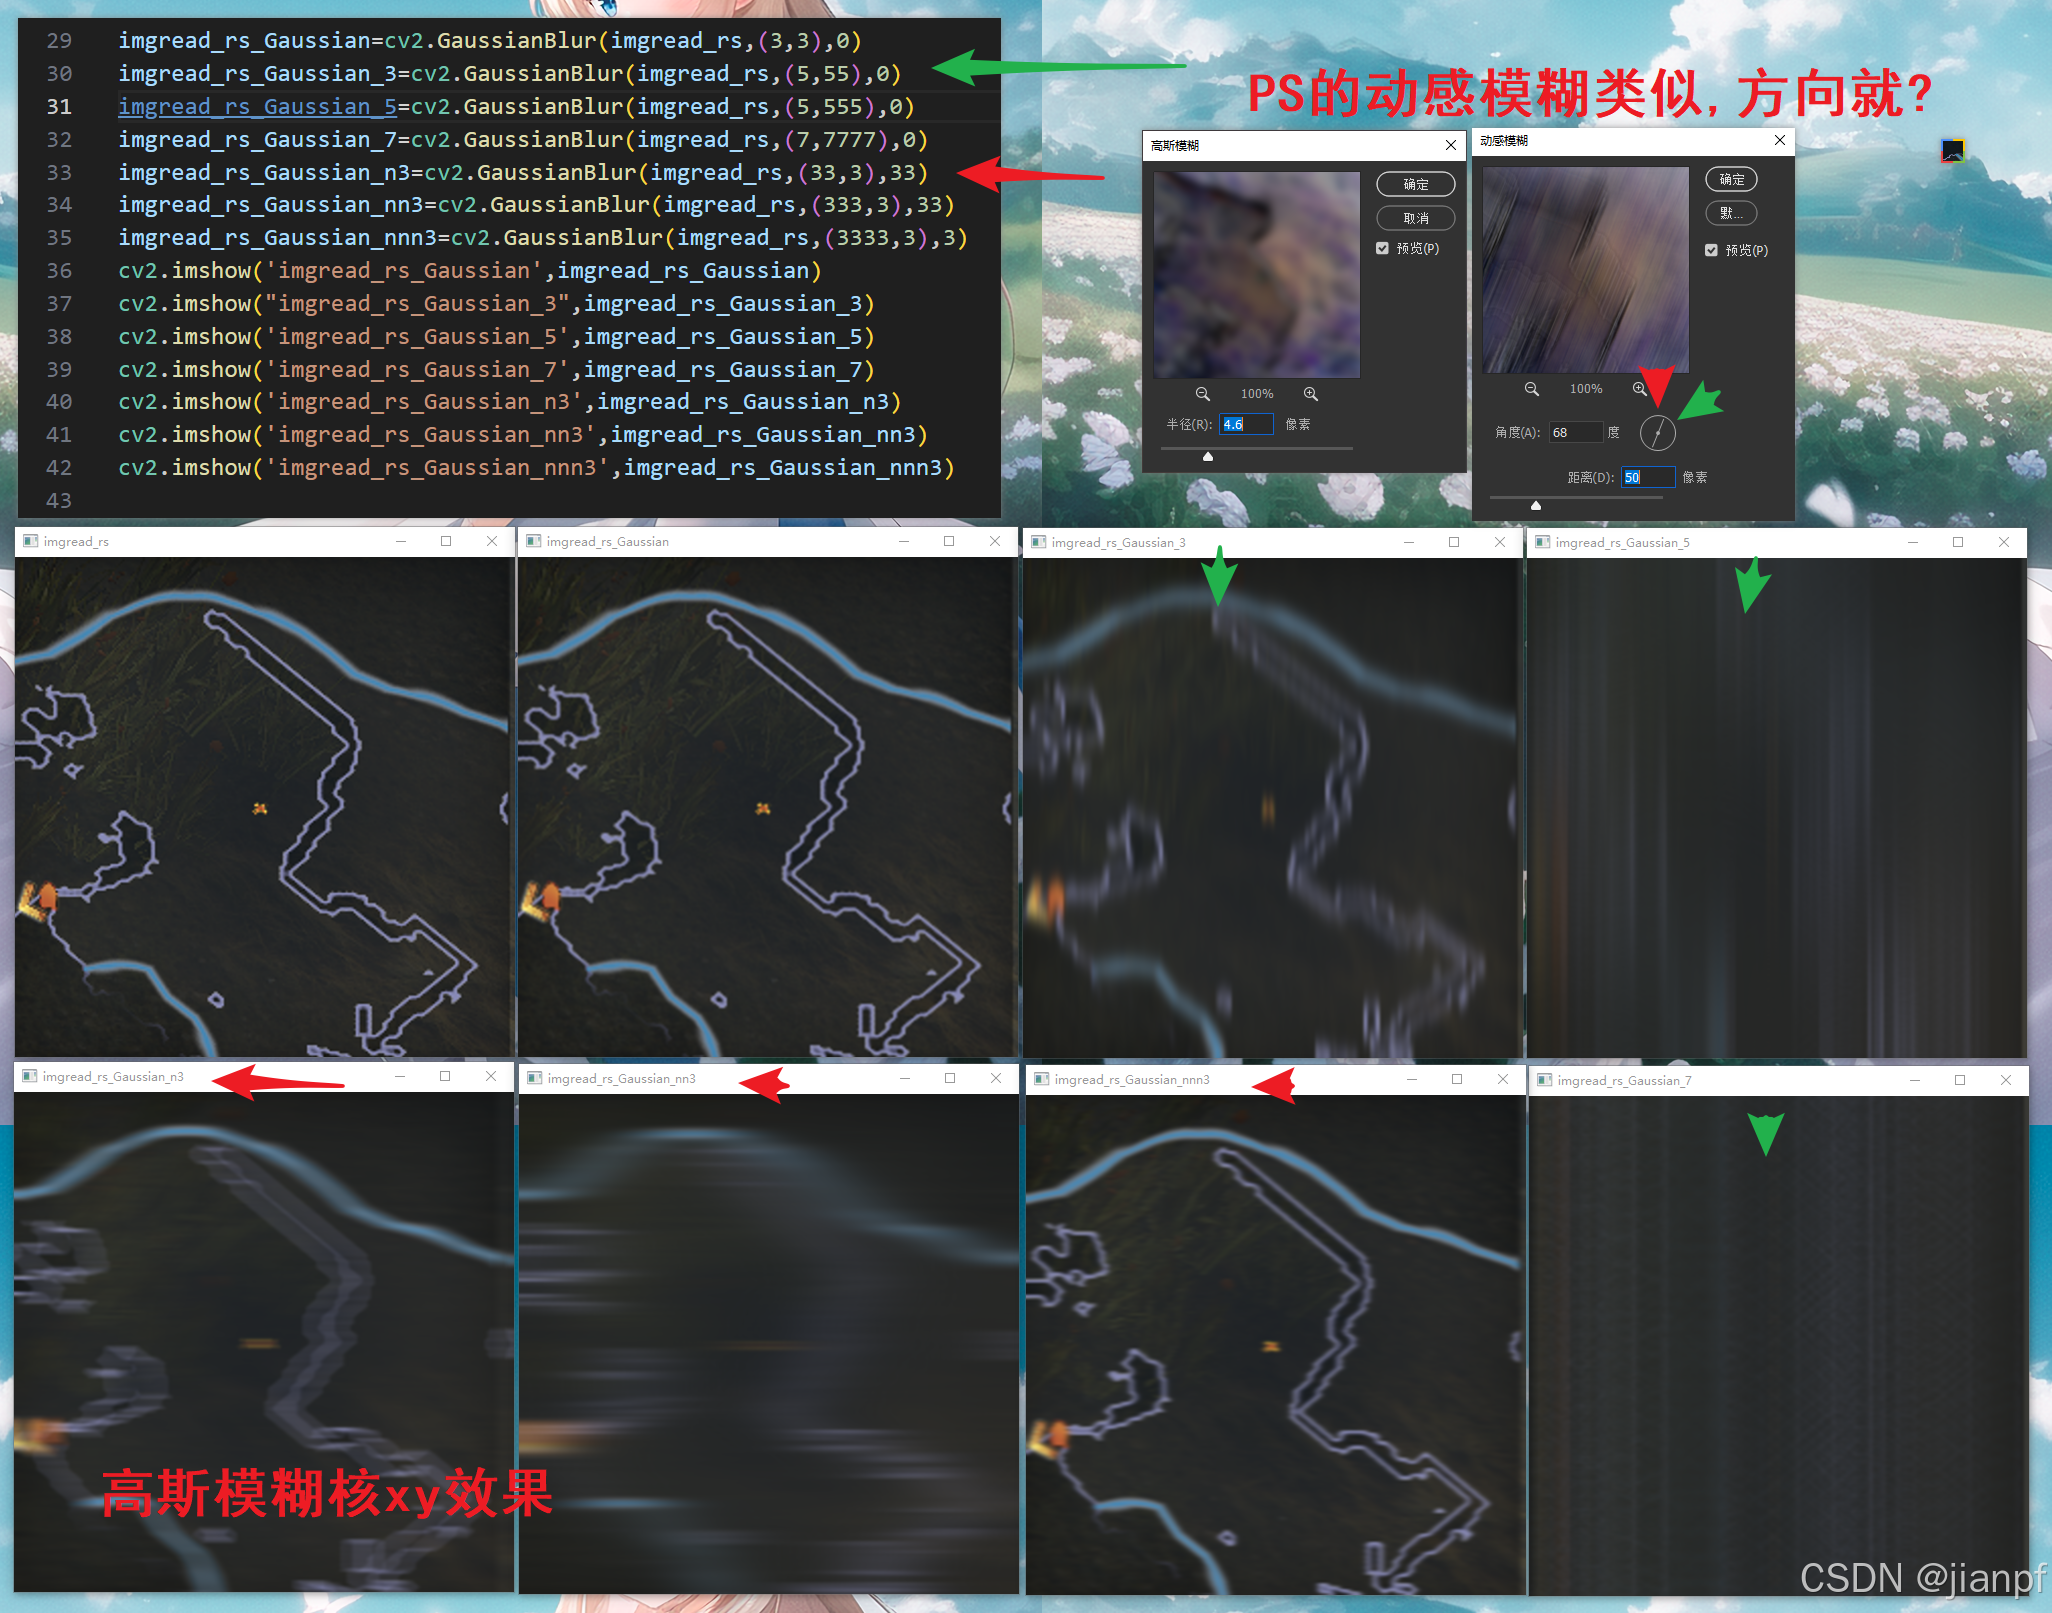
高斯模糊,耗时严重20秒
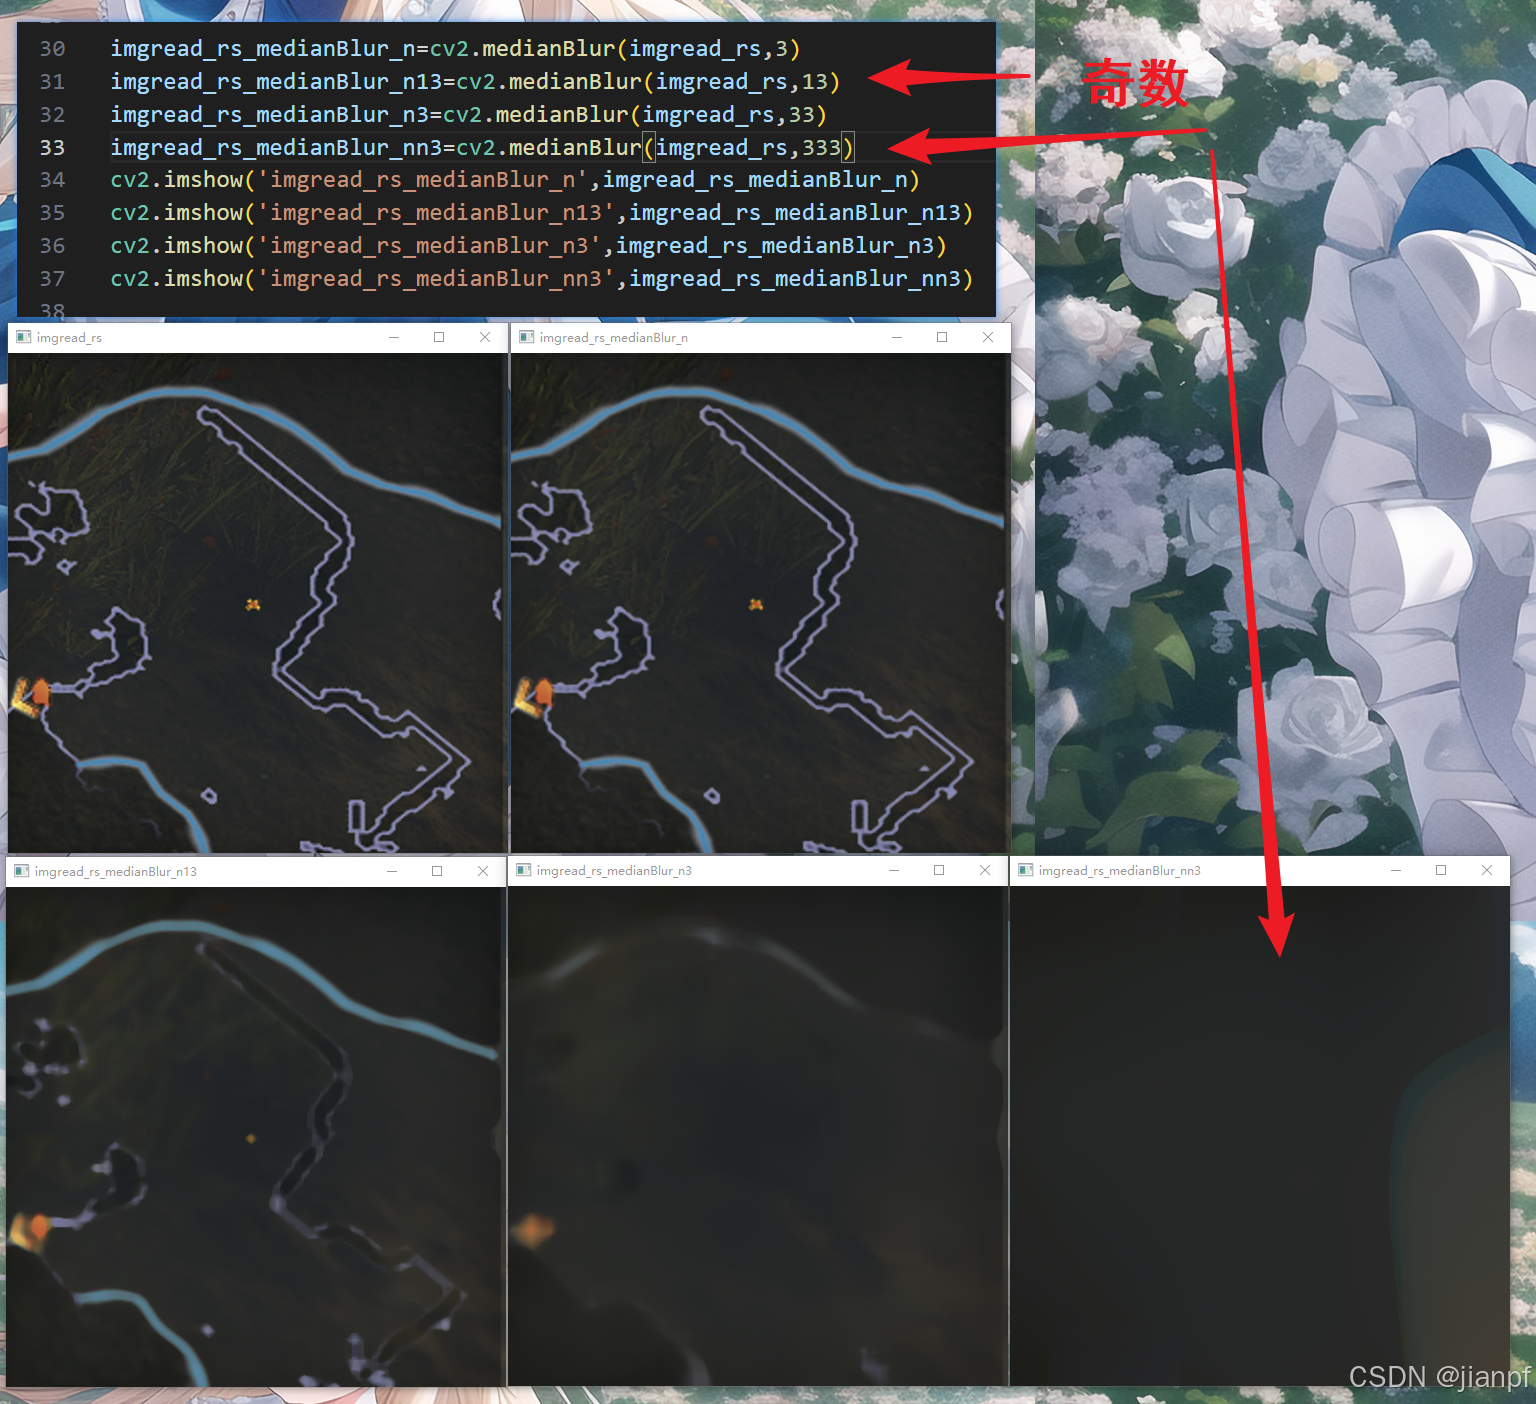
中间模糊,中间滤波,区域有内区中间值给到输入值,不要输入核域,默认扫雷9格
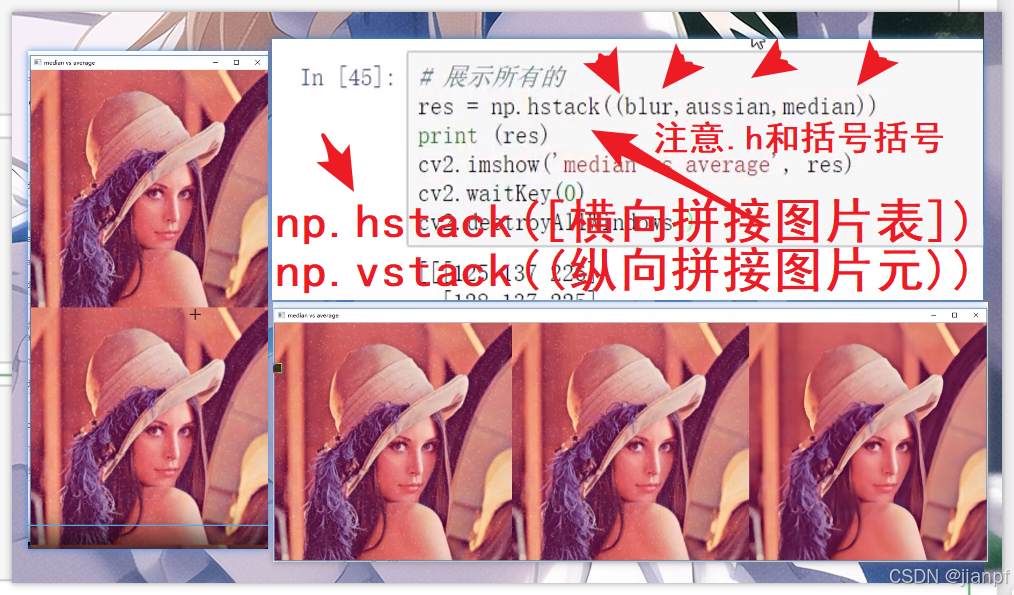
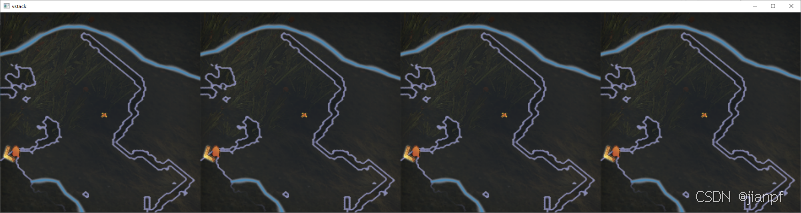
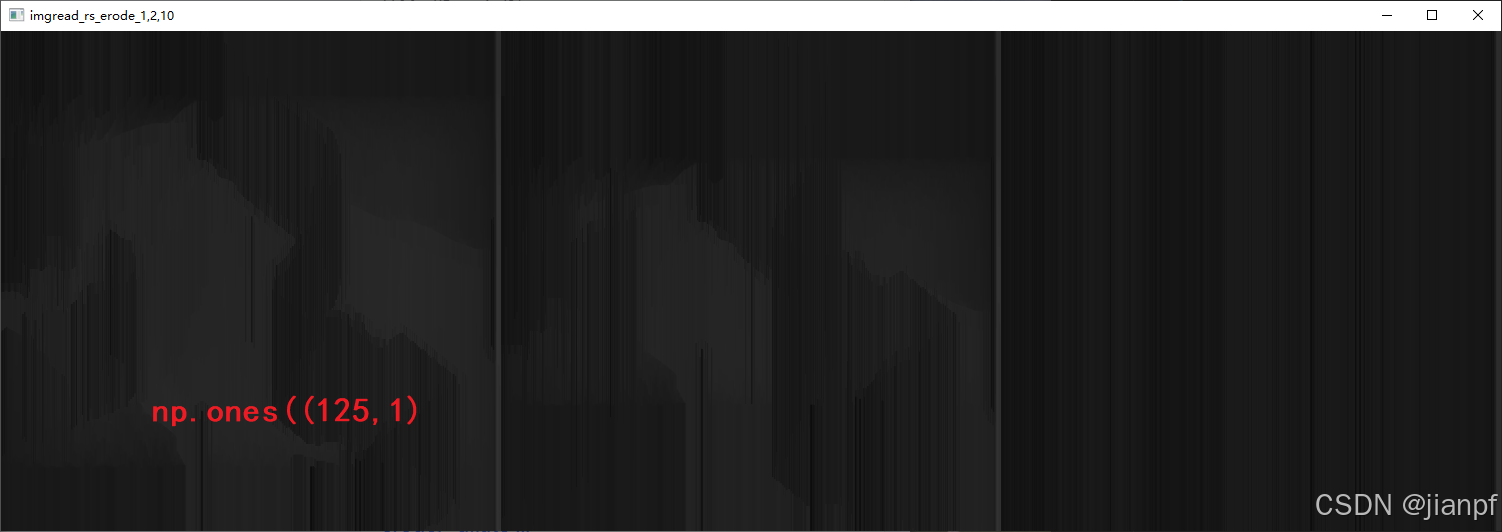
np.hstack([横向拼接图片,图片])
np.vstack((纵向拼接图片,图片))
注意:括号 括号.
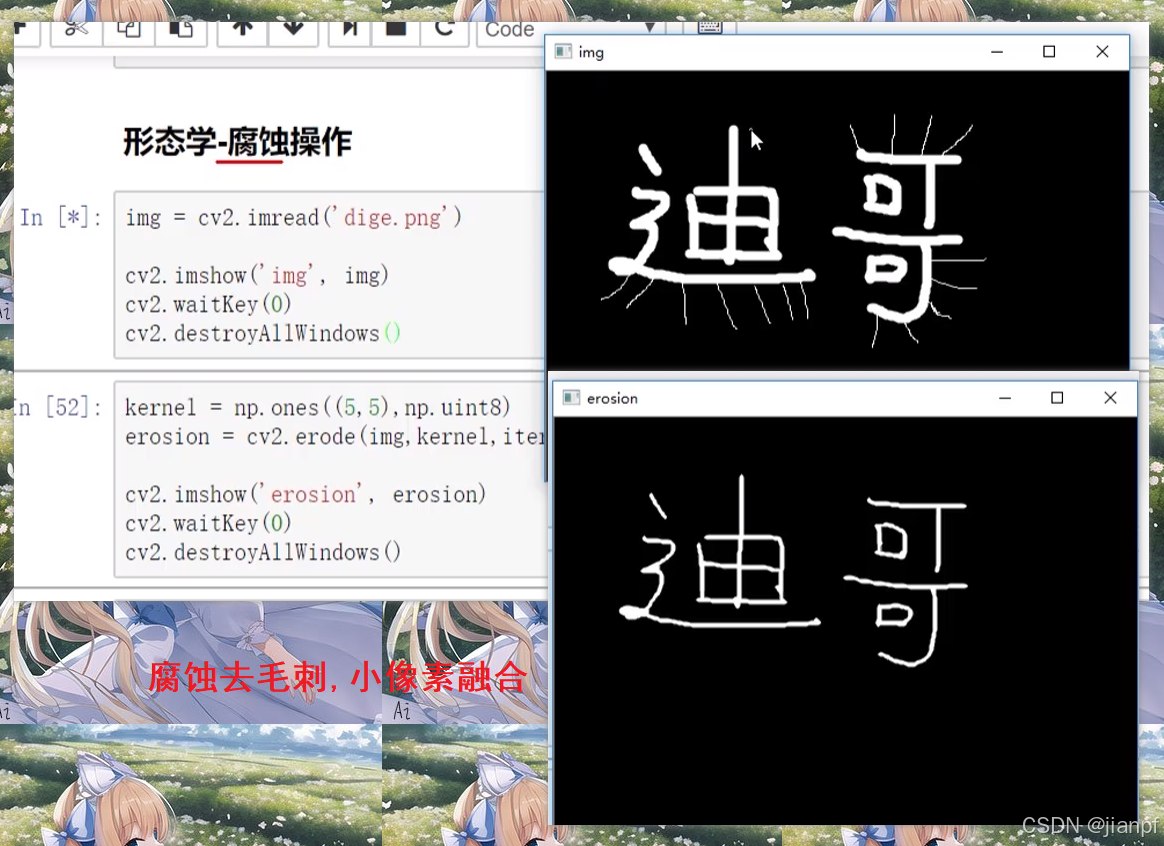
腐蚀需要灰度图
cv2.erode 是 OpenCV 中用于图像腐蚀操作的函数。腐蚀操作是一种形态学操作,它通过指定的结构元素(kernel)来侵蚀图像中的前景物体。腐蚀操作通常用于消除小的噪声、断开连接的对象或缩小物体的边界。
函数的基本用法如下:
python
dst = cv2.erode(src, kernel[, dst[, anchor[, iterations[, borderType[, borderValue]]]]])
参数解释:
src:输入图像,可以是灰度图或二值图。
kernel:用于腐蚀的结构元素,如果为 None,则使用 3x3 矩形结构元素。可以通过 cv2.getStructuringElement 函数创建不同形状的结构元素。
dst:输出图像,与源图像大小和类型相同。
anchor:结构元素的锚点,默认为 (-1, -1),表示锚点在元素中心。
iterations:腐蚀的次数,默认为 1。
borderType:边界像素的外推方法,默认为 cv2.BORDER_CONSTANT。
borderValue:在常量边界情况下的边界值。
在实际应用中,你可以根据需要选择合适的结构元素和迭代次数。例如,使用较大的结构元素可以更有效地消除噪声或断开细小的连接。
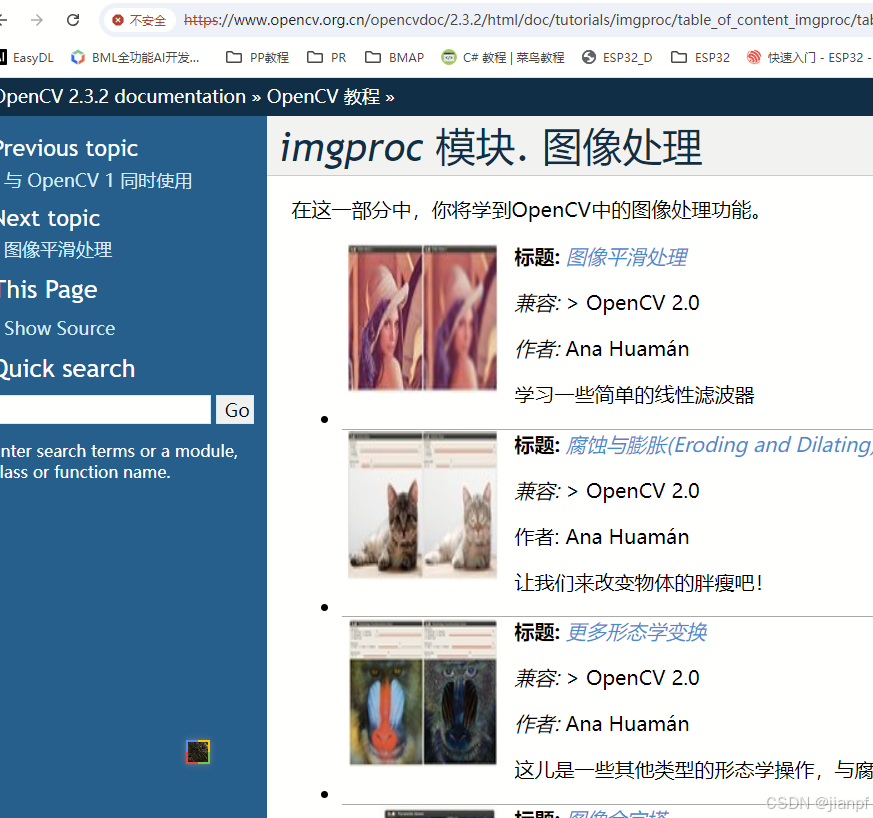
https://www.opencv.org.cn/opencvdoc/2.3.2/html/doc/tutorials/imgproc/table_of_content_imgproc/table_of_content_imgproc.html
opencv官方素材库
https://www.opencv.org.cn/opencvdoc/2.3.2/html/doc/tutorials/tutorials.html
英文C#的不够友好,初学不建议看
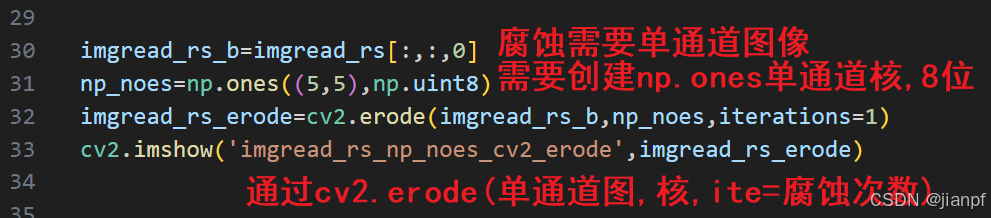
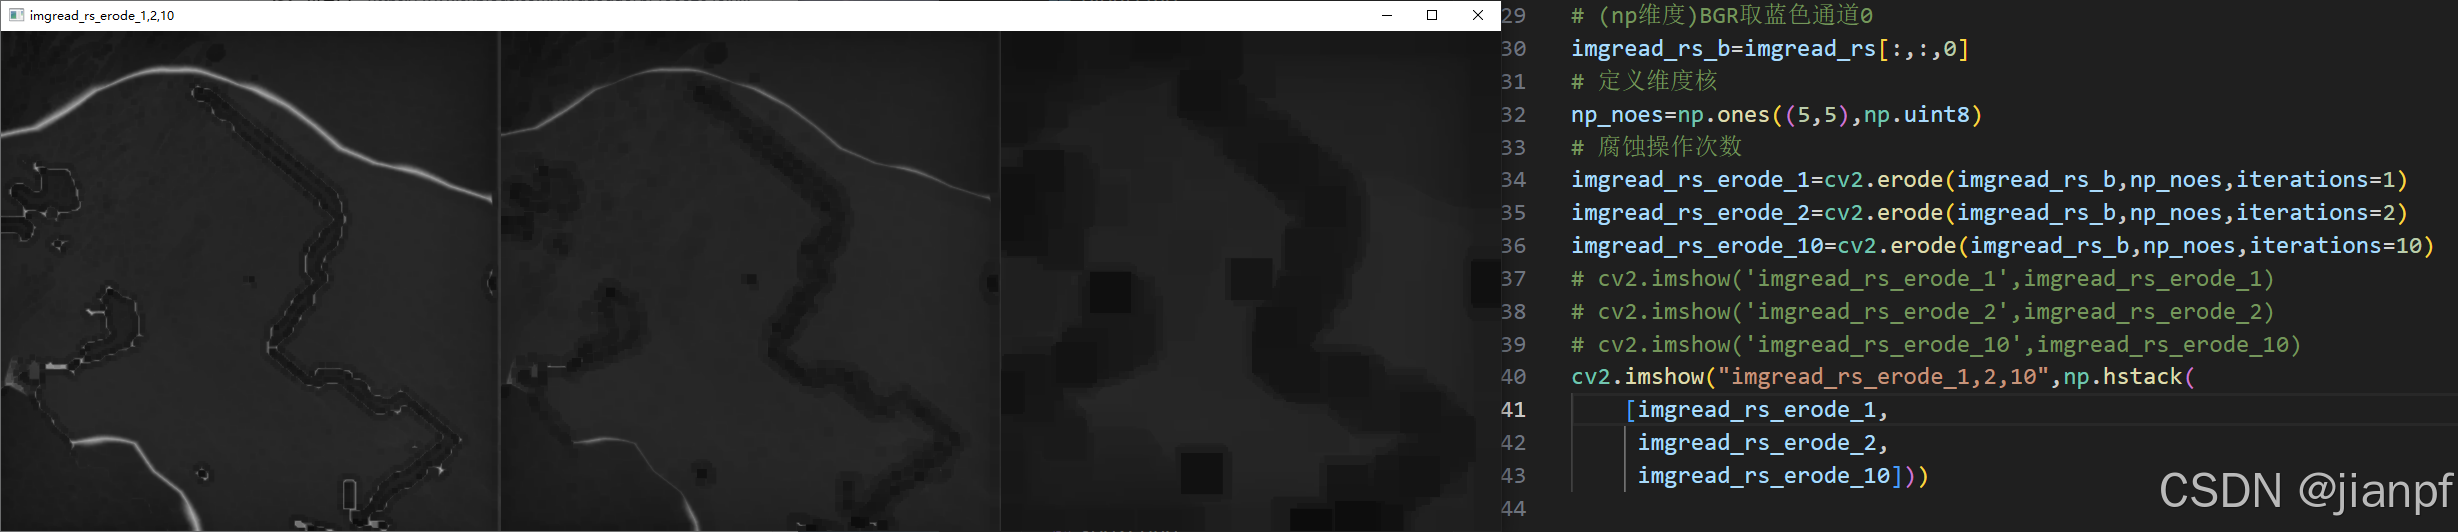
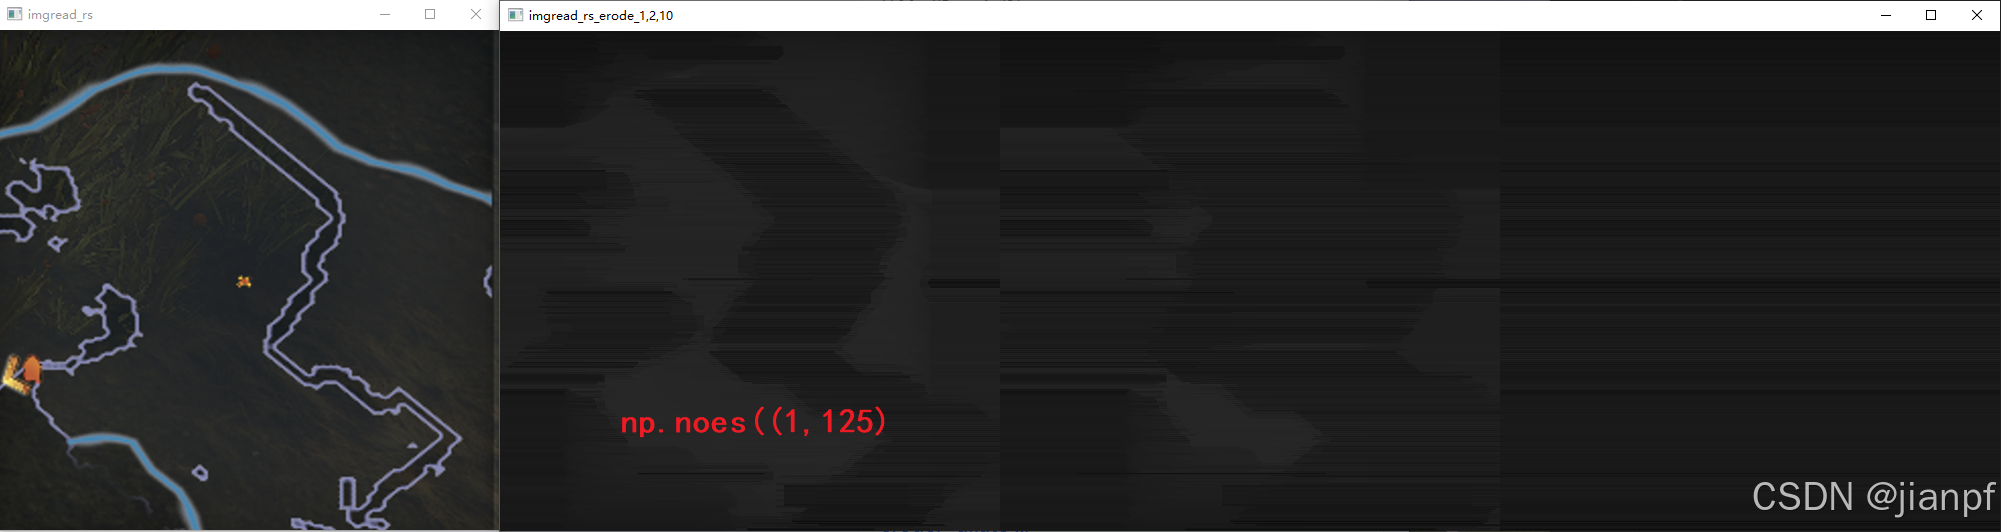
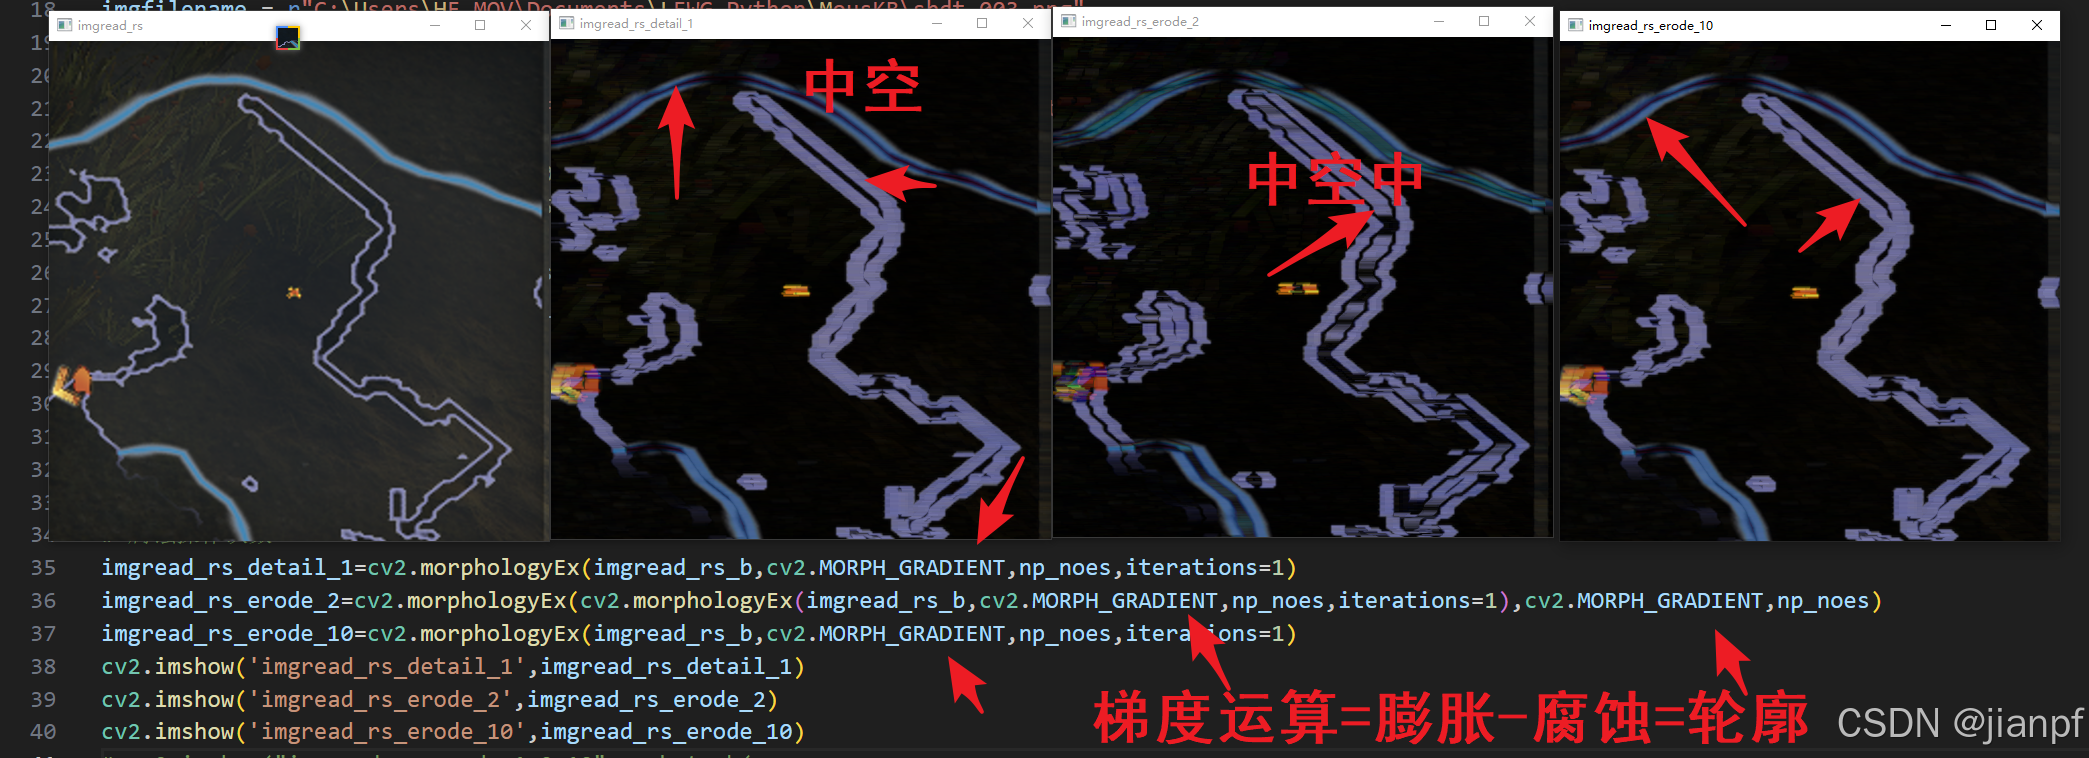
# (np维度)BGR取蓝色通道0
imgread_rs_b=imgread_rs[:,:,0]
# 定义维度核
np_noes=np.ones((2,2),np.uint8)
# 腐蚀操作次数
imgread_rs_erode_1=cv2.erode(imgread_rs_b,np_noes,iterations=1)
imgread_rs_erode_2=cv2.erode(imgread_rs_b,np_noes,iterations=2)
imgread_rs_erode_10=cv2.erode(imgread_rs_b,np_noes,iterations=10)
# cv2.imshow('imgread_rs_erode_1',imgread_rs_erode_1)
# cv2.imshow('imgread_rs_erode_2',imgread_rs_erode_2)
# cv2.imshow('imgread_rs_erode_10',imgread_rs_erode_10)
cv2.imshow("imgread_rs_erode_1,2,10",np.hstack(
    [imgread_rs_erode_1,
     imgread_rs_erode_2,
     imgread_rs_erode_10]))
创建一个形状为 (height, width, channels) 的数组,这里 channels=3
array_3channels = np.ones((100, 100, 3), dtype=np.uint8)


cv2.dilate(imgread_rs_b,np_noes,iterations=2)
膨胀.dilate
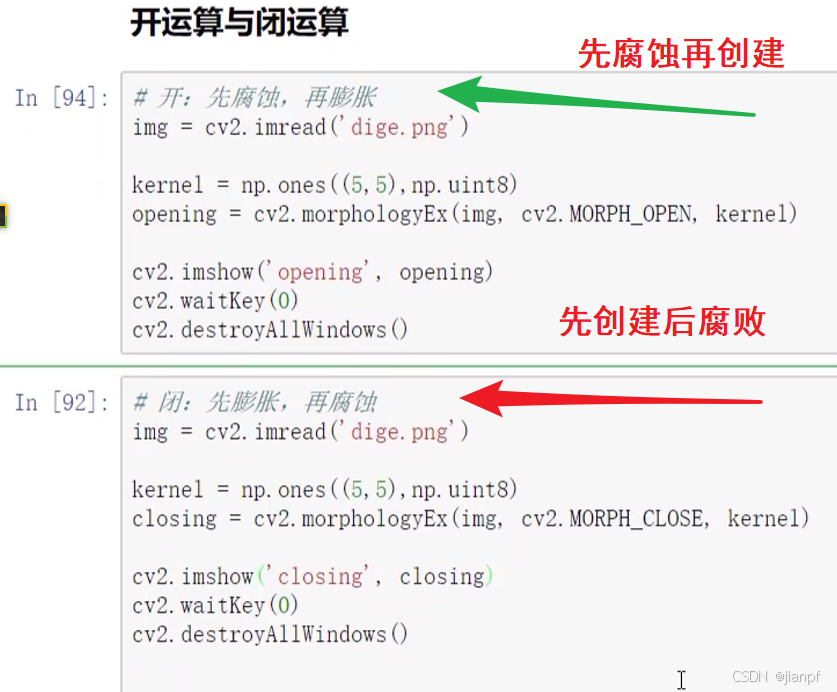
cv2的腐蚀膨胀的开运算核闭运算
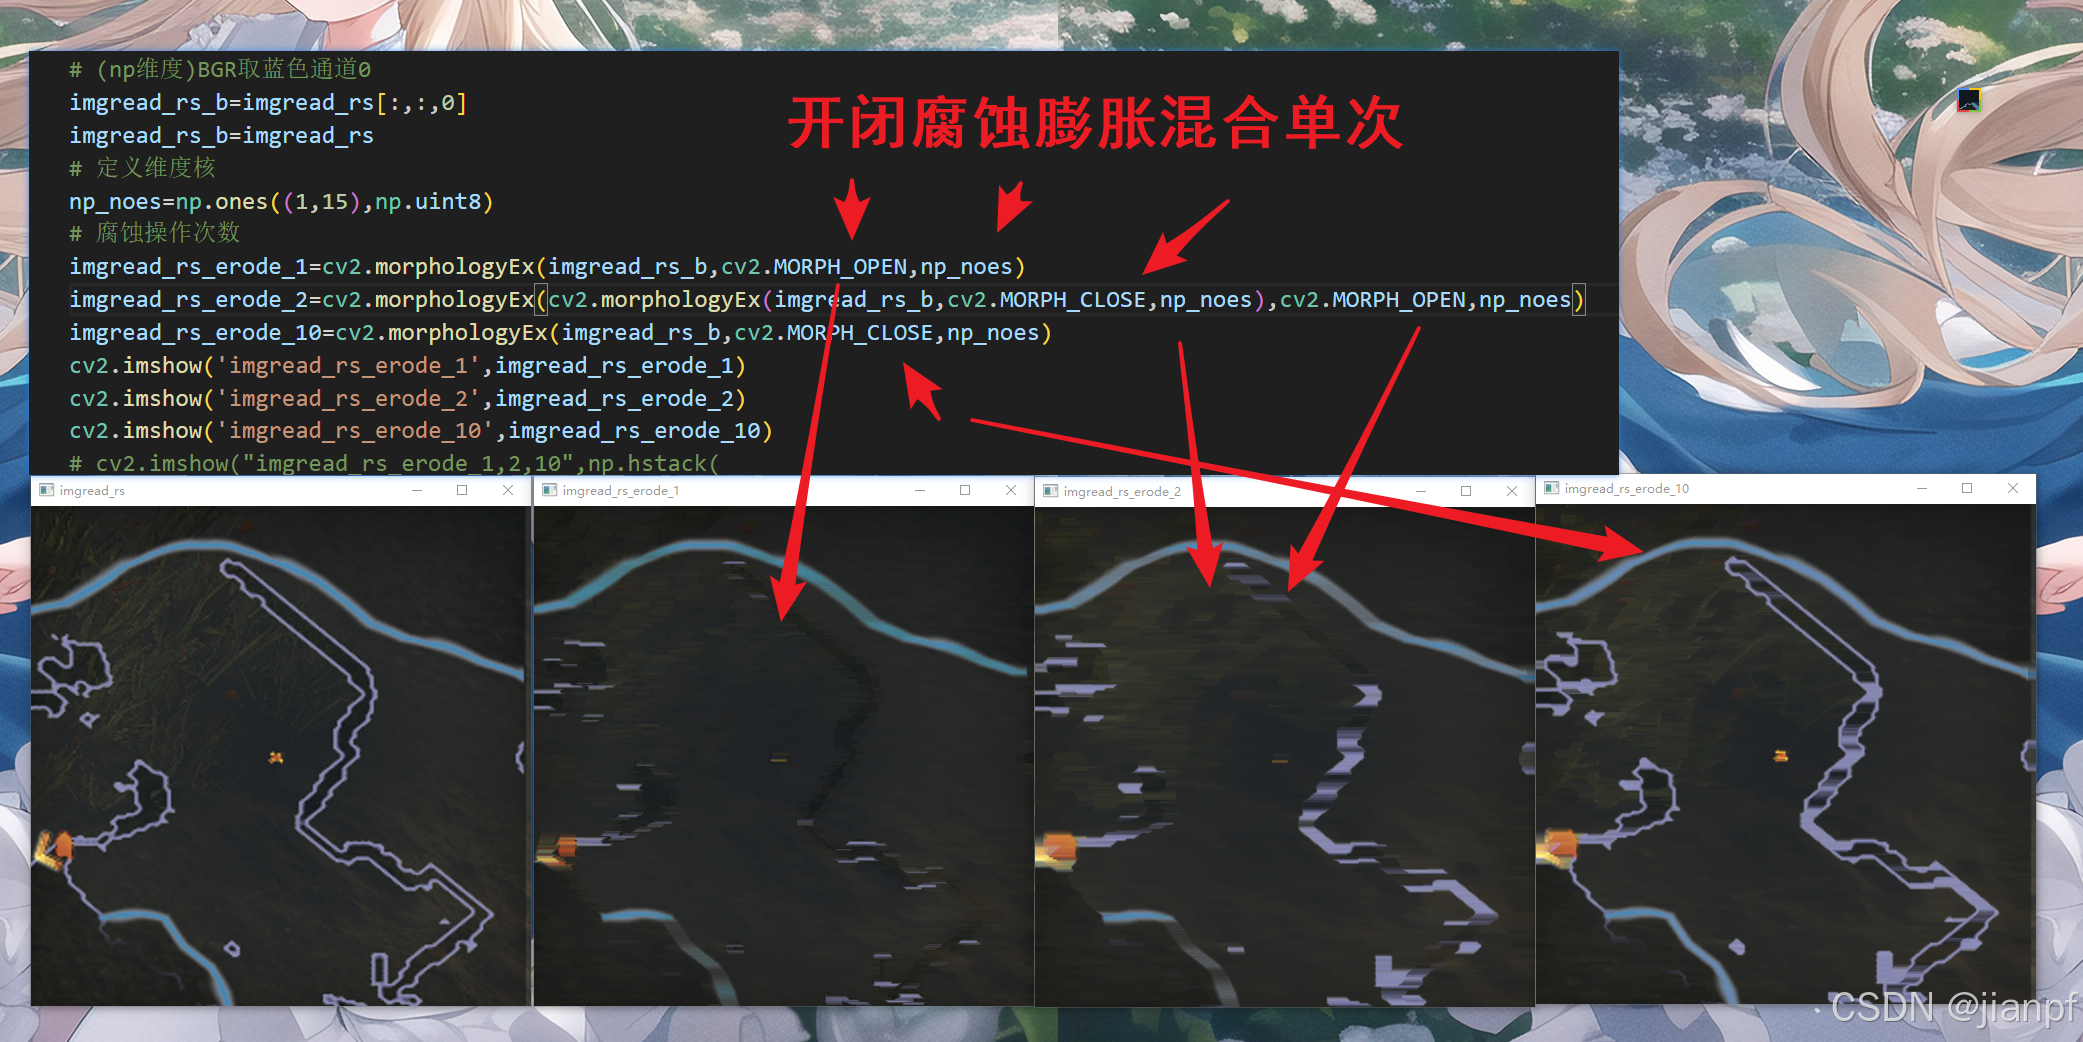

imgread_rs_erode_dilate_2=cv2.morphologyEx(cv2.morphologyEx(imgread_rs_b,cv2.MORPH_CLOSE,np_noes,iterations=10),cv2.MORPH_OPEN,np_noes)
开运算的次数iterations=10
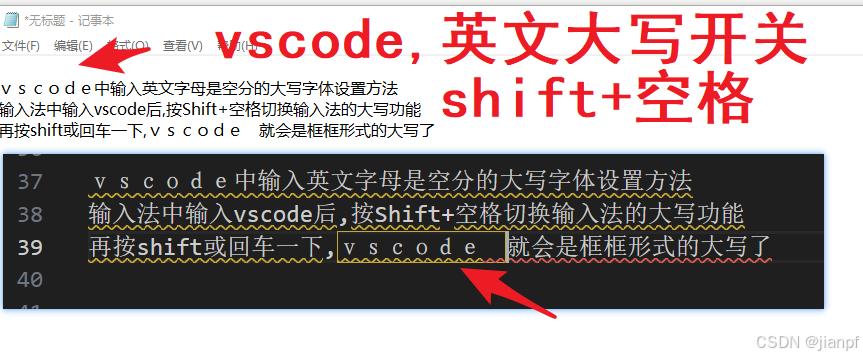
vscode输入英文变大写空格的原因,是输入法大写功能开启了,重复按一下关闭.
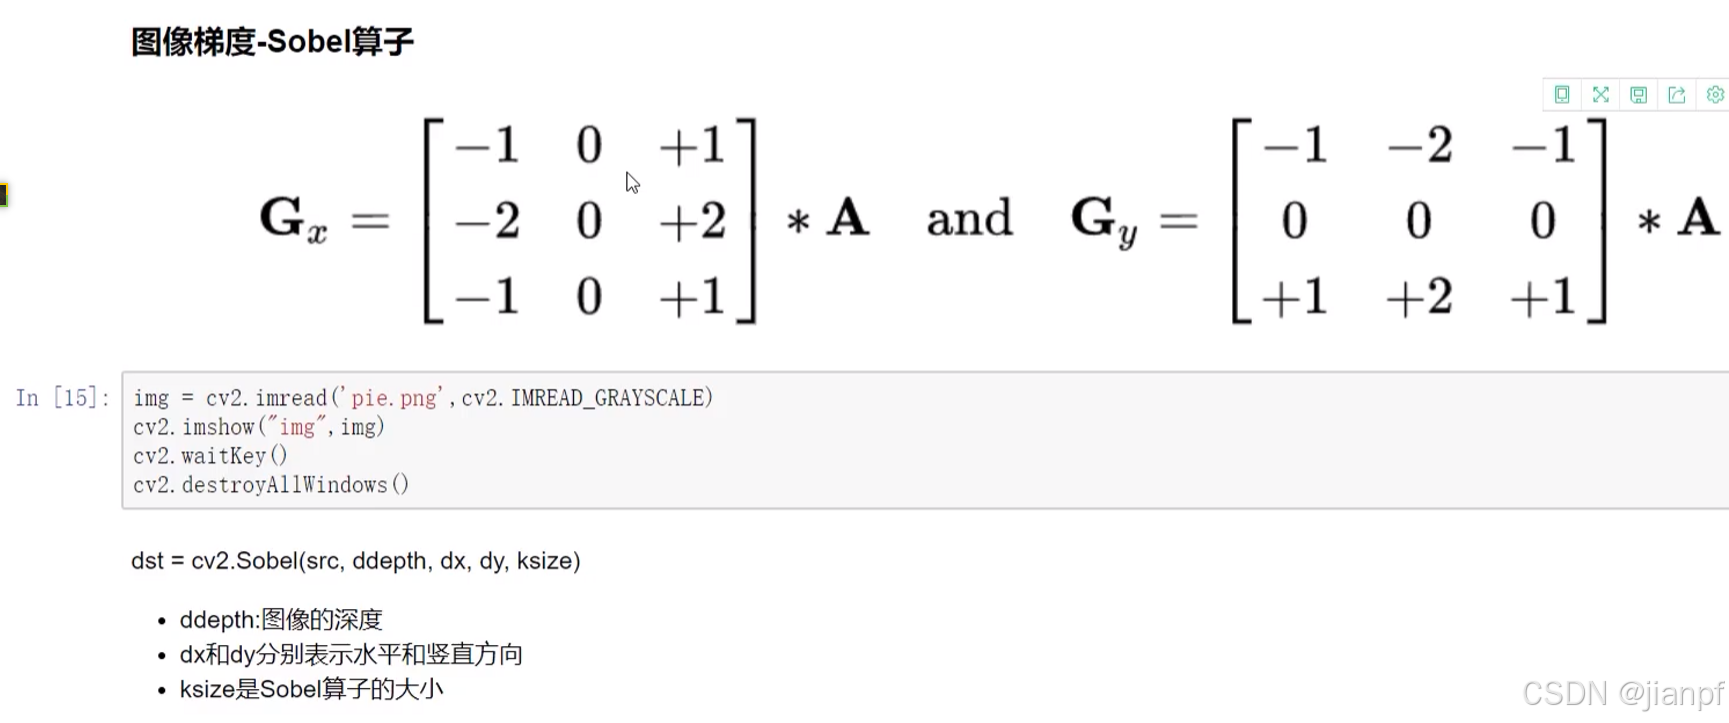
图像梯度sobel算子
Scharr算子
Laplacian算子
Canny边检测
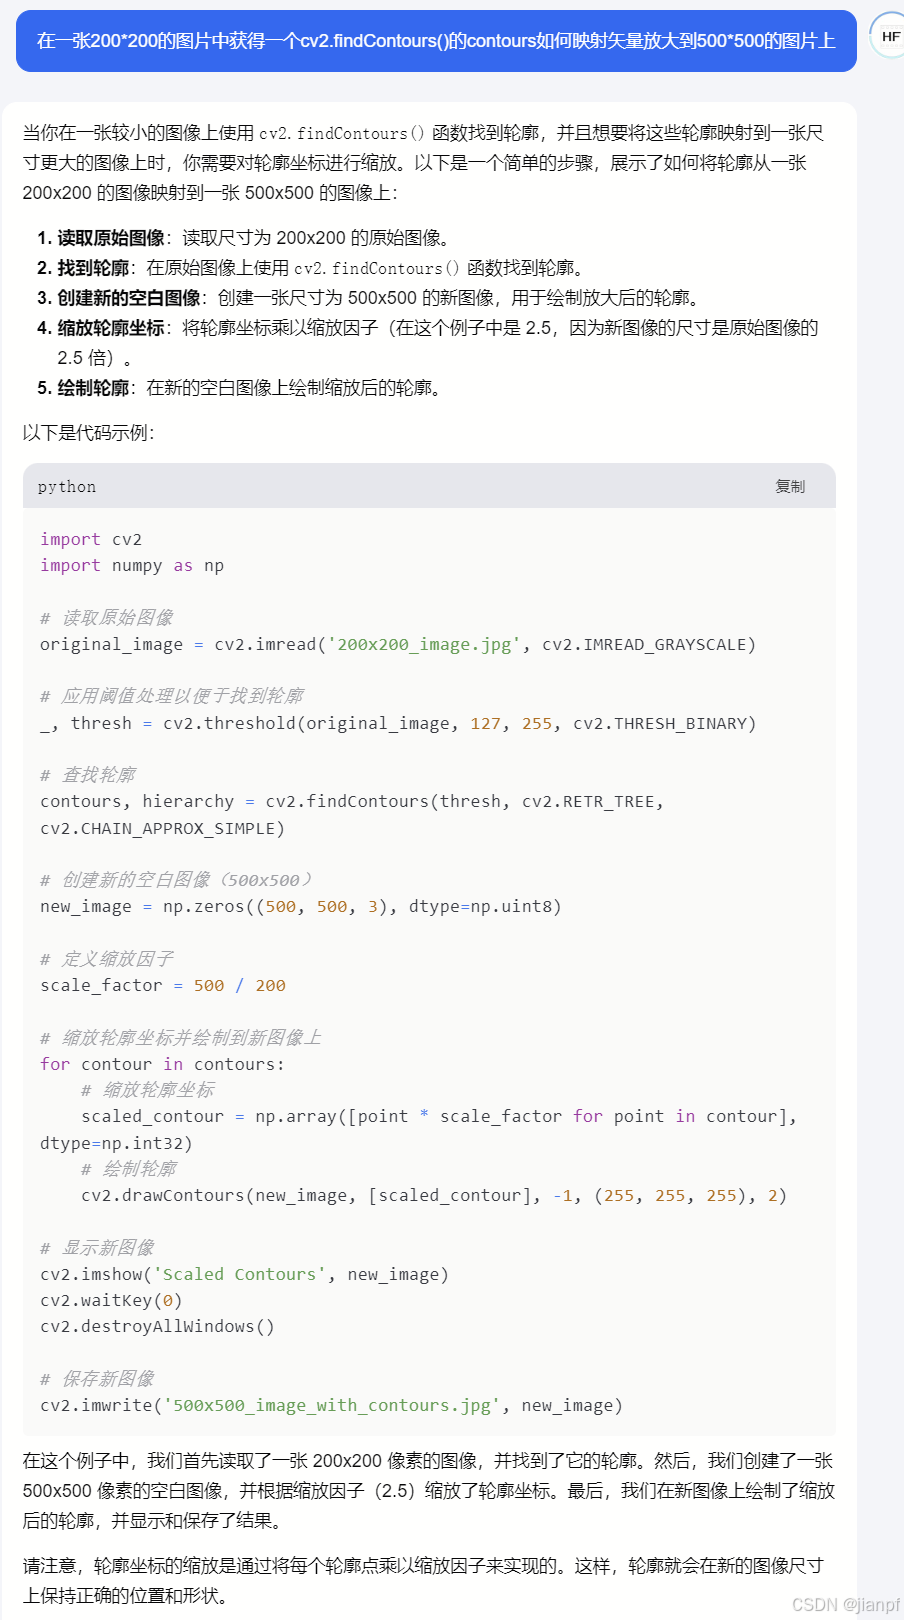
当你在一张较小的图像上使用 cv2.findContours() 函数找到轮廓,并且想要将这些轮廓映射到一张尺寸更大的图像上时,你需要对轮廓坐标进行缩放。以下是一个简单的步骤,展示了如何将轮廓从一张 200x200 的图像映射到一张 500x500 的图像上:
import cv2
import numpy as np

# 读取原始图像
original_image = cv2.imread('200x200_image.jpg', cv2.IMREAD_GRAYSCALE)

# 应用阈值处理以便于找到轮廓
_, thresh = cv2.threshold(original_image, 127, 255, cv2.THRESH_BINARY)

# 查找轮廓
contours, hierarchy = cv2.findContours(thresh, cv2.RETR_TREE, cv2.CHAIN_APPROX_SIMPLE)

# 创建新的空白图像(500x500)
new_image = np.zeros((500, 500, 3), dtype=np.uint8)

# 定义缩放因子
scale_factor = 500 / 200

# 缩放轮廓坐标并绘制到新图像上
for contour in contours:
    # 缩放轮廓坐标
    scaled_contour = np.array([point * scale_factor for point in contour], dtype=np.int32)
    # 绘制轮廓
    cv2.drawContours(new_image, [scaled_contour], -1, (255, 255, 255), 2)

# 显示新图像
cv2.imshow('Scaled Contours', new_image)
cv2.waitKey(0)
cv2.destroyAllWindows()

# 保存新图像
cv2.imwrite('500x500_image_with_contours.jpg', new_image)
缩放轮廓坐标:将轮廓坐标乘以缩放因子(在这个例子中是 2.5,因为新图像的尺寸是原始图像的 2.5 倍)。

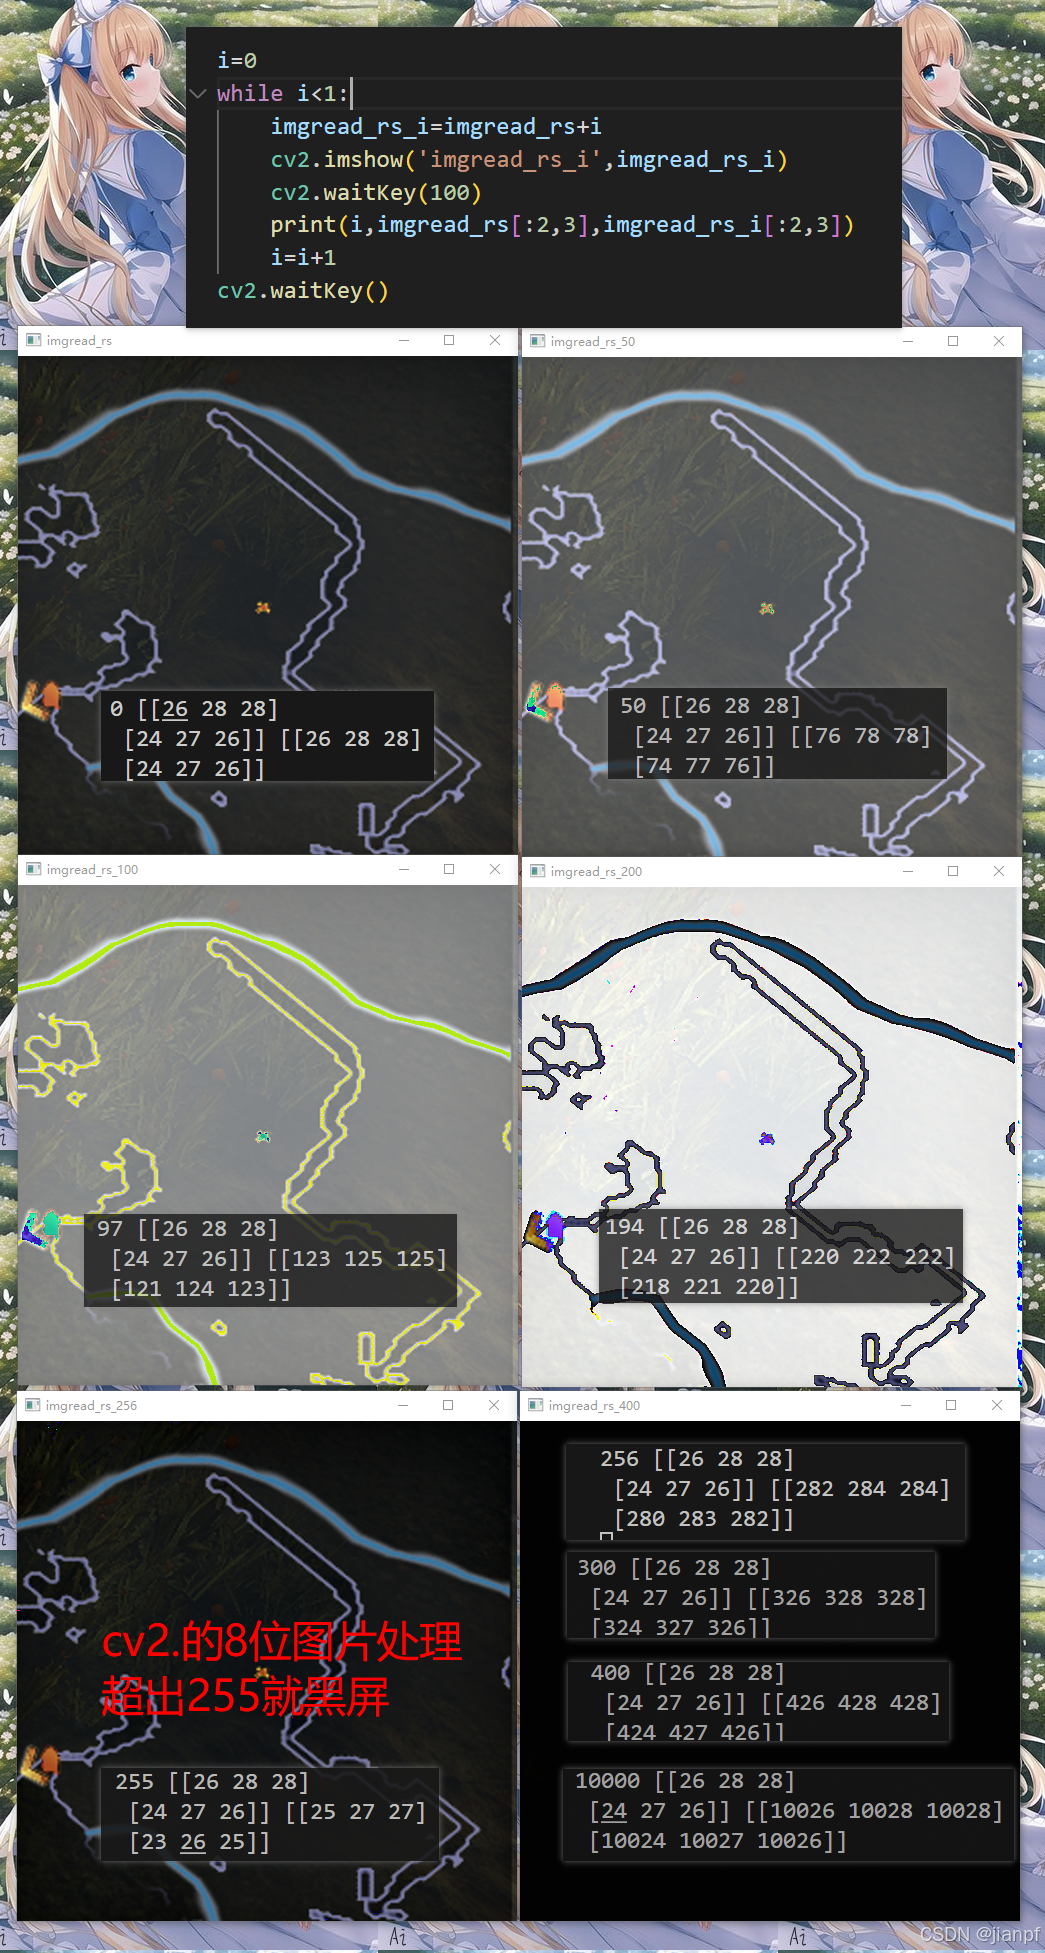
#导入图片
# 缩放二值化
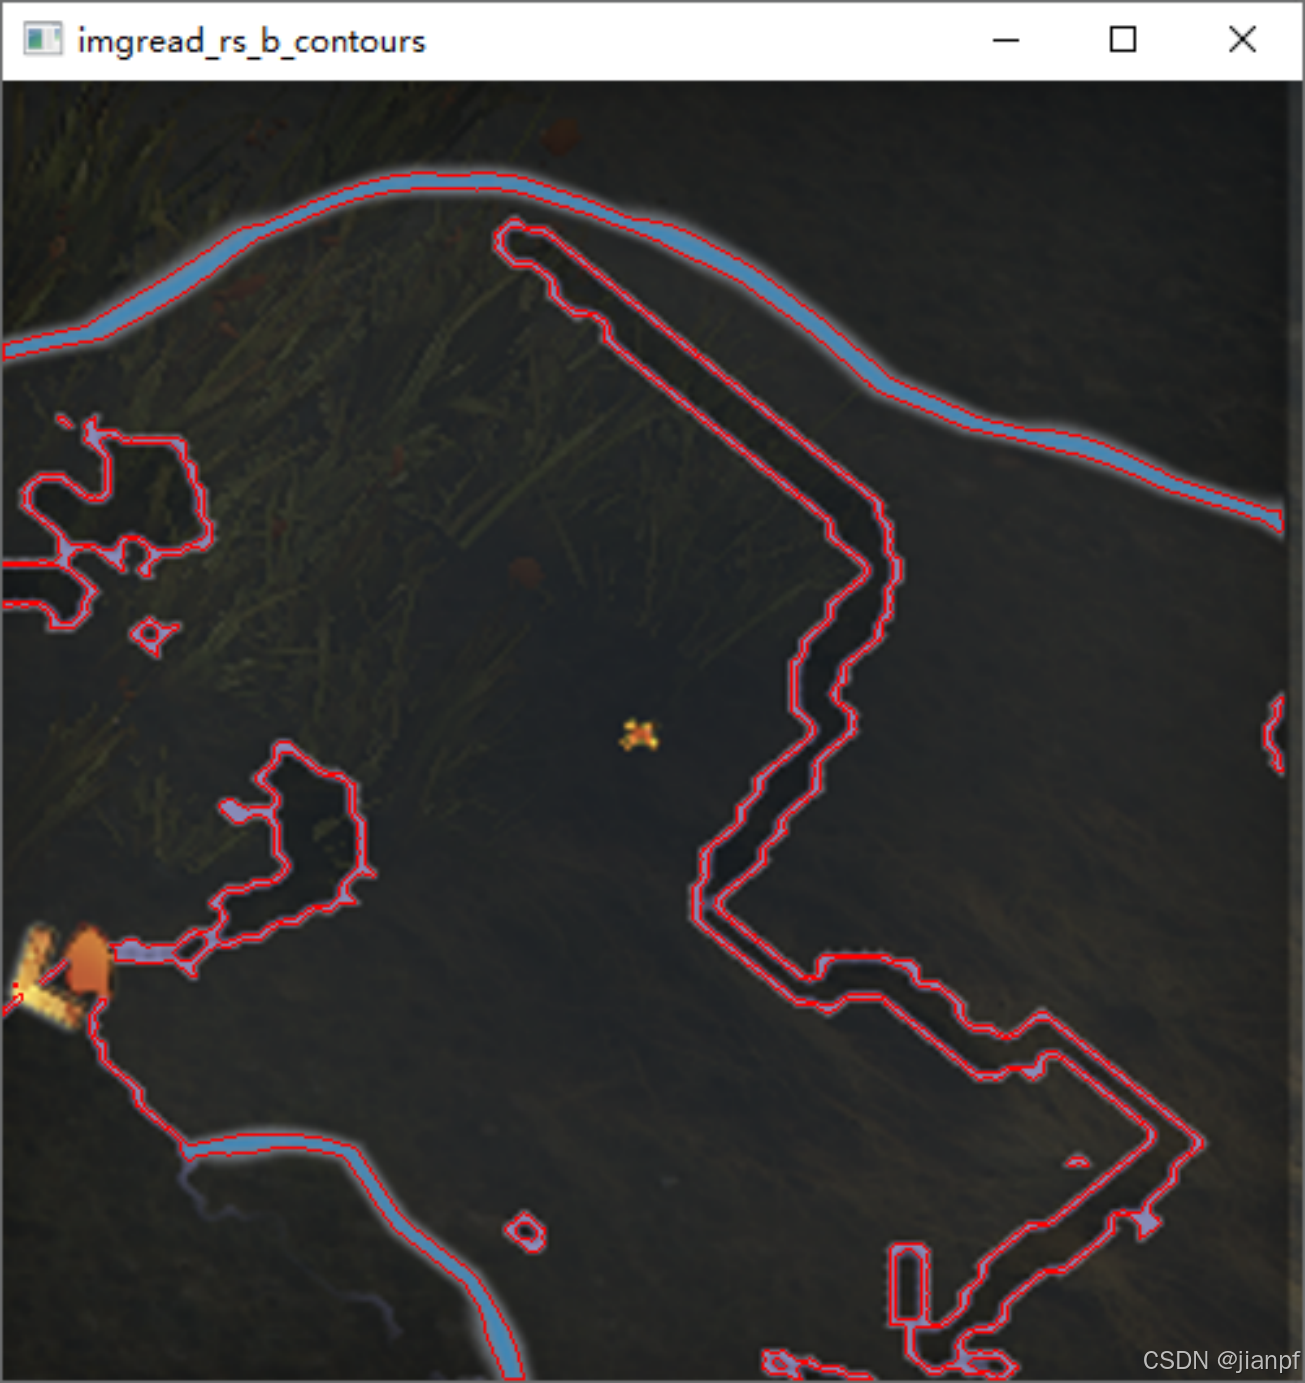
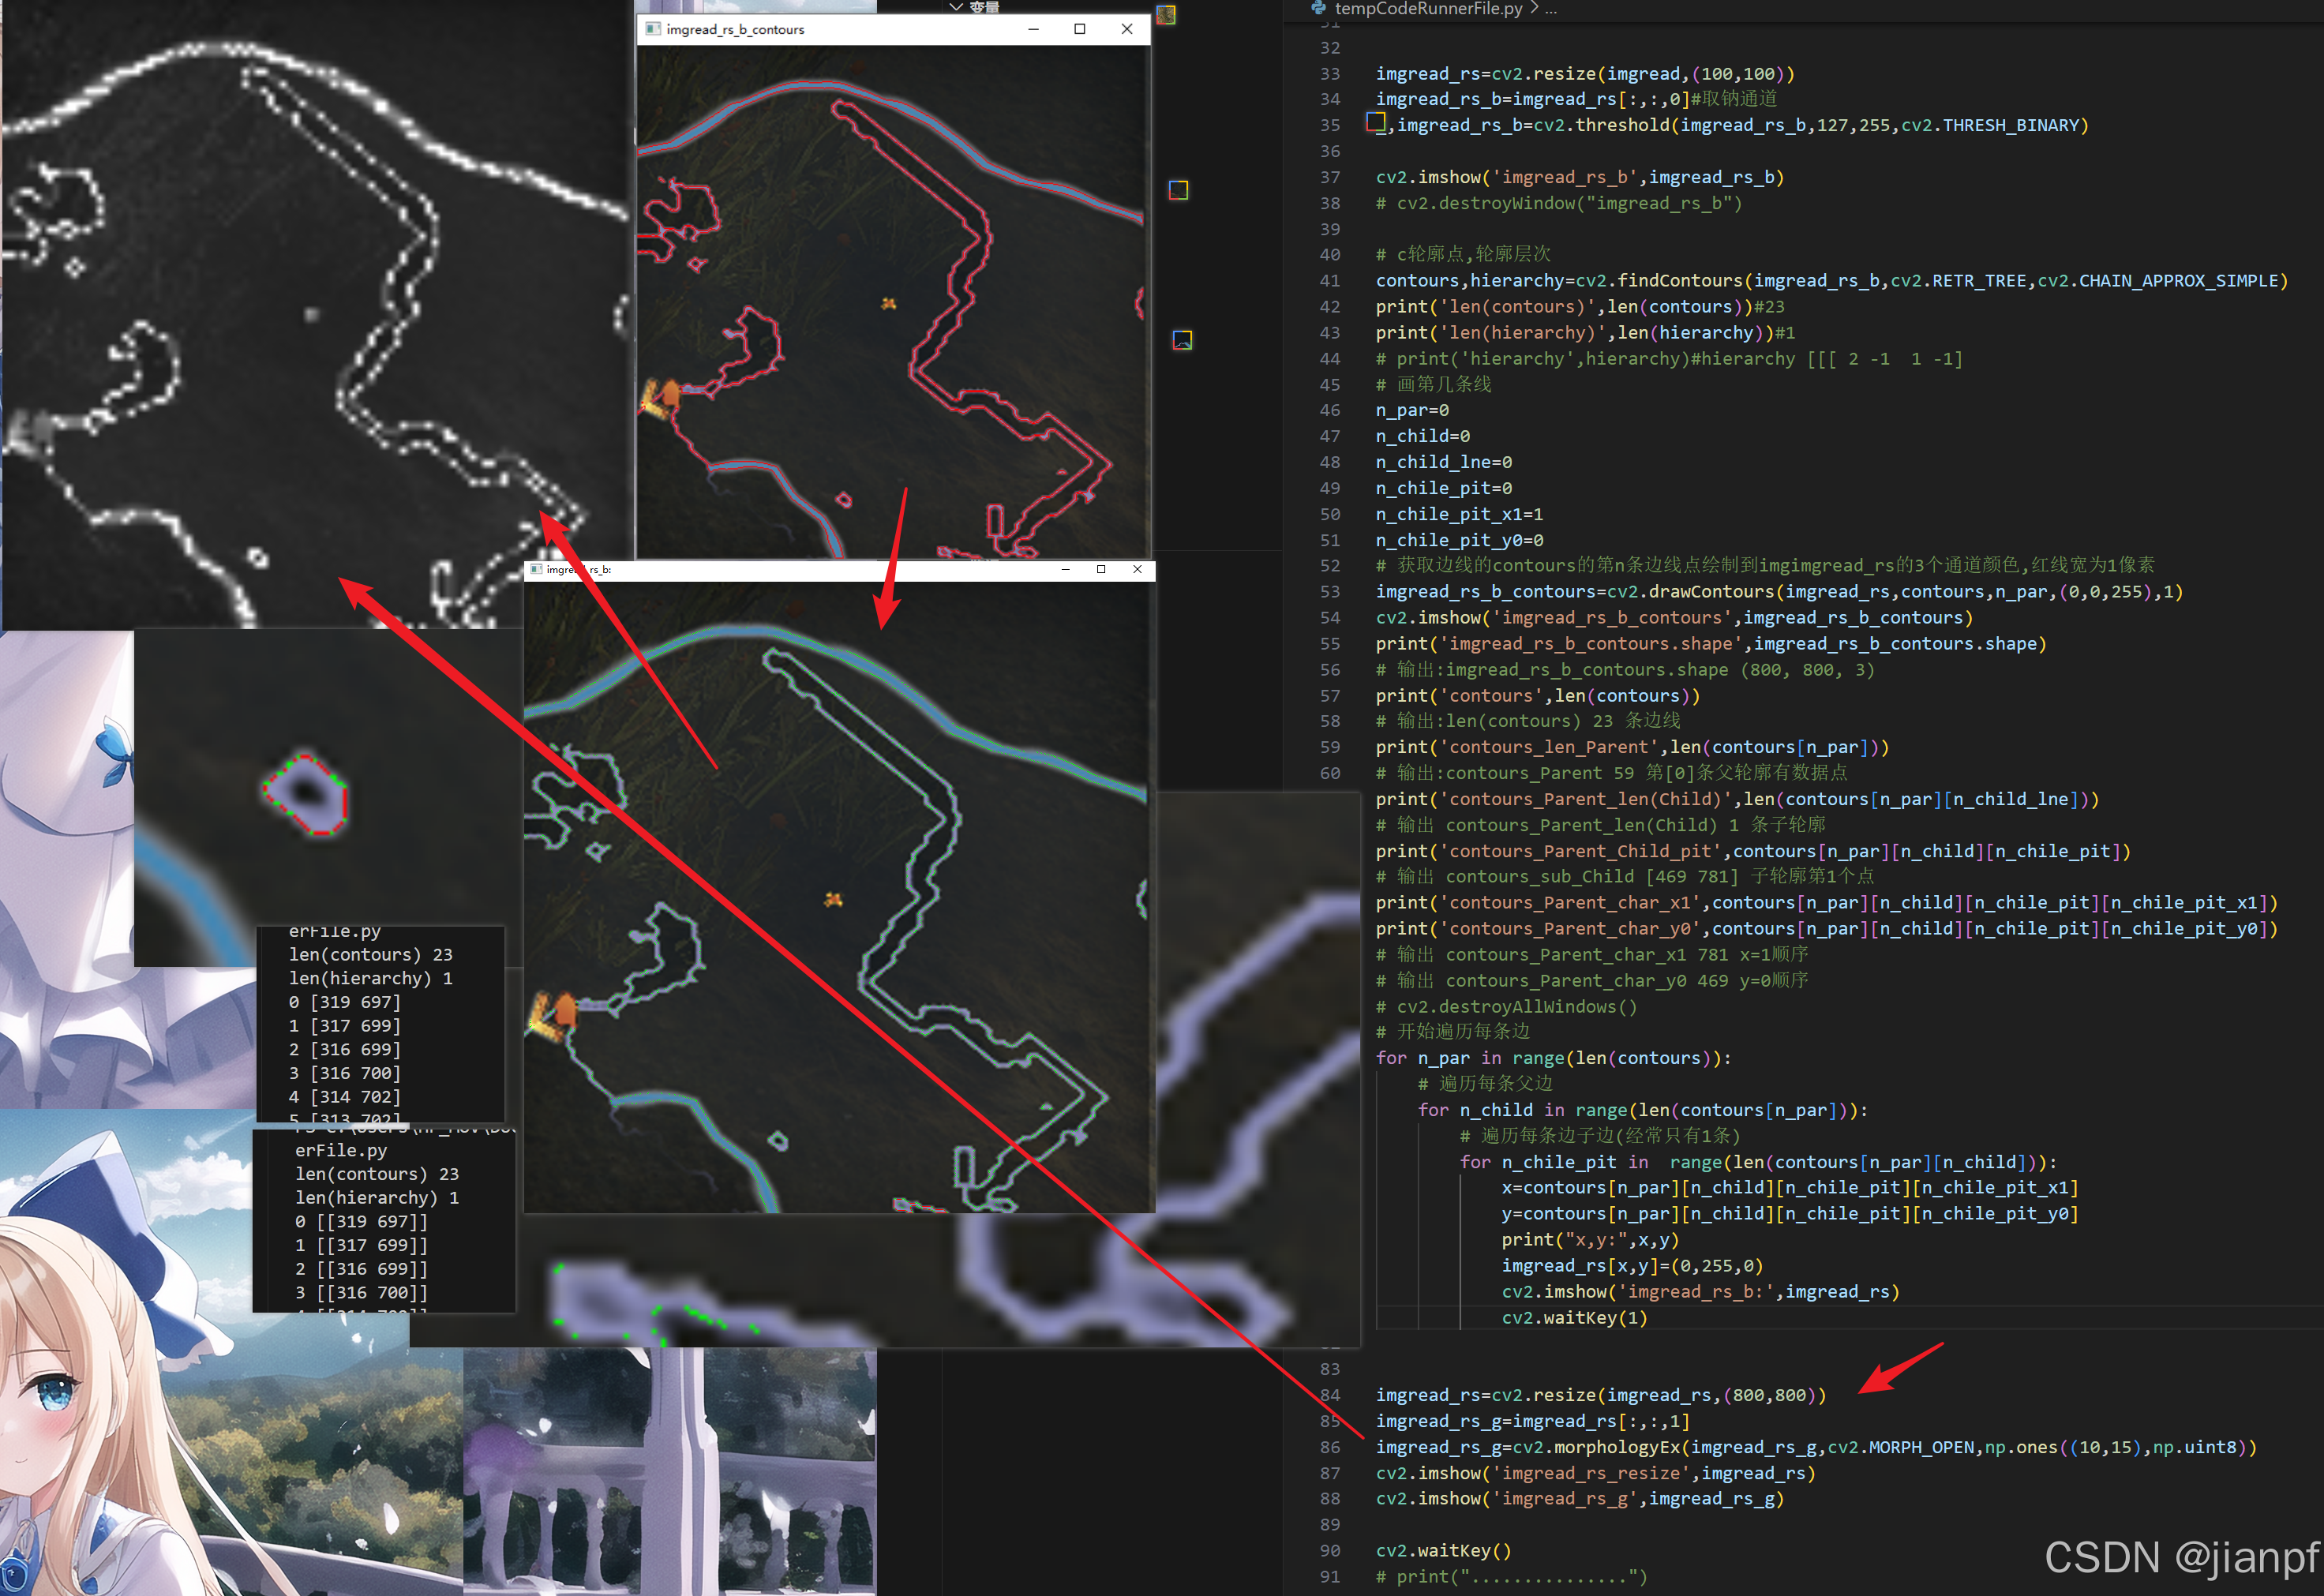
imgread_rs=cv2.resize(imgread,(100,100),cv2.INTER_NEAREST)
imgread_rs_b=imgread_rs[:,:,0]#取钠通道
_,imgread_rs_b=cv2.threshold(imgread_rs_b,127,255,cv2.THRESH_BINARY)
cv2.imshow('imgread_rs_b',imgread_rs_b)
# cv2.destroyWindow("imgread_rs_b")
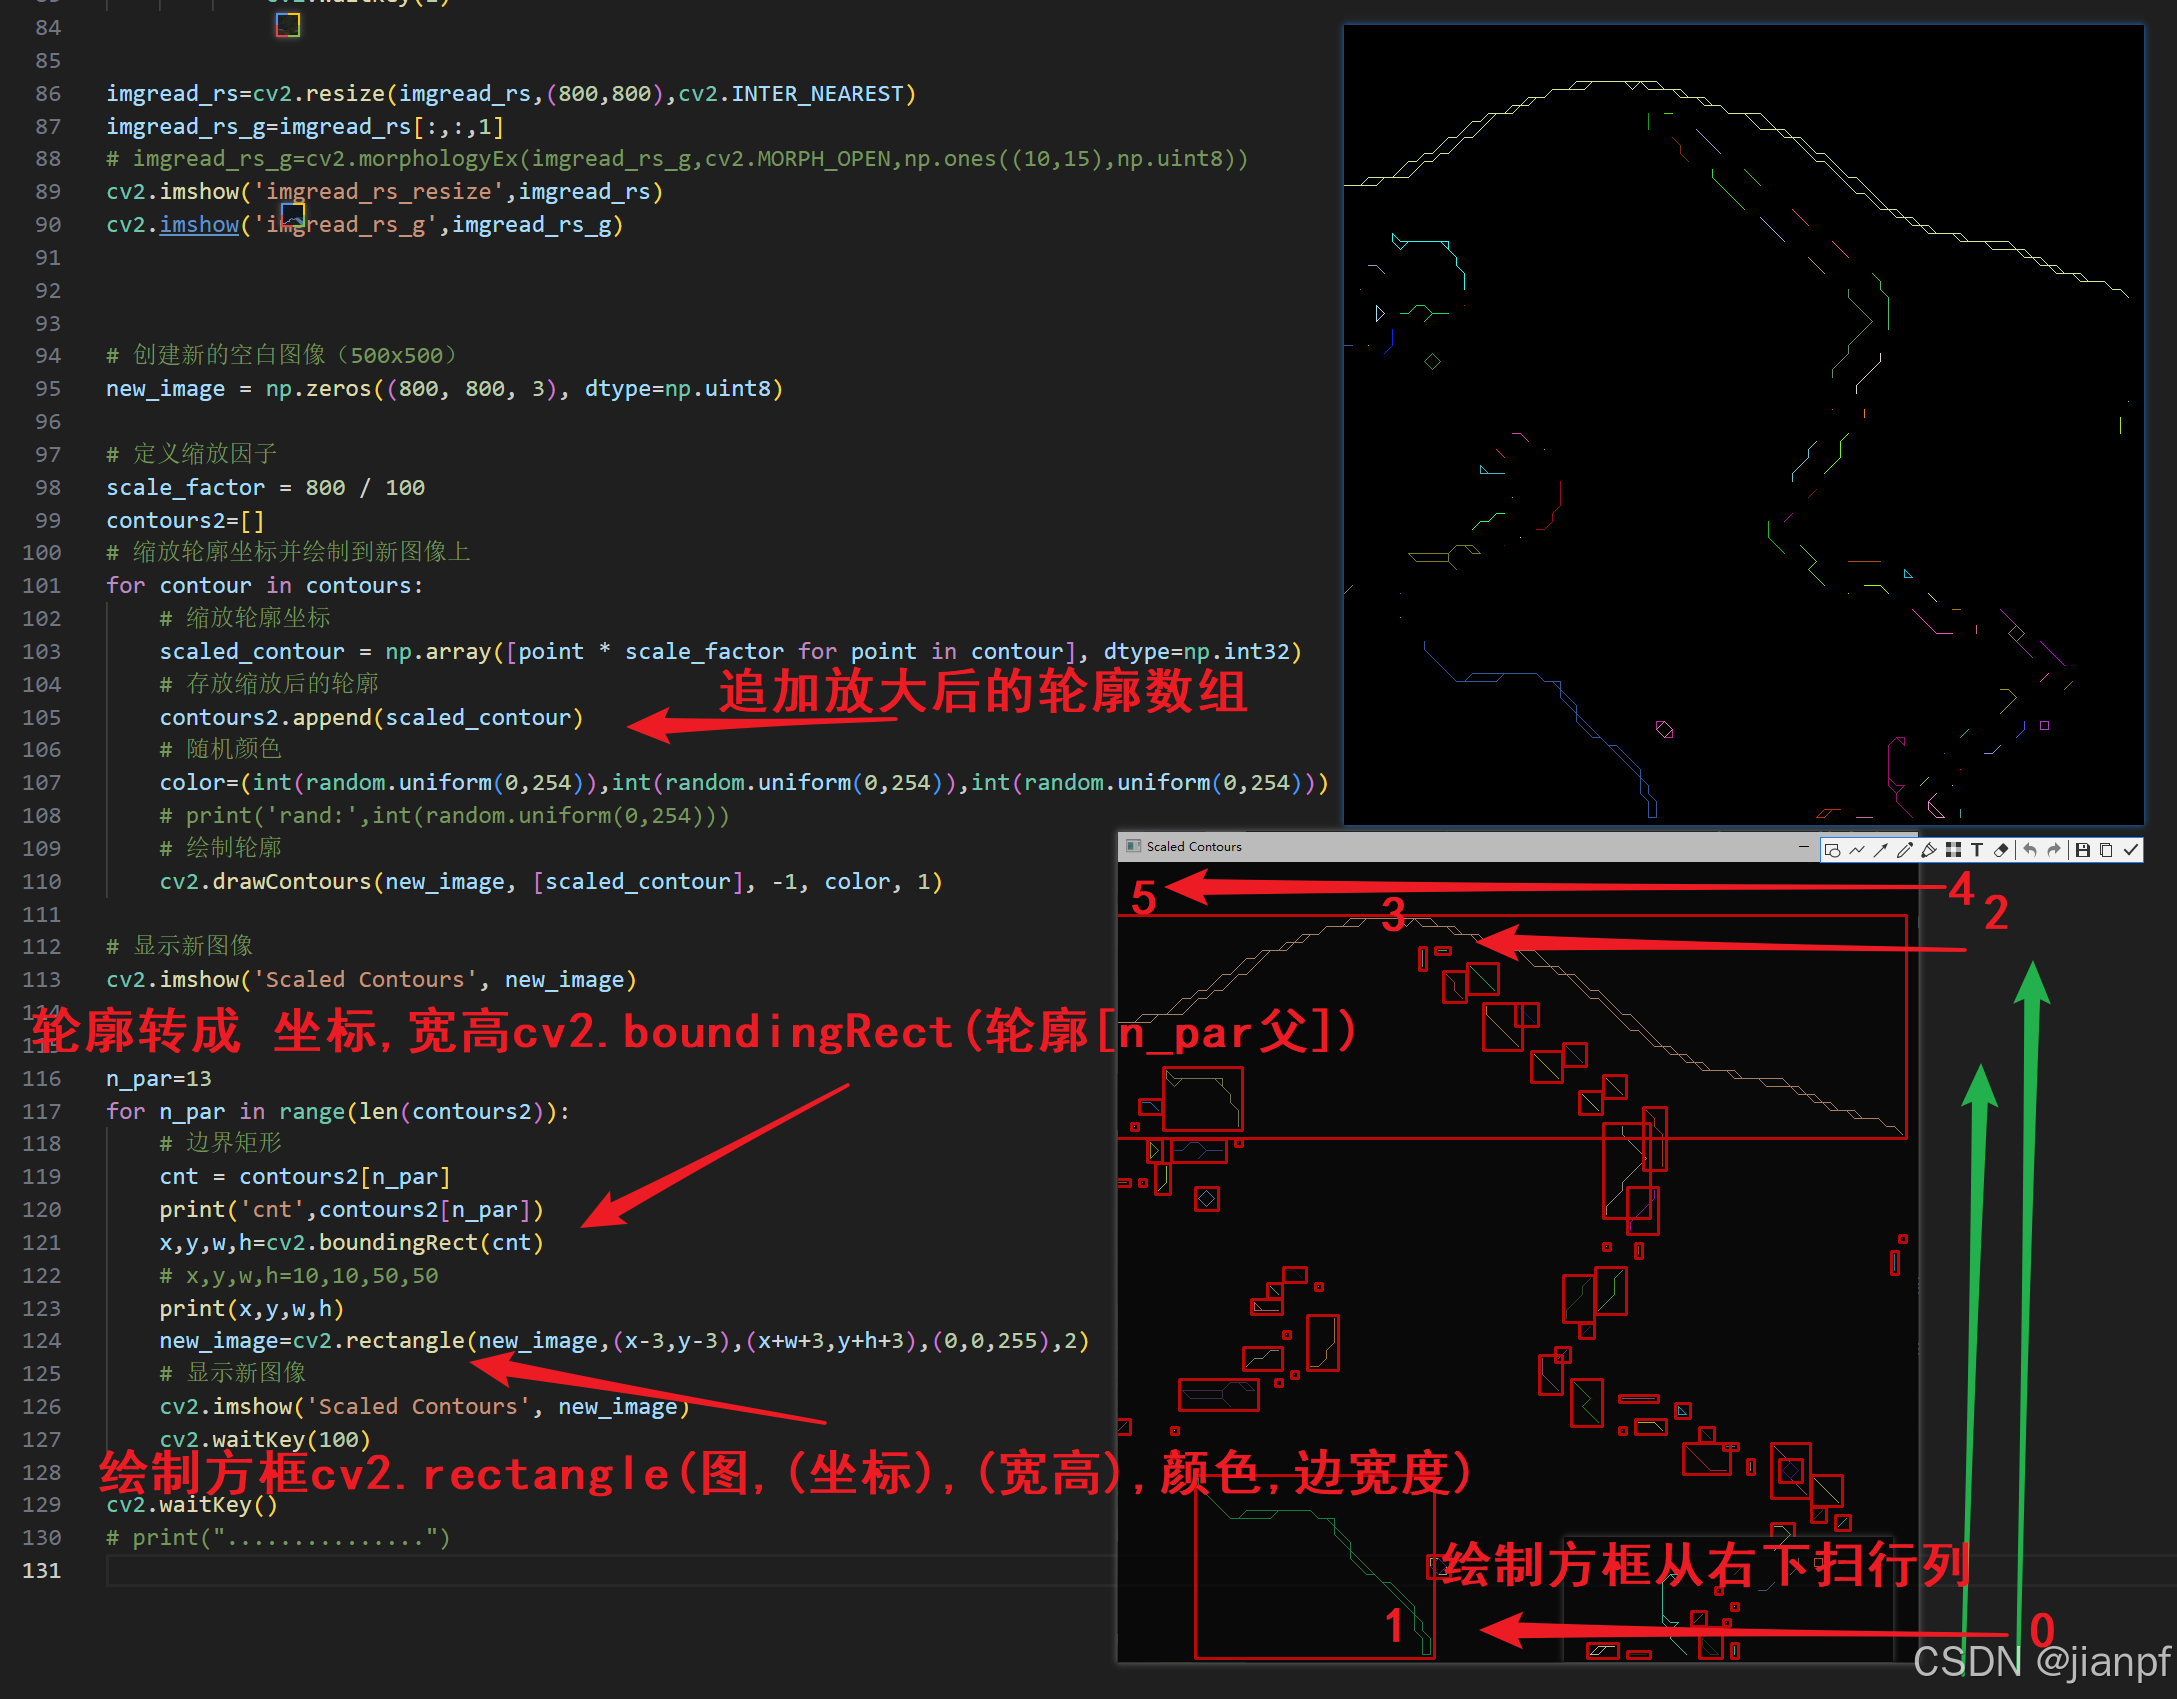
# c轮廓点,轮廓层次
contours,hierarchy=cv2.findContours(imgread_rs_b,cv2.RETR_TREE,cv2.CHAIN_APPROX_SIMPLE)
print('len(contours)',len(contours))#23
print('len(hierarchy)',len(hierarchy))#1
# print('hierarchy',hierarchy)#hierarchy [[[ 2 -1 1 -1]
# 画第几条线
n_par=0
n_child=0
n_child_lne=0
n_chile_pit=0
n_chile_pit_x1=1
n_chile_pit_y0=0
# 获取边线的contours的第n条边线点绘制到imgimgread_rs的3个通道颜色,红线宽为1像素
imgread_rs_b_contours=cv2.drawContours(imgread_rs,contours,n_par,(0,0,255),1)
cv2.imshow('imgread_rs_b_contours',imgread_rs_b_contours)
print('imgread_rs_b_contours.shape',imgread_rs_b_contours.shape)
# 输出:imgread_rs_b_contours.shape (800, 800, 3)
print('contours',len(contours))
# 输出:len(contours) 23 条边线
print('contours_len_Parent',len(contours[n_par]))
# 输出:contours_Parent 59 第[0]条父轮廓有数据点
print('contours_Parent_len(Child)',len(contours[n_par][n_child_lne]))
# 输出 contours_Parent_len(Child) 1 条子轮廓
print('contours_Parent_Child_pit',contours[n_par][n_child][n_chile_pit])
# 输出 contours_sub_Child [469 781] 子轮廓第1个点
print('contours_Parent_char_x1',contours[n_par][n_child][n_chile_pit][n_chile_pit_x1])
print('contours_Parent_char_y0',contours[n_par][n_child][n_chile_pit][n_chile_pit_y0])
# 输出 contours_Parent_char_x1 781 x=1顺序
# 输出 contours_Parent_char_y0 469 y=0顺序
# cv2.destroyAllWindows()
# 开始遍历每条边
for n_par in range(len(contours)):
# 遍历每条父边
for n_child in range(len(contours[n_par])):
# 遍历每条边子边(经常只有1条)
for n_chile_pit in range(len(contours[n_par][n_child])):
x=contours[n_par][n_child][n_chile_pit][n_chile_pit_x1]
y=contours[n_par][n_child][n_chile_pit][n_chile_pit_y0]
# print("x,y:",x,y)
imgread_rs[x,y]=(0,255,0)
cv2.imshow('imgread_rs_b:',imgread_rs)
cv2.waitKey(1)
imgread_rs=cv2.resize(imgread_rs,(800,800),cv2.INTER_NEAREST)
imgread_rs_g=imgread_rs[:,:,1]
# imgread_rs_g=cv2.morphologyEx(imgread_rs_g,cv2.MORPH_OPEN,np.ones((10,15),np.uint8))
cv2.imshow('imgread_rs_resize',imgread_rs)
cv2.imshow('imgread_rs_g',imgread_rs_g)
# 创建新的空白图像(500x500)
new_image = np.zeros((50, 50, 3), dtype=np.uint8)
# 定义缩放因子
scale_factor = 50 / 100
# 缩放轮廓坐标并绘制到新图像上
for contour in contours:
# 缩放轮廓坐标
scaled_contour = np.array([point * scale_factor for point in contour], dtype=np.int32)
# 随机颜色
color=(int(random.uniform(0,254)),int(random.uniform(0,254)),int(random.uniform(0,254)))
# print('rand:',int(random.uniform(0,254)))
# 绘制轮廓
cv2.drawContours(new_image, [scaled_contour], -1, color, 1)
# 显示新图像
cv2.imshow('Scaled Contours', new_image)
cv2.waitKey()
P28
https://www.bilibili.com/video/BV1ts4y1G7A1?p=28&spm_id_from=pageDriver&vd_source=606d359e368cfd6b2c0e0b03ff16fa67
如何判断一个点在contours2的哪条线段中?
遍历轮廓中的每对相邻点
enumerate() 返回一个枚举对象,该对象可以被迭代,每次迭代返回一个包含索引和值的元组。
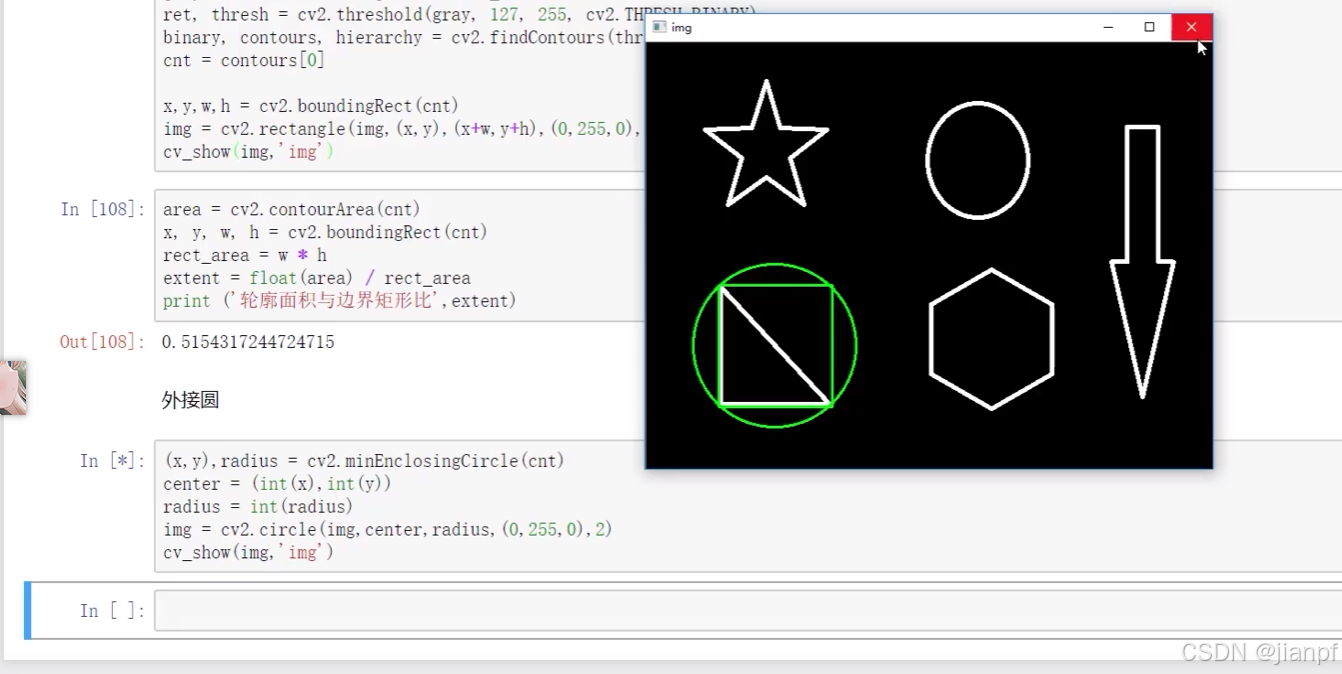
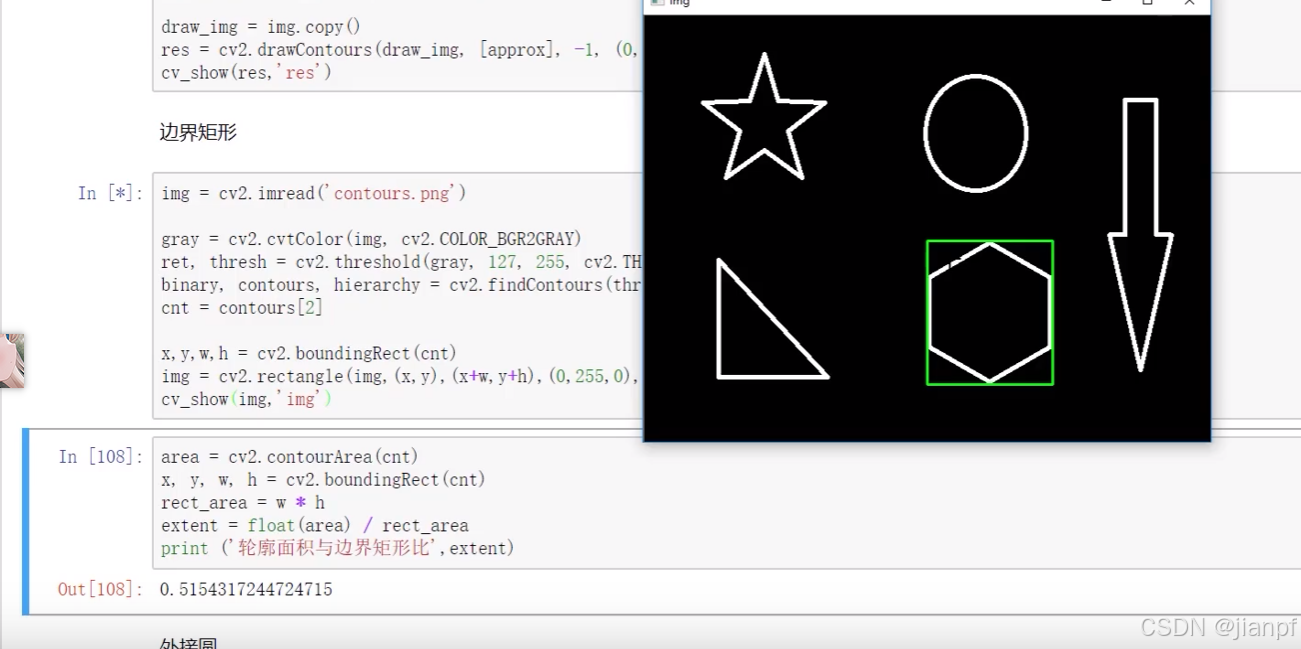
外接圆cv2.minEnclosingCircle(cnt)
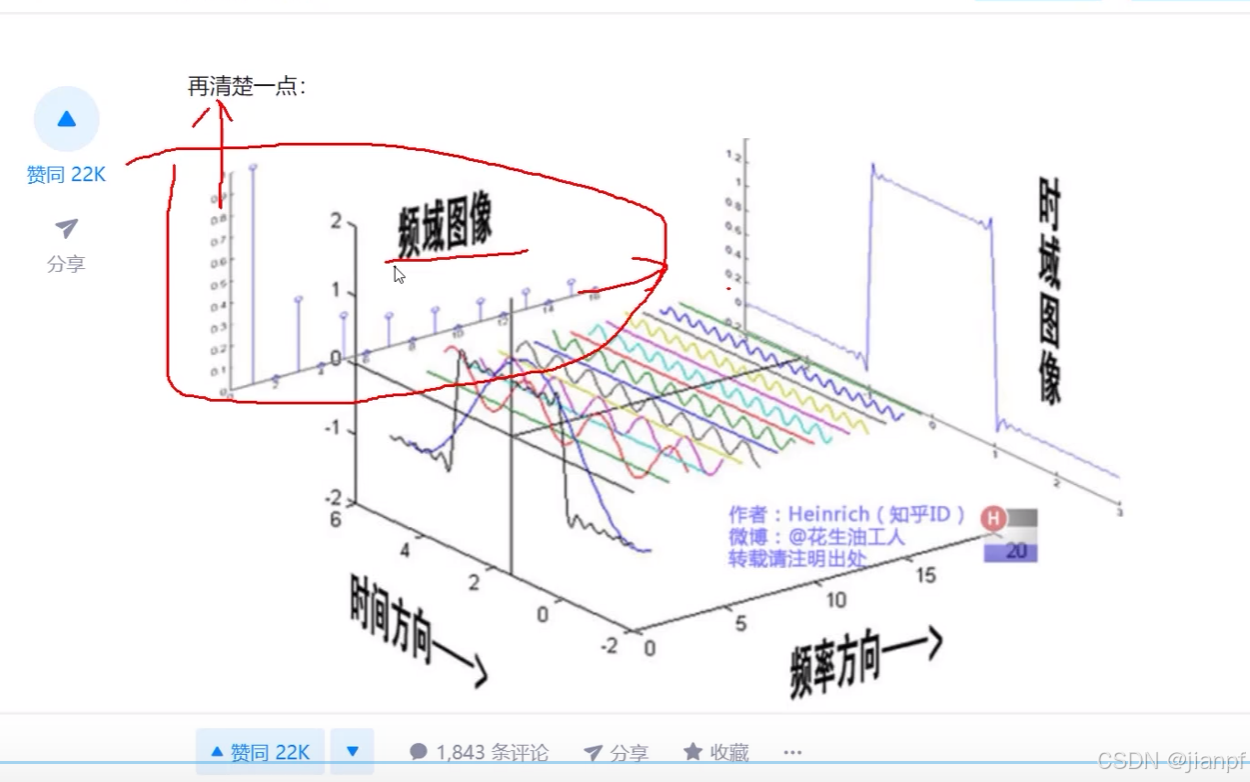
傅里叶概述

#代码片段(省略了加载图片,自己修改)
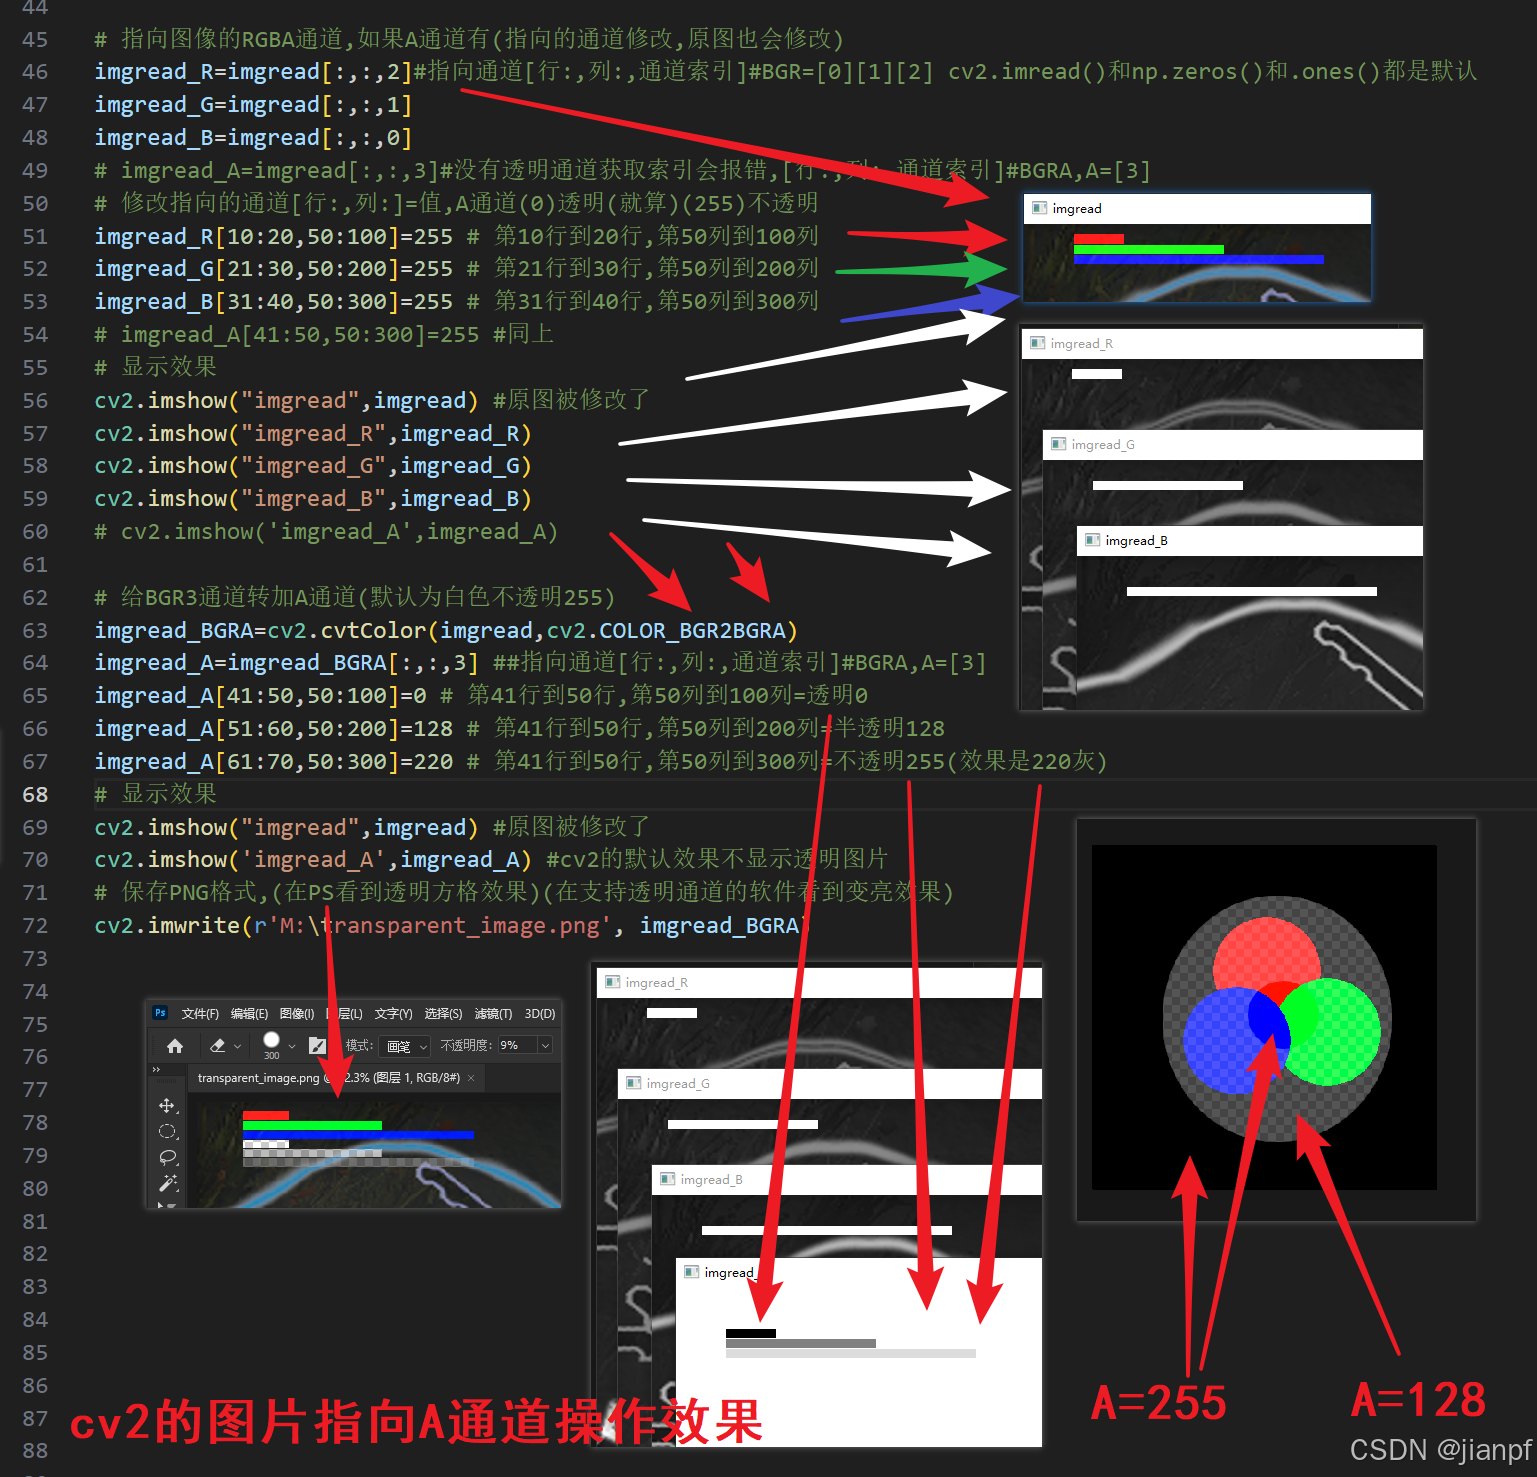
# 指向图像的RGBA通道,如果A通道有(指向的通道修改,原图也会修改)
imgread_R=imgread[:,:,2]#指向通道[行:,列:,通道索引]#BGR=[0][1][2] cv2.imread()和np.zeros()和.ones()都是默认
imgread_G=imgread[:,:,1]
imgread_B=imgread[:,:,0]
# imgread_A=imgread[:,:,3]#没有透明通道获取索引会报错,[行:,列:,通道索引]#BGRA,A=[3]
# 修改指向的通道[行:,列:]=值,A通道(0)透明(就算)(255)不透明
imgread_R[10:20,50:100]=255 # 第10行到20行,第50列到100列
imgread_G[21:30,50:200]=255 # 第21行到30行,第50列到200列
imgread_B[31:40,50:300]=255 # 第31行到40行,第50列到300列
# imgread_A[41:50,50:300]=255 #同上
# 显示效果
cv2.imshow("imgread",imgread) #原图被修改了
cv2.imshow("imgread_R",imgread_R)
cv2.imshow("imgread_G",imgread_G)
cv2.imshow("imgread_B",imgread_B)
# cv2.imshow('imgread_A',imgread_A)
# 给BGR3通道转加A通道(默认为白色不透明255)
imgread_BGRA=cv2.cvtColor(imgread,cv2.COLOR_BGR2BGRA)
imgread_A=imgread_BGRA[:,:,3] ##指向通道[行:,列:,通道索引]#BGRA,A=[3]
imgread_A[41:50,50:100]=0 # 第41行到50行,第50列到100列=透明0
imgread_A[51:60,50:200]=128 # 第41行到50行,第50列到200列=半透明128
imgread_A[61:70,50:300]=220 # 第41行到50行,第50列到300列=不透明255(效果是220灰)
# 显示效果
cv2.imshow("imgread",imgread) #原图被修改了
cv2.imshow('imgread_A',imgread_A) #cv2的默认效果不显示透明图片
# 保存PNG格式,(在PS看到透明方格效果)(在支持透明通道的软件看到变亮效果)
cv2.imwrite(r'M:\transparent_image.png', imgread_BGRA)

np创建一个白色背景图像方法用1*255
background = np.ones((height, width, 3), dtype=np.uint8) * 255
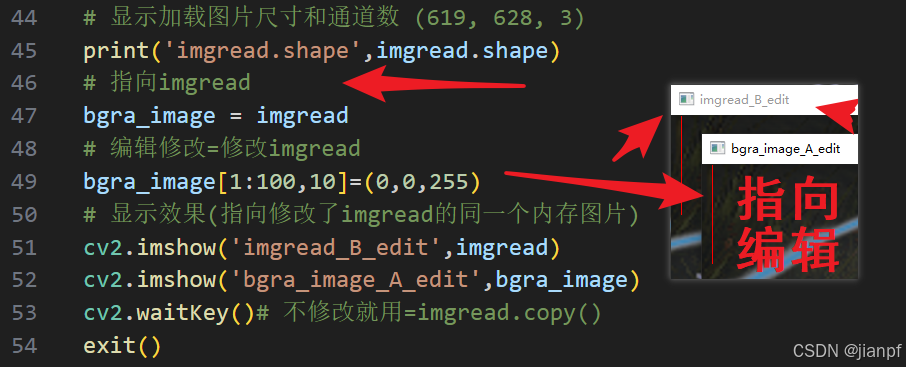
(指向修改了imgread的同一个内存图片)
cv2.图像叠加代码
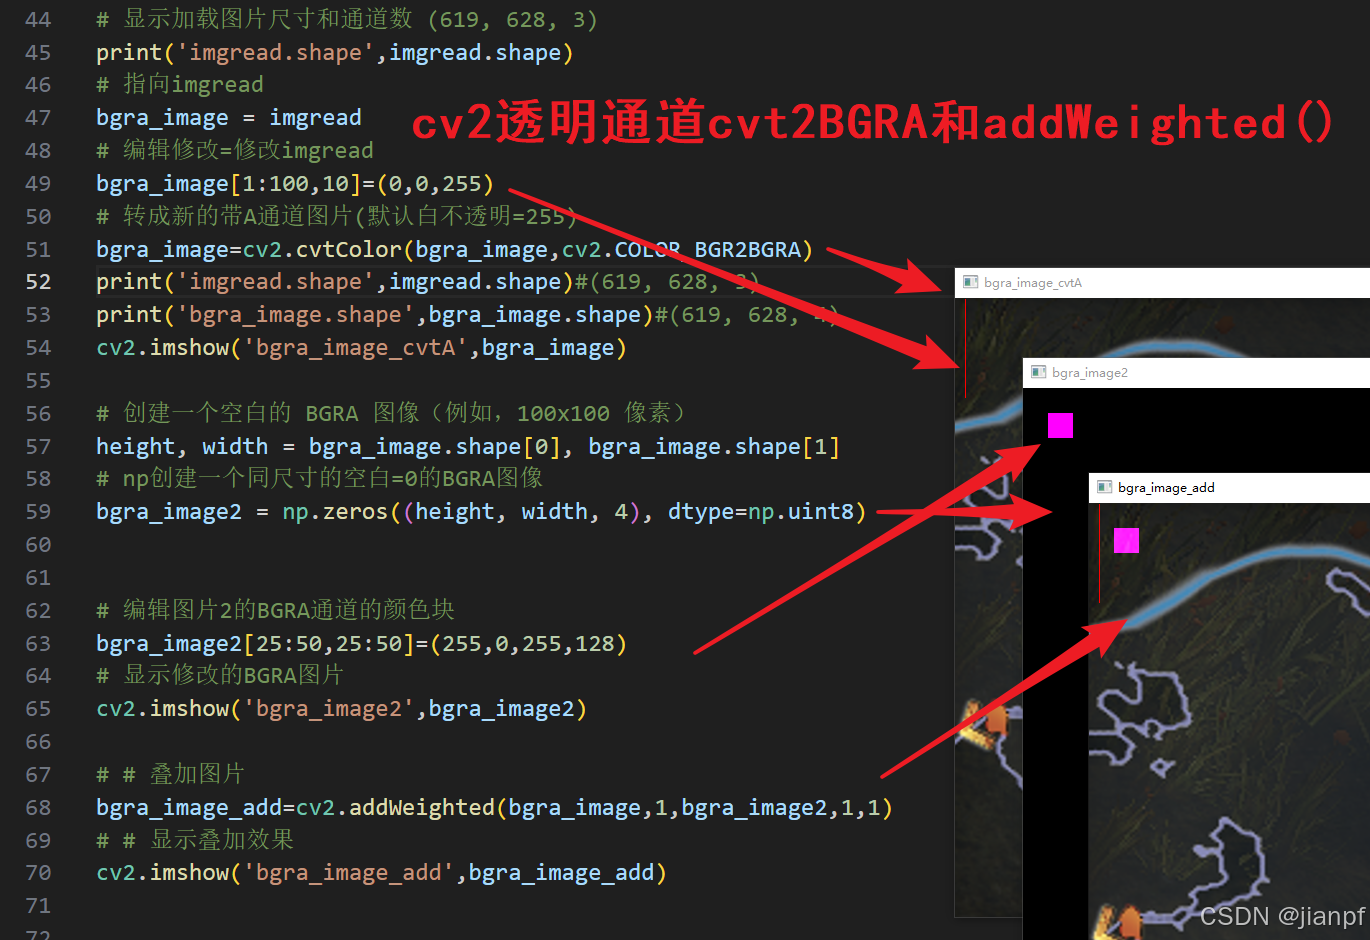
# 显示加载图片尺寸和通道数 (619, 628, 3)
print('imgread.shape',imgread.shape)
# 指向imgread
bgra_image = imgread
# 编辑修改=修改imgread
bgra_image[1:100,10]=(0,0,255)
# 转成新的带A通道图片(默认白不透明=255)
bgra_image=cv2.cvtColor(bgra_image,cv2.COLOR_BGR2BGRA)
print('imgread.shape',imgread.shape)#(619, 628, 3)
print('bgra_image.shape',bgra_image.shape)#(619, 628, 4)
cv2.imshow('bgra_image_cvtA',bgra_image)
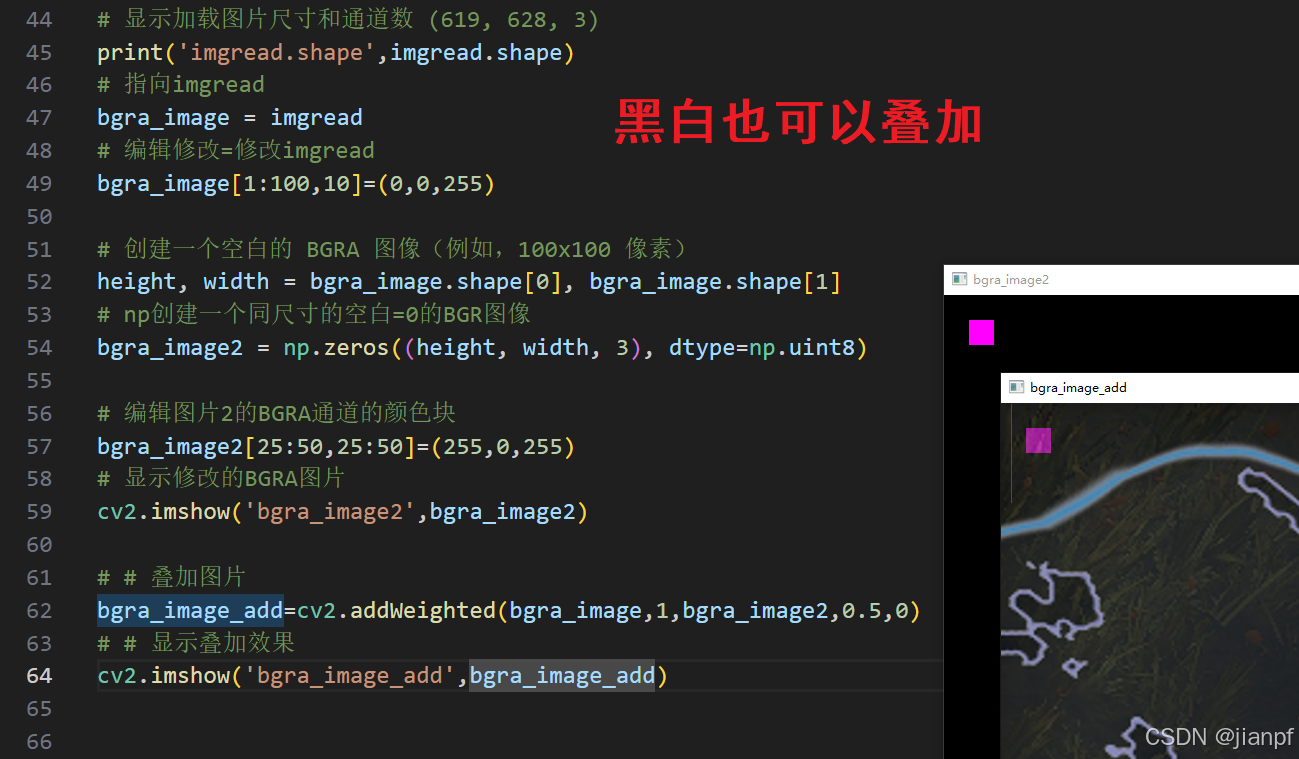
# 创建一个空白的 BGRA 图像(例如,100x100 像素)
height, width = bgra_image.shape[0], bgra_image.shape[1]
# np创建一个同尺寸的空白=0的BGRA图像
bgra_image2 = np.zeros((height, width, 4), dtype=np.uint8)
# 编辑图片2的BGRA通道的颜色块
bgra_image2[25:50,25:50]=(255,0,255,5)
# 显示修改的BGRA图片
cv2.imshow('bgra_image2',bgra_image2)
# # 叠加图片
bgra_image_add=cv2.addWeighted(bgra_image,1,bgra_image2,0.5,0)
# # 显示叠加效果
cv2.imshow('bgra_image_add',bgra_image_add)
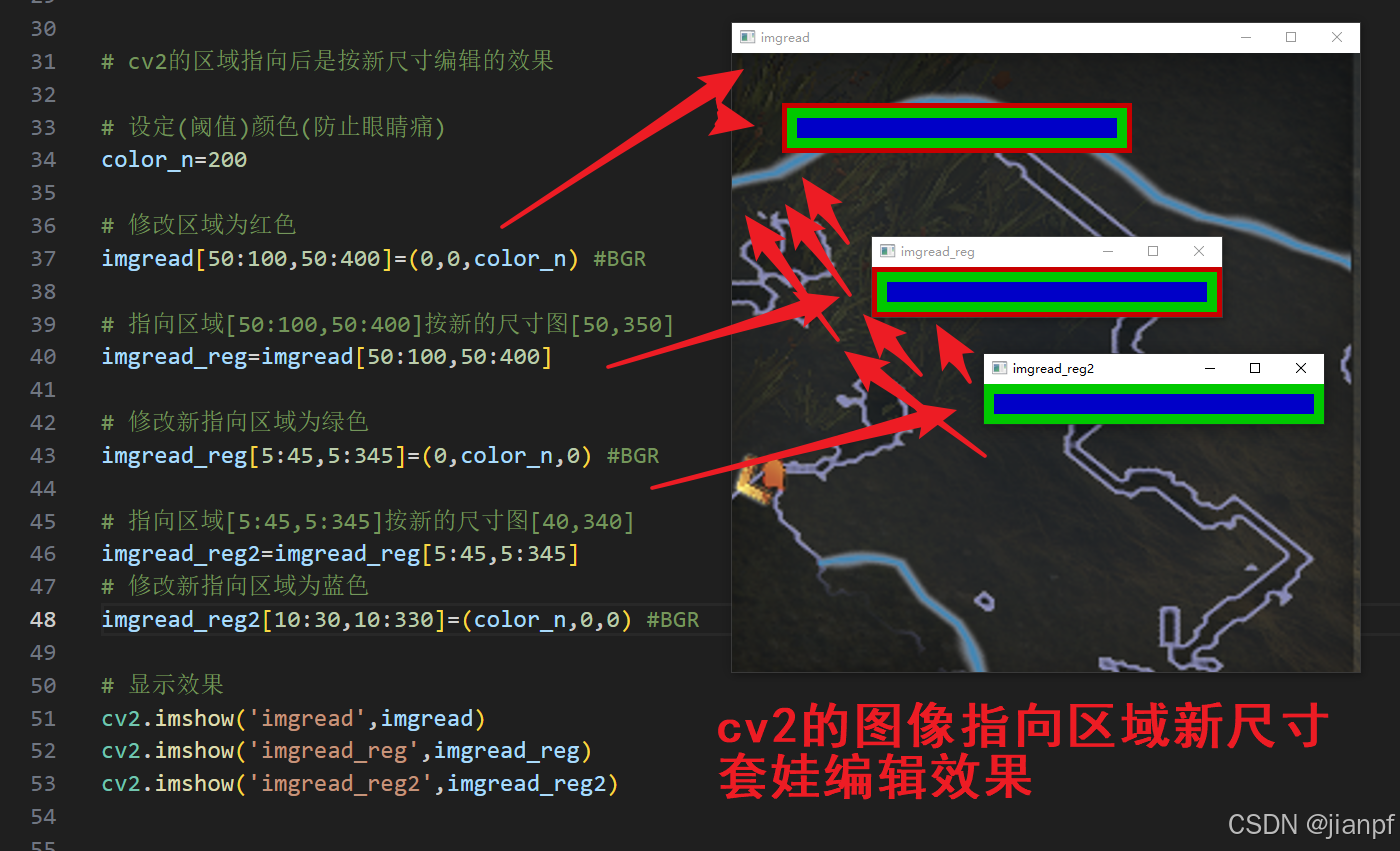
# cv2的区域指向后是按新尺寸编辑的效果

# 设定(阈值)颜色(防止眼睛痛)
color_n=200

# 修改区域为红色
imgread[50:100,50:400]=(0,0,color_n) #BGR

# 指向区域[50:100,50:400]按新的尺寸图[50,350]
imgread_reg=imgread[50:100,50:400]

# 修改新指向区域为绿色
imgread_reg[5:45,5:345]=(0,color_n,0) #BGR

# 指向区域[5:45,5:345]按新的尺寸图[40,340]
imgread_reg2=imgread_reg[5:45,5:345]
# 修改新指向区域为蓝色
imgread_reg2[10:30,10:330]=(color_n,0,0) #BGR

# 显示效果
cv2.imshow('imgread',imgread)
cv2.imshow('imgread_reg',imgread_reg)
cv2.imshow('imgread_reg2',imgread_reg2)
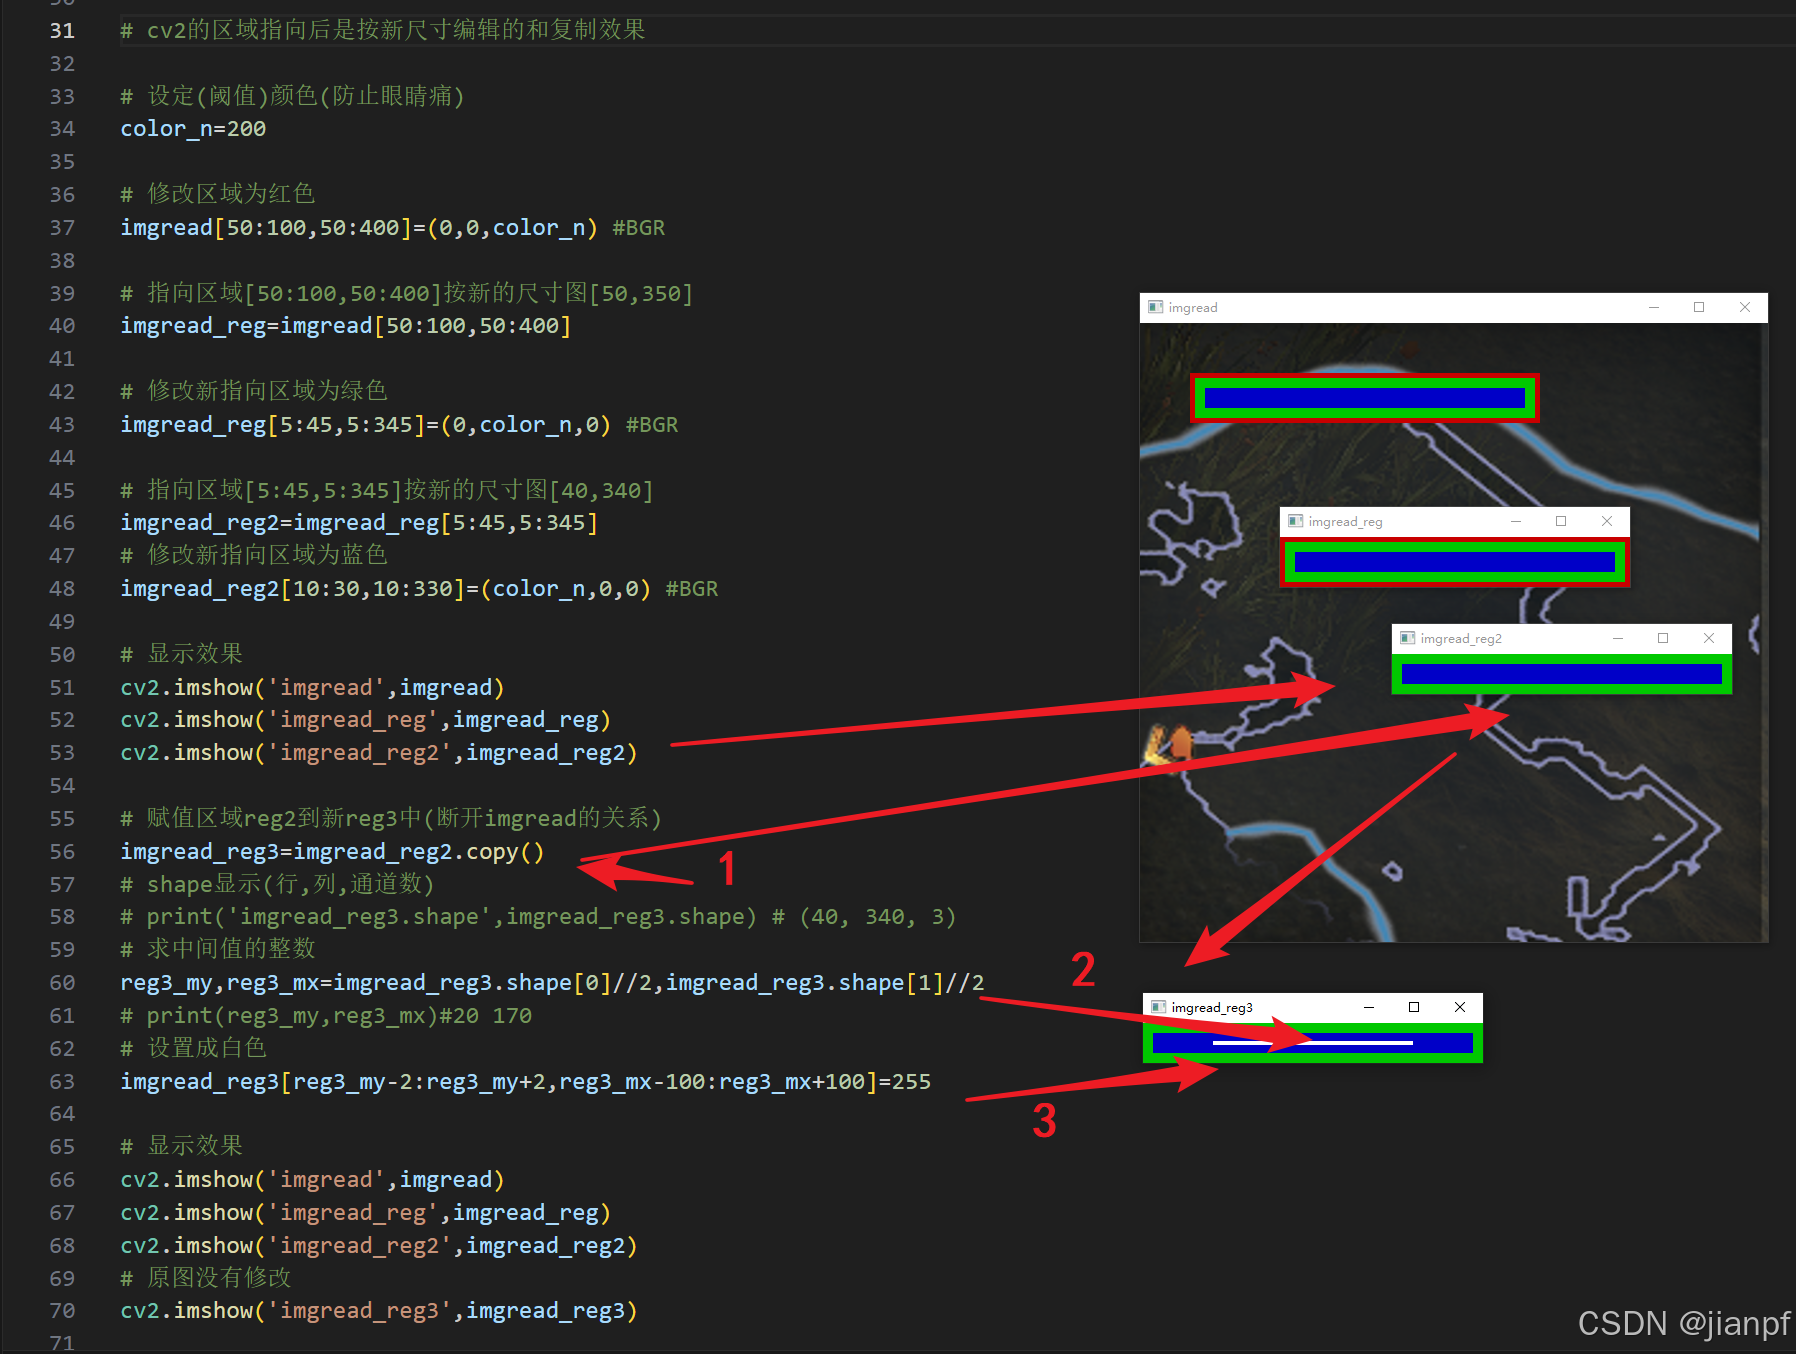
# cv2的区域指向后是按新尺寸编辑的和复制效果

# 设定(阈值)颜色(防止眼睛痛)
color_n=200

# 修改区域为红色
imgread[50:100,50:400]=(0,0,color_n) #BGR

# 指向区域[50:100,50:400]按新的尺寸图[50,350]
imgread_reg=imgread[50:100,50:400]

# 修改新指向区域为绿色
imgread_reg[5:45,5:345]=(0,color_n,0) #BGR

# 指向区域[5:45,5:345]按新的尺寸图[40,340]
imgread_reg2=imgread_reg[5:45,5:345]
# 修改新指向区域为蓝色
imgread_reg2[10:30,10:330]=(color_n,0,0) #BGR

# 显示效果
cv2.imshow('imgread',imgread)
cv2.imshow('imgread_reg',imgread_reg)
cv2.imshow('imgread_reg2',imgread_reg2)

# 赋值区域reg2到新reg3中(断开imgread的关系)
imgread_reg3=imgread_reg2.copy()
# shape显示(行,列,通道数)
# print('imgread_reg3.shape',imgread_reg3.shape) # (40, 340, 3)
# 求中间值的整数
reg3_my,reg3_mx=imgread_reg3.shape[0]//2,imgread_reg3.shape[1]//2
# print(reg3_my,reg3_mx)#20 170
# 设置成白色
imgread_reg3[reg3_my-2:reg3_my+2,reg3_mx-100:reg3_mx+100]=255

# 显示效果
cv2.imshow('imgread',imgread)
cv2.imshow('imgread_reg',imgread_reg)
cv2.imshow('imgread_reg2',imgread_reg2)
# 原图没有修改
cv2.imshow('imgread_reg3',imgread_reg3)
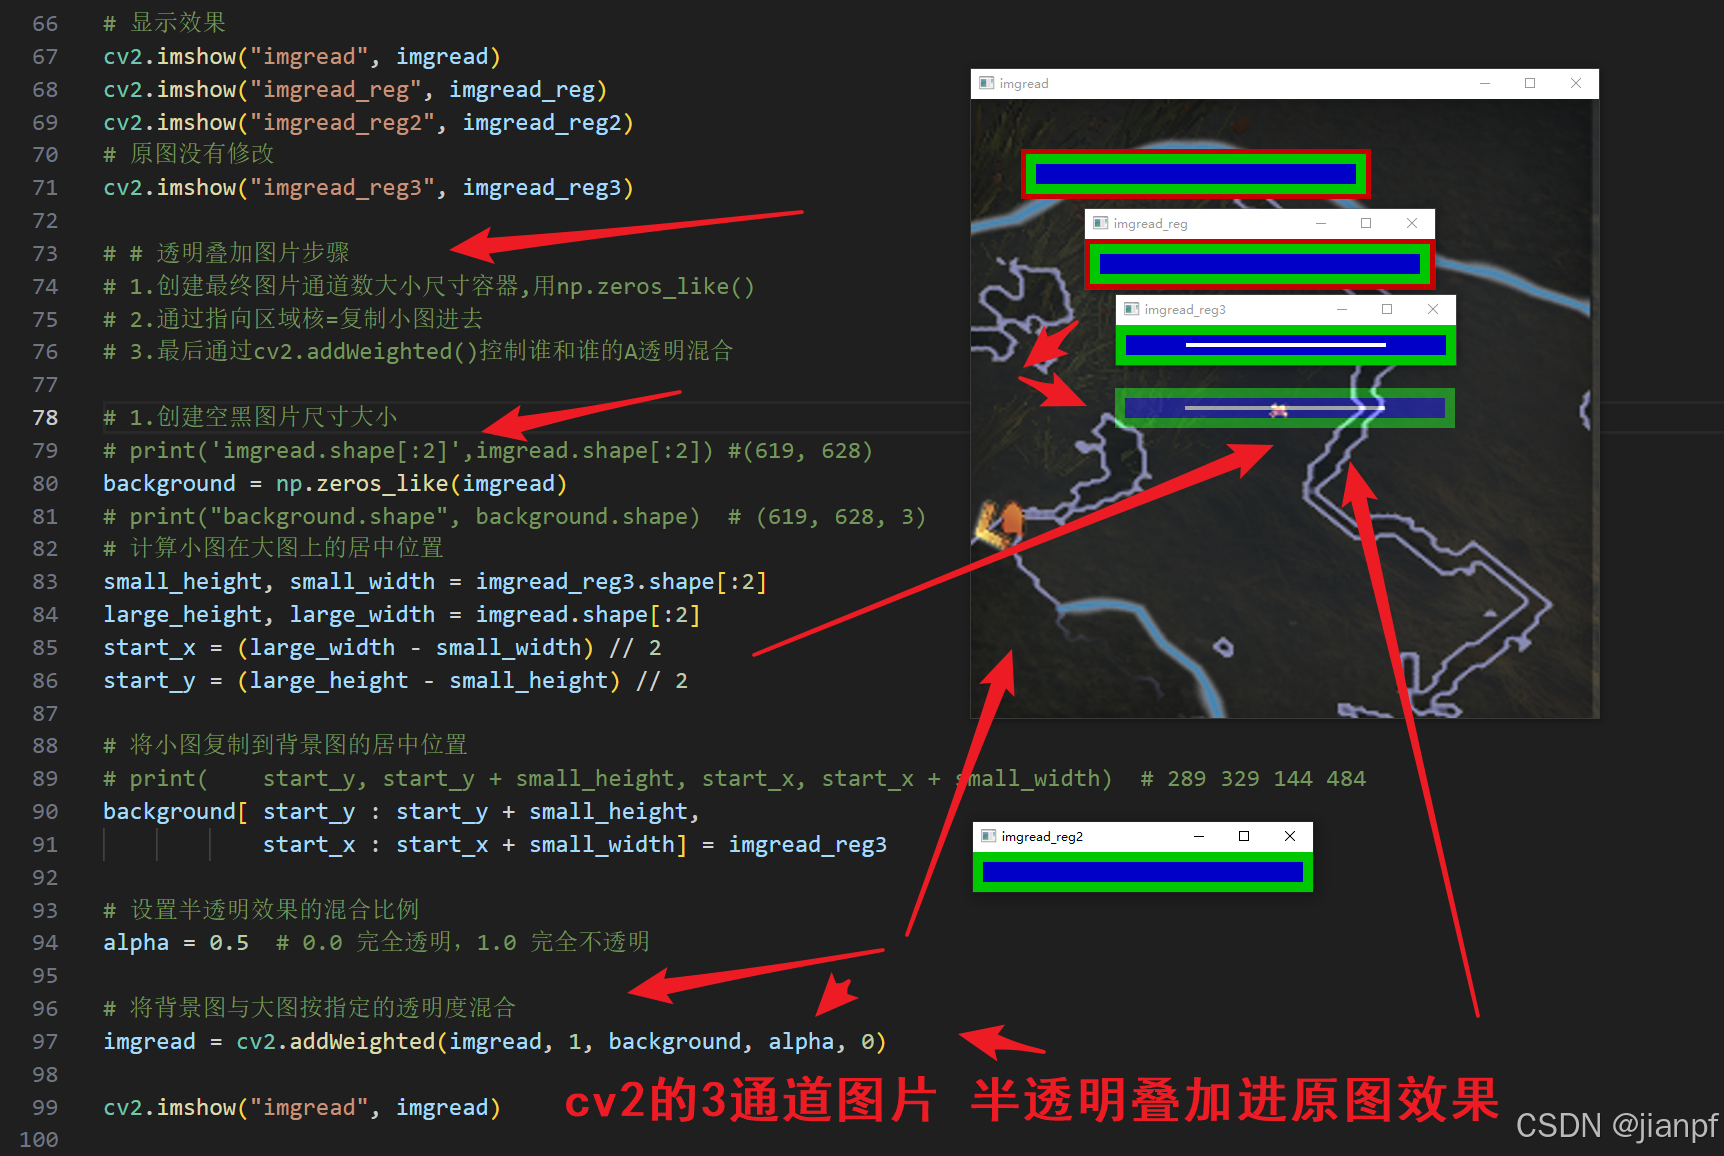
# cv2的区域指向后是按新尺寸编辑的和复制效果和半透明叠加进入原图效果2024.9.6.9:58(搞了2天)

# 设定(阈值)颜色(防止眼睛痛)
color_n = 200

# 修改区域为红色
imgread[50:100, 50:400] = (0, 0, color_n)  # BGR

# 指向区域[50:100,50:400]按新的尺寸图[50,350]
imgread_reg = imgread[50:100, 50:400]

# 修改新指向区域为绿色
imgread_reg[5:45, 5:345] = (0, color_n, 0)  # BGR

# 指向区域[5:45,5:345]按新的尺寸图[40,340]
imgread_reg2 = imgread_reg[5:45, 5:345]
# 修改新指向区域为蓝色
imgread_reg2[10:30, 10:330] = (color_n, 0, 0)  # BGR

# 显示效果
cv2.imshow("imgread", imgread)
cv2.imshow("imgread_reg", imgread_reg)
cv2.imshow("imgread_reg2", imgread_reg2)

# 赋值区域reg2到新reg3中(断开imgread的关系)
imgread_reg3 = imgread_reg2.copy()
# shape显示(行,列,通道数)
# print('imgread_reg3.shape',imgread_reg3.shape) # (40, 340, 3)
# 求中间值的整数
reg3_my, reg3_mx = imgread_reg3.shape[0] // 2, imgread_reg3.shape[1] // 2
# print(reg3_my,reg3_mx)#20 170
# 设置成白色
imgread_reg3[reg3_my - 2 : reg3_my + 2, reg3_mx - 100 : reg3_mx + 100] = 255

# 显示效果
cv2.imshow("imgread", imgread)
cv2.imshow("imgread_reg", imgread_reg)
cv2.imshow("imgread_reg2", imgread_reg2)
# 原图没有修改
cv2.imshow("imgread_reg3", imgread_reg3)

# # 透明叠加图片步骤
# 1.创建最终图片通道数大小尺寸容器,用np.zeros_like()
# 2.通过指向区域核=复制小图进去
# 3.最后通过cv2.addWeighted()控制谁和谁的A透明混合

# 1.创建空黑图片尺寸大小
# print('imgread.shape[:2]',imgread.shape[:2]) #(619, 628)
background = np.zeros_like(imgread)
# print("background.shape", background.shape)  # (619, 628, 3)
# 计算小图在大图上的居中位置
small_height, small_width = imgread_reg3.shape[:2]
large_height, large_width = imgread.shape[:2]
start_x = (large_width - small_width) // 2
start_y = (large_height - small_height) // 2

# 将小图复制到背景图的居中位置
# print(    start_y, start_y + small_height, start_x, start_x + small_width)  # 289 329 144 484
background[ start_y : start_y + small_height,
            start_x : start_x + small_width] = imgread_reg3

# 设置半透明效果的混合比例
alpha = 0.5  # 0.0 完全透明,1.0 完全不透明

# 将背景图与大图按指定的透明度混合
imgread = cv2.addWeighted(imgread, 1, background, alpha, 0)

cv2.imshow("imgread", imgread)
cv2的区域指向后是按新尺寸编辑的和复制效果和半透明叠加进入原图效果2024.9.6.9:58(搞了2天)
cv2.meanShift追踪
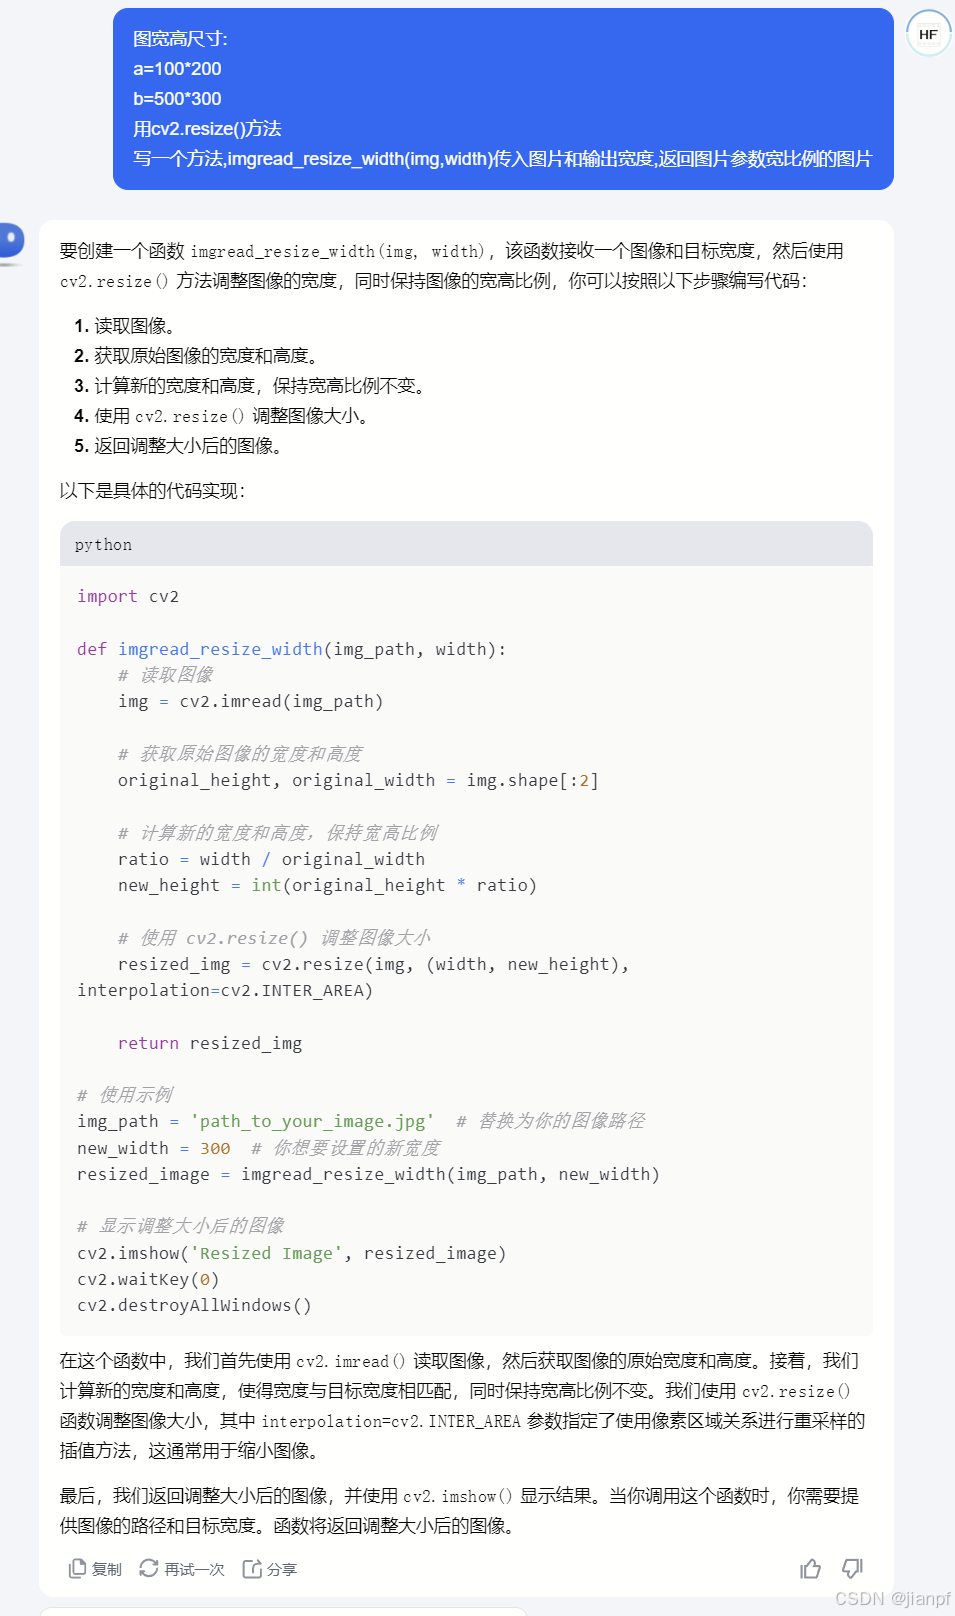
比例问题:
图宽高尺寸:
a=100200
b=500300
c=200*300
要求a,b都缩放成200宽
cv2.resize(图片,(0,0),fx=?,fy=?,interpolation=cv2.INTER_NEAREST)
import cv2

def imgread_resize_width(img_path, width):
    # 读取图像
    img = cv2.imread(img_path)

    # 获取原始图像的宽度和高度
    original_height, original_width = img.shape[:2]

    # 计算新的宽度和高度,保持宽高比例
    ratio = width / original_width
    new_height = int(original_height * ratio)

    # 使用 cv2.resize() 调整图像大小
    resized_img = cv2.resize(img, (width, new_height), interpolation=cv2.INTER_AREA)

    return resized_img

# 使用示例
img_path = 'path_to_your_image.jpg'  # 替换为你的图像路径
new_width = 300  # 你想要设置的新宽度
resized_image = imgread_resize_width(img_path, new_width)

# 显示调整大小后的图像
cv2.imshow('Resized Image', resized_image)
cv2.waitKey(0)
cv2.destroyAllWindows()
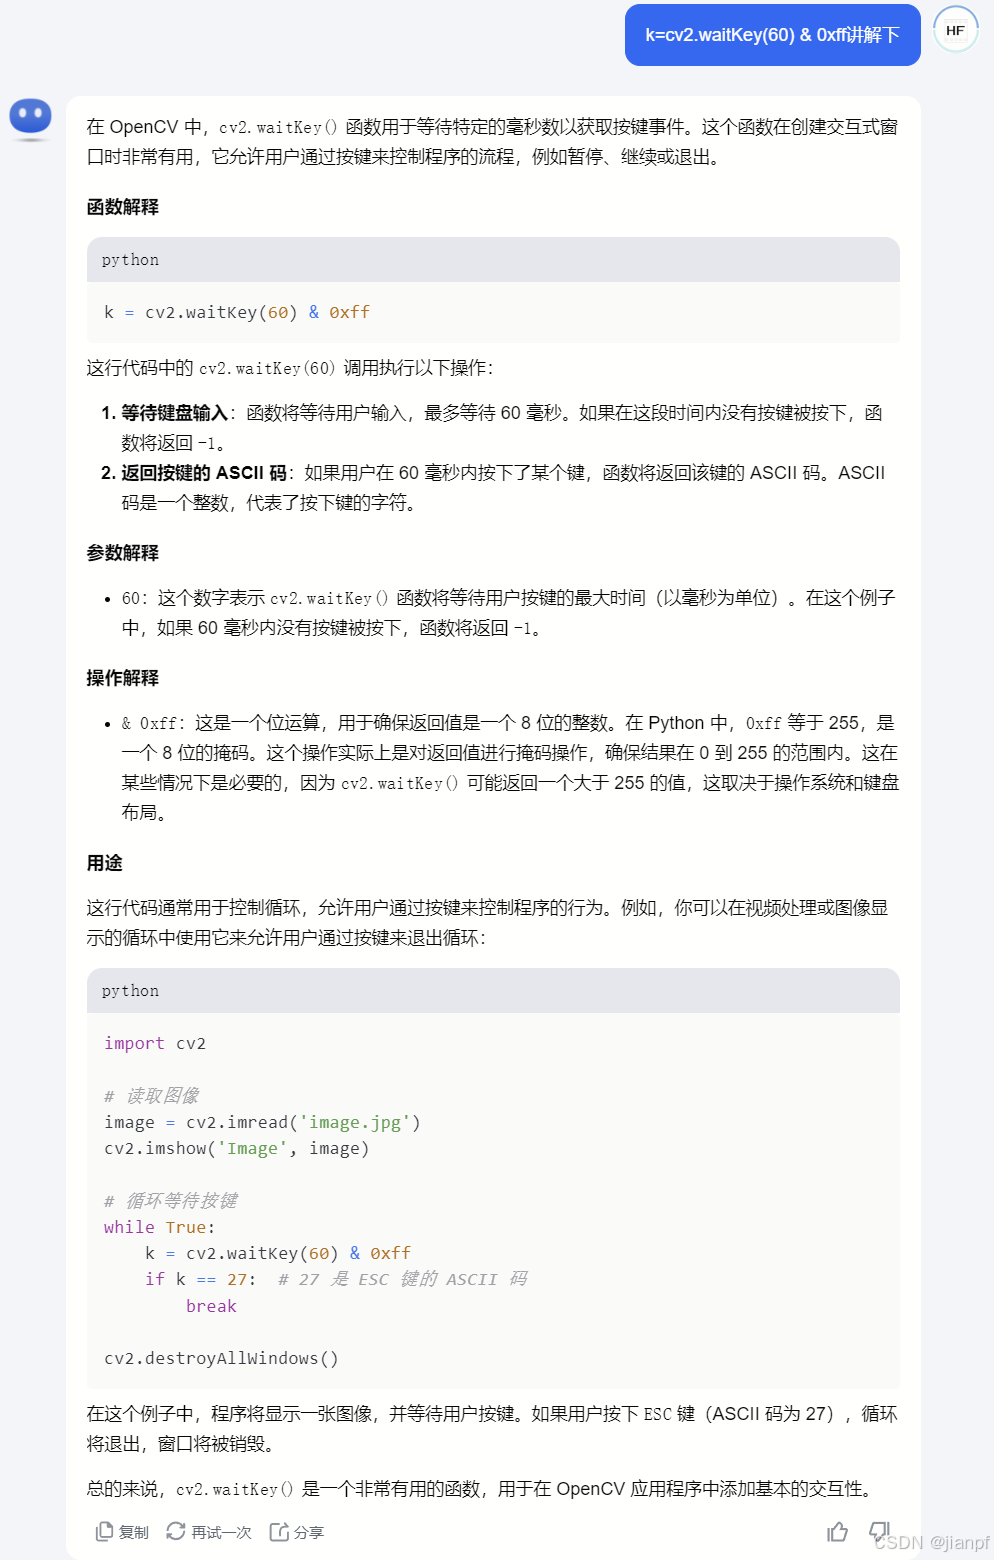
cv2的窗口按键返回码片段,现在才发现,(一点都不会)
k = cv2.waitKey(60) & 0xff #esc=27
2024.9.7.05:04阴雨29度
# 定义一个RGB或者BGR互转处理顺序调换方法 #默认返回列表
def rgb2bgr(rgb, tupleOut=False):
if tupleOut == True:
return (rgb[2], rgb[1], rgb[0])
else:
return [rgb[2], rgb[1], rgb[0]]
# 定义一个加数列表(正负值,列表) #默认返回列表
def sum2In(numlist, num, tupleOut=False):
if tupleOut == True:
return tuple([i + num for i in numlist])
else:
return [i + num for i in numlist]
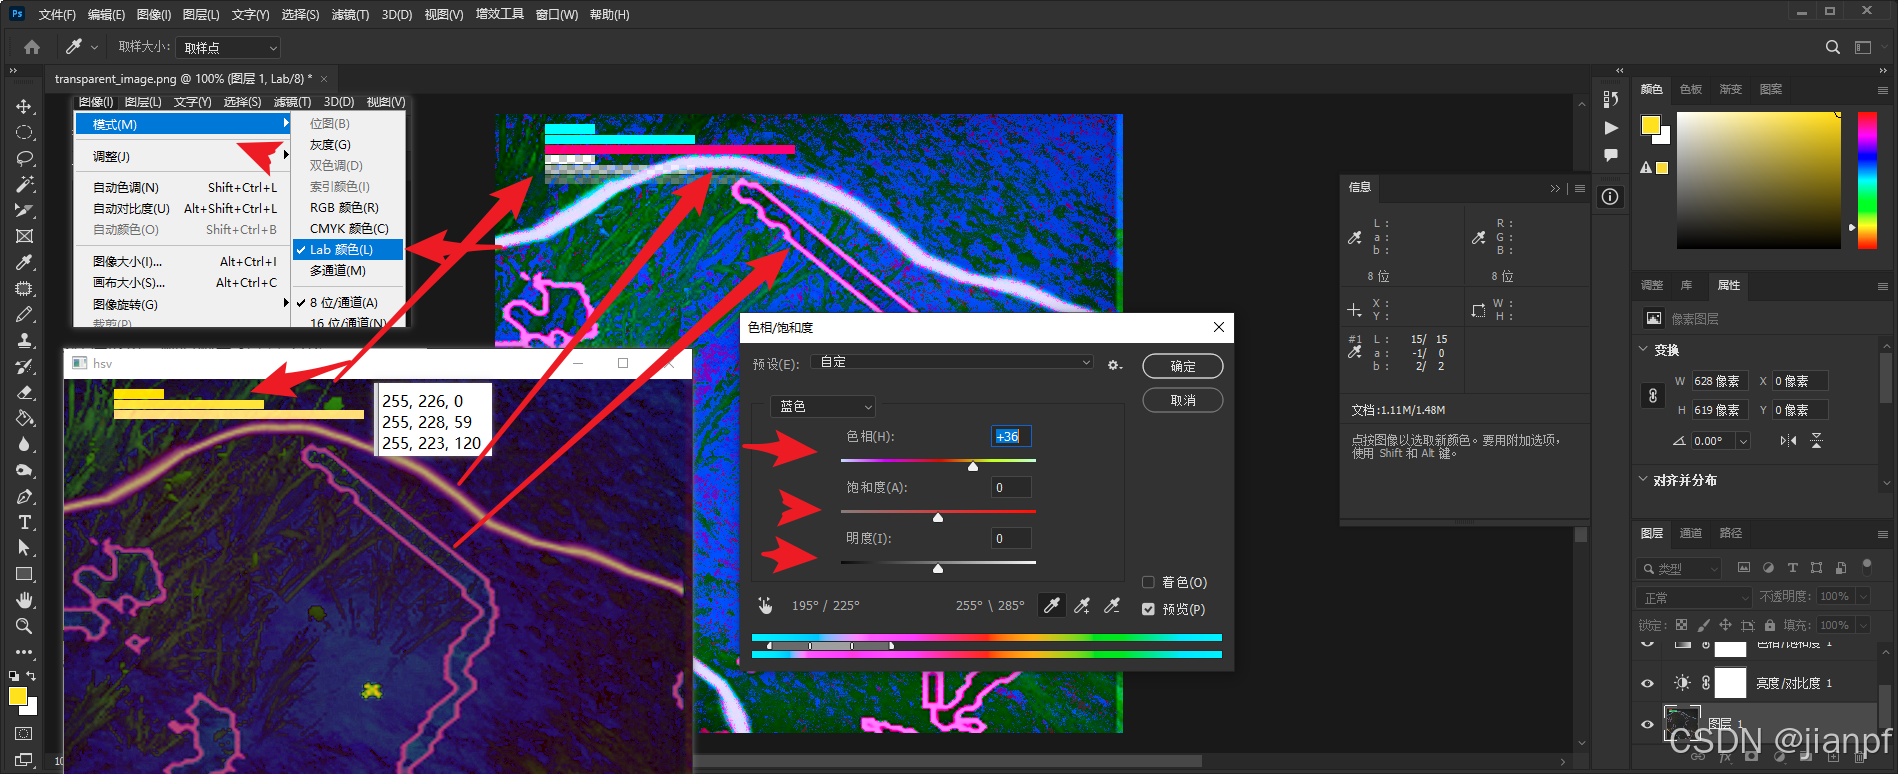
# 屏幕点颜色RGB2BGR色
color_s = [136, 138, 183] # BGR=[183,138,136]
# RGB转BGR
color_s = rgb2bgr(color_s)
# print('color_s',color_s)
# 调用sum2In(列表,正负值,默认输出[列表])
color_lon = sum2In(color_s, -10,tupleOut=True)
color_upn = sum2In(color_s, 10,True)
# print(color_lon,color_upn)
print(color_s, color_lon, color_upn)
# (183, 138, 136) [173, 128, 126] [193, 148, 146]
# 根据阈值构建掩模
imgread_mask = cv2.inRange(image, color_lon, color_upn)
cv2.imshow("imgread_mask", imgread_mask)
cv2.waitKey()
exit()
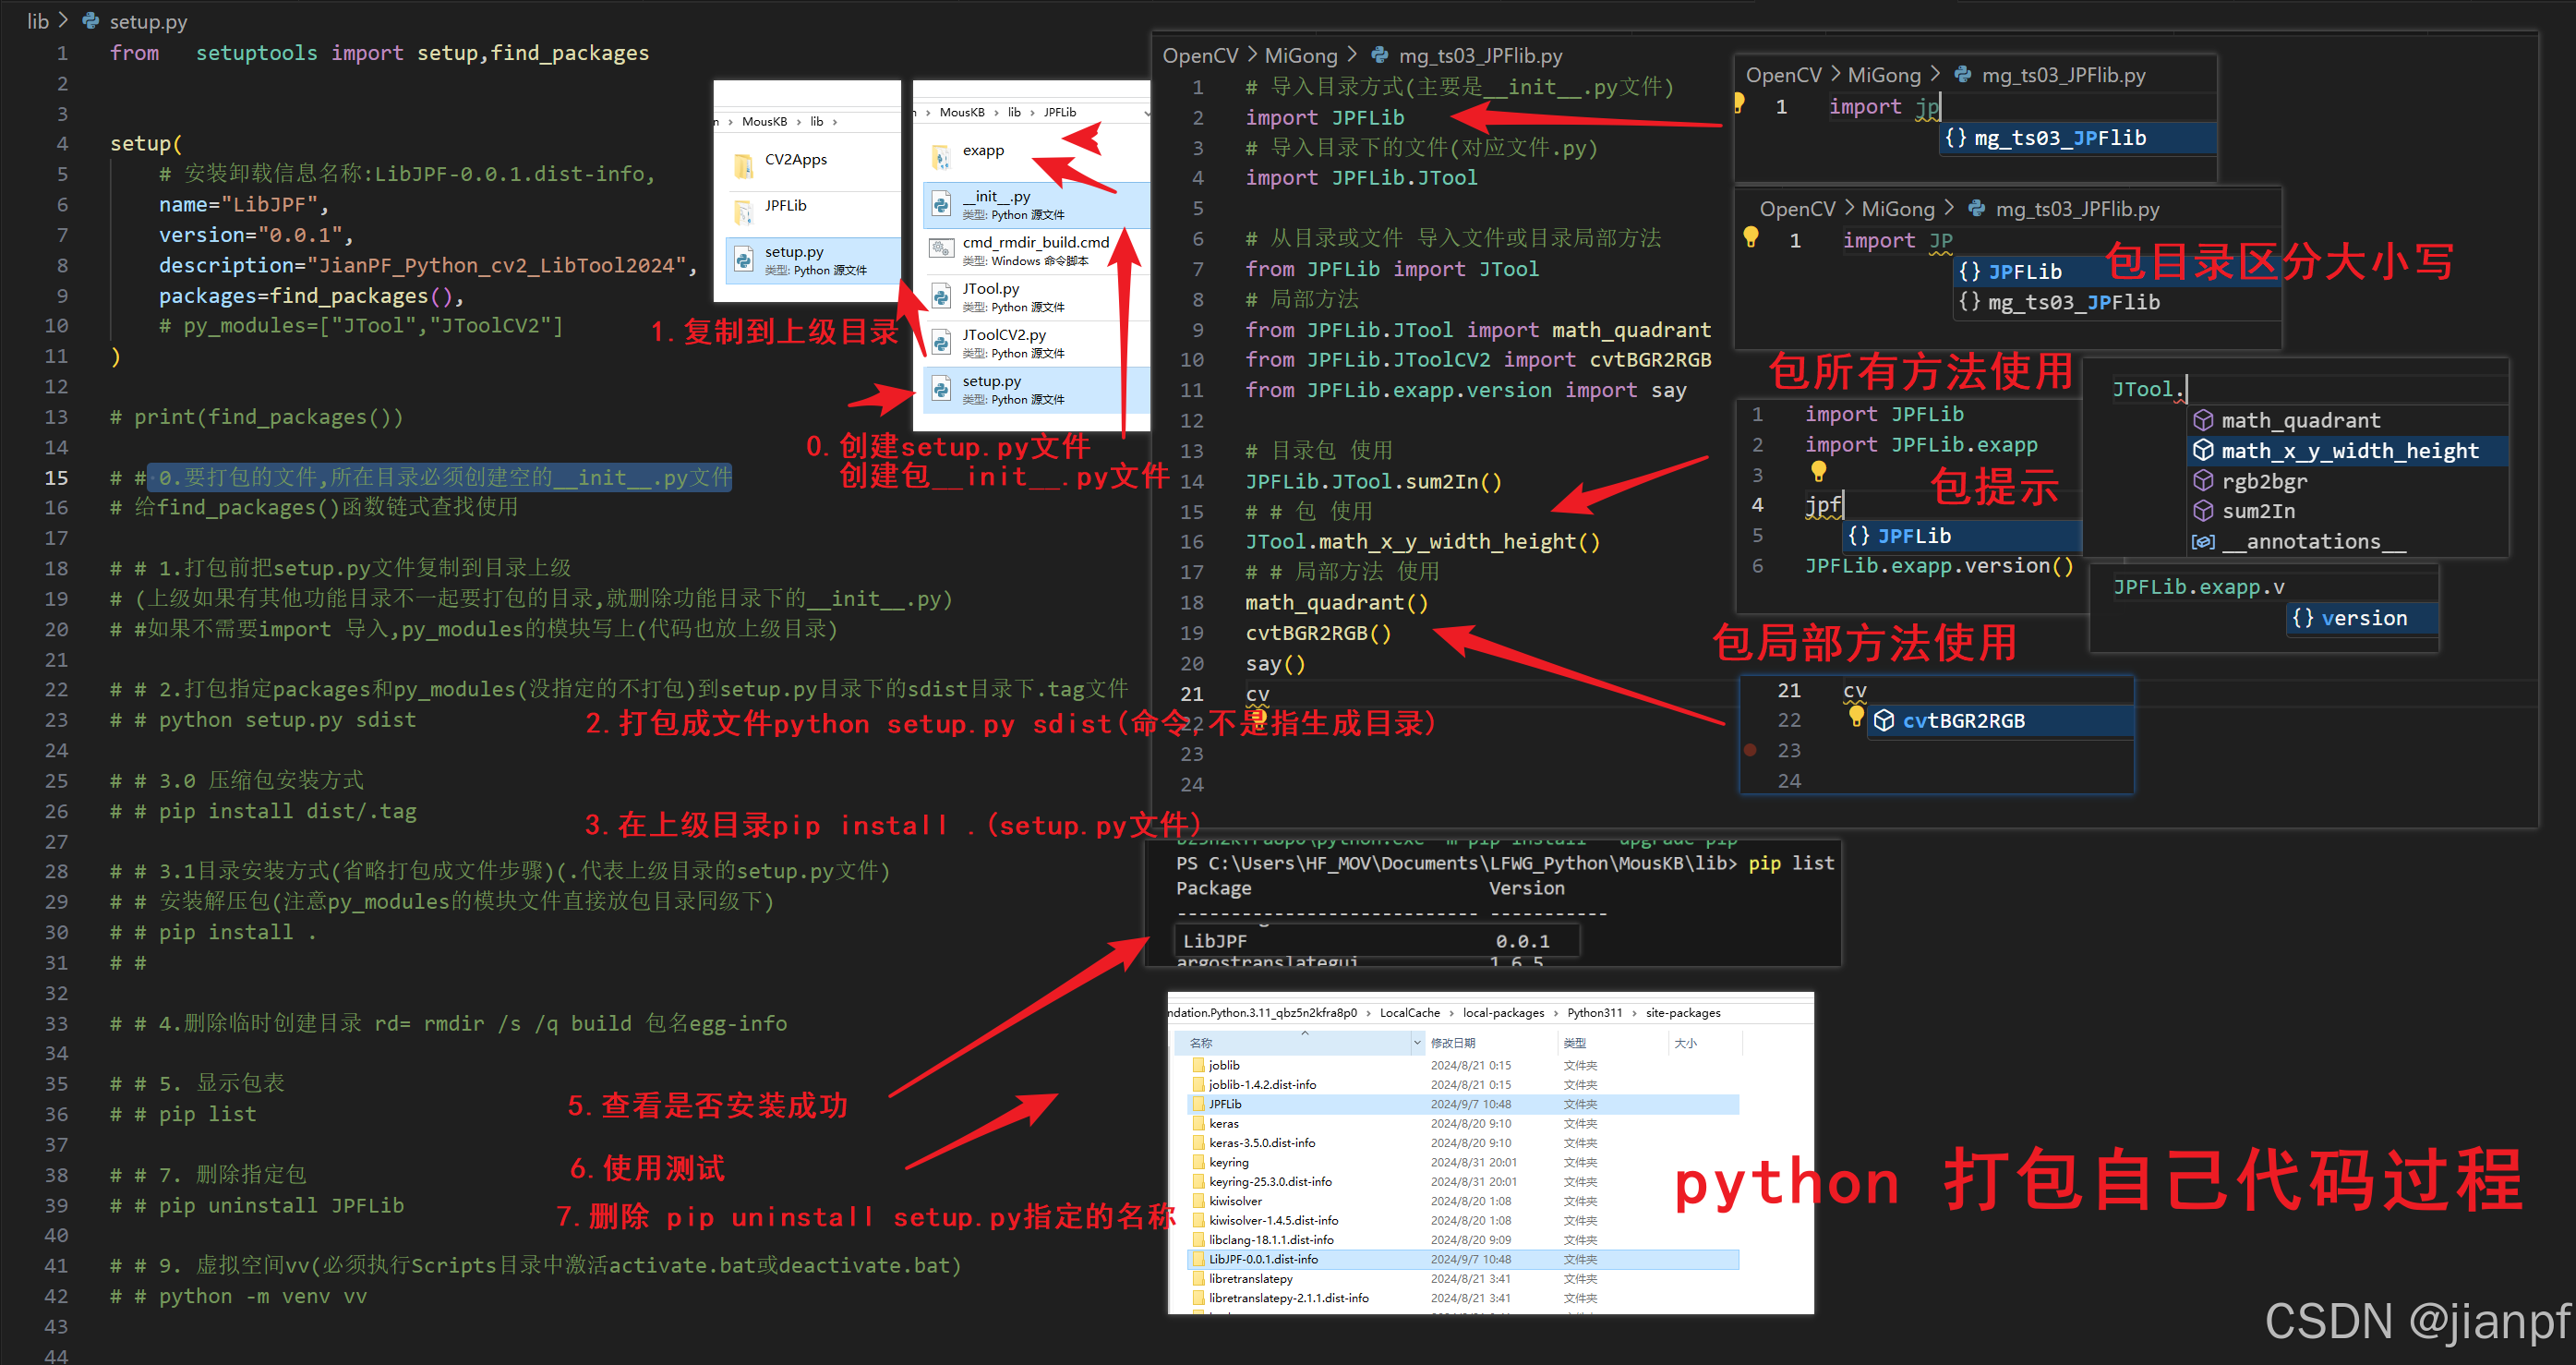
#setup.py
#JianPF2024.9.7
from   setuptools import setup,find_packages


setup(
    # 安装卸载信息名称:LibJPF-0.0.1.dist-info,
    name="LibJPF",
    version="0.0.1",
    description="JianPF_Python_cv2_LibTool2024",
    packages=find_packages(),
    # py_modules=["JTool","JToolCV2"]
)

# print(find_packages())

# # 0.要打包的文件,所在目录必须创建空的__init__.py文件
# 给find_packages()函数链式查找使用

# # 1.打包前把setup.py文件复制到目录上级
# (上级如果有其他功能目录不一起要打包的目录,就删除功能目录下的__init__.py)
# #如果不需要import 导入,py_modules的模块写上(代码也放上级目录)

# # 2.打包指定packages和py_modules(没指定的不打包)到setup.py目录下的sdist目录下.tag文件
# # python setup.py sdist

# # 3.0 压缩包安装方式
# # pip install dist/.tag

# # 3.1目录安装方式(省略打包成文件步骤)(.代表上级目录的setup.py文件)
# # 安装解压包(注意py_modules的模块文件直接放包目录同级下)
# # pip install .
# #

# # 4.删除临时创建目录 rd= rmdir /s /q build 包名egg-info

# # 5. 显示包表
# # pip list

# # 7. 删除指定包
# # pip uninstall JPFLib

# # 9. 虚拟空间vv(必须执行Scripts目录中激活activate.bat或deactivate.bat)
# # python -m venv vv
更新下打包的过程setup.py
//代码块prr快捷键
		,
		"print(321,1)": {
		"prefix": "prr",
		"body": [
			// "print( ${3:${2:$1}},$1)$0",
			"print( ${3:$1$2 },$1)$0",
		],
		"description": "print('.',.)"
		}
好用的代码块prr快捷键
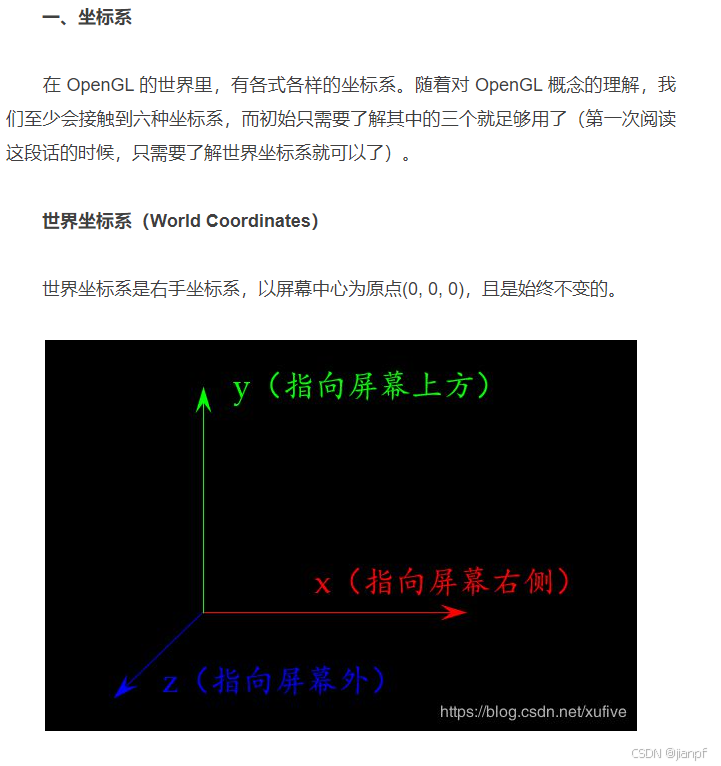
OpenGL的坐标系屏幕中心为(0,0,0)
https://www.163.com/dy/article/EJQJU6RP0511FQO9.html
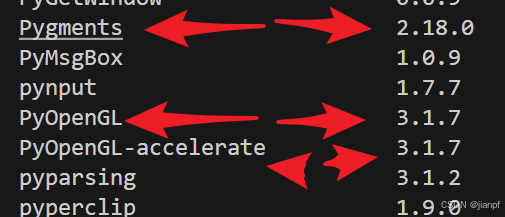
pip install PyOpenGL-3.1.3b2-cp37-cp37m-win_amd64.whl
python 不用用opengl了安装不了,直径C#就好了
开始研究弧度
2024.9.8.8:11阴雨台风
https://inscode.csdn.net/
insCode AI开始使用,次数100次/天,
还是kimi香(https://kimi.moonshot.cn/)
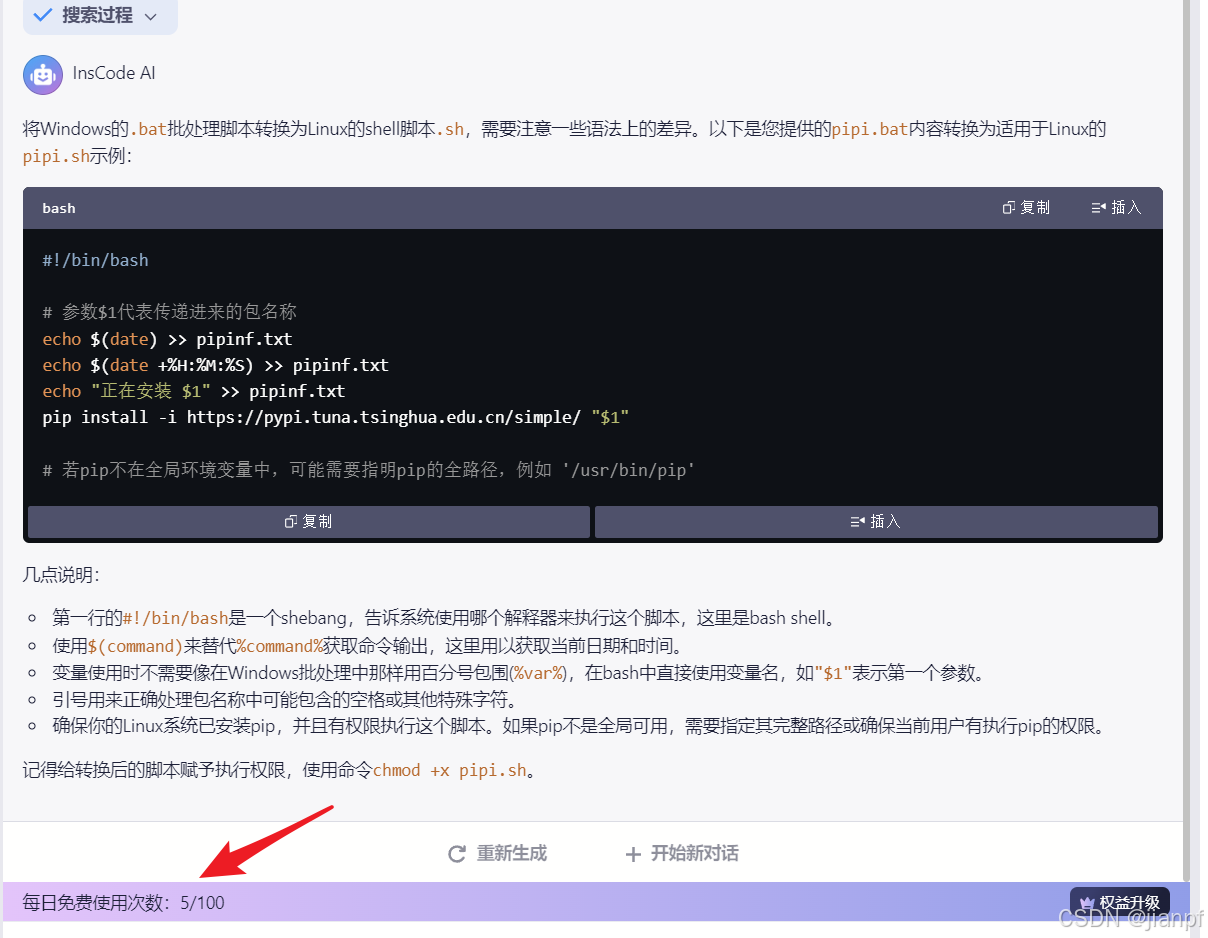
pipi.sh(linux)…
#!/bin/bash

# 参数$1代表传递进来的包名称
echo $(date) >> pipinf.txt
echo $(date +%H:%M:%S) >> pipinf.txt
echo "正在安装 $1" >> pipinf.txt
pip install -i https://pypi.tuna.tsinghua.edu.cn/simple/ "$1"

# 若pip不在全局环境变量中,可能需要指明pip的全路径,例如 '/usr/bin/pip'
# 记得给转换后的脚本赋予执行权限,使用命令chmod +x pipi.sh。
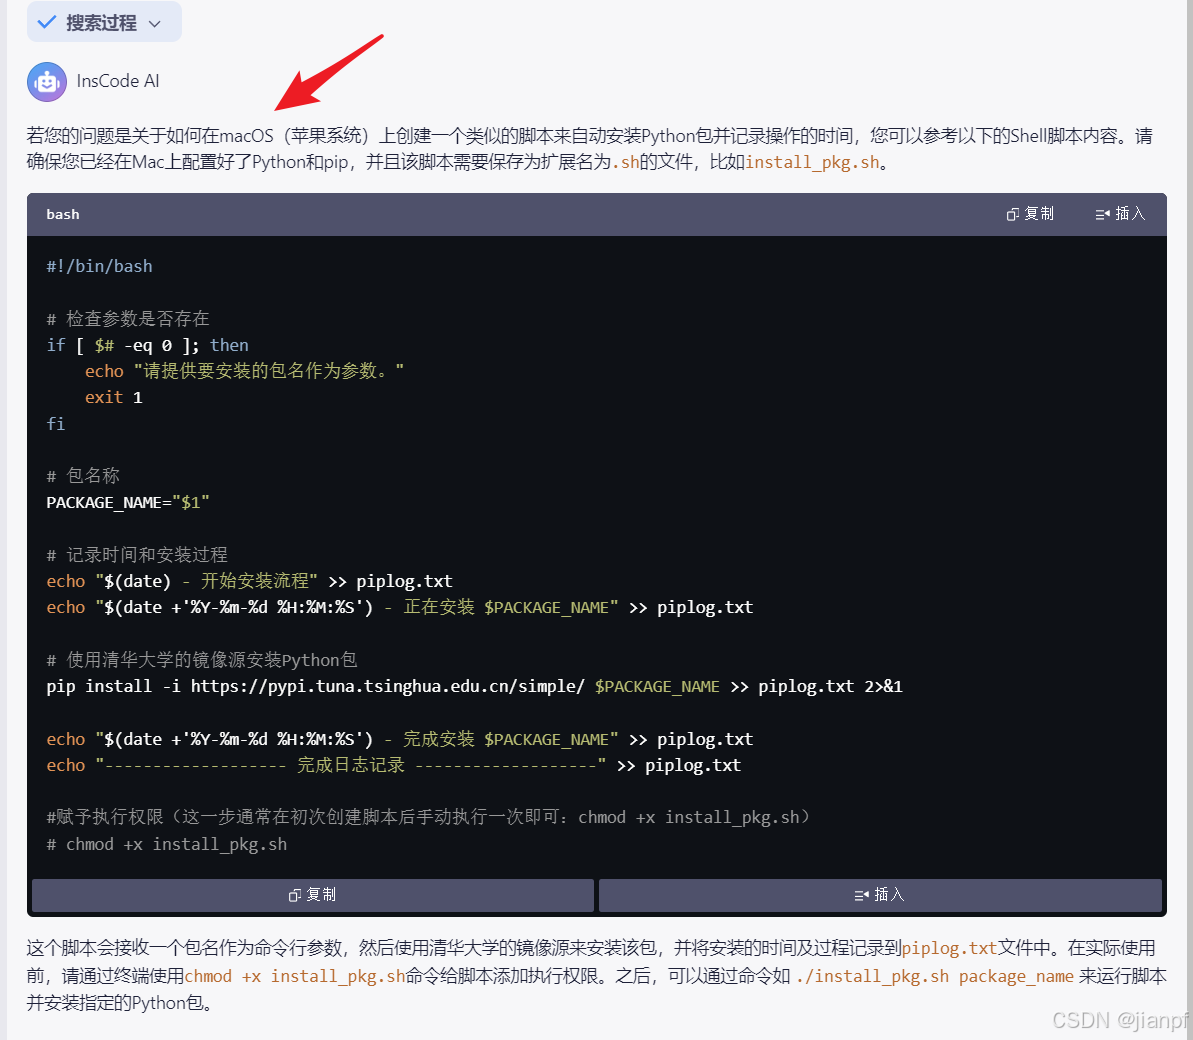
MAC苹果版的未测试(工具工具工具都有优缺点)…
#!/bin/bash

# 检查参数是否存在
if [ $# -eq 0 ]; then
    echo "请提供要安装的包名作为参数。"
    exit 1
fi

# 包名称
PACKAGE_NAME="$1"

# 记录时间和安装过程
echo "$(date) - 开始安装流程" >> piplog.txt
echo "$(date +'%Y-%m-%d %H:%M:%S') - 正在安装 $PACKAGE_NAME" >> piplog.txt

# 使用清华大学的镜像源安装Python包
pip install -i https://pypi.tuna.tsinghua.edu.cn/simple/ $PACKAGE_NAME >> piplog.txt 2>&1

echo "$(date +'%Y-%m-%d %H:%M:%S') - 完成安装 $PACKAGE_NAME" >> piplog.txt
echo "------------------- 完成日志记录 -------------------" >> piplog.txt

#赋予执行权限(这一步通常在初次创建脚本后手动执行一次即可:chmod +x install_pkg.sh)
# chmod +x install_pkg.sh
pipi.cmd(windows)…
@REM pip的镜像源批处理JianPF2024/8/21(追加保存安装时间记录)
@REM % 1 是传递进来的包名称
date /t >>pipinf.txt
time /t >>pipinf.txt
echo ./pipi.cmd %1 >>pipinf.txt
echo "正在安装"  >>pipinf.txt
pip install -i https://pypi.tuna.tsinghua.edu.cn/simple/ %1
使用命令chmod +x pipi.sh给文件可执行权限
linux的.sh批处理需要该权限和bash命令再执行

错误,没有权限sudo
df -h 查看系统容量,居然开个500G云盘(二手价20元,三五一十五,就是免费给我使用几天时间)
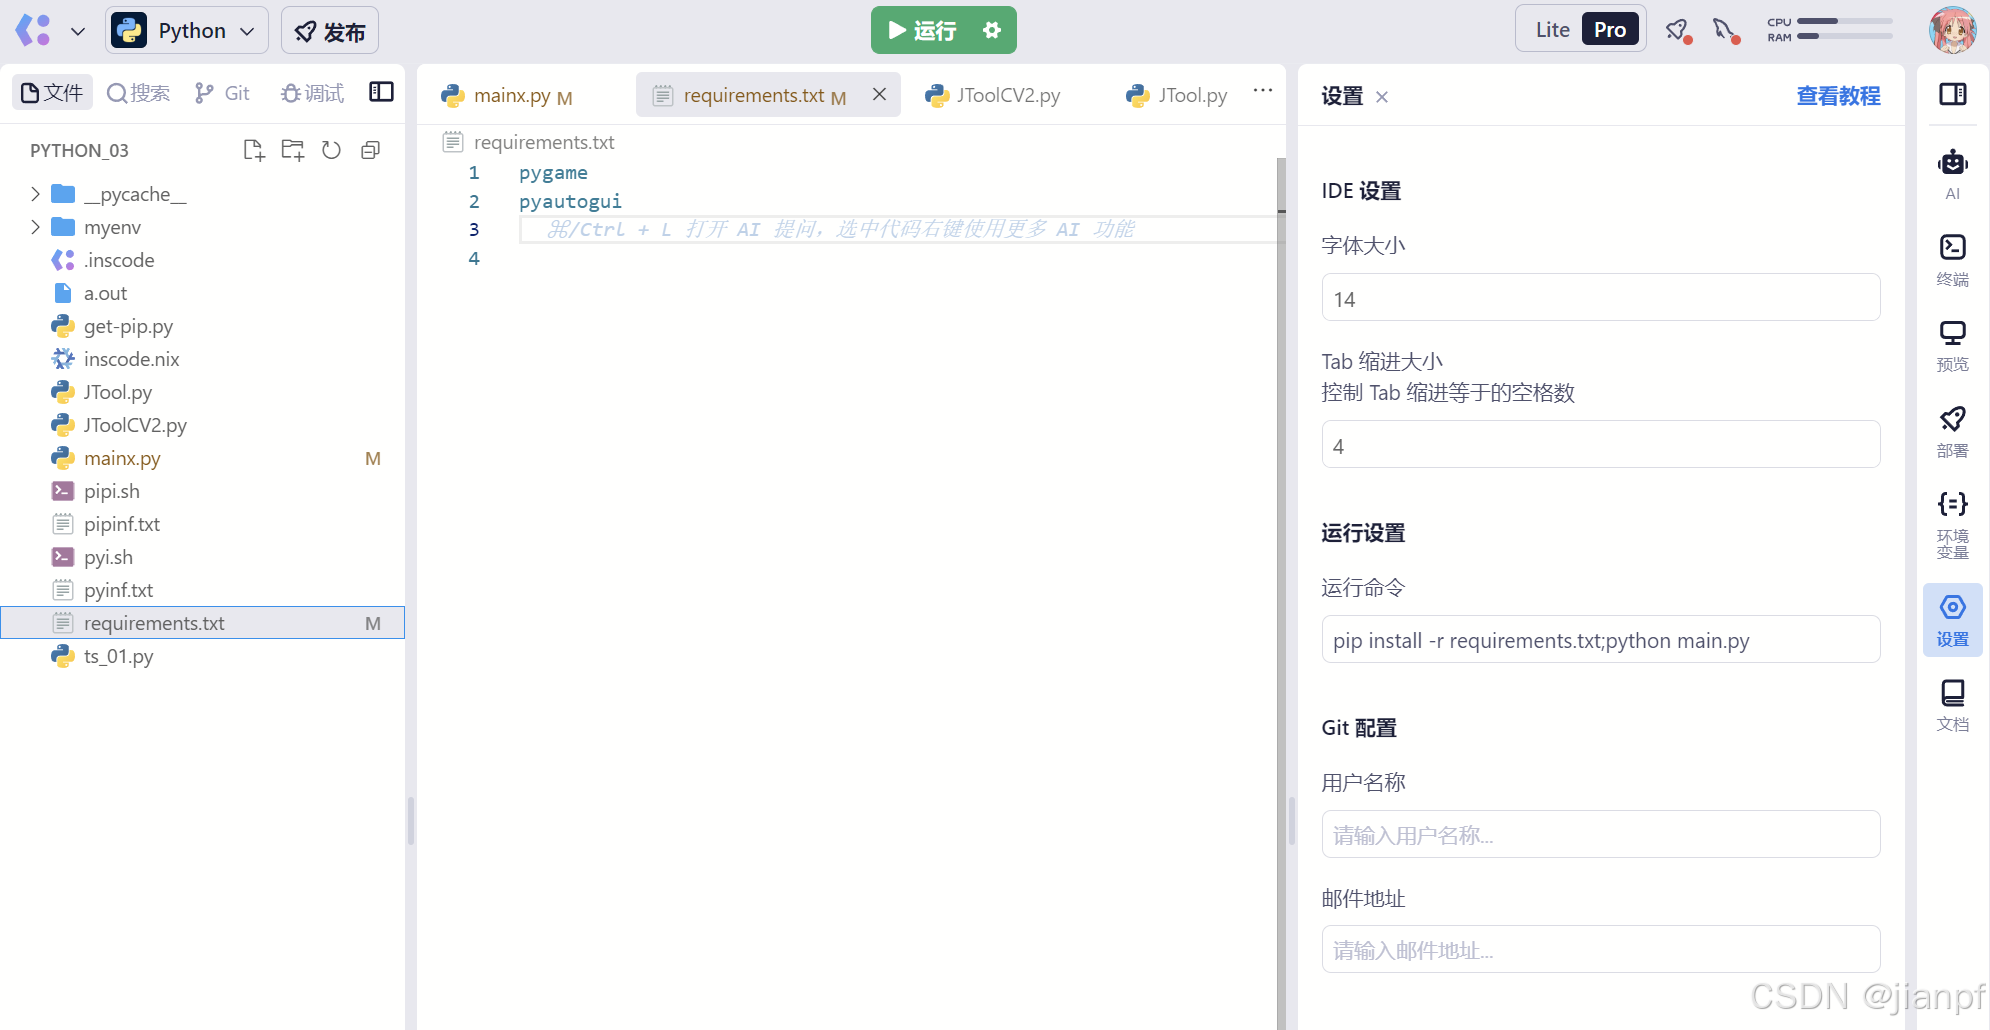
pip install -r requirements.txt;python main.py

GO语言
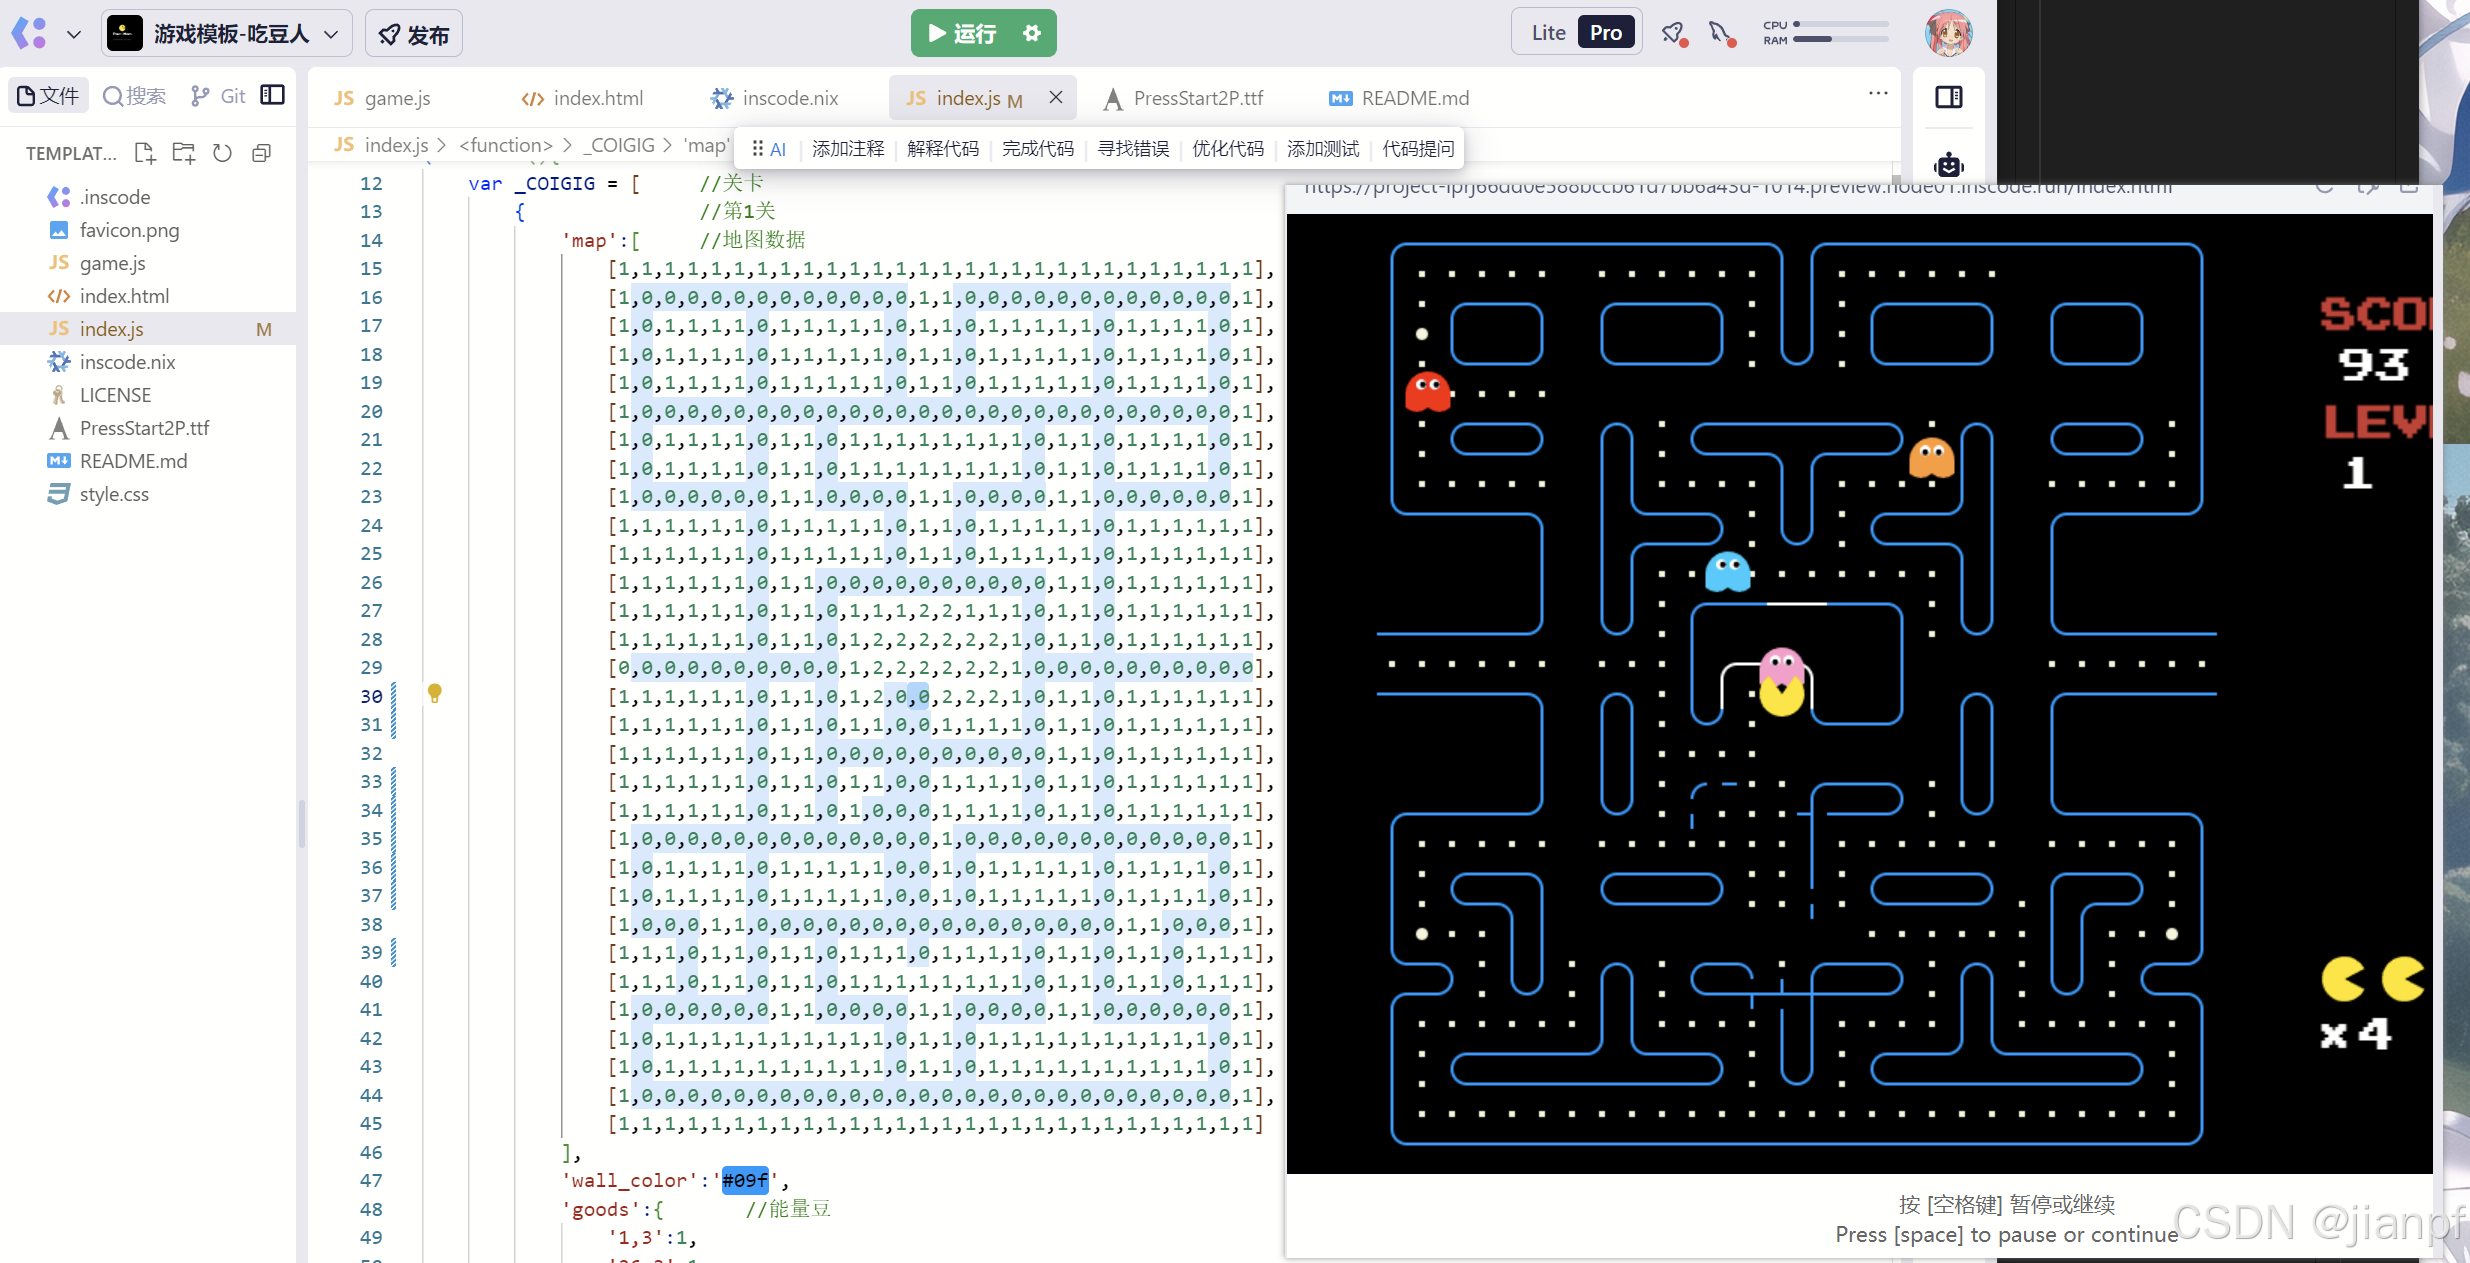
js吃豆豆,修改地图0是通道,1是墙,2是怪物出生地
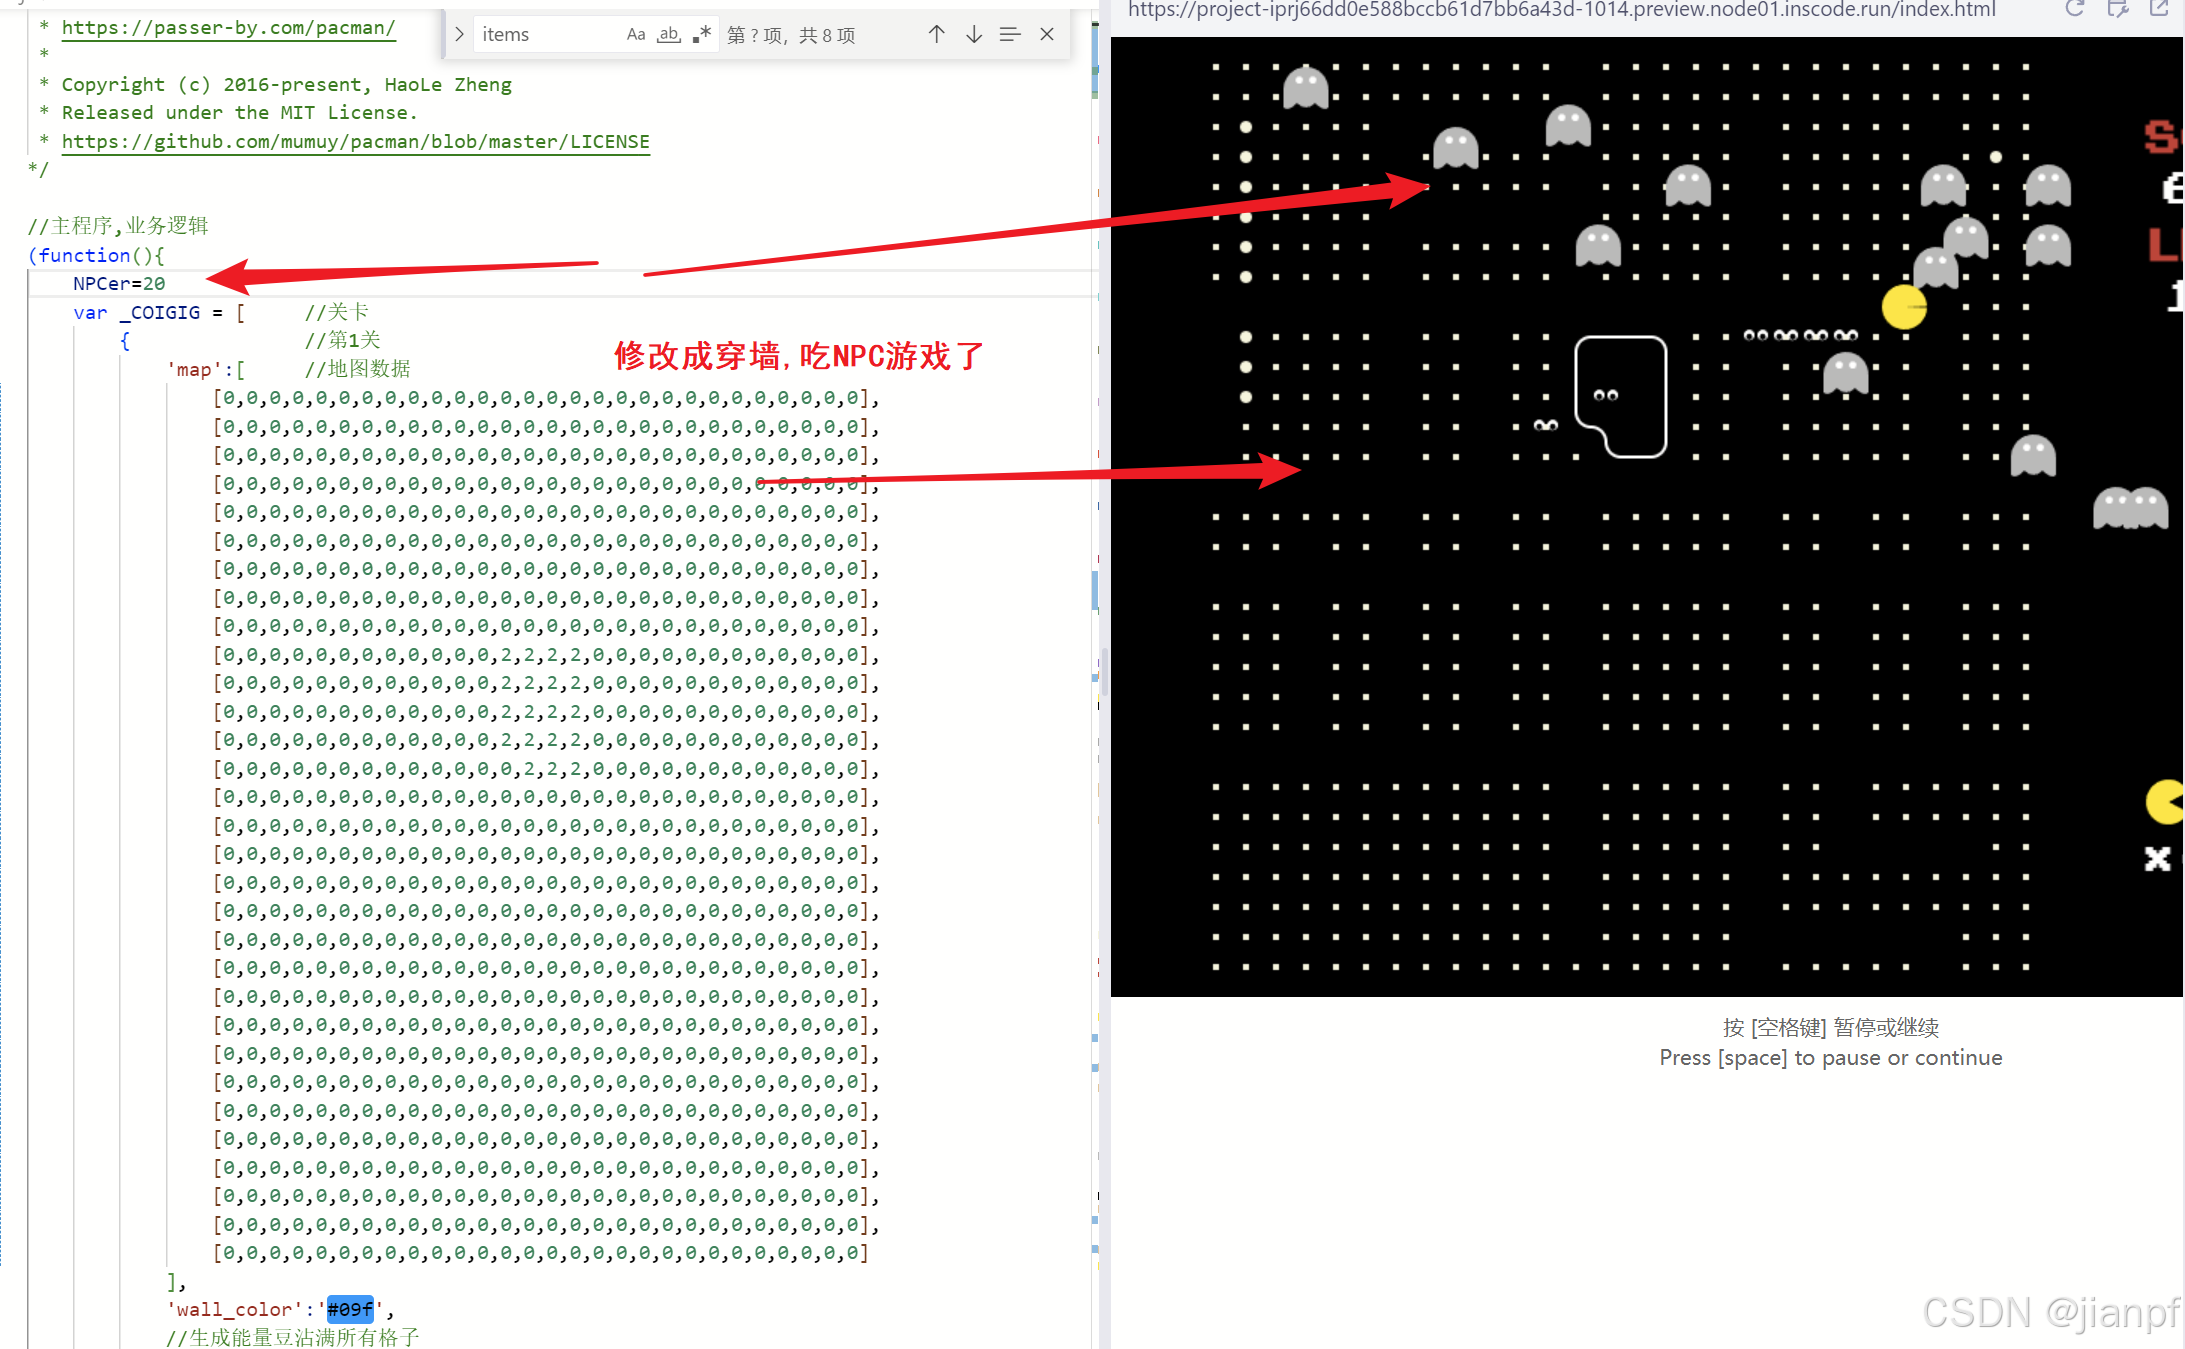
吃豆人改吃NPC游戏

原来只有10次机会啊,再来

6次成功了,聪明如我,还没用AI对打,下次继续

inscode的GPU价格RTX3090=0.97=不常用1元每差别
总结:openAI需要tokey登录

inscode 默认不允许运行cv2库,没有图像界面,只有文字界面
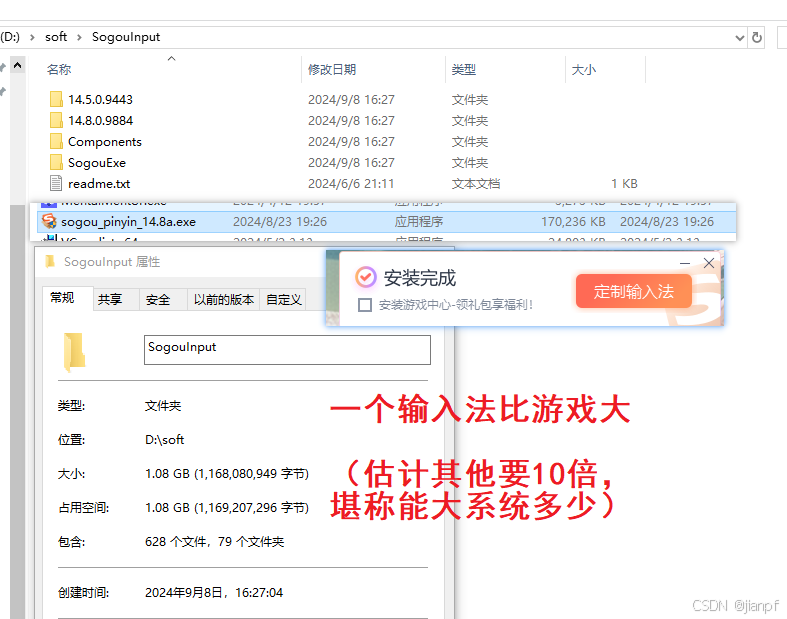
sogou输入法就又1个G,(应该不少临时工,十三代码也多)(还是怪系统环境分支太大)
搜狗语言输入地址D:\soft\SogouInput\Components\MobileInput\1.0.0.2078\SGMobileInput.exe
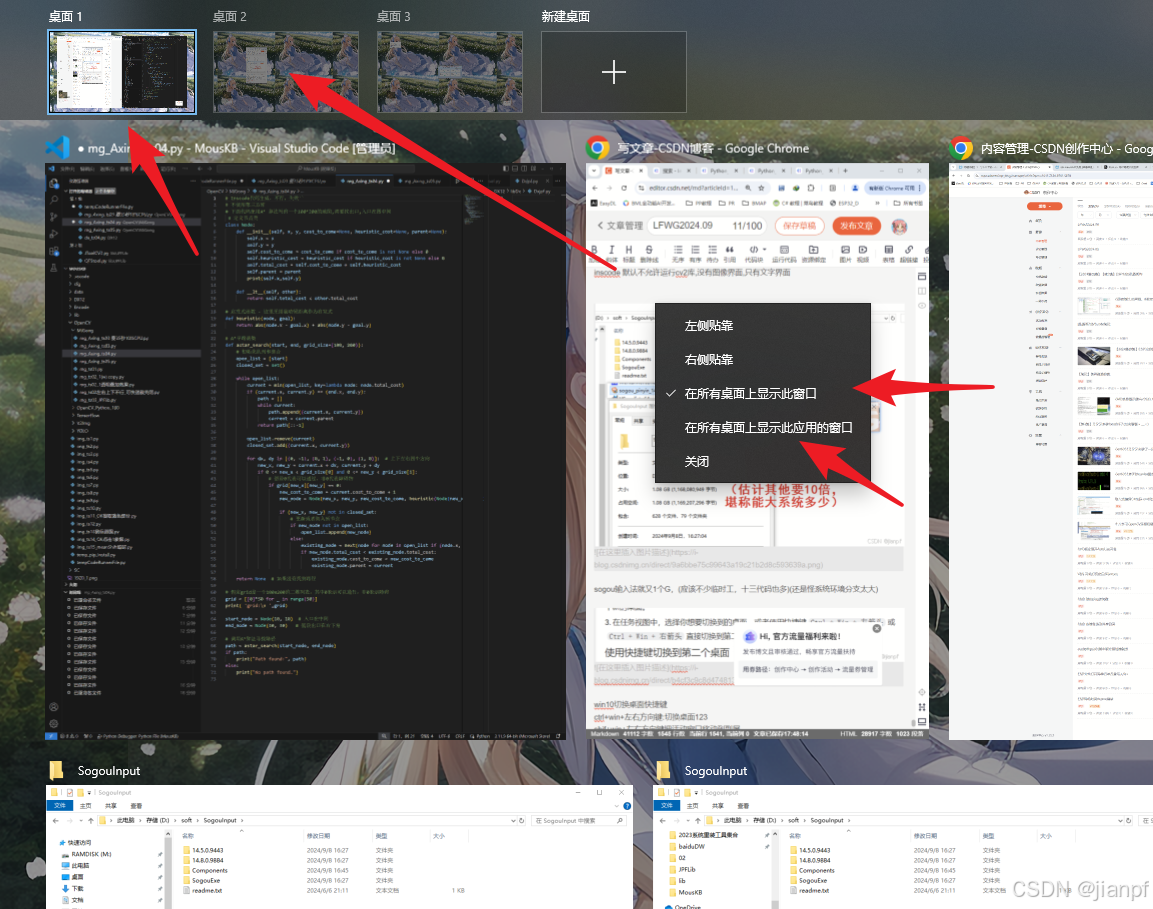

win10切换桌面快捷键
ctrl+win+左右方向键:切换桌面123
shif+win+左右方向键把活动窗口移动到副屏
win+Tab后:右键把窗口或整个应用显示到所有窗口
import cv2
import numpy as np


print("---默认数组,常用方式---")
# 默认数组,常用方式
map_01=(3,4)
print('# len(map_01):\t',len(map_01))
# len(map_01):   2
print('# map_1:\t',map_01)
# map_1:         (3, 4)

print("---():统计count(值)个数,index(值的首次下标索引)---")
# 统计count(值)个数,index(值的首次下标索引)
map_01=(3,4,10,11,12,3,10,13,14,15,3,16,17,18)
print('# len(map_01):\t',len(map_01))
# len(map_01):   14
print('# map_1:\t',map_01)
# map_1:         (3, 4, 10, 11, 12, 3, 10, 13, 14, 15, 3, 16, 17, 18)
print('# map_01.count():\t',map_01.count(3))
# map_01.count():        3
print('# map_01.index(3):\t',map_01.index(3))
# map_01.index(3):        0位置
print('# map_01.index(10):\t',map_01.index(10))
# map_01.index(10):       2
print('# map_01.index(12):\t',map_01.index(12))
# map_01.index(12):       4

print("---[]:统计count(值)个数,index(值的首次下标索引)---")
# 统计count(值)个数,index(值的首次下标索引)
map_01=[3,4,10,11,12,3,10,13,14,15,3,16,17,18]
print('# len(map_01):\t',len(map_01))
# len(map_01):   14
print('# map_1:\t',map_01)
# map_1:         (3, 4, 10, 11, 12, 3, 10, 13, 14, 15, 3, 16, 17, 18)
print('# map_01.count():\t',map_01.count(3))
# map_01.count():        3
print('# map_01.index(3):\t',map_01.index(3))
# map_01.index(3):        0位置
print('# map_01.index(10):\t',map_01.index(10))
# map_01.index(10):       2
print('# map_01.index(12):\t',map_01.index(12))
# map_01.index(12):       4

print("---np.array():简单行数据,原整数,输出[]数组---")
map_01=np.array((3,4))
print('# map_01.shape:\t',map_01.shape)
# map_01.shape:  (2,)
print('# map_1:\t',map_01)
# map_1:         [3 4]

print("---np.array():简单行数据,原浮点数,输出[]数组---")
map_01=np.array((3.1,4))
print('# map_01.shape:\t',map_01.shape)
# map_01.shape:  (2,)
print('# map_1:\t',map_01)
# map_1:         [3.1 4. ]

print("---np.array():行数据,定义成浮点数,3. 4.,输出[]数组---")
map_01=np.array((3,4),dtype=float)
print('# map_01.shape:\t',map_01.shape)
# map_01.shape:    (2,)
print('# map_1:\t',map_01)
# map_1:   [3. 4.]
print("---np.array():行数据,定义成浮点数,3.1 4.,输出[]数组---")
map_01=np.array((3.1,4),dtype=float)
print('# map_01.shape:\t',map_01.shape)
# map_01.shape:    (2,)
print('# map_1:\t',map_01)
# map_1:         [3.1 4. ]
print("---np.array():行数据,定义成浮点数,1. 2. 3. 4.,输出[]数组---")
map_01=np.array((1,2,3,4),dtype=float)
print('# map_01.shape:\t',map_01.shape)
# map_01.shape:  (4,)
print('# map_1:\t',map_01)
# map_1:         [1. 2. 3. 4.]


cv2.imshow('map_01',map_01)

print('---a.resize((2, 3, 1))---')
a = np.array((8, 2, 3, 4), dtype=float)
# resize(行,列,单值)
a.resize((2, 3, 1))
print(a)
#  [
#   [[8.]
#    [2.]
#    [3.]]

#   [[4.]
#    [0.]
#    [0.]]
# ]

print('---a.resize((2, 3, 1))---')
a = np.array((8, 2, 3, 4,5,6,7,9,10,11,12,13,14,15), dtype=float)
# resize(行,列,单值)
a.resize((2, 3, 1))
print(a)
# [[[8.]
#   [2.]
#   [3.]]

#  [[4.]
#   [0.]
#   [0.]]]
# [[[8.]
#   [2.]
#   [3.]]

#  [[4.]
#   [5.]
#   [6.]]]

print('---a.resize((2, 3, 2))---')
a = np.array((8, 2, 3, 4,5,6,7,9,10,11,12,13,14,15), dtype=float)
# resize(行,列,单值)
a.resize((2, 3, 2))
print(a)
# [[[ 8.  2.]
#   [ 3.  4.]
#   [ 5.  6.]]

#  [[ 7.  9.]
#   [10. 11.]
#   [12. 13.]]]

print('---a.resize((2, 3, 4))---')
a = np.array((8, 2, 3, 4,5,6,7,9,10,11,12,13,14,15), dtype=float)
# resize(行,列,单值)
a.resize((2, 3, 4))
print(a)
# [[[ 8.  2.  3.  4.]
#   [ 5.  6.  7.  9.]
#   [10. 11. 12. 13.]]

#  [[14. 15.  0.  0.]
#   [ 0.  0.  0.  0.]
#   [ 0.  0.  0.  0.]]]

# 总结resize(行,列,单值),看到[[是行列
print('---a.resize((5, 3, 4))---')
a = np.array((8, 2, 3, 4,5,6,7,9,10,11,12,13,14,15), dtype=float)
# resize(行,列,单值)
a.resize((5, 3, 4))
print(a)
# [[[ 8.  2.  3.  4.]
#   [ 5.  6.  7.  9.]
#   [10. 11. 12. 13.]]

#  [[14. 15.  0.  0.]
#   [ 0.  0.  0.  0.]
#   [ 0.  0.  0.  0.]]

#  [[ 0.  0.  0.  0.]
#   [ 0.  0.  0.  0.]
#   [ 0.  0.  0.  0.]]

#  [[ 0.  0.  0.  0.]
#   [ 0.  0.  0.  0.]
#   [ 0.  0.  0.  0.]]

#  [[ 0.  0.  0.  0.]
#   [ 0.  0.  0.  0.]
#   [ 0.  0.  0.  0.]]]

# 总结resize(行,列,单值),看到三个[[[是表,看到[[是行列
print('---a.resize((5, 3, 4,2))---')
a = np.array((8, 2, 3, 4,5,6,7,9,10,11,12,13,14,15), dtype=float)
# resize(行,列,单值)
a.resize((5, 3, 4,2))
print(a)
# [[[[ 8.  2.]
#    [ 3.  4.]
#    [ 5.  6.]
#    [ 7.  9.]]

#   [[10. 11.]
#    [12. 13.]
#    [14. 15.]
#    [ 0.  0.]]

#   [[ 0.  0.]
#    [ 0.  0.]
#    [ 0.  0.]
#    [ 0.  0.]]]


#  [[[ 0.  0.]
#    [ 0.  0.]
#    [ 0.  0.]
#    [ 0.  0.]]

#   [[ 0.  0.]
#    [ 0.  0.]
#    [ 0.  0.]
#    [ 0.  0.]]

#   [[ 0.  0.]
#    [ 0.  0.]
#    [ 0.  0.]
#    [ 0.  0.]]]


#  [[[ 0.  0.]
#    [ 0.  0.]
#    [ 0.  0.]
#    [ 0.  0.]]

#   [[ 0.  0.]
#    [ 0.  0.]
#    [ 0.  0.]
#    [ 0.  0.]]

#   [[ 0.  0.]
#    [ 0.  0.]
#    [ 0.  0.]
#    [ 0.  0.]]]


#  [[[ 0.  0.]
#    [ 0.  0.]
#    [ 0.  0.]
#    [ 0.  0.]]

#   [[ 0.  0.]
#    [ 0.  0.]
#    [ 0.  0.]
#    [ 0.  0.]]

#   [[ 0.  0.]
#    [ 0.  0.]
#    [ 0.  0.]
#    [ 0.  0.]]]


#  [[[ 0.  0.]
#    [ 0.  0.]
#    [ 0.  0.]
#    [ 0.  0.]]

#   [[ 0.  0.]
#    [ 0.  0.]
#    [ 0.  0.]
#    [ 0.  0.]]

#   [[ 0.  0.]
#    [ 0.  0.]
#    [ 0.  0.]
#    [ 0.  0.]]]]

# 总结resize(行,列,单值),看到三个[[[是表,看到[[是行列
print('---a.resize((3,5, 3, 4,2))---')
a = np.array((8, 2, 3, 4,5,6,7,9,10,11,12,13,14,15), dtype=float)
# resize(行,列,单值)
a.resize((3,5, 3, 4,2))
print(a)


print('---np.array(10)坐标阵列值---')
# 坐标阵列值(有2种场景:颜色和坐标)
# np.array(0)单值就是=对象级的单值,有shape等resize方法
# 必须传入数组[,] 或
# 二维数组[[,]]或[[,,,]] 或
# 图=通道=表[[[,]]]或[[[,,,]]] 或
# 表组序列[[[[,]]]]或序[[[[,,,]]]]
# 总结resize:把原序列看成一行,在重置成需要的序列
# 坐标阵列值重置坐标阵列 #重置阵列,值少补0
# resize(列,单/双值)
# resize(行,列,单/双值)
# resize(表,行,列,单/双值)
# resize(序列,表,行,列,单/双值)
b=np.array(10)
print( '#b.shape:\t' ,b.shape)
# b.shape:         ()
print( '#b:\t' ,b)
#b.shape:        (2, 2)
b.resize(3,2)
print( '#b.shape:\t' ,b.shape)
#b.shape:        (3, 2)
print( '#b:\t' ,b)
#b:
#  [[10  0]
#   [ 0  0]
#   [ 0  0]]
print('---np.resize([[[BGR00],[BGR01]],[[BGR10],[BGR11]]]) 颜色点行列阵列值---')
# 2行
c=np.array([[[10,11,101],[12,13,102]],[[14,15,201],[16,17,202]]])
print( '#c.shape:\t' ,c.shape)
#c.shape:        (2, 2, 3)
print( '#c:\t' ,c)
#c:
# [[[ 10  11 101]
#   [ 12  13 102]]

#  [[ 14  15 201]
#   [ 16  17 202]]]
print( '--- ')
c=np.array([[[10,11,101],[12,13,102]],[[14,15,201],[16,17,202]]])
c.resize(1)
print( '#c.shape:\t' ,c.shape)
#c.shape:        (1,)
print( '#c:\t' ,c)
#c:      [10]
print( '--- ')
c=np.array([[[10,11,101],[12,13,102]],[[14,15,201],[16,17,202]]])
c.resize(2)
print( '#c.shape:\t' ,c.shape)
#c.shape:        (2,)
print( '#c:\t' ,c)
#c:      [10 11]
print( '--- ')
c=np.array([[[10,11,101],[12,13,102]],[[14,15,201],[16,17,202]]])
c.resize(5)
print( '#c.shape:\t' ,c.shape)
#c.shape:        (5,)
print( '#c:\t' ,c)
#c:      [ 10  11 101  12  13]
print( '--- ')
c=np.array([[[10,11,101],[12,13,102]],[[14,15,201],[16,17,202]]])
c.resize(5,2)
print( '#c.shape:\t' ,c.shape)
#c.shape:        (5, 2)
print( '#c:\t' ,c)
#c:
# [[ 10  11]
#  [101  12]
#  [ 13 102]
#  [ 14  15]
#  [201  16]]
print( '--- ')
c=np.array([[[10,11,101],[12,13,102]],[[14,15,201],[16,17,202]]])
c.resize(12,2)
print( '#c.shape:\t' ,c.shape)
#c.shape:        (5, 2)
print( '#c:\t' ,c)
#c:
# [[ 10  11]
#  [101  12]
#  [ 13 102]
#  [ 14  15]
#  [201  16]
#  [ 17 202]
#  [  0   0]
#  [  0   0]
#  [  0   0]
#  [  0   0]
#  [  0   0]
#  [  0   0]]


print( '--- ')
c=np.array([[[10,11,101],[12,13,102]],[[14,15,201],[16,17,202]]])
c.resize(3,12)
print( '#c.shape:\t' ,c.shape)
#c.shape:        (5, 2)
print( '#c:\t' ,c)
#c:
# [[ 10  11 101  12  13 102  14  15 201  16  17 202]
#  [  0   0   0   0   0   0   0   0   0   0   0   0]
#  [  0   0   0   0   0   0   0   0   0   0   0   0]]

# np,允许直接加操作
c=c+10
print( '#c:\t' ,c)
#c:
# [[ 20  21 111  22  23 112  24  25 211  26  27 212]
#  [ 10  10  10  10  10  10  10  10  10  10  10  10]
#  [ 10  10  10  10  10  10  10  10  10  10  10  10]]
c=c-20
print( '#c:\t' ,c)
#c:
# [[  0   1  91   2   3  92   4   5 191   6   7 192]
#  [-10 -10 -10 -10 -10 -10 -10 -10 -10 -10 -10 -10]
#  [-10 -10 -10 -10 -10 -10 -10 -10 -10 -10 -10 -10]]
#  [ 10  10  10  10  10  10  10  10  10  10  10  10]]
c=c*-1
print( '#c:\t' ,c)
#c:
# [[   0   -1  -91   -2   -3  -92   -4   -5 -191   -6   -7 -192]
#  [  10   10   10   10   10   10   10   10   10   10   10   10]
#  [  10   10   10   10   10   10   10   10   10   10   10   10]]
c=c/20
print( '#c:\t' ,c)
#c:
# [[ 0.   -0.05 -4.55 -0.1  -0.15 -4.6  -0.2  -0.25 -9.55 -0.3  -0.35 -9.6 ]
#  [ 0.5   0.5   0.5   0.5   0.5   0.5   0.5   0.5   0.5   0.5   0.5   0.5 ]
#  [ 0.5   0.5   0.5   0.5   0.5   0.5   0.5   0.5   0.5   0.5   0.5   0.5 ]]

c=np.array([[[10,11,101],[12,13,102]],[[14,15,201],[16,17,202]]])
d=np.array([[[10,11,101],[12,13,102]],[[14,15,201],[16,17,202]]])
c.resize(3,12)
# c=c+d
c=c+d[0][0][1]
print( '#c:\t' ,c)
#c:
# [[ 21  22 112  23  24 113  25  26 212  27  28 213]
#  [ 11  11  11  11  11  11  11  11  11  11  11  11]
#  [ 11  11  11  11  11  11  11  11  11  11  11  11]]


c=np.array([[[10,11,101],[12,13,102]],[[14,15,201],[16,17,202]]])
d=np.array([[[10,11,101],[12,13,102]],[[14,15,201],[16,17,202]]])
# 同结构np+np是允许的
c=c+d
print( '#c:\t' ,c)
#c:
# [[[ 20  22 202]
#   [ 24  26 204]]
#  [[ 28  30 402]
#   [ 32  34 404]]]

c=np.array([[[10,11,101],[12,13,102]],[[14,15,201],[16,17,202]]])
d=np.array([10,11,101,12,13,102,14,15,201,16,17,202])
# 不同结构np+np直接报错
c=c+d
print( '#c:\t' ,c)
# ValueError: operands could not be broadcast together with shapes (2,2,3) (12,)


[inscode(embedurl-https://inscode.csdn.net/@jianpf/Python_04/embed)(id-iprj66dd1a898bccb61d7bb6a49a)]


# cv2.waitKey()
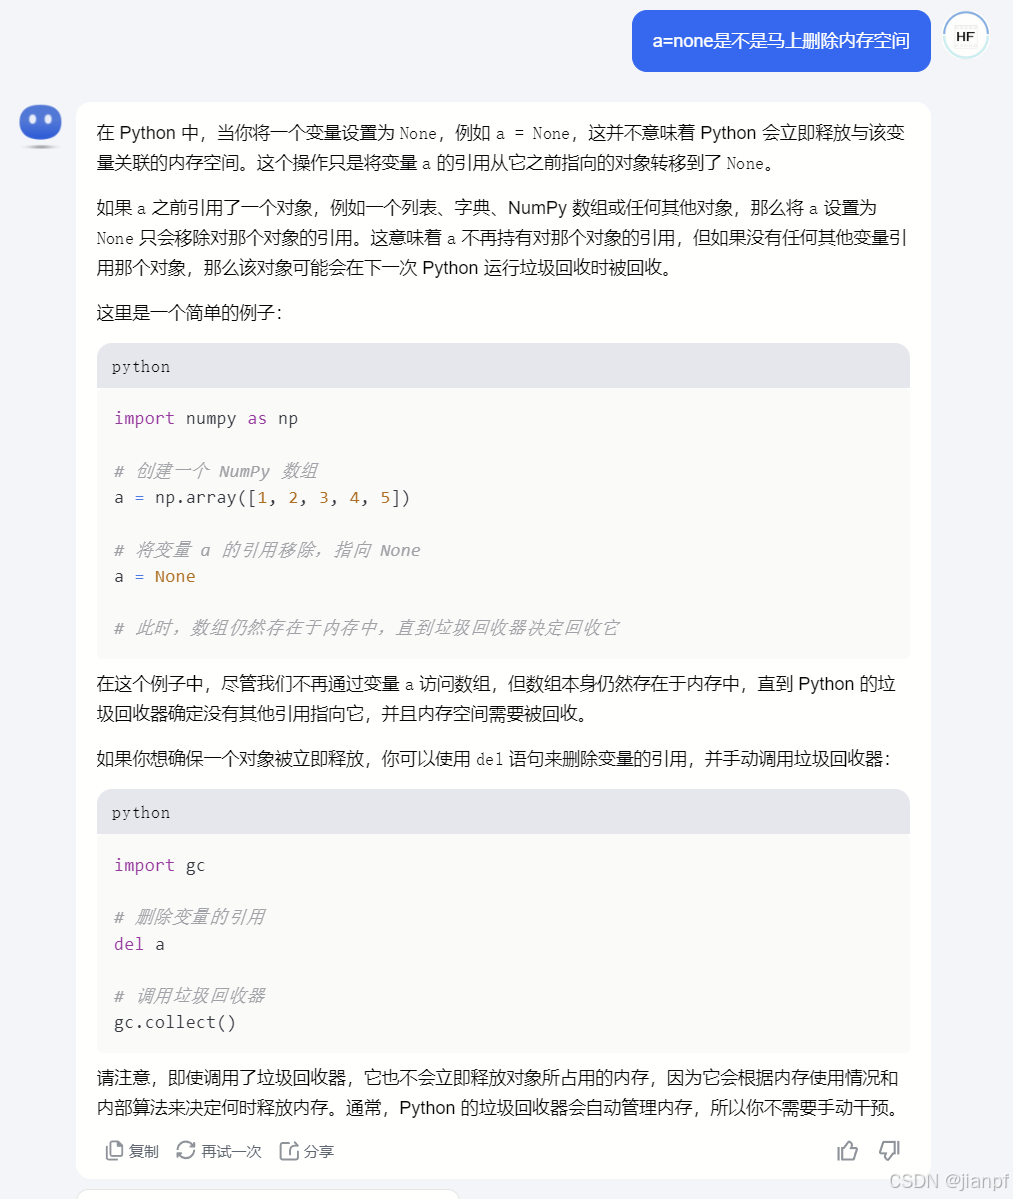
import gc
#删除变量的引用
del a
#调用垃圾回收器
gc.collect()
请注意,即使调用了垃圾回收器,它也不会立即释放对象所占用的内存
Python 的垃圾回收器会自动管理内存,所以你不需要手动干预
就是说,不需要管就对了(硬件跟不上再处理)
2024.9.10.17:15
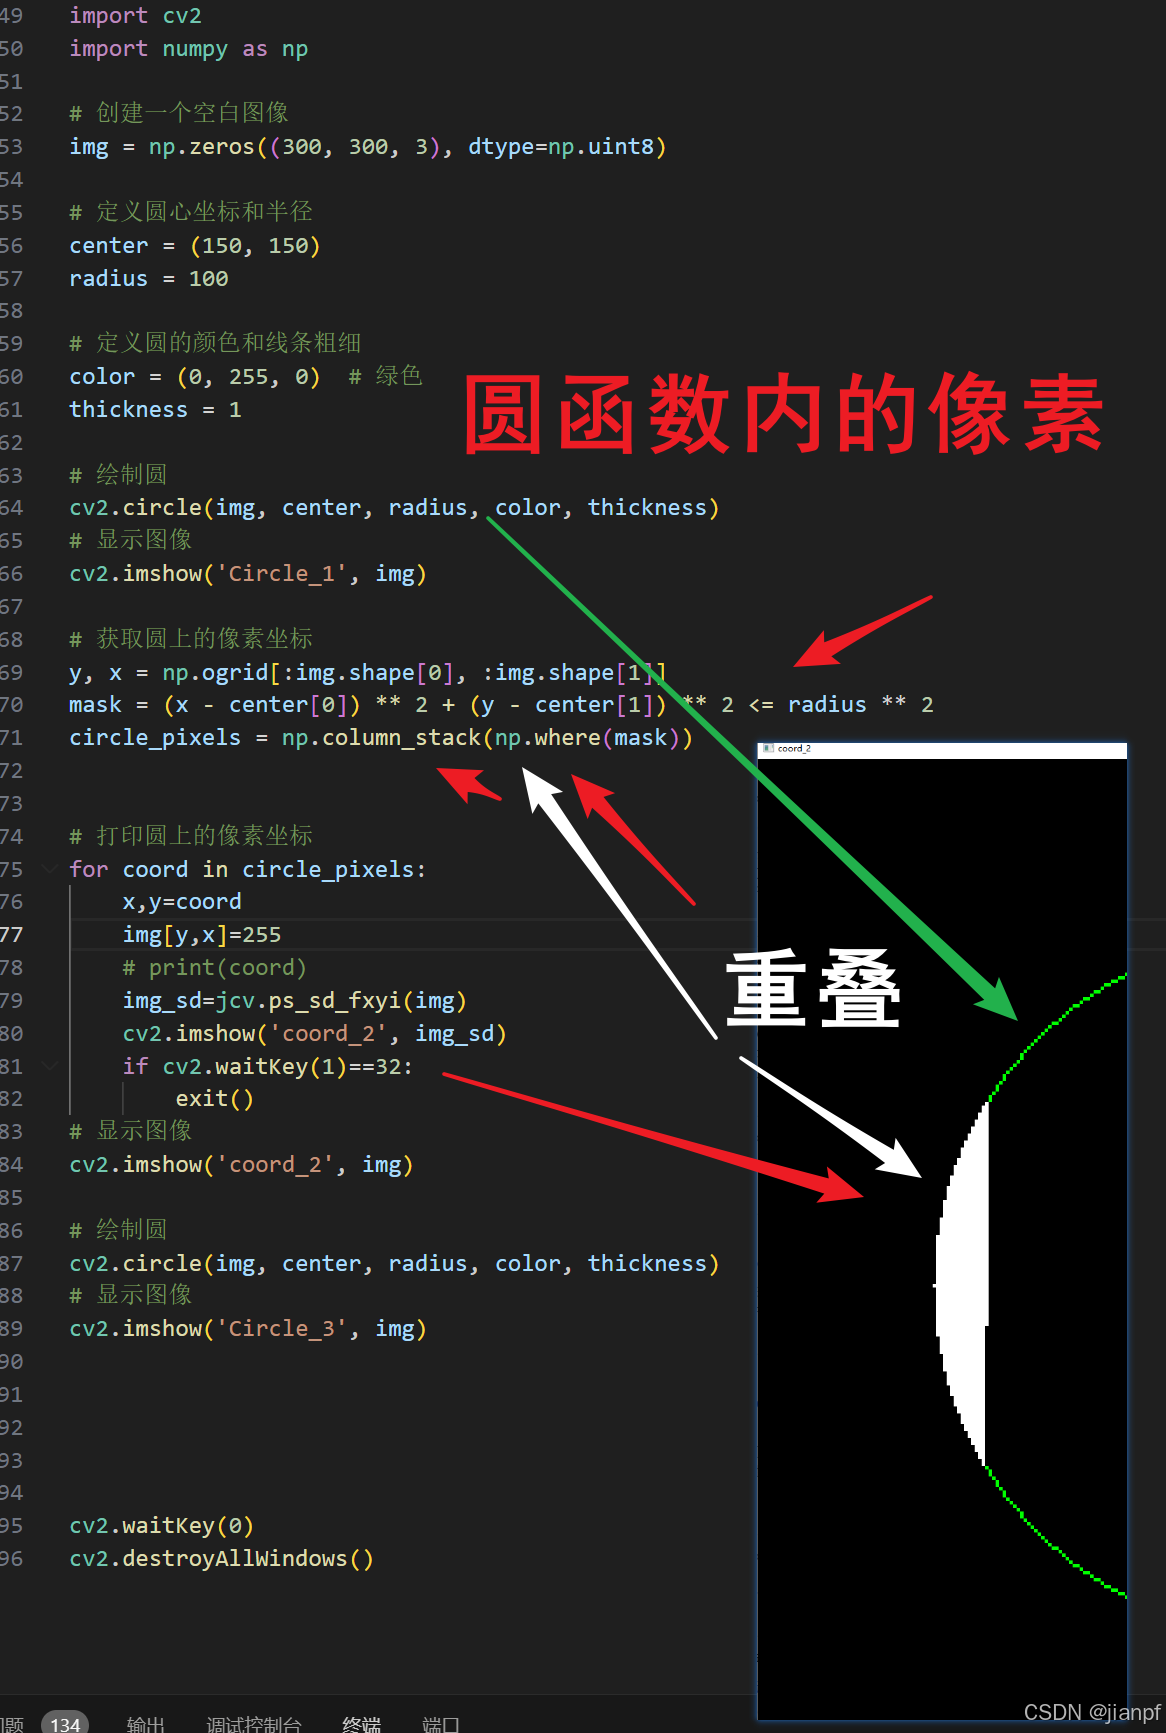
研究了2天,np.ogrid(5,8)
mask = (x - center[0]) ** 2 + (y - center[1]) ** 2 <= radius ** 2
放弃研究,改天一看就懂的.

2024.9.10.19:45晴32度,晚上了
原来是圆的一般方程
(x-c)* * 2是(x-c)的平方
角度angle
弧度radian
radius
# 生成开放网格0开始
arr1=np.ogrid[:5, :8]
# 分开数组成x,y
x,y=np.ogrid[:5,:8]
print( '#arr1: ',arr1)
#arr1:
# [array([[0],[1],[2],[3],[4]]),
#  array([[0, 1, 2, 3, 4, 5, 6, 7]])]
print( '#x: ',x)
#x:  [[0][1][2][3][4]]
print( '#y: ',y)
#y:  [[0 1 2 3 4 5 6 7]]
# 数组每下表值加(不影响维度)
print('# x+10:', x+10)
# x+10: [[10][11][12][13][14]]
# 数组每下表值加(不影响维度)
print('# y+10:', y+10)
# y+10: [[10 11 12 13 14 15 16 17]]
# 5维度+12维度
xy=x+y
print('# xy:',xy)
# xy:
# [[ 0  1  2  3  4  5  6  7]
#  [ 1  2  3  4  5  6  7  8]
#  [ 2  3  4  5  6  7  8  9]
#  [ 3  4  5  6  7  8  9 10]
#  [ 4  5  6  7  8  9 10 11]]
# 维度判断mask
mask_if5=xy>5
print('# mask_if5:',mask_if5)
# mask_if5:
# [[False False False False False False  True  True]
#  [False False False False False  True  True  True]
#  [False False False False  True  True  True  True]
#  [False False False  True  True  True  True  True]
#  [False False  True  True  True  True  True  True]]


# # 生成开放网格,2,3开始
# arr1=np.ogrid[2:5, 3:8]
# # 分开数组成x,y
# x,y=np.ogrid[2:5, 3:8]
# print( '#arr1: ',arr1)
# #arr1:
# # [array([[2],
# #         [3],
# #         [4]]),
# #  array([[3, 4, 5, 6, 7]])]
# print( '#x: ',x)
# #x:
# # [[2]
# #  [3]
# #  [4]]
# print( '#y: ',y)
# #y:  [[3 4 5 6 7]]
# print('# x+10:', x+10)
# # x+10:
# # [[12]
# #  [13]
# #  [14]]
# print('# y+10:', y+10)
# # y+10: [[13 14 15 16 17]]
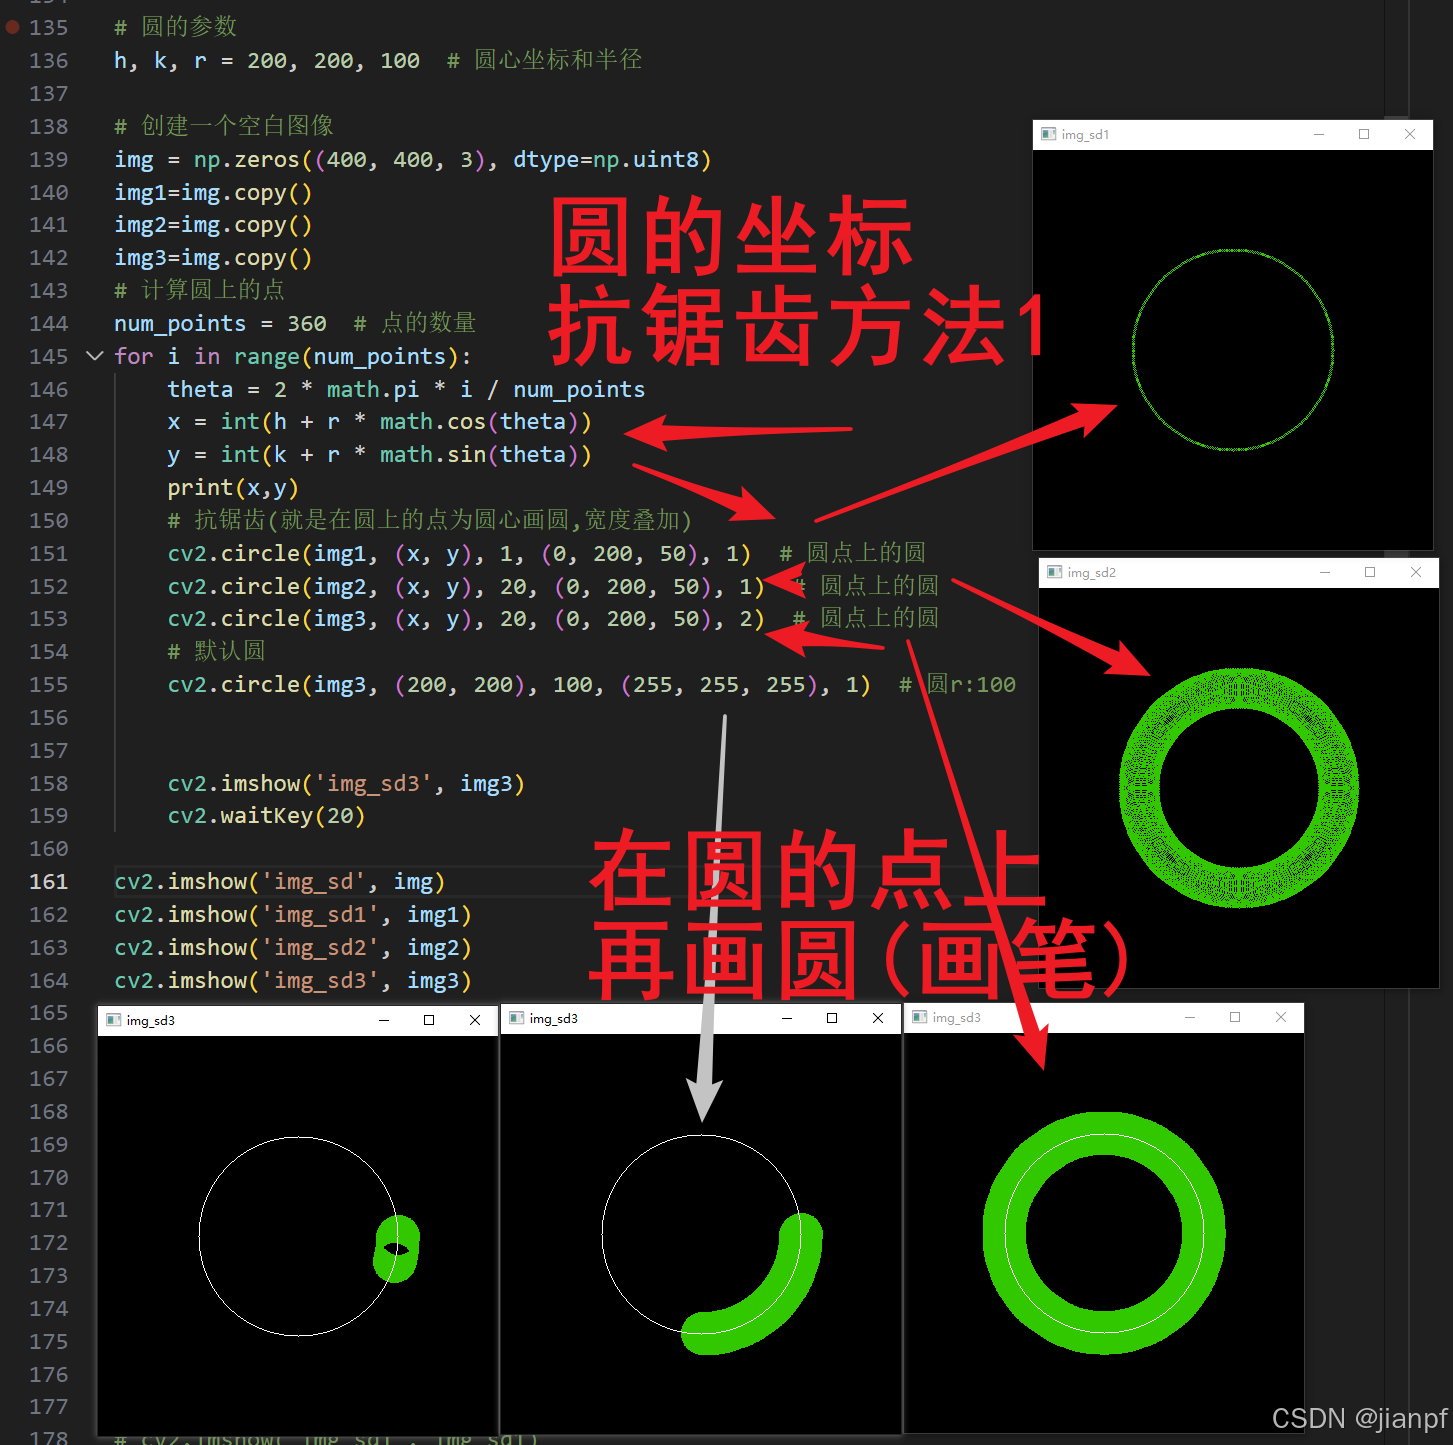
# 圆的参数
h, k, r = 200, 200, 100  # 圆心坐标和半径

# 创建一个空白图像
img = np.zeros((400, 400, 3), dtype=np.uint8)
img1=img.copy()
img2=img.copy()
img3=img.copy()
# 计算圆上的点
num_points = 360  # 点的数量
for i in range(num_points):
    theta = 2 * math.pi * i / num_points
    x = int(h + r * math.cos(theta))
    y = int(k + r * math.sin(theta))
    print(x,y)
    # 抗锯齿(就是在圆上的点为圆心画圆,宽度叠加)
    cv2.circle(img1, (x, y), 1, (0, 200, 50), 1)  # 圆点上的圆
    cv2.circle(img2, (x, y), 20, (0, 200, 50), 1)  # 圆点上的圆
    cv2.circle(img3, (x, y), 20, (0, 200, 50), 2)  # 圆点上的圆
    # 默认圆
    cv2.circle(img3, (200, 200), 100, (255, 255, 255), 1)  # 圆r:100


    cv2.imshow('img_sd3', img3)
    cv2.waitKey(20)

cv2.imshow('img_sd', img)
cv2.imshow('img_sd1', img1)
cv2.imshow('img_sd2', img2)
cv2.imshow('img_sd3', img3)
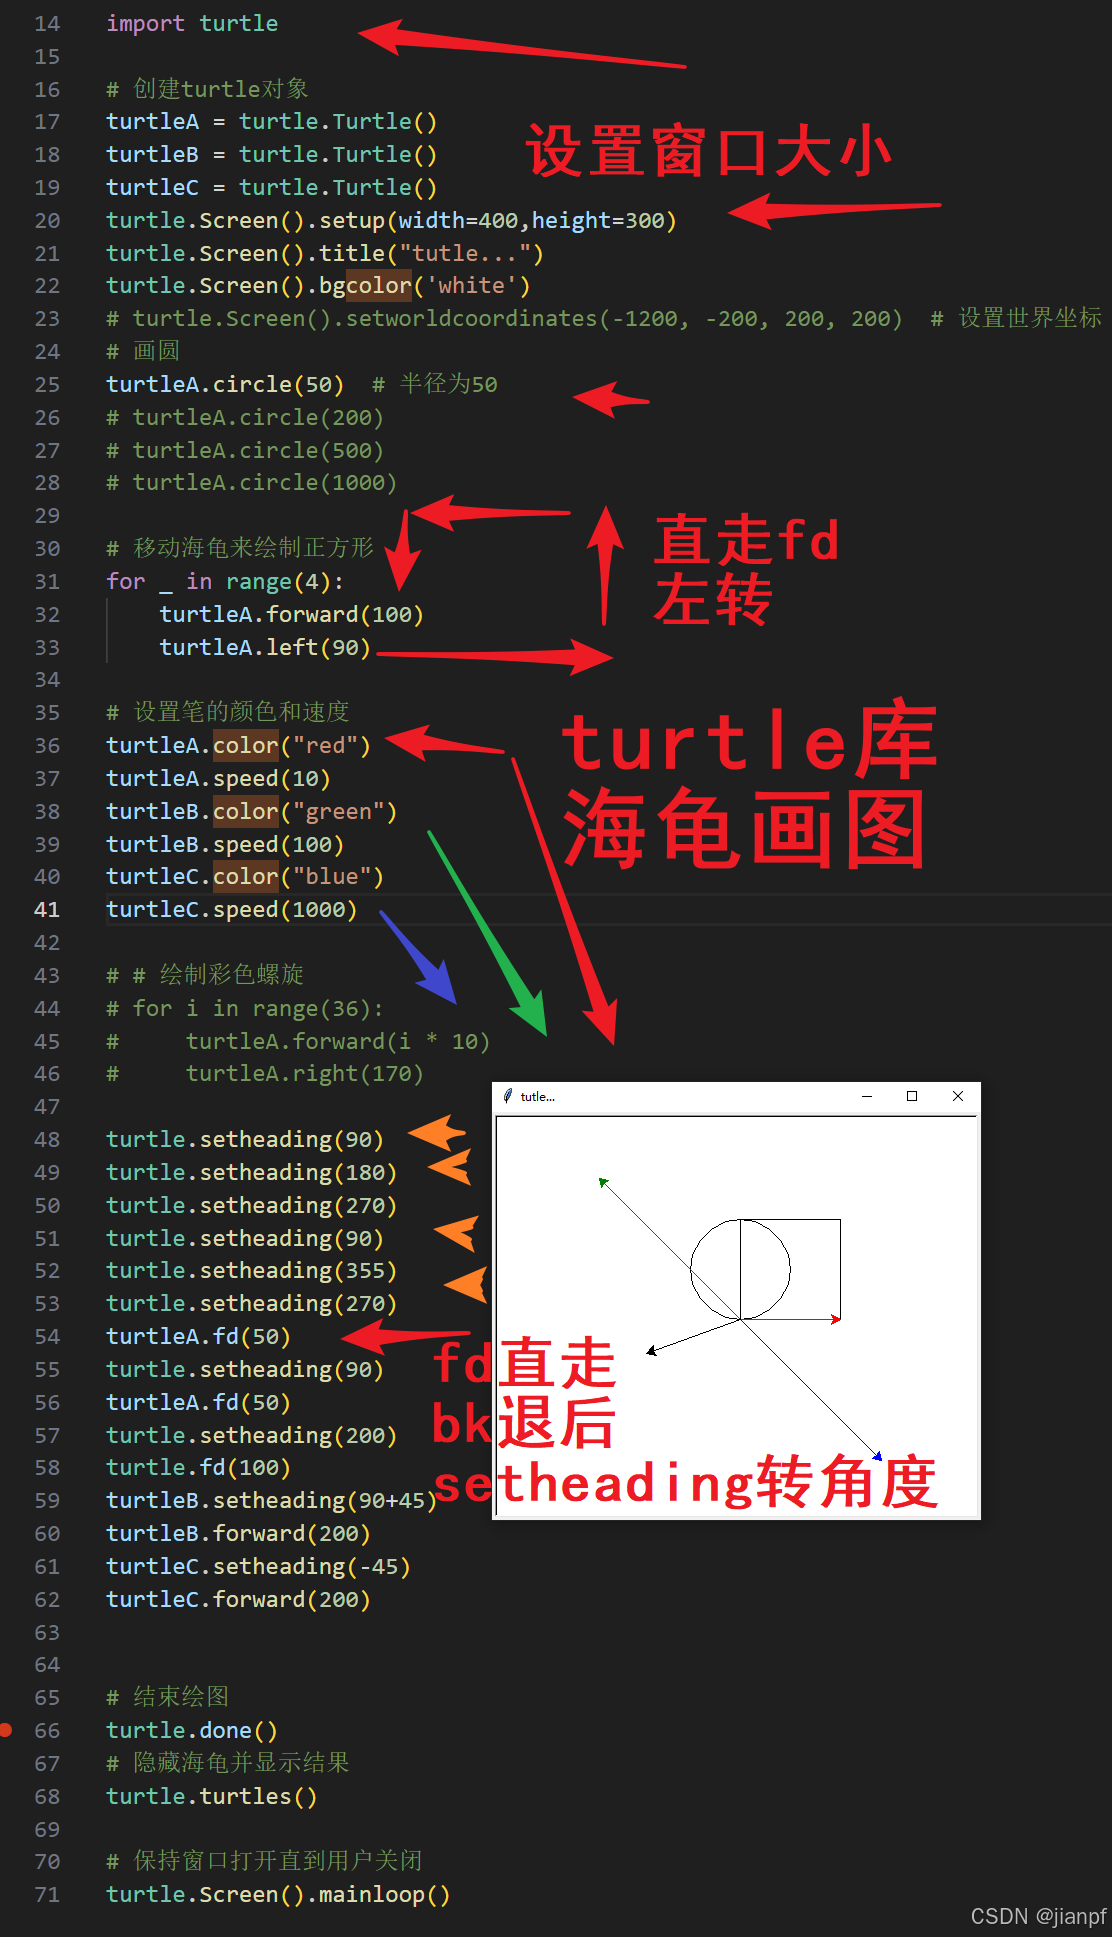
import turtle

# 创建turtle对象
turtleA = turtle.Turtle()
turtleB = turtle.Turtle()
turtleC = turtle.Turtle()
turtle.Screen().setup(width=400,height=300)
turtle.Screen().title("tutle...")
turtle.Screen().bgcolor('white')
# turtle.Screen().setworldcoordinates(-1200, -200, 200, 200)  # 设置世界坐标
# 画圆
turtleA.circle(50)  # 半径为50
# turtleA.circle(200)
# turtleA.circle(500)
# turtleA.circle(1000)

# 移动海龟来绘制正方形
for _ in range(4):
    turtleA.forward(100)
    turtleA.left(90)

# 设置笔的颜色和速度
turtleA.color("red")
turtleA.speed(10)
turtleB.color("green")
turtleB.speed(100)
turtleC.color("blue")
turtleC.speed(1000)

# # 绘制彩色螺旋
# for i in range(36):
#     turtleA.forward(i * 10)
#     turtleA.right(170)

turtle.setheading(90)
turtle.setheading(180)
turtle.setheading(270)
turtle.setheading(90)
turtle.setheading(355)
turtle.setheading(270)
turtleA.fd(50)
turtle.setheading(90)
turtleA.fd(50)
turtle.setheading(200)
turtle.fd(100)
turtleB.setheading(90+45)
turtleB.forward(200)
turtleC.setheading(-45)
turtleC.forward(200)


# 结束绘图
turtle.done()
# 隐藏海龟并显示结果
turtle.turtles()

# 保持窗口打开直到用户关闭
turtle.Screen().mainloop()
turtle海龟CNC一样G代码
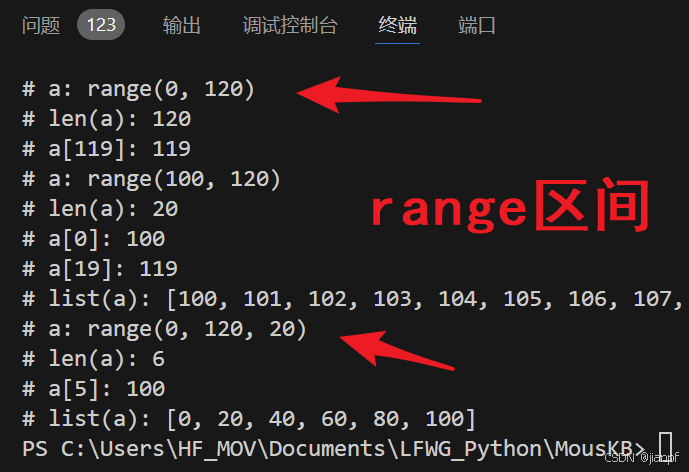
# 0尾下标区间 0-120-1
a=range(120)
print("# a:",a)
print("# len(a):",len(a))
print("# a[119]:",a[119])
# a: range(0, 120)
# len(a): 120
# a[119]: 119

# 首尾下标区间 0-120-1
a=range(0,120)
print("# a:",a)
print("# len(a):",len(a))
print("# a[119]:",a[119])
# a: range(0, 120)
# len(a): 120
# a[119]: 119

# 首尾下标区间 100-120=20-1
a=range(100,120)
print("# a:",a)
print("# len(a):",len(a))
print("# a[0]:",a[0])
print("# a[19]:",a[19])
print("# list(a):",list(a))
# a: range(100, 120)
# len(a): 20
# a[0]: 100
# a[19]: 119
# list(a): [100, 101,..., 118, 119]

# 首尾间隔下标区间 0-120,(120/20)=6-1
a=range(0,120,20)
print("# a:",a)
print("# len(a):",len(a))
print("# a[5]:",a[5])
print("# list(a):",list(a))
# len(a): 6
# a[5]: 100
# list(a): [0, 20, 40, 60, 80, 100]
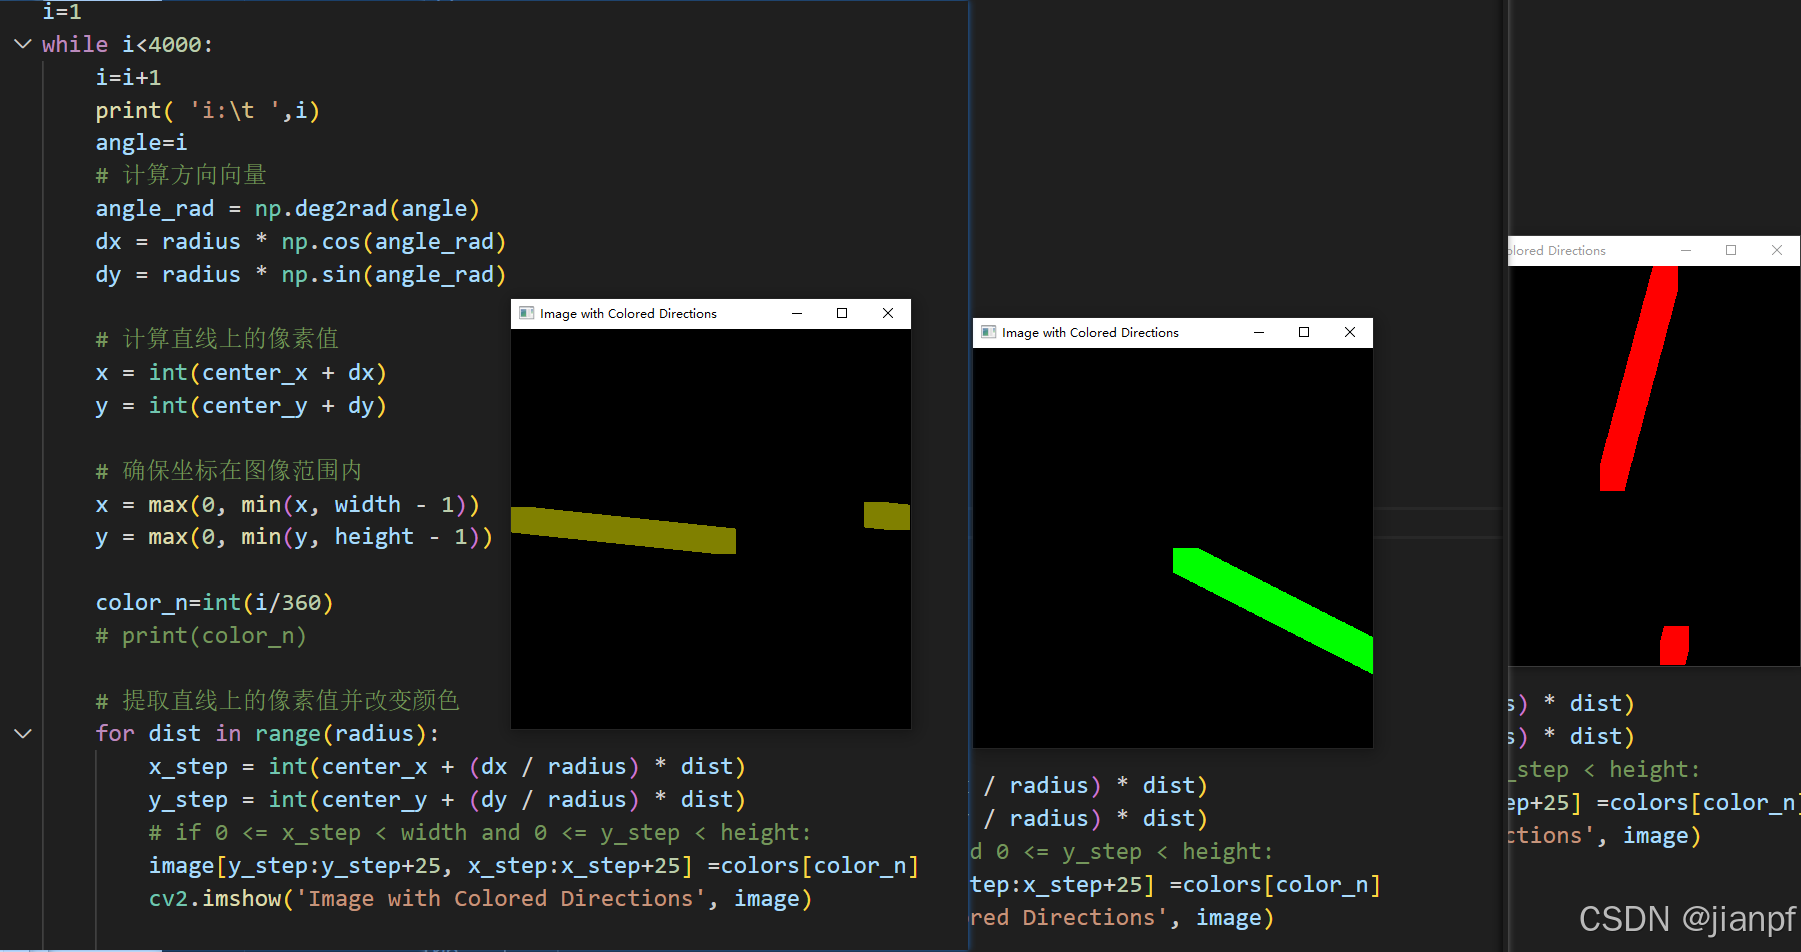
#给出x求y圆上点,逆时针90度连贯圆的画法JPF2024.9.12.0:32
import numpy as np
import cv2
from JPFLib import JTool as jt
import JPFLib.JToolCV2 as jcv
import random


k=32
image=jcv.ps_new0(400,400,3)

# 图片尺寸
height, width = image.shape[:2]

# 中心点坐标
center_x, center_y = width // 2, height // 2

# 定义8个方向的角度(以中心点为原点,逆时针方向)
angles = [10, 20, 30, 40, 50 + 60, 70 + 80, 90 + 1180, 315 + 180]

# 定义8种颜色
colors = [ (0, 255, 0), (0, 0, 255),(255, 0, 0), (255, 255, 0), (255, 0, 255), (0, 255, 255), (128, 128, 0), (0, 128, 128)]

# 半径
radius = 100
i=0

for i in range(-100,100):
    yy=jt.math_circle_py2_x(center_x+i,(center_x,center_y),radius)
    y1,y2=yy
    image[y1,center_x+i]=colors[0]
    image[y2,center_x+i]=colors[1]
    image[center_x+i,y1]=colors[2]
    image[center_x+i,y2]=colors[3]
    image_sd=jcv.ps_sd_fxyi(image)
    cv2.imshow('image_sd',image_sd)
    kk=cv2.waitKey(10)
    if kk==k:
        break
    print(i)

for i in range(-100,100):
    yy=jt.math_circle_px2_y(center_x+i,(center_x,center_y),radius)
    y1,y2=yy
    image[center_x+i,y1]=colors[2]
    image[center_x+i,y2]=colors[3]
    image_sd=jcv.ps_sd_fxyi(image)
    cv2.imshow('image_sd',image_sd)
    kk=cv2.waitKey(10)
    if kk==k:
        break
    print(i)

image_sd=jcv.ps_sd_fxyi(image)
cv2.imshow('image',image)
cv2.imshow('image_sd',image_sd)
cv2.waitKey()
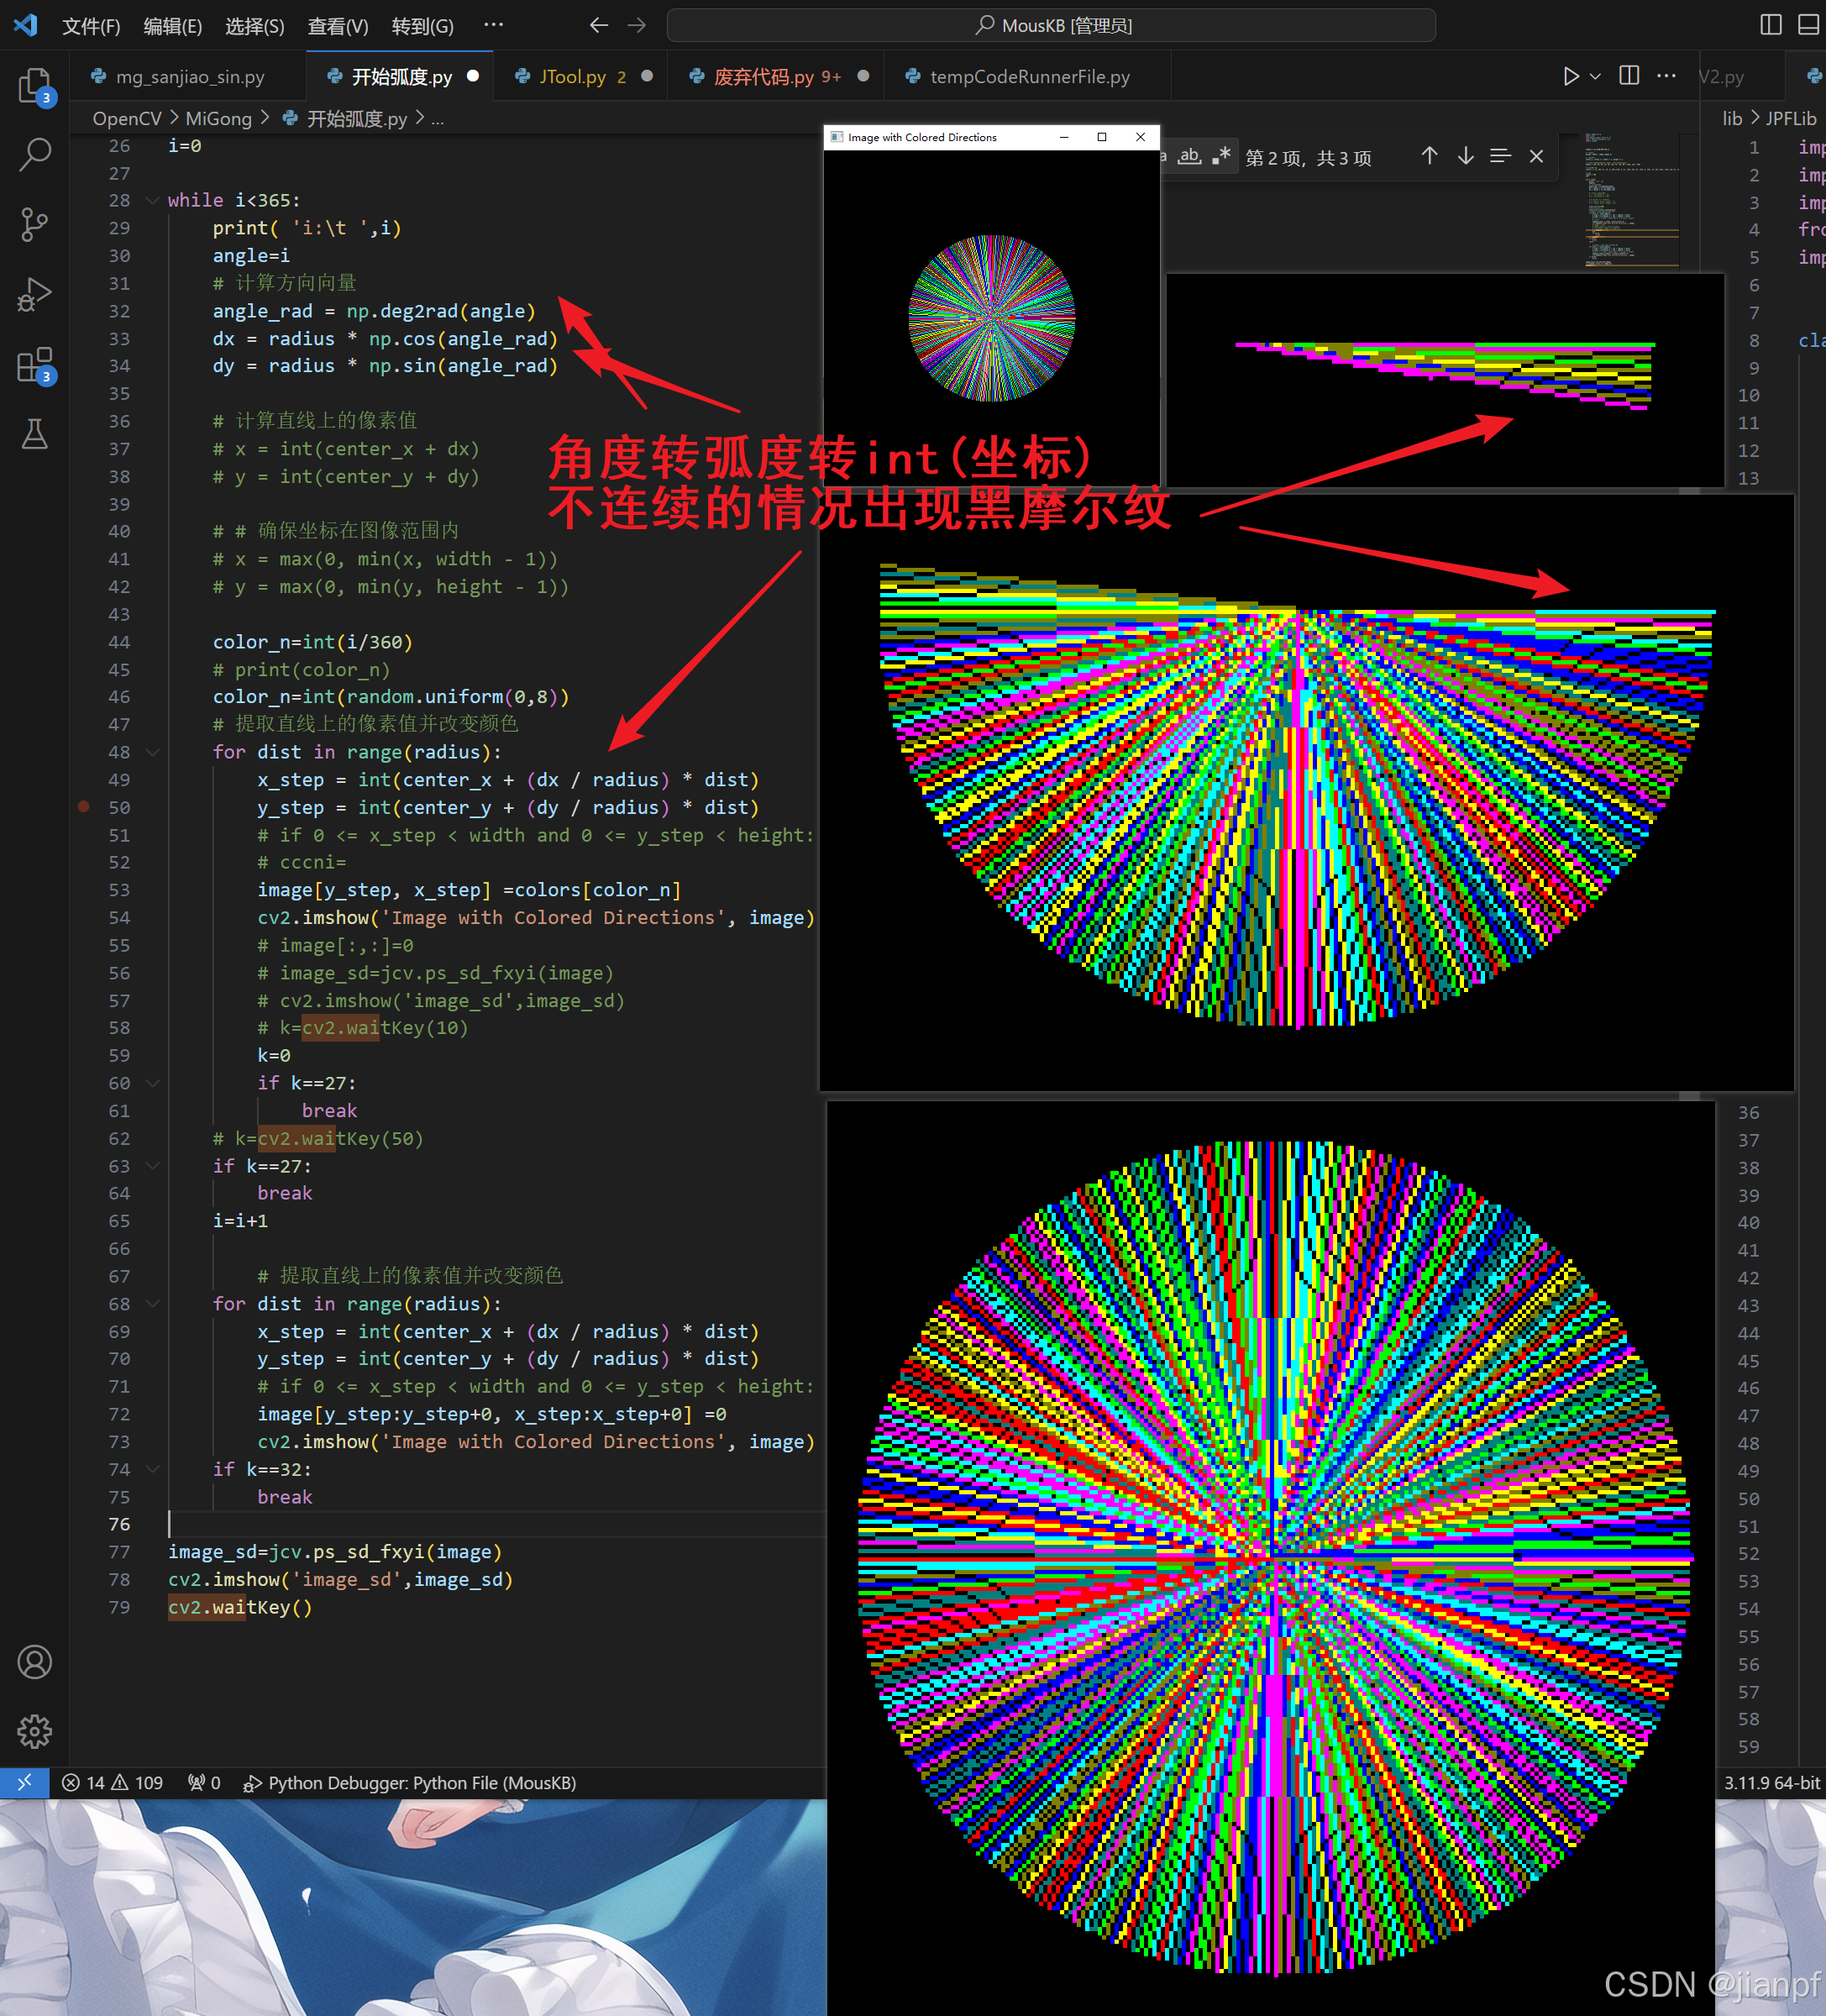
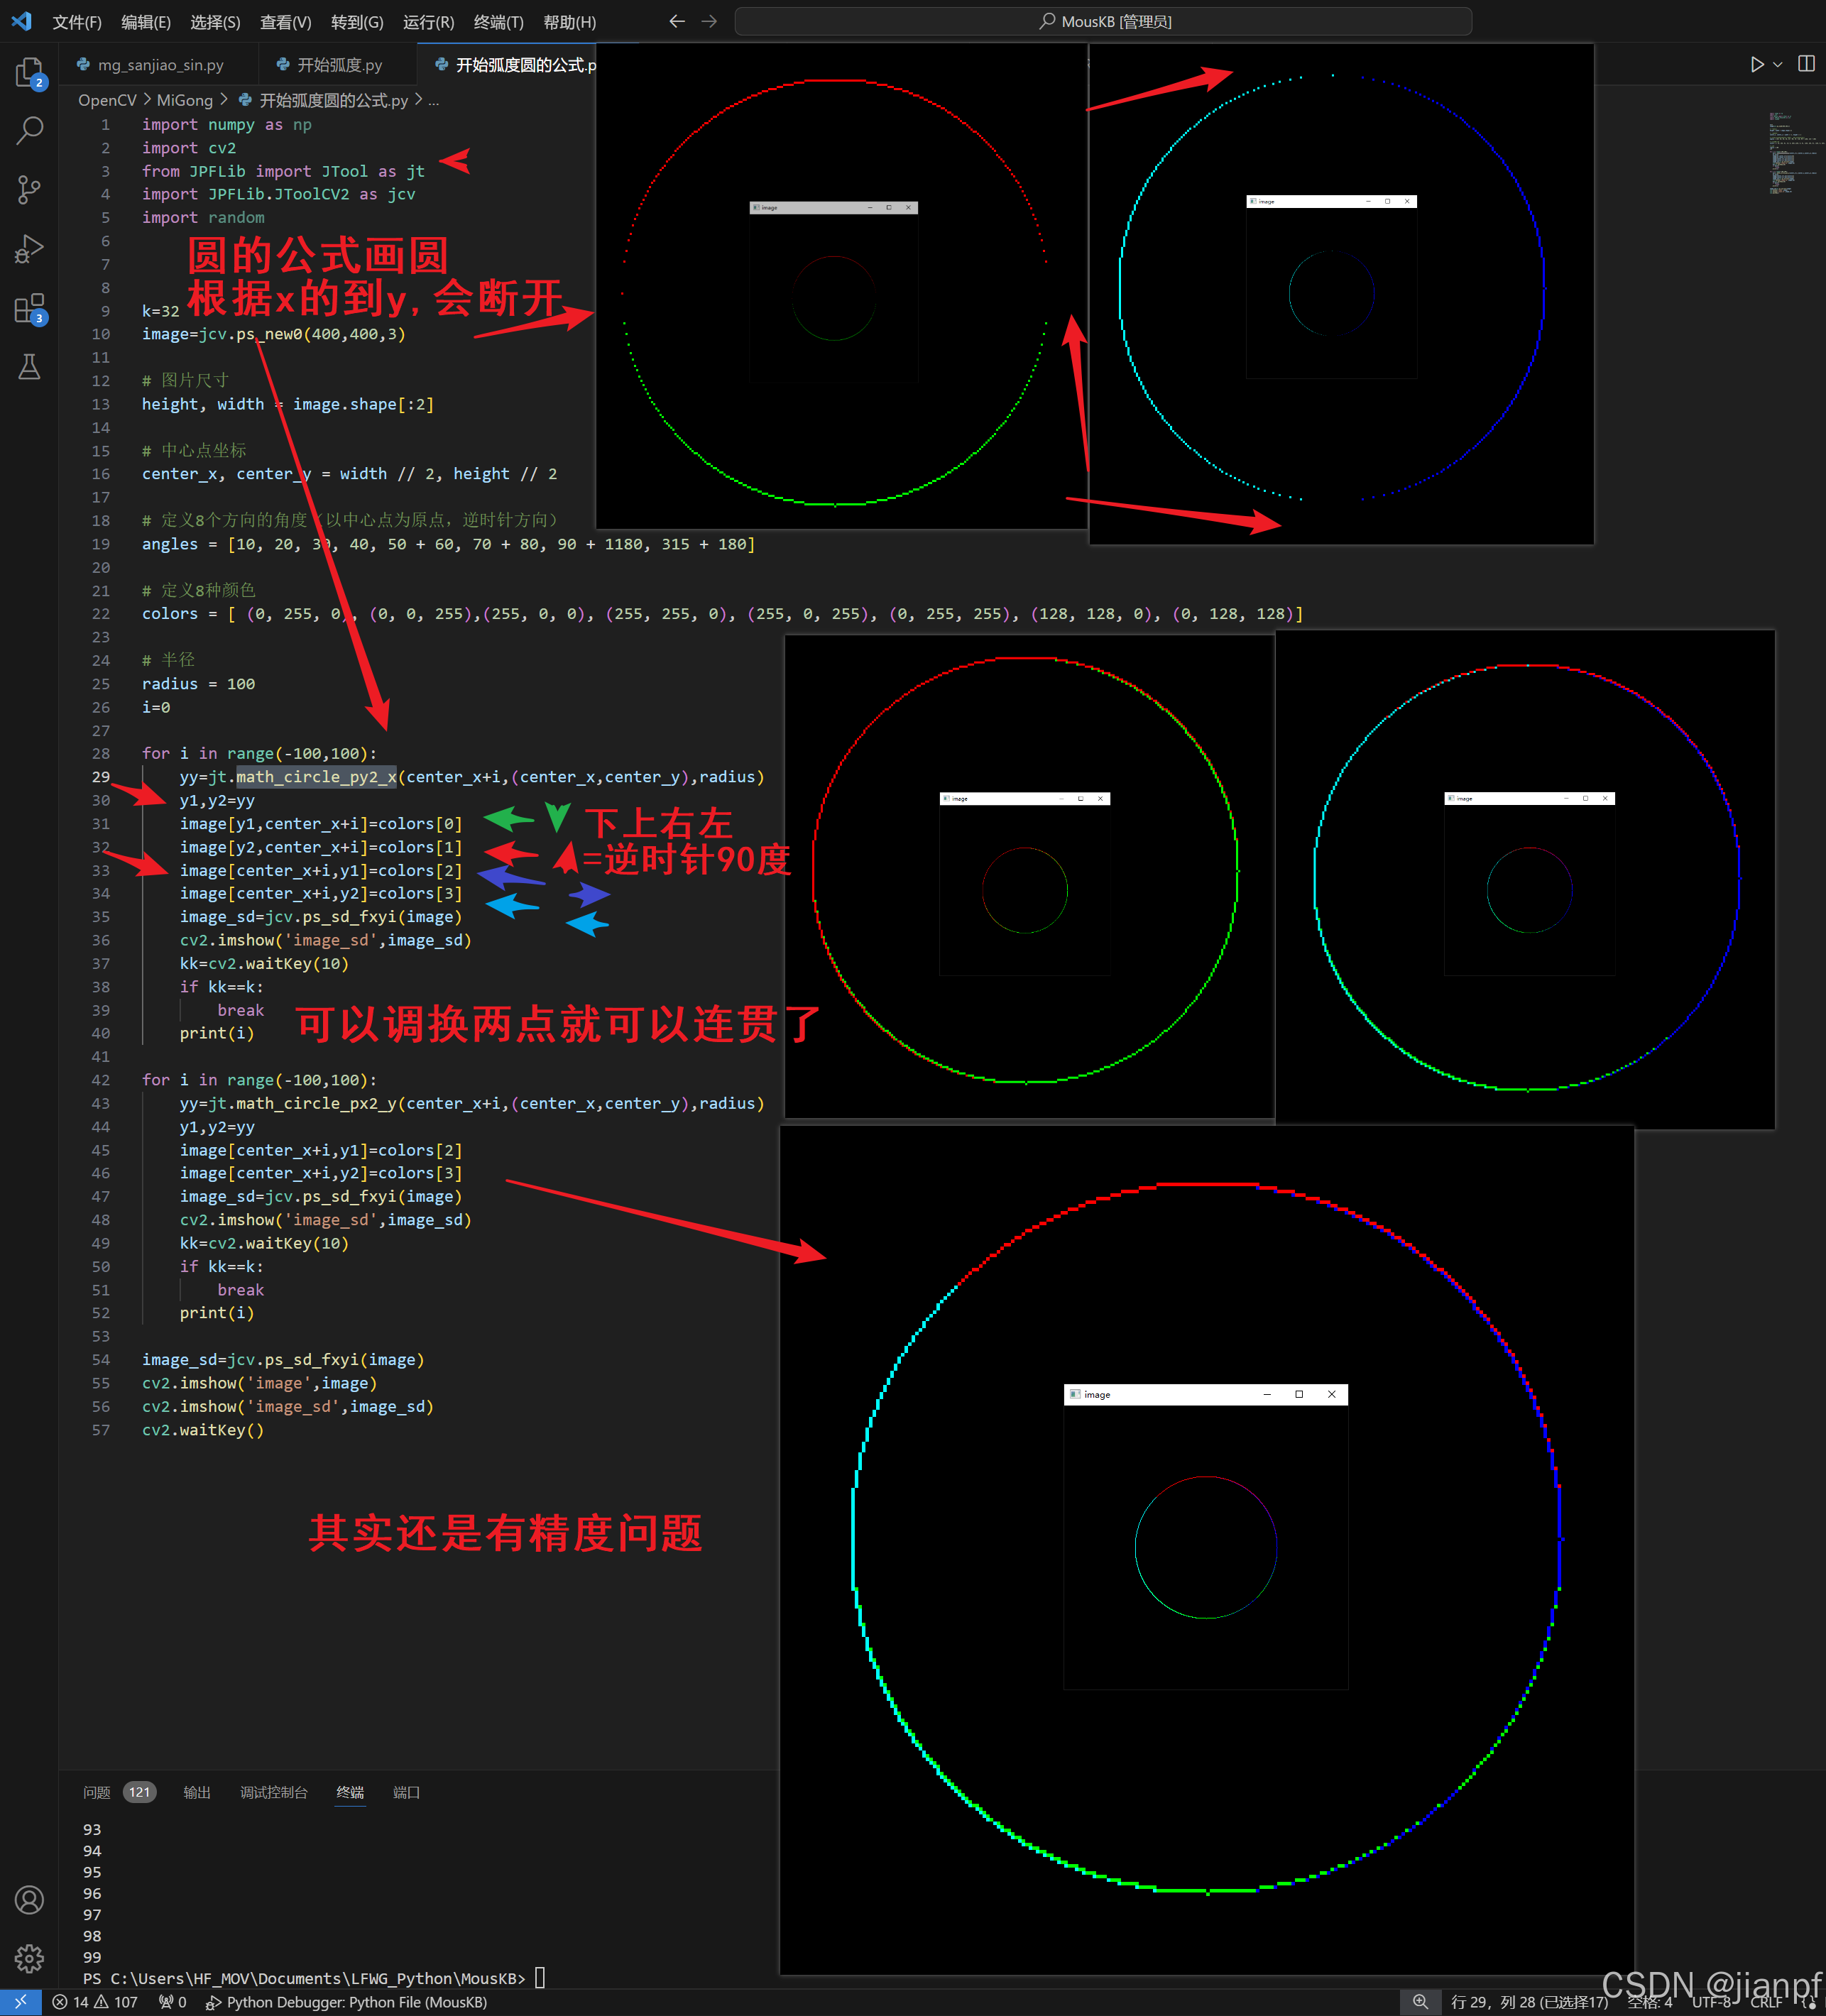
角度转弧度转笛卡尔坐标
角度转坐标
圆的公式画圆
圆转坐标
给出x求y圆上点,逆时针90度连贯圆的画法
精度问题
2024.9.13
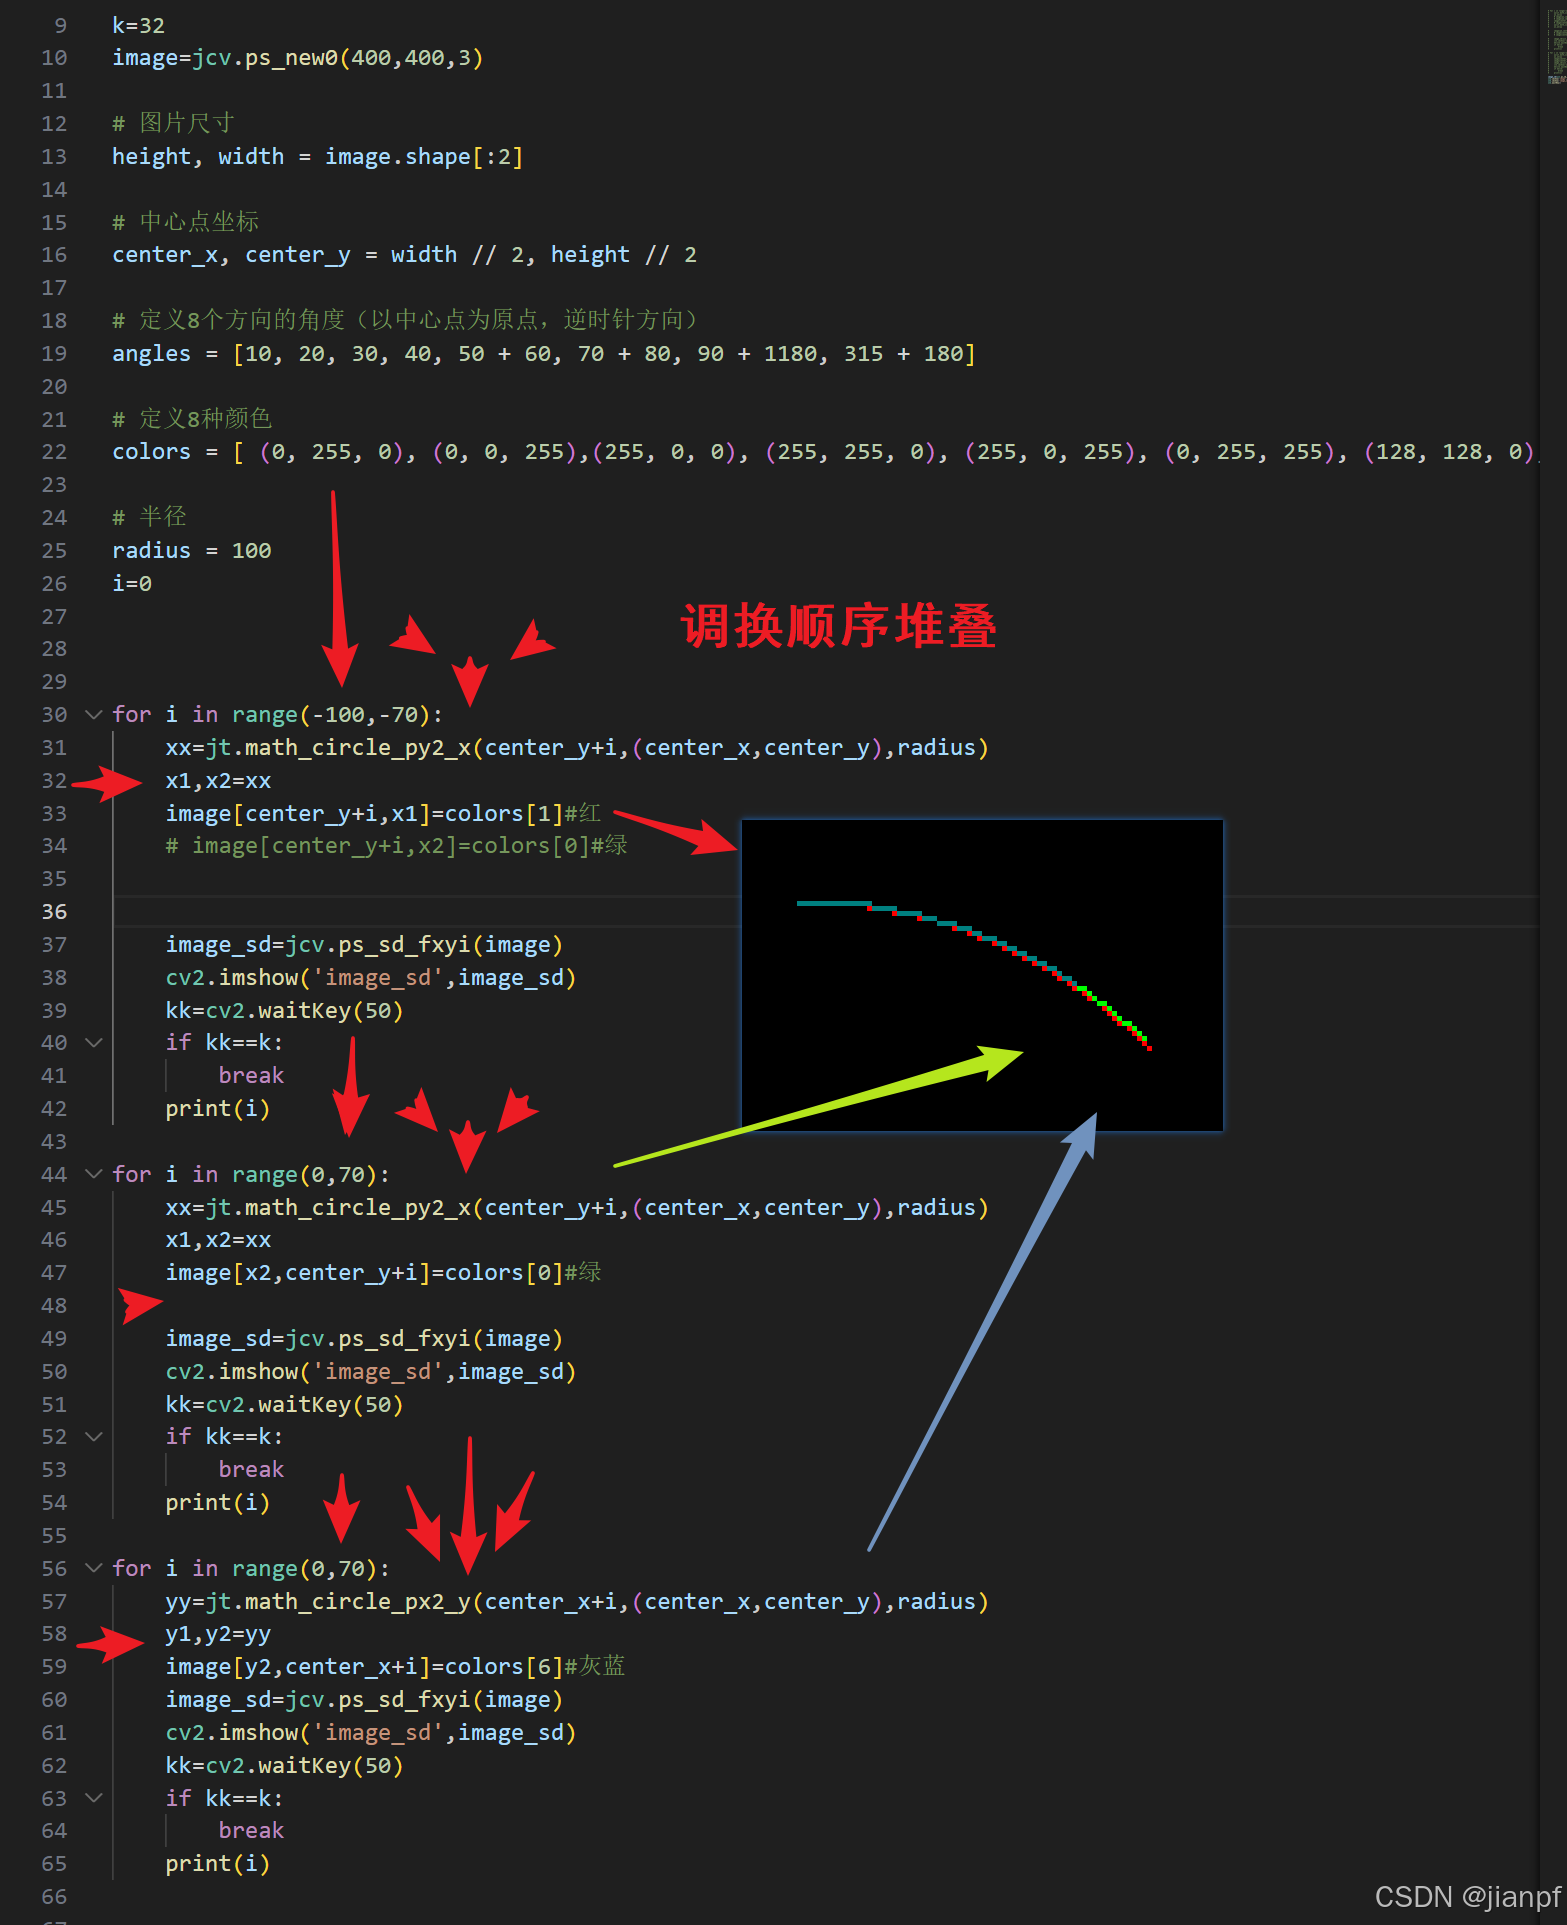
顺序堆叠
2024.9.20时隔半个多月,我又被调度回来写代码了(应该一会儿又会去干活了,赶紧)
还是用角度函数,把精度控制在0.5内应该可以了
半径没问题
2024.9.22.2:26晴32度
#.\a\b\ts.py 调用.\lib\jpflib下的模块,但没有代码提示
#相对路径加载模块,不是模块的相对路径,是首程序运行的相对路径
import sys
# 以开发目录调用
# 首程序的相对地址,不是模块相对地址
sys.path.append(r'.\lib\jpflib')
print(sys.path)
from exapp import lfzl
a=lfzl.lfzl()
a.test()
# 测试成功
相对路径加载模块,不是模块的相对路径,是首程序运行的相对路径
这样是没有模块代码提示的,可先按首程序的目录import后再运行时删除目录后运行测试
或用宏代码批量处理
2024.9.22.23:28阴小雨晴30度
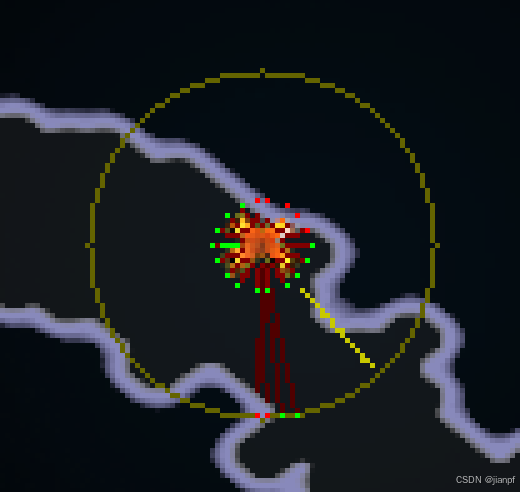
半径r=10的效果

双向量测试中.
10度角暗红点扫描
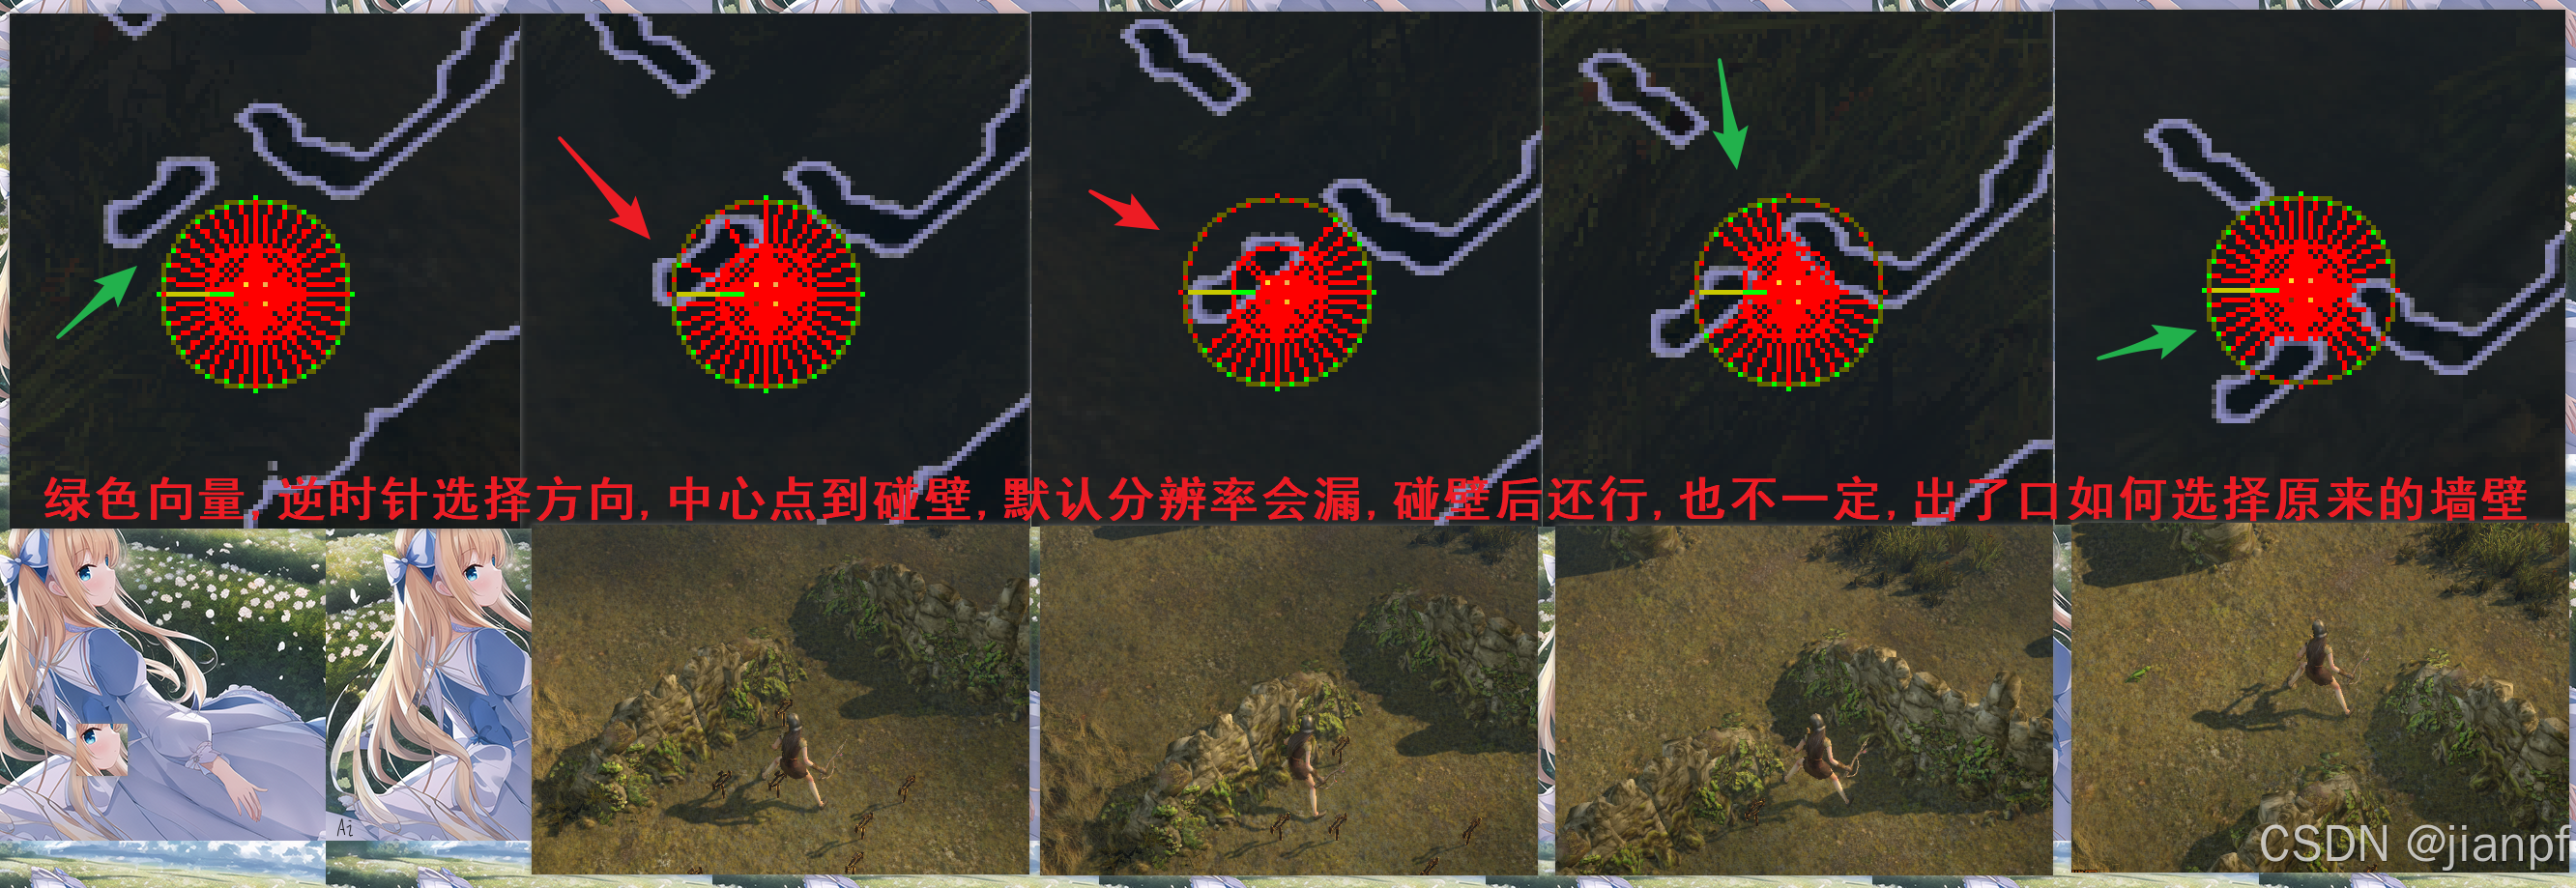
向量碰壁分辨率漏点
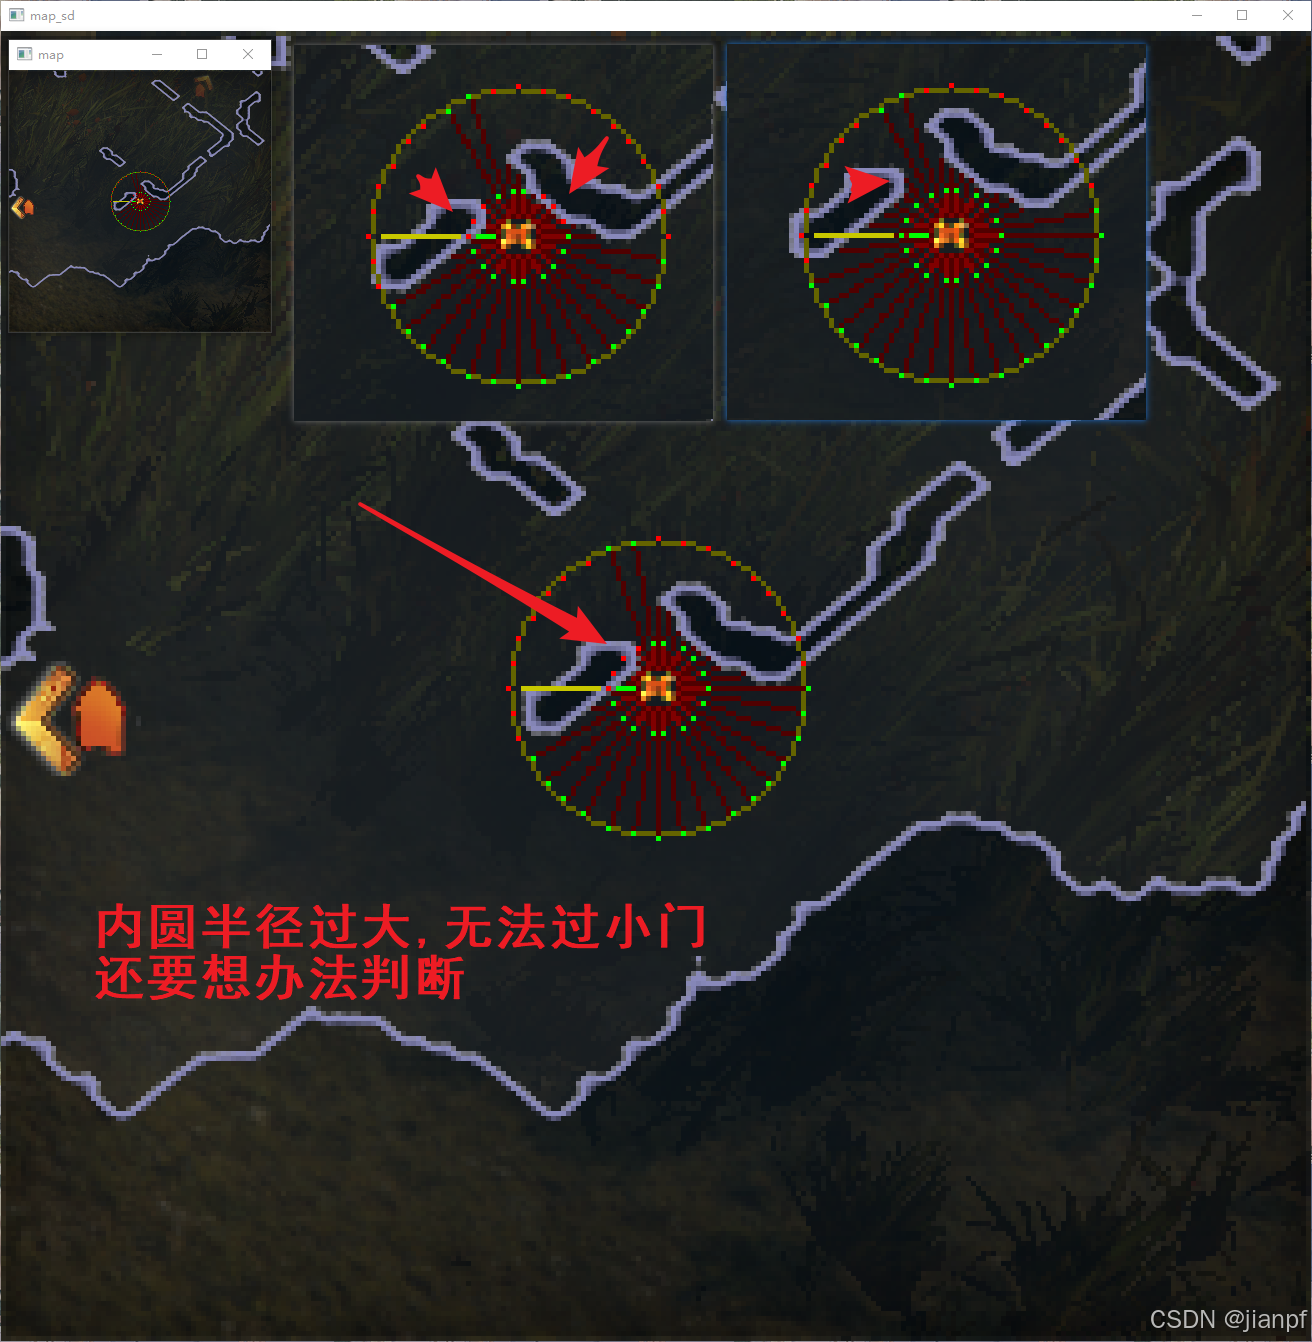
双圆判断墙壁,内圆半径过大
2024.9.25.0:25晴阴30度
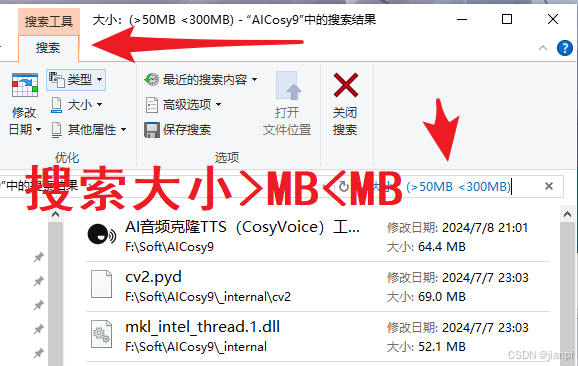
win10搜索:大小:(>50MB <300MB)

# 热键模块暂停模块JianPF2024.9.25V01

from pynput.keyboard import GlobalHotKeys
import threading
import time

hkey="ok"
# 简单的设置退出快捷键shift+F4的标注模板
def shift_esc():
    global hkey
    print("shift_esc运行结束...")
    # 通知外部要退出
    hkey="exit"
    # 退出监听和进程
    exit()
# 设置暂停10
def shift_F5():
    global hkey
    print("shift_F5暂停运行10秒")
    # 通知外部要暂停操作
    hkey="stop"
    # time.sleep(10)
    # print("暂停运行10结束...")

def ctrl_up():
    global hkey
    hkey="up"
    # print("ctrl_up...")
def ctrl_down():
    global hkey
    hkey="down"
    # print("ctrl_down...")

# 热键的进程函数
def thread_hkey_listener(stop_event):
    # with包裹执行代码块
    with GlobalHotKeys({'<shift>+<F4>':shift_esc,
                        '<shift>+<F5>':shift_F5,
                        '<ctrl>+<up>': ctrl_up,
                        '<ctrl>+<down>': ctrl_down,
                        }) as thkey:
                print("join...")
                # 包裹内while循环判断没有stop_event.set()=True进程标识
                # 或者直接while标识hkey = "exit"也是可以的
                while not stop_event.is_set() and hkey != "exit":
                    thkey.join(1)  # 每隔1秒检查一次
                # 手动设置了stop_event.set() 或 hkey = "exit"
                print("with GlobalHotKeys线程结束")
                # 进程执行完就自动销毁了

# 创建两个线程的停止事件,对应进程标识,进程结束后直接删除内存(无法重启)
stop_event=threading.Event()
# stop_event2=threading.Event()
# 创建进程
thread_hkey=threading.Thread(target=thread_hkey_listener,args=(stop_event,))
# thread_hkey2=threading.Thread(target=thread_hkey_listener,args=(stop_event2,))
# 进程启动
thread_hkey.start()
# thread_hkey2.start()
#
# 在某个时刻,如果你想手动停止线程,可以调用 或 hkey = "exit"
stop_event.set()
# stop_event2.set()
py 热键暂停模块
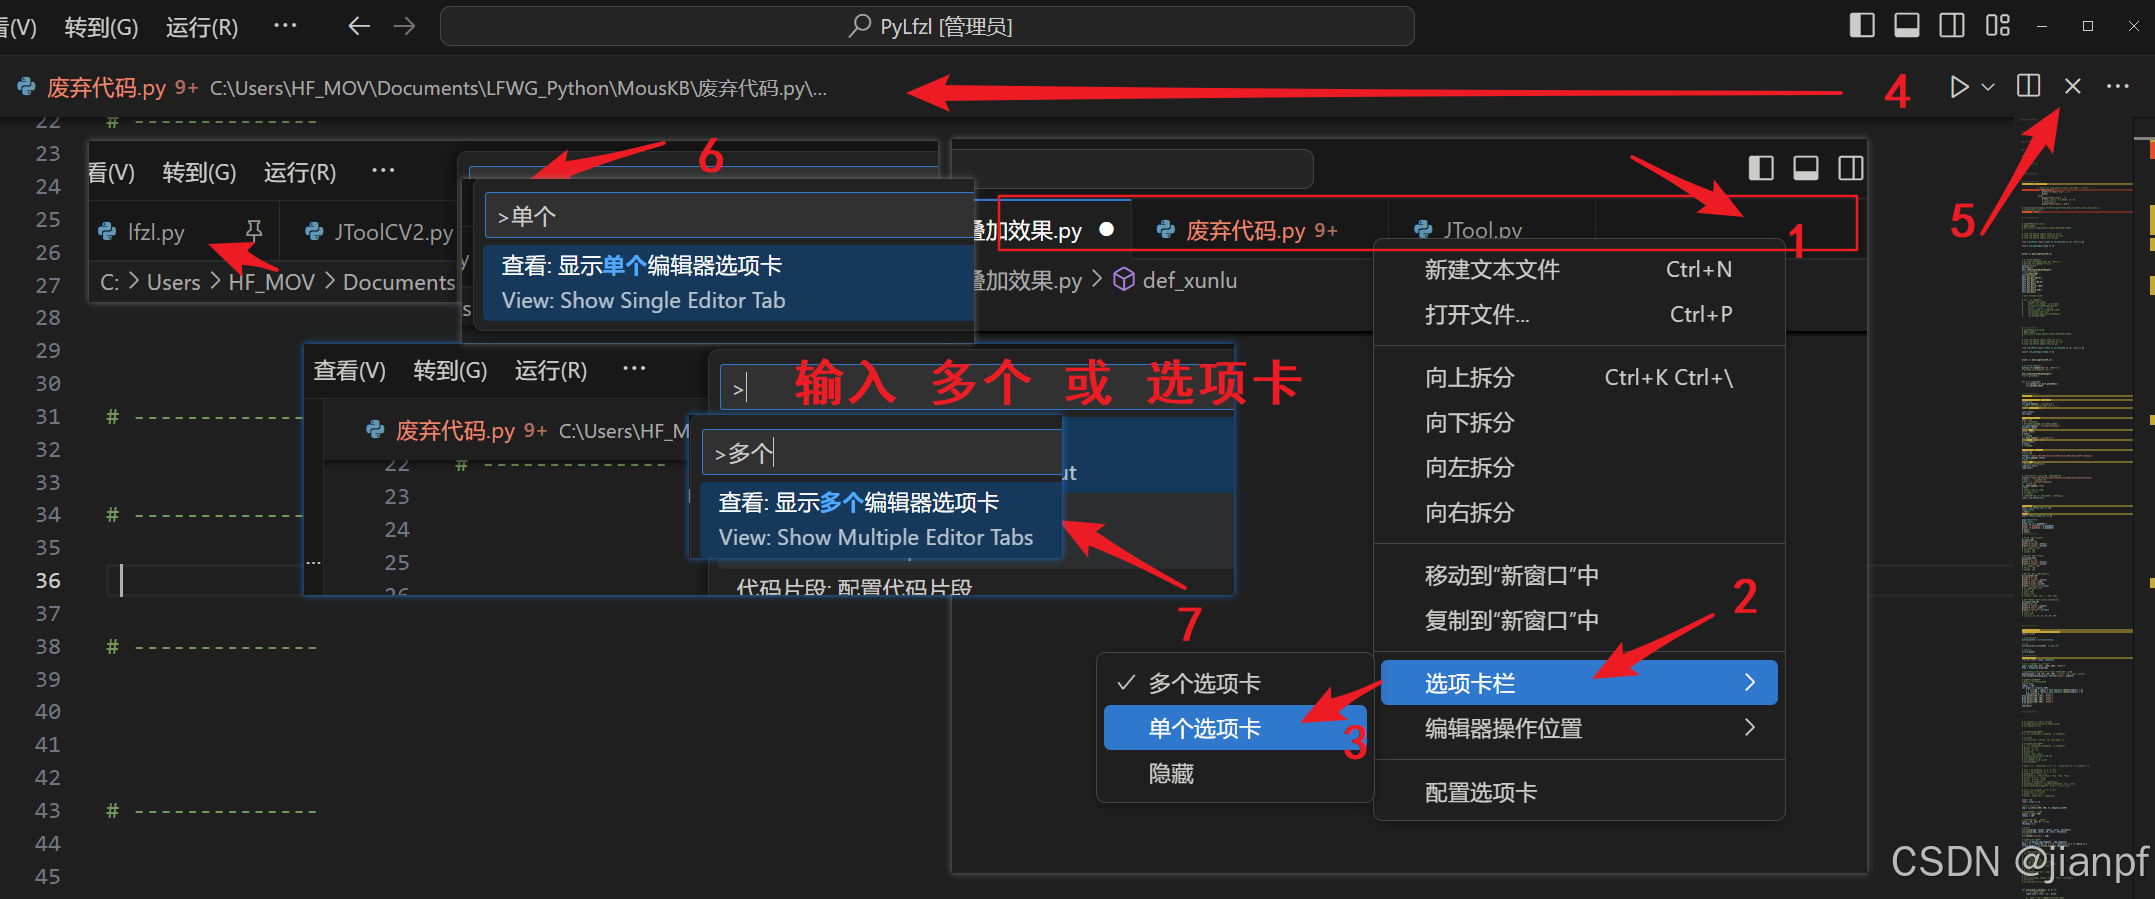
vscode 选项卡单列编辑器布局和多个编辑器
还是过不了门口,失败2024.9.25.5:32A
2024.9.26.15:30
import cv2
import numpy as np

# 读取源图像和模板图像
img = cv2.imread('image.jpg', 0)  # 0 表示以灰度模式读取
template = cv2.imread('template.jpg', 0)
h, w = template.shape[:2]

# 调用 matchTemplate 函数
res = cv2.matchTemplate(img, template, cv2.TM_CCOEFF_NORMED)

# 设定阈值
threshold = 0.8
loc = np.where(res >= threshold)

# 画出所有匹配区域的矩形框
for pt in zip(*loc[::-1]):  # Switch collumns and rows
    cv2.rectangle(img, pt, (pt[0] + w, pt[1] + h), 255, 2)

# 显示结果
cv2.imshow('Matched Result', img)
cv2.waitKey(0)
cv2.destroyAllWindows()
cv2的matchTemplate模板匹配和rectangle区域
标记下,再测试学习
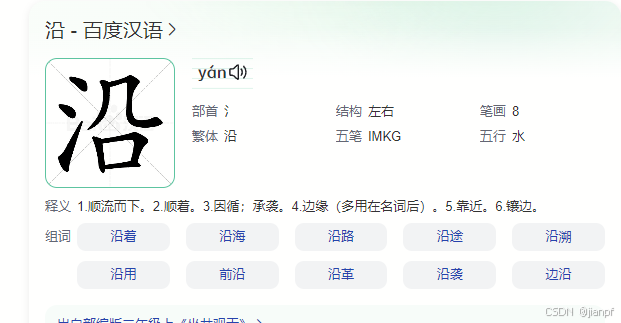
yan沿这字次次打不出来,再再再再再备注一下

https://www.dp.tech/product/bohrium/workspace
https://www.dp.tech/
https://bohrium.dp.tech/
微信扫手机码验证通过

https://www.bilibili.com/video/BV18z421i7s8/?spm_id_from=333.337.search-card.all.click&vd_source=606d359e368cfd6b2c0e0b03ff16fa67
《JPS跳点搜索算法》比A*算法快百倍的JPS寻路算法是怎么实现的


《游戏中的避障算法》游戏中的单位是如何动态避障的
https://www.bilibili.com/video/BV1Nb421n7qJ/?spm_id_from=333.788&vd_source=606d359e368cfd6b2c0e0b03ff16fa67
RVO动态避障算法
迭代后ORCA动态避障算法
2024.9.27.23:08

百度BML中解压ZIP文件方法,创建终端,unzip 压缩文件.zip就可以了


 896
896

 被折叠的 条评论
为什么被折叠?
被折叠的 条评论
为什么被折叠?
 到【灌水乐园】发言


