


实例1 :类型avro,在flume的conf里面创建一个avro.conf用来测试,如下:
a1.sources = r1
a1.sinks = k1
a1.channels = c1
# Describe/configure the source
a1.sources.r1.type = avro
a1.sources.r1.channels = c1
a1.sources.r1.bind = 0.0.0.0
a1.sources.r1.port = 44444
# Describe the sink
a1.sinks.k1.type = logger
# Use a channel which buffers events in memory
a1.channels.c1.type = memory
a1.channels.c1.capacity = 1000
a1.channels.c1.transactionCapacity = 100
# Bind the source and sink to the channel
a1.sources.r1.channels = c1
a1.sinks.k1.channel = c1
启动flume
/usr/flume/apache-flume-1.6.0-bin/bin/flume-ng agent --conf /usr/flume/apache-flume-1.6.0-bin/conf/ --conf-file /usr/flume/apache-flume-1.6.0-bin/conf/avro.conf --name a1 -Dflume.root.logger=INFO,console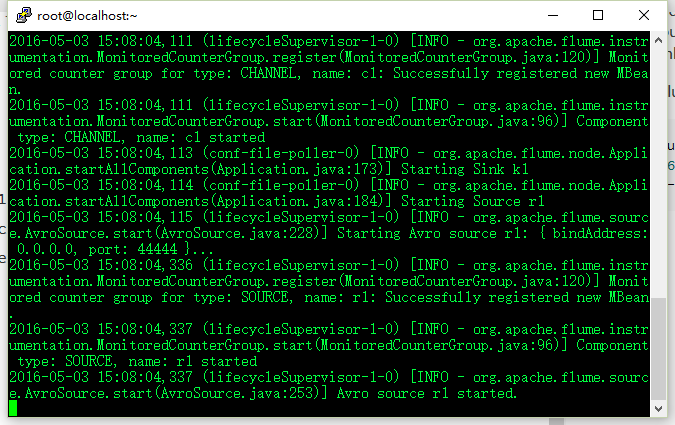
开启仍外一个窗口,穿件一个测试文件,写入一些测试信息,然后透过avro发送给flume
echo "hellow word" > /var/log/27.log/usr/flume/apache-flume-1.6.0-bin/bin/flume-ng avro-client -c /usr/flume/apache-flume-1.6.0-bin/conf/ -H localhost -p 44444 -F /var/log/27.log结果如图:


实例2:Spool监测配置的目录下新增的文件,并将文件中的数据读取出来。需要注意两点:1spool目录下的文件不可以再打开编辑,2spool目录下不可包含相应的子目录
spool.conf
a1.sources = r1
a1.sinks = k1
a1.channels = c1
# Describe/configure the source
a1.sources.r1.type = spooldir
a1.sources.r1.channels = c1
a1.sources.r1.spoolDir = /var/log/ppp
a1.sources.r1.fileHeader = true
# Describe the sink
a1.sinks.k1.type = logger
# Use a channel which buffers events in memory
a1.channels.c1.type = memory
a1.channels.c1.capacity = 1000
a1.channels.c1.transactionCapacity = 100
# Bind the source and sink to the channel
a1.sources.r1.channels = c1
a1.sinks.k1.channel = c1
启动flume
/usr/flume/apache-flume-1.6.0-bin/bin/flume-ng agent --conf /usr/flume/apache-flume-1.6.0-bin/conf/ --conf-file /usr/flume/apache-flume-1.6.0-bin/conf/spool.conf --name a1 -Dflume.root.logger=INFO,console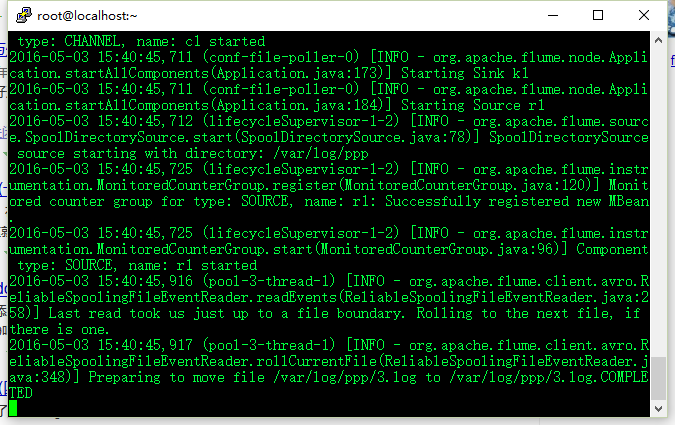
监控的目录是 /var/log/ppp
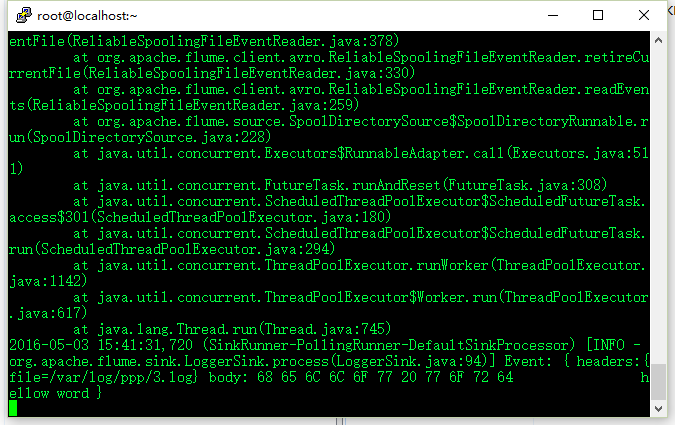
echo "hellow word" > /var/log/ppp/3.log结果
实例3:EXEC执行一个给定的命令获得输出的源,如果要使用tail命令,必选使得file足够大才能看到输出内容
exec.conf
a1.sources = r1
a1.sinks = k1
a1.channels = c1
# Describe/configure the source
#a1.sources.r1.type = exec
#a1.sources.r1.channels = c1
#a1.sources.r1.command = tail -F /var/log/flume.log

a1.sources.r1.type = netcat
a1.sources.r1.bind = localhost
a1.sources.r1.port = 44444


# Describe the sink
a1.sinks.k1.type = logger
# Use a channel which buffers events in memory
a1.channels.c1.type = memory
a1.channels.c1.capacity = 1000
a1.channels.c1.transactionCapacity = 100
# Bind the source and sink to the channel
a1.sources.r1.channels = c1
a1.sinks.k1.channel = c1
启动flume
/usr/flume/apache-flume-1.6.0-bin/bin/flume-ng agent --conf /usr/flume/apache-flume-1.6.0-bin/conf/ --conf-file /usr/flume/apache-flume-1.6.0-bin/conf/exec.conf --name a1 -Dflume.root.logger=INFO,console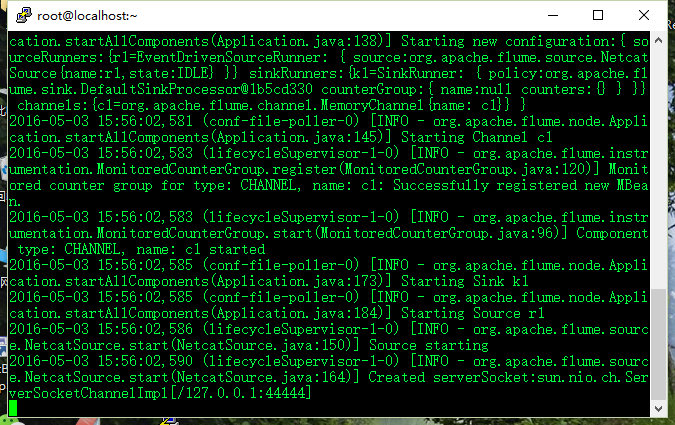
往文件里面写内容:
for i in {1..100};do echo "exec tail$i" >> /var/log/flume.log;echo $i;sleep 0.1;done结果:
实例4:Syslogtcp监听TCP的端口做为数据源
Syslogtcp.conf
a1.sources = r1
a1.sinks = k1
a1.channels = c1
# Describe/configure the source
a1.sources.r1.type = syslogtcp
a1.sources.r1.port = 80
a1.sources.r1.host = localhost
a1.sources.r1.channels = c1
# Describe the sink
a1.sinks.k1.type = logger
# Use a channel which buffers events in memory
a1.channels.c1.type = memory
a1.channels.c1.capacity = 1000
a1.channels.c1.transactionCapacity = 100
# Bind the source and sink to the channel
a1.sources.r1.channels = c1
a1.sinks.k1.channel = c1
启动flume
/usr/flume/apache-flume-1.6.0-bin/bin/flume-ng agent --conf /usr/flume/apache-flume-1.6.0-bin/conf/ --conf-file /usr/flume/apache-flume-1.6.0-bin/conf/Syslogtcp.conf --name a1 -Dflume.root.logger=INFO,console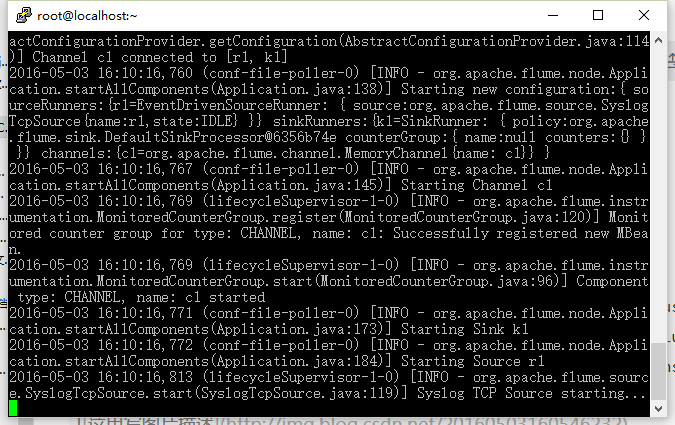
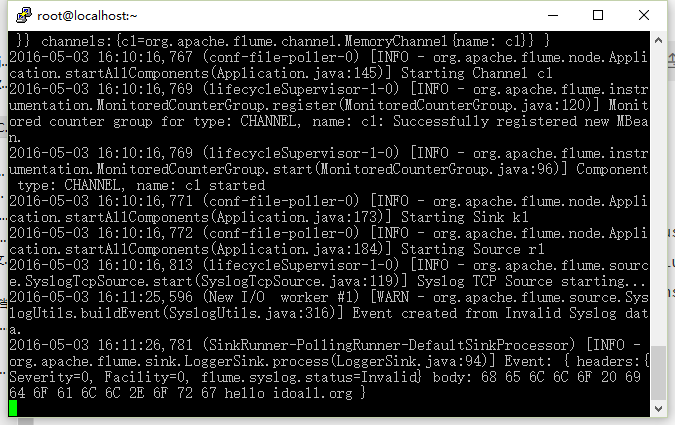
往端口80发送内容:
echo "hello idoall.org syslog" | nc localhost 5140结果:


 857
857

 被折叠的 条评论
为什么被折叠?
被折叠的 条评论
为什么被折叠?
 到【灌水乐园】发言


