


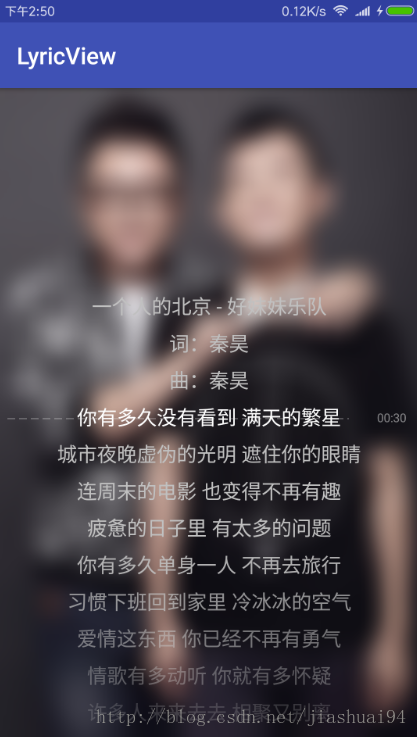
先看下效果
在上篇文章中呢,分享了关于lrc歌词文件的解析方法,根据歌词文件格式,解析出对应实体类。但是,怎样才能让让自己的音乐播放器的歌词像网易云音乐一样,随音乐(歌词时间)滚动、当前歌词高亮、其他歌词渐变等效果呢?
接下来我想和大家分享的就是如何通过自定义View实现炫酷的LyricView歌词显示控件。
分析
我们最重要的目的是将文字绘制在View中,并设置各种效果和动画,而在绘制之前我们需要计算出文字的位置,而歌词又是以 行 为单位来显示,所以,计算行高和行间距,当然,还需要一些文字颜色等属性;
可以想到,歌词会随着音乐或者说时间进行滚动,所以我们需要对纵向偏移量进行计算和处理,并设置滚动动画;
接下来就应该逐行进行绘制了,之后可以给当前播放位置绘制指示器以提高逼格;
用户可以手势滑动歌词进行查看,之后还需要回滚,所以我们需要对手势,也就是onTouchEvent进行处理。
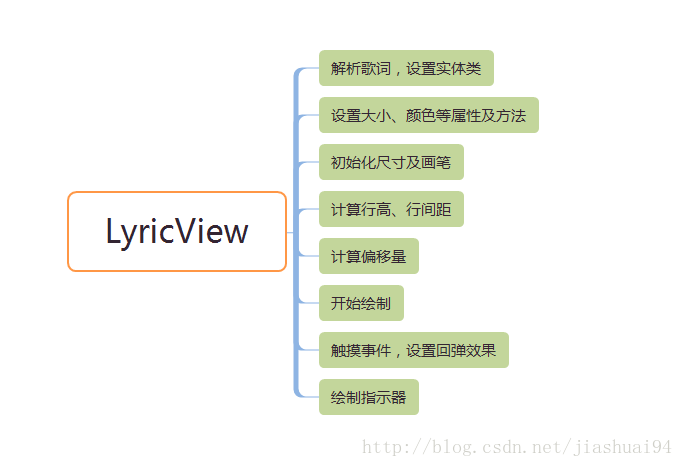
好的,大致思路就是这样,接下来我们一步步地实现:
解析歌词,设置实体类
解析歌词上一篇文章已经介绍很详细,这里不再累赘。
这里讲歌词解析也封装进LyricView中,所以解析与赋值一并进行。
注意赋值实体类时,View其实已经绘制过了,不过界面上什么都没有显示(因为LyricInfo类为null,在绘制时会返回不再继续),赋值实体类后,在刷新一下界面:
/**
 * 刷新View
 */
private void invalidateView() {
    if (Looper.getMainLooper() == Looper.myLooper()) {
        //  当前线程是主UI线程,直接刷新。
        invalidate();
    } else {
        //  当前线程是非UI线程,post刷新。
        postInvalidate();
    }
}
在这里进行线程的判断,主线程中直接调用invalidate,在子线程中调用postInvalidate,原因想必大家都清楚,就不再解释了。
设置大小、颜色等相关属性
/**
 * 设置高亮显示文本的字体颜色
 *
 * @param color 颜色值
 */
public void setHighLightTextColor(int color) {
    if (mHighLightColor != color) {
        mHighLightColor = color;
        invalidateView();
    }
}

/**
 * 设置歌词内容行间距
 *
 * @param lineSpace 行间距大小
 */
public void setLineSpace(float lineSpace) {
    if (mLineSpace != lineSpace) {
        mLineSpace = getRawSize(TypedValue.COMPLEX_UNIT_SP, lineSpace);
        measureLineHeight();
        mScrollY = measureCurrentScrollY(mCurrentPlayLine);
        invalidateView();
    }
}

/**
 * 设置歌词文本内容字体大小
 *
 * @param unit
 * @param size
 */
public void setTextSize(int unit, float size) {
    setRawTextSize(getRawSize(unit, size));
}

/**
 * 设置歌词文本内容字体大小
 *
 * @param size
 */
public void setTextSize(float size) {
    setTextSize(TypedValue.COMPLEX_UNIT_SP, size);
}
其中getRawSize方法只是根据设备将设置的数据转换单位返回。
/**
 * 设置字体大小,并重新计算,刷新
 * @param size
 */
private void setRawTextSize(float size) {
    if (size != mTextPaint.getTextSize()) {
        mTextPaint.setTextSize(size);
        measureLineHeight();
        mScrollY = measureCurrentScrollY(mCurrentPlayLine);
        invalidateView();
    }
}

private float getRawSize(int unit, float size) {
    Context context = getContext();
    Resources resources;
    if (context == null) {
        resources = Resources.getSystem();
    } else {
        resources = context.getResources();
    }
    return TypedValue.applyDimension(unit, size, resources.getDisplayMetrics());
}
其中measureLineHeight是在计算行高,measureCurrentScrollY是在计算纵向偏移量,这两个方法稍后就会介绍。
初始化尺寸及画笔
/**
 * 初始化需要的尺寸
 */
private void initAllBounds() {
    setTextSize(20);
    setLineSpace(18);
    mBtnWidth = (int) (getRawSize(TypedValue.COMPLEX_UNIT_SP, 20));
    mTimerBound = new Rect();
    mIndicatorPaint.getTextBounds(mDefaultTime, 0, mDefaultTime.length(), mTimerBound);

    measureLineHeight();
}

/**
 * 初始化画笔
 */
private void initAllPaints() {
    mTextPaint = new Paint();
    mTextPaint.setDither(true); // 防抖动
    mTextPaint.setAntiAlias(true); // 抗锯齿
    mTextPaint.setTextAlign(Paint.Align.CENTER); // 文字对其方式

    mIndicatorPaint = new Paint();
    mIndicatorPaint.setDither(true);
    mIndicatorPaint.setAntiAlias(true);
    mIndicatorPaint.setTextSize(getRawSize(TypedValue.COMPLEX_UNIT_SP, 12));
    mIndicatorPaint.setTextAlign(Paint.Align.CENTER);

    mBtnPaint = new Paint();
    mBtnPaint.setDither(true); // 设置防抖动
    mBtnPaint.setAntiAlias(true); // 设置抗锯齿
    mBtnPaint.setColor(mBtnColor);
    mBtnPaint.setStrokeWidth(3.0f); // 设置空心线宽
    mBtnPaint.setStyle(Paint.Style.STROKE);
}
这些简单的初始化,就不再详细介绍了。
计算行高,行间距
/**
 * 计算行高度
 */
private void measureLineHeight() {
    Rect lineBound = new Rect();
    mTextPaint.getTextBounds(mDefaultHint, 0, mDefaultHint.length(), lineBound);
    mLineHeight = lineBound.height() + mLineSpace;
}
之前行间距已经设置过了,当然,开发者不设置也是可以的,我已经设了默认值。
我们认为一行,应该包括一行文字和一个行间距,所以 行高=文字高度+行间距。
计算文字高度,应该使用画笔的getTextBounds方法,从文字区域的Rect中获取文字所占的高度。
计算偏移量
/**
 * 根据当前给定的时间戳滑动到指定位置
 *
 * @param time 时间戳
 */
private void scrollToCurrentTimeMillis(long time) {
    int position = 0;
    if (scrollable()) {
        for (int i = 0, size = mLineCount; i < size; i++) {
            LineInfo lineInfo = mLyricInfo.getLines().get(i);
            if (lineInfo != null && lineInfo.getStartTime() > time) {
                position = i;
                break;
            }
            if (i == mLineCount - 1) {
                position = mLineCount;
            }
        }
    }
    if (mCurrentPlayLine != position && !mUserTouch && !mSliding && !mIndicatorShow) {
        mCurrentPlayLine = position;
        smoothScrollTo(measureCurrentScrollY(position));
    } else {
        if (!mSliding && !mIndicatorShow) {
            mCurrentPlayLine = mCurrentShowLine = position;
        }
    }
}
既然LyricView能够实现滑动功能,那么引入scrollY值记录滑动偏移量,并控制视图绘制效果也就顺理成章。 需要明确一点,当偏移量scrollY的值为零的时候,歌词的首行将显示在整个LyricView的正中间 。
在上篇中,我们也知道每一句歌词中都包含着开始时间,而我们也就可以通过当前歌曲播放进度匹配当前播放的行数 mCurrentPlayLine,并通过当前播放所在行,计算偏移量scrollY的值,控制歌词播放滚动和当前播放位置的高亮显示。
/**
 * 根据行号计算偏移量
 * @param line 当前指定行号
 */
private float measureCurrentScrollY(int line) {
    return (line - 1) * mLineHeight;
}这里还需注意,第一行的时候偏移量为0,所以计算对应偏移量的时候需要先减一。
开始绘制
    @Override
    protected void onDraw(Canvas canvas) {
        if (mLyricInfo != null && mLyricInfo.getLines() != null && mLyricInfo.getLines().size() > 0) {
            for (int i = 0, size = mLineCount; i < size; i++) {
                float x = getMeasuredWidth() * 0.5f;
                float y = getMeasuredHeight() * 0.5f + (i + 0.5f) * mLineHeight - 6 - mLineSpace * 0.5f - mScrollY;
                // 已经绘制的不再绘制
                if (y + mLineHeight * 0.5f < 0) {
                    continue;
                }
                // 超出屏幕部分不绘制
                if (y - mLineHeight * 0.5f > getMeasuredHeight()) {
                    break;
                }
                if (i == mCurrentPlayLine - 1) {
                    mTextPaint.setColor(mHighLightColor);
                } else {
                    if (mIndicatorShow && i == mCurrentShowLine - 1) {
                        mTextPaint.setColor(mCurrentShowColor);
                    } else {
                        mTextPaint.setColor(mDefaultColor);
                    }
                }
                // 不在中心区域
                if (y > getMeasuredHeight() - mShaderWidth || y < mShaderWidth) {
                    if (y < mShaderWidth) {
                        mTextPaint.setAlpha(26 + (int) (23000.0f * y / mShaderWidth * 0.01f));
                    } else {
                        mTextPaint.setAlpha(26 + (int) (23000.0f * (getMeasuredHeight() - y) / mShaderWidth * 0.01f));
                    }
                // 在中心区
                } else {
                    mTextPaint.setAlpha(255);
                }
                canvas.drawText(mLyricInfo.getLines().get(i).getContent(), x, y, mTextPaint);
            }
        } else {
            mTextPaint.setColor(mHintColor);
            canvas.drawText(mDefaultHint, getMeasuredWidth() * 0.5f, (getMeasuredHeight() + mLineHeight - 6) * 0.5f, mTextPaint);
        }
    }
这样文字就可以绘制在屏幕上了,同时大家可能也看出来了,我设置了透明度,也就是淡入淡出效果。
注意:
- 已经绘制过的不再进行绘制
- 超出屏幕的不绘制
- 不在中心区域的其他位置的字体设置透明度
- 在中心区,也就是当前局无透明度
触摸事件,回弹效果
如果单纯实现视图滑动的功能的话,比较简单:只需要记录ACTION_DOWN时的y值,并比较ACTION_MOVE过程中的y值计算两者的差值,生成新的偏移量scrollY,再刷新视图,就可以了 !
但是,这样实现的话,用户一直滑动,整个歌词内容区域就会滑动出我们的可视区域,也就是常说的overScroll,如果不加以限制将会是一种非常差的用户体验。
与正常滑动时有所区别,滑动应该有一种阻尼效果:也就是实际滑动距离和视图的滚动距离并不相等,而且随着overScroll的值越大,阻力越大,滑动越艰难,并在用户手指离开屏幕后回到overScroll的值为零的位置。
/**
 * 计算阻尼效果的大小
 */
private final int mMaxDampingDistance = 360;

private float measureDampingDistance(float value02) {
    return value02 > mMaxDampingDistance ? (mMaxDampingDistance * 0.6f + (value02 - mMaxDampingDistance) * 0.72f) : value02 * 0.6f;
}
/**
* 手势移动执行事件
*
* @param event
*/
private void actionMove(MotionEvent event) {
if (scrollable()) {
final VelocityTracker tracker = mVelocityTracker;
tracker.computeCurrentVelocity(1000, maximumFlingVelocity);
float scrollY = mLastScrollY + mDownY - event.getY(); // 102 -2 58 42
float value01 = scrollY - (mLineCount * mLineHeight * 0.5f); // 52 -52 8 -8
float value02 = ((Math.abs(value01) - (mLineCount * mLineHeight * 0.5f))); // 2 2 -42 -42
mScrollY = value02 > 0 ? scrollY - (measureDampingDistance(value02) * value01 / Math.abs(value01)) : scrollY; // value01 / Math.abs(value01) 控制滑动方向
mVelocity = tracker.getYVelocity();
measureCurrentLine();
}
}其中VelocityTracker主要用跟踪触摸屏事件(flinging事件和其他gestures手势事件)的速率。
通过一次一次对代码的细化,只要这么简单的两个方法,就完成了滑动时偏移量scrollY的计算,包括overScroll和非overScroll。
到了这一步,歌词的显示、滑动查看都已经完成。
绘制指示器
/**
 * 绘制指示器
 *
 * @param canvas
 */
private void drawIndicator(Canvas canvas) {
    mIndicatorPaint.setColor(mIndicatorColor);
    mIndicatorPaint.setAlpha(128);
    mIndicatorPaint.setStyle(Paint.Style.FILL);
    canvas.drawText(measureCurrentTime(), getMeasuredWidth() - mTimerBound.width(), (getMeasuredHeight() + mTimerBound.height() - 6) * 0.5f, mIndicatorPaint);

    Path path = new Path();
    mIndicatorPaint.setStrokeWidth(2.0f);
    mIndicatorPaint.setStyle(Paint.Style.STROKE);
    mIndicatorPaint.setPathEffect(new DashPathEffect(new float[]{20, 10}, 0));
    path.moveTo(mPlayable ? mBtnBound.right + 24 : 24, getMeasuredHeight() * 0.5f);
    path.lineTo(getMeasuredWidth() - mTimerBound.width() - mTimerBound.width() - 36, getMeasuredHeight() * 0.5f);
    canvas.drawPath(path, mIndicatorPaint);
}
到这里,歌词显示器就算完成了,有不对的地方还望大家指出。
获取更多精彩内容,关注我的微信公众号——安卓干货营!


 528
528


 被折叠的 条评论
为什么被折叠?
被折叠的 条评论
为什么被折叠?
 到【灌水乐园】发言


